background image

Paper Jams

LO C AT I N G PA P E R J A M S

C

Caauuttiioonn::

Parts that are near the fuser are hot. To prevent personal injury, never touch an area that has a

Caution label. Power off the printer immediately, then wait 40 minutes for the fuser to cool. After the

printer has cooled, try to remove the jammed paper. If the error on the control panel remains, contact
your Xerox representative.

W

Waarrnniinngg::

Do not attempt to clear any paper jams using tools or instruments. This action can damage

the printer permanently.

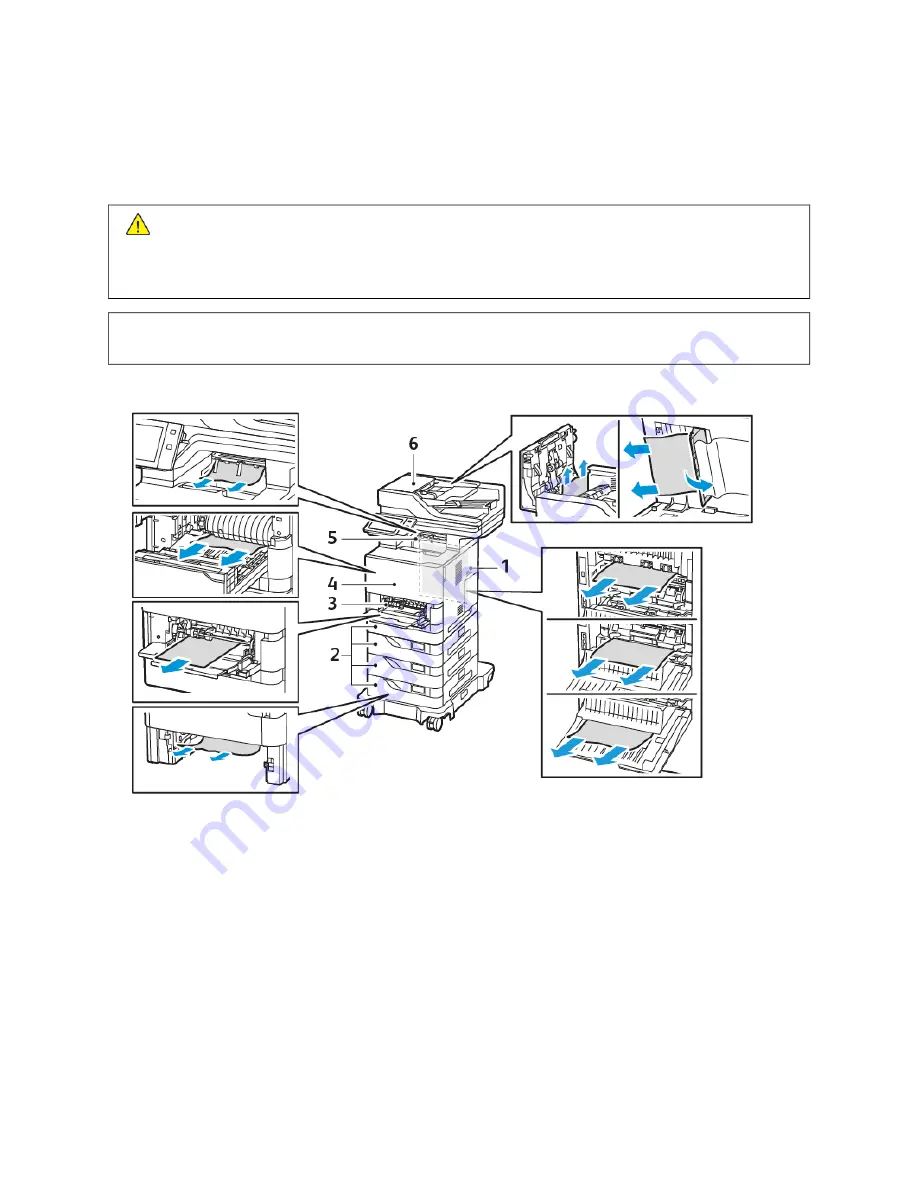
The following illustration shows where paper jams can occur along the paper path:

1.

Door C, Back Door

2.

Standard 550-sheet Paper Trays 1–4

3.

Bypass Tray

4.

Door A, Front Door

5.

Center Output Tray

6.

Duplex Automatic Document Feeder (DADF)

M I N I M I Z I N G PA P E R J A M S

The printer is designed to function with minimal paper jams using Xerox supported paper. Other paper types can
cause jams. If supported paper is jamming frequently in one area, clean that area of the paper path. To avoid
damage, always remove jammed paper carefully without tearing it. Try to remove the paper in the same direction it
normally moves through the printer. Even a small piece of paper left in the printer can cause a jam. Do not reload
paper that has jammed.

258

Xerox

®

VersaLink

®

B625 Multifunction Printer User Guide

Troubleshooting

Summary of Contents for VersaLink B625

Page 1: ...VERSION 1 0 MARCH 2023 702P08795 Xerox VersaLink B625 Multifunction Printer User Guide...

Page 2: ...and Macintosh are trademarks or registered trademarks of Apple Inc in the U S and other countries The ENERGY STAR and ENERGY STAR mark are registered United States trademarks HP GL HP UX and PCL are...

Page 3: ...Information 22 Product Symbols 23 Getting Started 27 Parts of the Printer 28 Front View 28 Duplex Automatic Document Feeder 29 Internal Parts 31 Rear View 32 Control Panel 33 Configurations and Optio...

Page 4: ...ork 54 Wireless Network Adapter 54 Connecting with Wi Fi Direct 55 Connecting with Near Field Communication NFC 56 Configuring a Device for Universal Print 58 Connecting to a Telephone Line 59 Initial...

Page 5: ...App Gallery Account 86 Logging in to your Xerox App Gallery Account 87 Installing or Updating an App from the Xerox App Gallery 87 Device 89 Device Overview 89 About 90 Information Pages 90 Supply St...

Page 6: ...rive 151 Printing from Saved Jobs 152 Printing from a Mailbox 153 PrintByXerox 154 PrintByXerox Overview 154 Printing with the PrintByXerox App 154 Xerox Connect for XMPie 155 Xerox Connect for XMPie...

Page 7: ...191 Paper Storage Guidelines 192 Supported Paper Types and Weights 192 Supported Standard Paper Sizes 194 Supported Paper Sizes and Weights for 2 Sided Printing 195 Supported Custom Paper Sizes 196 C...

Page 8: ...Document Prints from Wrong Tray 255 Empty or Partially Printed Document 255 Printer is Making Unusual Noises 255 Automatic 2 Sided Printing Problems 256 Date and Time Are Incorrect 256 Scanner Errors...

Page 9: ...with High Capacity Feeder and Caster Base 297 Base Configuration with Optional Standard Tray and High Capacity Feeder with Caster Base 298 Configuration with Optional Trays and Printer Stand 299 Envir...

Page 10: ...7 European Union 318 South Africa 318 Safety Certification 319 Material Safety Data Sheets 320 Recycling and Disposal 321 All Countries 322 Battery Removal 322 North America 323 European Union 324 Dis...

Page 11: ...Safety 17 Operational Safety 19 Maintenance Safety 21 Environmental Health and Safety Contact Information 22 Product Symbols 23 Your printer and the recommended supplies have been designed and tested...

Page 12: ...aluation and certification and compliance with electromagnetic regulations and established environmental standards The safety and environment testing and performance of this product have been verified...

Page 13: ...TATEMENTS C CA AU UT TI IO ON N P PO OT TE EN NT TI IA AL L I IN NJ JU UR RY Y To avoid the risk of fire or electrical shock connect the power cord to an appropriately rated and properly grounded elec...

Page 14: ...rical outlet before inspecting it C CA AU UT TI IO ON N S SH HO OC CK K H HA AZ ZA AR RD D To avoid the risk of electrical shock make sure that all external connections such as Ethernet and telephone...

Page 15: ...jarring movements Make sure that your fingers are not under the printer when you set it down Make sure that there is adequate clearance around the printer C CA AU UT TI IO ON N T TI IP PP PI IN NG G H...

Page 16: ...safety standards with the use of specific manufacturer components The safety features of some parts may not always be obvious The manufacturer is not responsible for the use of other replacement part...

Page 17: ...ese conditions occur do the following 1 Power off the printer immediately 2 Disconnect the power cord from the electrical outlet 3 Call an authorized service representative POWER CORD Use the power co...

Page 18: ...er fuse or other safety device has been tripped Liquid is spilled into the printer The printer is exposed to water Any part of the printer is damaged BATTERY SAFETY One or more circuit boards in this...

Page 19: ...ces To avoid a tip hazard do not push or move the device with all the paper trays extended PRINTER LOCATION Place the printer on a level solid non vibrating surface with adequate strength to hold its...

Page 20: ...on Xerox supplies is not recommended The Xerox Warranty Service Agreement and Total Satisfaction Guarantee do not cover damage malfunction or degradation of performance caused by use of non Xerox supp...

Page 21: ...these covers In case of a Dry Ink or Toner Spill use a broom or a wet cloth to wipe off spilled dry ink toner Sweep slowly to minimize generation of dust during clean up Avoid using a vacuum If a vac...

Page 22: ...and supplies contact United States and Canada only 1 800 ASK XEROX 1 800 275 9376 Web address Environmental Health Sustainability Xerox Email request world wide EHS Europe xerox com For product safety...

Page 23: ...To avoid personal injury use caution No symbol Warning Indicates a mandatory action to take to avoid damage to the property Do not touch the part or area of the printer Do not touch this part of the...

Page 24: ...caution in this area Do not remove the paper forcefully Hot Surface Before handling wait for the time indicated On Off Standby Do not use paper attached with staples or any form of binding clip Do not...

Page 25: ...o not use postcards Do not use envelopes Do not copy money Add paper or media Paper jam Lock Unlock Paper clip Cooling Elapsed time Supply paper 1 Sided original document Hole punched paper Xerox Vers...

Page 26: ...Load letterhead face up Load letterhead face down Load labels face down USB Universal Serial Bus LAN Local Area Network Telephone Line Weight Services Home button This item can be recycled 26 Xerox Ve...

Page 27: ...ntains Parts of the Printer 28 Power Options 37 Accessing the Printer 39 Apps Features and Functions 42 Information Pages 44 The Embedded Web Server 46 Installation and Setup 51 Connecting the Printer...

Page 28: ...r 2 Document Glass 3 Center Output Tray 4 Tray 1 Standard 550 sheet Tray 5 Bypass Tray 100 sheets 6 Door A Front Door 7 Near Field Communication NFC Area 8 Power Wake Button 28 Xerox VersaLink B625 Mu...

Page 29: ...r 2 Document Guides 3 Document Feeder Input Tray 4 Document Feeder Output Tray 5 Second side Scanning Lens Assembly 6 Document Glass Constant Velocity Transport CVT Glass Xerox VersaLink B625 Multifun...

Page 30: ...document feeder cover and place the first page face down in the upper left corner of the document glass Align the original documents to the matching paper size printed on the edge of the glass The do...

Page 31: ...INTERNAL PARTS 1 Door A Front Door 2 Toner Cartridge 3 Imaging Unit 4 Door C Back Door 5 Fuser Assembly Xerox VersaLink B625 Multifunction Printer User Guide 31 Getting Started...

Page 32: ...REAR VIEW 1 Main Power Outlet 2 Door C Back Door 3 USB Port Type B 4 Ethernet Port 5 USB Port Type A 6 Fax Telephone Line Port 32 Xerox VersaLink B625 Multifunction Printer User Guide Getting Started...

Page 33: ...ower status of the printer I IT TE EM M N NA AM ME E D DE ES SC CR RI IP PT TI IO ON N 1 Log In Button Touching the Log In button on the control panel touch screen allows you to log in and identify yo...

Page 34: ...ld Communication NFC is a technology that enables devices to communicate when they are within the network range of each other Use the NFC area to obtain a network interface to add the printer to your...

Page 35: ...reless Network Adaptor that requires installation in the front USB port and you have a USB Card Reader do not install the Card Reader into the USB port of the Wireless Network Adaptor Use the rear USB...

Page 36: ...t appears on the control panel touch screen when paper of the same size is loaded in a tray For standard adjustable paper trays select an option A Allw wa ay ys s S Sh ho ow w This option shows the pa...

Page 37: ...the printer receives data from a connected device the printer exits Sleep Mode automatically When the printer receives data from a network print job to reduce power consumption only necessary electron...

Page 38: ...ark and theP Po ow we er r W Wa ak ke e button pulses To power off the printer touch P Po ow we er r O Of ff f A Please Wait message appears as the printer powers off Note It is not recommended but if...

Page 39: ...r ro ox x W Wo or rk kp plla ac ce e C Cllo ou ud d This option enables cloud based authentication The printer connects directly to the Xerox Workplace Cloud solution This method provides multiple opt...

Page 40: ...interface Personalization for logged in users is enabled by default Personalization allows a logged in user to configure the following settings Personalized walk up screen When a user logs in the dev...

Page 41: ...s to restrict the total number of jobs by type that a user can send to the printer The administrator can generate reports that list usage data for individual users and groups For details refer to the...

Page 42: ...ginals Are Detected feature are enabled for an app you can create touchless workflows The following example describes this scenario for a 1 Touch App based on the Copy App If the 1 Touch App is select...

Page 43: ...se of certain applications An individual user can choose the types of suggestions that they receive Personalized suggestions apply to the Copy Email and Scan To Apps only For more information about pe...

Page 44: ...tarted guide provides an overview of the key features of the printer Troubleshooting Print Quality Page The Troubleshooting Print Quality Page provides a list of common print quality problems and tips...

Page 45: ...n and more Printing a Configuration Report 1 At the printer control panel press the H Ho om me e button 2 Touch D De ev viic ce e I In nf fo or rm ma at tiio on n P Pa ag ge es s 3 Touch B Ba as siic...

Page 46: ...s been on for 2 minutes If the TCP IP address is 0 0 0 0 or begins with 169 it indicates that there is a network connectivity issue Viewing the IP Printer Address on the Control Panel To view the IP a...

Page 47: ...choice when they use a compatible app P Pr ro op pe er rt tiie es s You can use the Properties tab to access and configure settings for your device System administrator login credentials are required...

Page 48: ...Server then install the certificate on your client For information on obtaining installing and enabling certificates refer to the System Administrator Guide at www xerox com office VLB625docs DOWNLOA...

Page 49: ...4 To enable remote access to the device control panel click S St ta ar rt t R Re em mo ot te e S Se es ss siio on n The remote control panel sends a request to the local control panel If the local co...

Page 50: ...printer apps Single Sign on SSO authentication is provided allowing you to access all of your SSO enabled apps without having to perform any additional login steps Xerox Workplace Cloud is easy to set...

Page 51: ...udden temperature fluctuations can affect print quality Rapid heating of a cold room can cause condensation inside the printer which directly interferes with image transfer 2 Place the printer on a le...

Page 52: ...e System Administrator Guide at www xerox com office VLB625docs REMOVING THE INTERNAL PACKING MATERIALS The printer comes with internal packing materials Remove the packing materials and install the i...

Page 53: ...ection is typically faster than USB and allows you direct access to the settings of the printer using the Embedded Web Server Note To access the Embedded Web Server a network connection is required W...

Page 54: ...strator Guide at www xerox com office VLB625docs WIRELESS NETWORK ADAPTER The Xerox Wireless Network Adapter enables you to use the Wireless Wizard to connect to a wireless network The compatibility o...

Page 55: ...you install the Wireless Network Adapter the Wi Fi Direct feature is enabled by default Wi Fi Direct Overview The Wi Fi Direct feature allows you to print from a mobile device to your printer using on...

Page 56: ...d for the job 5 Submit the job for printing A message appears on the mobile device 6 Select C Co on nn ne ec ct t When the connection is made a message appears on the printer 7 At the printer control...

Page 57: ...riin nt t S Se er rv viic ce e 5 To enable X Xe er ro ox x P Pr riin nt t S Se er rv viic ce e touch O On n 6 Exit S Se et tt tiin ng gs s Enabling NFC on the Mobile Device Most mobile devices have N...

Page 58: ...ct the print settings required for the job 5 Submit the job for printing CONFIGURING A DEVICE FOR UNIVERSAL PRINT Universal Print is a cloud based print protocol that provides a simple and secure prin...

Page 59: ...mmunication line cord 1 Ensure that the printer is powered off 2 Connect a standard RJ11 cable No 26 American Wire Gauge AWG or larger to the Line port on the back of the printer 3 Connect the other e...

Page 60: ...ensure that the device stays in the appropriate configuration throughout day to day operations The feature ensures that values remain compliant without external device monitoring When a watched settin...

Page 61: ...t app on your smartphone you can setup your new printer easily manage its configuration view alerts indicating supply requirements and order them and get live troubleshooting support for your printer...

Page 62: ...network interface INSTALLING THE PRINT DRIVERS FOR A WINDOWS NETWORK PRINTER 1 Insert the Software and Documentation disc into the appropriate drive on your computer If the installer does not start a...

Page 63: ...r the check box for Q Qu ue er ry y t th he e p pr riin nt te er r a an nd d a au ut to om ma at tiic ca alllly y s se elle ec ct t t th he e d dr riiv ve er r t to o u us se e then click N Ne ex xt t...

Page 64: ...er rs s a an nd d S Sc ca an nn ne er rs s 2 To add the required printer click A Ad dd d a a P Pr riin nt te er r o or r S Sc ca an nn ne er r 3 In the list of available devices select the device tha...

Page 65: ...n nt te er rs s S Sc ca an nn ne er rs s The list of printers appears on the left of the window 3 For the list of printers click the Plus icon 4 At the top of the window click the D De ef fa au ullt t...

Page 66: ...based printing uses LPD LPR port 515 or lp to port 9100 For information about UNIX based printing refer to UNIX Linux and AS 400 Printing For more information on installing print drivers and utilitie...

Page 67: ...lpful tips and customized features to meet your individual needs www xerox com office businessresourcecenter Local sales and Technical Customer Support www xerox com office worldcontacts Printer regis...

Page 68: ...68 Xerox VersaLink B625 Multifunction Printer User Guide Getting Started...

Page 69: ...r User Guide 69 Personalize This chapter contains Personalize Overview 70 Personalization by the User 71 Personalization from Adaptive Learning 77 1 Touch Apps 80 Creating Personalized Touchless Workf...

Page 70: ...at the device control panel You can create private 1 Touch Apps to save and simplify lengthy or frequent workflows After you create your 1 Touch Apps they appear on the logged in users Home screen Fo...

Page 71: ...For the required app touch X X b Touch H Hiid de e 7 Touch D Do on ne e 8 Verify that only the required apps appear on the Home screen Rearranging Apps on the Home screen To rearrange apps on the Home...

Page 72: ...om the Home screen and other personalized device settings R Re em mo ov ve e A Allll P Pe er rs so on na alliiz za at tiio on n This option removes all personalization for the logged in user including...

Page 73: ...p p 6 Touch the required app or 1 Touch App 7 Touch O OK K Setting the Originals Detected Option To set the default screen when original documents are detected 1 At the printer control panel press the...

Page 74: ...h D Do on ne e Showing all Features in the Features List To show all the hidden features for an app 1 At the printer control panel press the H Ho om me e button 2 Touch the app required 3 Select the j...

Page 75: ...o on ne e 3 Touch the app required 4 Select the job settings that you want to save as the default settings 5 To enable Auto Start touch the A Au ut to o S St ta ar rt t W Wh he en n O Or riig giin na...

Page 76: ...he H Ho om me e button 2 Touch L Lo og g I In n Type the user name using the keypad then touch N Ne ex xt t Type the password using the keypad then touch D Do on ne e 3 Touch L Lo og g I In n then tou...

Page 77: ...ntified and the device suggests creating a 1 Touch App If a logged in user selects six or more features for a job a complex task is identified and the device suggests creating a 1 Touch App for the re...

Page 78: ...Fe ea at tu ur re es s The features are reordered based on the usage history of the logged in user 5 To modify the feature list manually touch the required option then do the following To hide a featu...

Page 79: ...st tiio on ns s option from each suggestion screen 4 Touch the options required R Re ep pe et tiit tiiv ve e 1 1 T To ou uc ch h A Ap pp p Use this option to receive a suggestion to create a 1 Touch...

Page 80: ...Touch Apps Private 1 Touch Apps are available only for the user that created the app and appear only on the Home screen for the logged in user After you create a private 1 Touch App you can save the...

Page 81: ...As s N Ne ew w 1 1 T To ou uc ch h A Ap pp p 5 To enter a name touch the E En nt te er r 1 1 T To ou uc ch h A Ap pp p N Na am me e entry field then use the alphanumeric keypad Touch N Ne ex xt t 6 D...

Page 82: ...Use this option to delete the 1 Touch App from the printer permanently H Hiid de e Use this option to remove the 1 Touch App from the Home screen The 1 Touch App is still available and you can add th...

Page 83: ...Auto Start When Originals Are Detected feature enabled To personalize the Entry Screen Defaults for Device Default App and Originals Detected the user chooses the private 1 Touch App Each day to run...

Page 84: ...g the keypad then touch D Do on ne e 3 Scroll to the bottom then touch P Pe er rs so on na alliiz ze e 4 Touch R Re em mo ov ve e A Allll P Pe er rs so on na alliiz za at tiio on ns s W Wa ar rn niin...

Page 85: ...d as standard but are hidden when you use your device for the first time You can show hide or reorder Apps on the Home screen using the settings available in the Embedded Web Server For details about...

Page 86: ...he Xerox App Gallery User Guide available at www xerox com XeroxAppGallery If authentication or accounting is enabled on your device to access features enter your login details For details about Perso...

Page 87: ...og g I In n A welcome message appears that confirms that the account verification process is complete LOGGING IN TO YOUR XEROX APP GALLERY ACCOUNT When you are logged in to the App Gallery you can br...

Page 88: ...installation process again touch I In ns st ta allll 8 To exit the Xerox App Gallery App press the H Ho om me e button Updating an App from the App Gallery 1 At the printer control panel press the H...

Page 89: ...l touch screen Note Sometimes this option is hidden from view For details see the System Administrator Guide at www xerox com office VLB625docs About The About option provides an overview of your devi...

Page 90: ...ion to the Xerox support team Note Your System Administrator is required to enable this feature using the Embedded Web Server Xerox Easy Assist App Use the Xerox Easy Assist app to access and configur...

Page 91: ...Print this page to check the quality of graphics PCL Font List The PCL Font List provides a printout of all PCL fonts that are available on the printer PostScript Font List The PostScript Font List p...

Page 92: ...o ou un nt te er rs s This option provides the number of impressions made by the printer Impressions for 2 Sided sheets are identified as a separate line from 1 Sided sheets I Im ma ag ge es s S Se en...

Page 93: ...Pr riin nt te er r If you have the QR Code or IP Address available you can set up a new Xerox printer with the help of Xerox Easy Assist app On My Printers screen in the app touch the icon then touch...

Page 94: ...ars b To use your mobile device to set up and manage your printer touch Y Ye es s Get the App screen appears to confirm the type of your mobile device Choose any one option iiO OS S To install the Xer...

Page 95: ...ew printer Checking the printer status and order supplies Downloading Print and Scan Drivers Printing Getting troubleshooting support Removing a printer from the XEA app My Printers list For Xerox Eas...

Page 96: ...n include additional printers directly to the list of My Printers To add printers that are on the network open the XEA app Home page On the My Printers screen touch the icon then refer to the followin...

Page 97: ...Note If the printer and mobile device cannot communicate ensure that they are on the same network Xerox VersaLink B625 Multifunction Printer User Guide 97 Xerox Apps...

Page 98: ...pause or delete jobs that are printing You can also view job progress or job details for a selected job A print job can be held by the printer when it is unable to complete the job For example if the...

Page 99: ...alert appear on the control panel 1 If the pop up alert is disabled by the system administrator to view the held jobs do the following a At the printer control panel press the H Ho om me e button b T...

Page 100: ...ved Job 1 In your software application access the print settings For most software applications press C CT TR RL L P P for Windows or C CM MD D P P for Macintosh 2 Select your printer then open the pr...

Page 101: ...tle of the button varies For Macintosh in the Print window click P Pr re ev viie ew w then select X Xe er ro ox x F Fe ea at tu ur re es s 3 For Job Type select S Se ec cu ur re e P Pr riin nt t 4 Typ...

Page 102: ...s the print settings For most software applications press C CT TR RL L P P for Windows or C CM MD D P P for Macintosh 2 Select your printer then open the print driver For Windows click P Pr riin nt te...

Page 103: ...the Embedded Web Server 1 At your computer open a Web browser In the address field type the IP address of the printer then press E En nt te er r or R Re et tu ur rn n 2 In the Embedded Web Server clic...

Page 104: ...nt te er r or R Re et tu ur rn n 2 In the Embedded Web Server click H Ho om me e 3 Click J Jo ob bs s 4 Click the S Sa av ve ed d J Jo ob bs s tab 5 For the job that you want to process select the che...

Page 105: ...them for later use For information about all the Copy App features and available settings refer to Apps Features For details on configuring and customizing the Apps refer to the System Administrator G...

Page 106: ...ments are detected the automatic document feeder confirmation indicator LED illuminates If the D De ef fa au ullt t S Sc cr re ee en n W Wh he en n O Or riig giin na alls s A Ar re e D De et te ec ct...

Page 107: ...m the edges of your copies using the Edge Erase feature You can specify the amount to erase on the right left top and bottom edges To erase the edges of copies 1 At the printer control panel press the...

Page 108: ...s s Position original documents face down in the upper left corner of the document glass long edge to the left To change the placement of the image 1 At the printer control panel press the H Ho om me...

Page 109: ...pe ec ciia all P Pa ag ge es s C Co ov ve er rs s Note If Paper Supply is set to Auto Paper Select the Paper Conflict screen appears Select the required paper tray then touch O OK K 4 For Covers Optio...

Page 110: ...entry box To enter a page number use the numeric keypad Touch E En nt te er r 6 To specify the paper tray to use for the insert a Touch P Pa ap pe er r S Su up pp plly y b Touch the required paper tr...

Page 111: ...on ns s Note If Paper Supply is set to Auto Paper Select the Paper Conflict screen appears Select the required paper tray then touch O OK K 4 To enter the range of pages to print on different paper T...

Page 112: ...page number touch an arrow The sample page shows the location of the page number f Touch O OK K 5 To insert a comment a Touch C Co om mm me en nt t b Touch O On n c For Stored Comments touch an option...

Page 113: ...Page Layout You can use Page Layout to place a defined number of pages on one or both sides of the paper To change the page layout 1 At the printer control panel press the H Ho om me e button 2 Touch...

Page 114: ...ed 8 To return to the home screen press the H Ho om me e button Saving Current Copy Settings To use a particular combination of copy settings for future copy jobs you can save the settings with a name...

Page 115: ...ed setting touch the setting then touch D De elle et te e S Se et tt tiin ng gs s Touch D De elle et te e to confirm 5 Touch O OK K The saved settings are loaded for the current copy job Xerox VersaLi...

Page 116: ...to access features enter your login details For details about Personalization for logged in users refer to Personalize COPYING AN ID CARD To copy an ID card 1 Lift the document feeder then place the...

Page 117: ...ce VLB625docs For information about all the Email App features and available settings refer to Apps Features For details on configuring and customizing the Apps refer to the System Administrator Guide...

Page 118: ...ments are detected the automatic document feeder confirmation indicator LED illuminates If the D De ef fa au ullt t S Sc cr re ee en n W Wh he en n O Or riig giin na alls s A Ar re e D De et te ec ct...

Page 119: ...O OK K To save the scanned document as a specific file format touch the attachment file format then select the required format To add password protection from the file format menu select M Mo or re e...

Page 120: ...uch M Ma an nu ua all E En nt tr ry y To enter an email address use the touch screen keypad 6 To add the recipient to the Device Address Book touch the A Ad dd dr re es ss s B Bo oo ok k icon 7 Do one...

Page 121: ...x destinations to workflows too Scan to Mailbox enables you to scan documents to public or private mailbox folders on the printer hard drive Scan to Home enables you to scan documents to a personal Ho...

Page 122: ...nst the original documents Note When the original documents are detected the automatic document feeder confirmation indicator LED illuminates 2 At the printer control panel press the H Ho om me e butt...

Page 123: ...the System Administrator Guide at www xerox com office VLB625docs If you are using the document glass to combine pages into a single scan file enable the Build Job feature To enable the feature touch...

Page 124: ...e repository Creating a New Workflow 1 At your computer open a Web browser in the address field type the IP address of the printer then press E En nt te er r or R Re et tu ur rn n Note For details abo...

Page 125: ...s Computer 1 Open Windows Explorer 2 Right click the folder you want to share then select P Pr ro op pe er rt tiie es s 3 Click the S Sh ha ar riin ng g tab then click A Ad dv va an nc ce ed d S Sh ha...

Page 126: ...x folder or to retrieve the scanned images All users can view scanned documents in the public mailbox folder You can create a password protected private mailbox folder For details refer to Creating a...

Page 127: ...tically displayed to display it touch C Ch ha an ng ge e W Wo or rk kf fllo ow w 5 On the Mailbox Password screen enter the password then touch O OK K 6 To add a file destination touch A Ad dd d F Fii...

Page 128: ...that adheres to the password rules 7 In the Confirm Folder Password field type the password again 8 Click A Ap pp plly y Your private mailbox folder appears in the mailbox folder list in the Embedded...

Page 129: ...Workflow screen To use the Home workflow 1 Load your original documents 2 To log in to the printer touch L Lo og g I In n then log in with your network credentials 3 At the printer control panel press...

Page 130: ...memory port 4 At the USB Drive Detected screen touch S Sc ca an n t to o U US SB B Note If the USB Flash drive is inserted in the printer already touch W Wo or rk kf fllo ow w S Sc ca an nn niin ng g...

Page 131: ...ble and other files on the drive can be damaged 9 To return to the Home screen press the H Ho om me e button Single Touch Apps A Single Touch App enables you to use a workflow without having to use th...

Page 132: ...unting is enabled on your device to access features enter your login details For details about Personalization for logged in users refer to Personalize SCANNING TO AN EMAIL ADDRESS You can scan a docu...

Page 133: ...nt as a specific file format touch the attachment file format then select the required format 9 Adjust scanning options as needed To change the email subject line touch S Su ub bj je ec ct t Enter a n...

Page 134: ...scanned document as a specific file format touch the attachment file format then select the required format 9 Adjust scanning features as needed 10 To scan multiple pages using the document glass or...

Page 135: ...add another Scan To destination touch A Ad dd d D De es st tiin na at tiio on n then select the required destination 8 To save the scanned document with a specific file name touch the attachment file...

Page 136: ...the scanned document as a specific file name touch the file name Enter a new name using the touch screen keypad then touch E En nt te er r 8 To save the scanned document as a specific file format tou...

Page 137: ...istrator Guide at www xerox com office VLB625docs Use the Embedded Web Server to associate a Scan To destination with a Device Address Book contact For details refer to Adding a Scan To Destination to...

Page 138: ...ontact has been set up to include a scan to destination the contact is available for selection in the Scan To App Contacts can be marked as a Favorite To create an address book contact and add a scan...

Page 139: ...for the computer that holds the destination folder For SMB the login name is your computer user name 9 To confirm the validity of the destination details click D De es st tiin na at tiio on n T Te es...

Page 140: ...Fax App configure the Fax Settings to ensure that they are compatible with your local connection and regulations The Fax Settings include optional features you can use to configure the printer for fax...

Page 141: ...cuments are detected the automatic document feeder confirmation indicator LED illuminates If the D De ef fa au ullt t S Sc cr re ee en n W Wh he en n O Or riig giin na alls s A Ar re e D De et te ec c...

Page 142: ...nn niin ng g then select an option For details about available features refer to Apps Features 7 Touch S Se en nd d 8 If Build Job is enabled touch S Sc ca an n then when prompted do these steps To c...

Page 143: ...O OK K 6 To enter the name of the sender touch the F Fr ro om m field then use the touch screen keyboard Touch O OK K 7 To add a comment do one of the following steps Touch an existing comment Touch...

Page 144: ...trator must enable Create Edit Contact from Touch Screen for All Users 1 Load your original documents 2 At the printer control panel press the H Ho om me e button 3 Touch F Fa ax x 4 To clear previous...

Page 145: ...this procedure 6 To add existing contacts from a phonebook a Click the A Ad dd d F Fr ro om m P Ph ho on ne eb bo oo ok k icon b Select the required phonebook from the list c Select names from the li...

Page 146: ...edure 6 To include a cover sheet click the C Co ov ve er r S Sh he ee et t tab From the Cover Sheet list select P Pr riin nt t a a C Co ov ve er r S Sh he ee et t then enter the details as required 7...

Page 147: ...w xerox com office VLB625docs If authentication or accounting is enabled on your device to access features enter your login details For details about Personalization for logged in users refer to Perso...

Page 148: ...s and paper clips from the pages Insert the original documents face up in the duplex automatic document feeder with the top of the page entering the feeder first Adjust the paper guides so that they f...

Page 149: ...ted do these steps To change settings touch P Pr ro og gr ra am m N Ne ex xt t S Se eg gm me en nt t To scan another page touch S Sc ca an n N Ne ex xt t S Se eg gm me en nt t To finish touch S Su ub...

Page 150: ...8 Touch S Se en nd d The fax is scanned and saved then sent at the time you specified 9 To return to the Home screen press the H Ho om me e button 150 Xerox VersaLink B625 Multifunction Printer User G...

Page 151: ...y files For details on configuring and customizing the Apps refer to the System Administrator Guide at www xerox com office VLB625docs If authentication or accounting is enabled on your device to acce...

Page 152: ...ch the file then select R Re em mo ov ve e To confirm removal touch R Re em mo ov ve e To remove all the files touch a file then select R Re em mo ov ve e A Allll To confirm removal touch R Re em mo o...

Page 153: ...xe es s then touch the name of the folder that contains the document Note If Mailboxes does not appear enable the feature or contact the system administrator For details refer to the System Administra...

Page 154: ...nting is enabled on your device to access features enter your login details PRINTING WITH THE PRINTBYXEROX APP 1 Send an email with an attachment that contains a supported file type to Print printbyxe...

Page 155: ...5docs To use the Connect for XMPie App from the Home screen touch C Co on nn ne ec ct t f fo or r X XM MP Piie e The main screen displays Featured Products and Product Categories You can browse the ca...

Page 156: ...156 Xerox VersaLink B625 Multifunction Printer User Guide Xerox Apps...

Page 157: ...Link B625 Multifunction Printer User Guide 157 Printing This chapter contains Printing Overview 158 Selecting Printing Options 159 Print Jobs 167 Printing Features 172 Using Custom Paper Sizes 182 Pri...

Page 158: ...Select your printer 5 To access the print driver settings for Windows select P Pr riin nt te er r P Pr ro op pe er rt tiie es s P Pr riin nt t O Op pt tiio on ns s or P Pr re ef fe er re en nc ce es s...

Page 159: ...formation is usually available from the Printing Preferences window To see the help click the H He ellp p button in the bottom left corner of the Printing Preferences window Information about Printing...

Page 160: ...ptions for a particular job you can change the Printing Preferences before sending the job to the printer 1 With the document open in your software application access the print settings For most softw...

Page 161: ...h the document open in your application click F Fiille e P Pr riin nt t 2 To open the Printing Preferences window select your printer then click P Pr ro op pe er rt tiie es s or P Pr re ef fe er re en...

Page 162: ...ptions To save the set of options in the Presets list click O OK K 6 To print using these options select the name from the Presets list UNIX LINUX AND AS 400 PRINTING To provide printer spooling and n...

Page 163: ...creates a Xerox directory in opt Xerox prtsys 3 To install the Xerox Office Standard Driver on Linux platform log in as root then type the appropriate command for your system Linux RPM based rpm U Xer...

Page 164: ...ter A Work Station Customization Object is a lookup table that the host print transform HPT uses to translate AS 400 commands to the equivalent PCL code that is specific to a particular printer A WSCO...

Page 165: ...iscovered printers list To enable Universal Print for your printer refer to Configuring a Device for Universal Print 1 To add a printer in Windows Operating System do the following For Windows 10 clic...

Page 166: ...Install and Setup instructions that are included with the kit To use Wi Fi Direct in the Embedded Web Server enable the Wi Fi Direct feature For details on configuring Wi Fi Direct refer to the Syste...

Page 167: ...ob b D De et ta aiills s then touch J Jo ob b S Se et tt tiin ng gs s or R Re eq qu uiir re ed d R Re es so ou ur rc ce es s 4 To return to the Home screen press the H Ho om me e button Note The syste...

Page 168: ...r computer then print it from the printer control panel Select special job types in the print driver Printing Options tab under Job Type Saved Job Saved Jobs are documents that are sent to the printer...

Page 169: ...the printer control panel After a Secure Print job is printed it is deleted automatically Printing using Secure Print 1 In your software application access the print settings For most software applica...

Page 170: ...ures A Sample Set job appears in a folder named after the user ID associated with the print job A Sample Set job does not use a passcode Any user can print or delete a Sample Set job A Sample Set prin...

Page 171: ...Printing and shows the number of remaining copies of the job 4 Select an option To print the remaining copies of the job touch R Re elle ea as se e To delete the remaining copies of the job touch D De...

Page 172: ...rom the tray and load the paper that is required for your job Note To prevent paper jams load the trays with the correct size and type of paper for the print job Scaling Scaling reduces or enlarges th...

Page 173: ...els or other media that cannot be printed on both sides 2 2 S Siid de ed d P Pr riin nt t This option prints the job on both sides of the paper to allow binding on the long edge of the paper The follo...

Page 174: ...e on the Page Layout tab select P Pa ag ge es s P Pe er r S Sh he ee et t To locate Pages Per Sheet in Windows on the Document Options tab click P Pa ag ge e L La ay yo ou ut t To locate Pages Per She...

Page 175: ...ges that are different from the source used for the body of a document For example you can use your company letterhead for the first page of a document You can use heavyweight paper for the first and...

Page 176: ...e of a special paper and the remainder of the pages printed 2 sided on regular paper You can use exception pages to print the job In the Exceptions window you can set the location characteristics and...

Page 177: ...button For a picture annotation select the scaling option that specifies the size of the picture in relation to the original image Use the arrows to scale the image in increments of 1 To define the an...

Page 178: ...e scaling angle and position of the watermark Select the scaling option that specifies the size of the picture in relation to the original image Use the arrows to scale the image in increments of 1 To...

Page 179: ...e orientation clear the Auto Rotate check box ADVANCED PRINTING OPTIONS You can use the Advanced option or tab to set advanced printing options Advanced printing selections apply to all jobs that you...

Page 180: ...Windows Print Jobs You can select encryption for your print job The print file is encrypted before it is transmitted to the printer The print file is decrypted before it is printed This feature is ava...

Page 181: ...he A Ad dm miin niis st tr ra at tiio on n tab 4 For Configurations click D Do oc cu um me en nt t E En nc cr ry yp pt tiio on n then select an option D Diis sa ab blle ed d This option disables encry...

Page 182: ...ns s tab 2 For Paper click the arrow then select O Ot th he er r S Siiz ze e A Ad dv va an nc ce ed d P Pa ap pe er r S Siiz ze e O Ou ut tp pu ut t P Pa ap pe er r S Siiz ze e N Ne ew w 3 In the New...

Page 183: ...ttings for Fully Adjustable or Dedicated mode refer to Configuring Paper Tray Settings 1 Open the paper tray then load the custom size paper 2 Close the tray 3 At the control panel to define the new p...

Page 184: ...tiie es s 4 On the Printing Options tab from the Paper list select O Ot th he er r S Siiz ze e 5 To select a custom paper size select F Fiit t t to o N Ne ew w P Pa ap pe er r S Siiz ze e then select...

Page 185: ...of data or printer malfunction do not touch the flash drive or the printer in the area shown while actively printing reading or writing from the memory device Note If the Print from USB feature does n...

Page 186: ...e then touch R Re em mo ov ve e Touch A Ad dd d D Do oc cu um me en nt t touch S Sa av ve ed d J Jo ob bs s then navigate to the job required 7 To return to the Home screen press the H Ho om me e butt...

Page 187: ...hen click O Op pe en n 4 For Printing select the required options for the job N No or rm ma all P Pr riin nt t prints a job immediately S Se ec cu ur re e P Pr riin nt t prints a job after you enter y...

Page 188: ...188 Xerox VersaLink B625 Multifunction Printer User Guide Printing...

Page 189: ...k B625 Multifunction Printer User Guide 189 Paper and Media This chapter contains Paper and Media Overview 190 Supported Paper 191 Configuring Paper Tray Settings 197 Loading Paper 199 Printing on Spe...

Page 190: ...in the stack The High Capacity Tray can be configured as dedicated or adjustable paper tray It can hold A4 210 x 297 mm 8 3 x 11 7 in Letter 216 x 279 mm 8 5 x 11 in 8 5 x 13 in 216 x 330 mm 8 5 x 13...

Page 191: ...imum fill line in the tray Adjust the paper guides to fit the paper size Fan paper before loading it in the paper tray If excessive jams occur use paper or other approved media from a new package Do n...

Page 192: ...pallets cartons shelves or in cabinets Avoid food or drinks in the area where paper is stored or handled Do not open sealed packages of paper until you are ready to load them into the printer Leave s...

Page 193: ...g m2 Bypass Tray Lightweight 60 74 g m2 Plain Hole Punched Recycled Pre Printed Custom Types 1 7 75 90 g m2 Letterhead Bond 75 105 g m2 Labels 75 180 g m2 Lightweight Cardstock 120 176 g m2 Cardstock...

Page 194: ...98 x 190 mm No 9 Envelope 3 9 x 8 9 in 98 x 225 mm No 10 Envelope 4 1 x 9 5 in 105 x 241 mm A5 148 x 210 mm 5 8 x 8 3 in High Capacity Tray Tray 2 3 or 4 A4 210 x 297 mm 8 3 x 11 7 in Letter 8 5 x 11...

Page 195: ...in B5 176 x 250 mm 6 9 x 9 8 in JIS B5 182 x 257 mm 7 2 x 10 1 in 215 x 315 mm 8 5 x 12 4 in Statement 5 5 x 8 5 in 140 x 216 mm Executive 7 25 x 10 5 in 184 x 267 mm Letter 8 5 x 11 in 216 x 279 mm L...

Page 196: ...imum 216 x 356 mm 8 5 x 14 in Bypass Tray Minimum 76 x 127 mm 3 x 5 in Maximum 216 x 356 mm 8 5 x 14 in High Capacity Tray Tray 2 3 or 4 High Capacity Tray do not support custom paper sizes For standa...

Page 197: ...pecified time the prompt closes which confirms the paper that is loaded While the prompt appears on the control panel touch screen you can confirm any change to the paper type color and size A Au ut t...

Page 198: ...a new paper type touch T Ty yp pe e To select a new paper color touch C Co ollo or r 4 To confirm the settings touch C Co on nf fiir rm m To set the paper size type or color when a tray is set to Dedi...

Page 199: ...y A warning message appears on the control panel when the wrong media is loaded in the tray or when the paper guides are set incorrectly Note Only the system administrator can change the media setting...

Page 200: ...ar rn niin ng g To avoid jams and misfeeds do not remove paper from its packaging until you are ready to use it 5 Load the paper in the tray For short edge feed insert letterhead and pre printed paper...

Page 201: ...and color If letterhead paper is loaded in the printer for type select L Le et tt te er rh he ea ad d If pre printed paper is loaded in the printer for type select P Pr re e p pr riin nt te ed d 9 To...

Page 202: ...measurement units I In nc ch he es s This option sets the paper size preference to inches and displays Imperial sizes first M Me et tr riic c This option sets the paper size preference to millimeters...

Page 203: ...f media types The tray is intended primarily for small quantity jobs that use special media The Bypass Tray is located above Tray 1 To load paper in the Bypass Tray 1 Open the Bypass Tray If the tray...

Page 204: ...evel surface The procedure separates any sheets that are stuck together and reduces the possibility of paper jams W Wa ar rn niin ng g To avoid jams and misfeeds do not remove paper from its packaging...

Page 205: ...for A5 148 x 210 mm 5 8 x 8 3 in paper W Wa ar rn niin ng g Do not load paper above the maximum fill line Overfilling can cause paper jams b For hole punched paper load the paper short edge feed with...

Page 206: ...g message when the paper in the tray is in short supply or when the tray is empty If your printer has a 2100 sheet High Capacity Feeder it can be configured as dedicated or adjustable paper tray The p...

Page 207: ...ocedure separates any sheets of paper that are stuck together and reduces the possibility of paper jams Note To avoid paper jams and misfeeds do not remove paper from the packaging until necessary 5 L...

Page 208: ...Overfilling can cause paper jams 6 Slide the tray back into the printer Note Press down the paper stack while pushing the tray back into the printer 7 At the control panel select the correct size typ...

Page 209: ...aintain constant temperatures and relative humidity Store unused envelopes in their packaging to avoid excess moisture and dryness which can affect print quality and cause wrinkling Excessive moisture...

Page 210: ...is a different size or type 3 To move out the length or width paper guides pinch the guide locks then slide out the length or width paper guides 4 To avoid jams flatten the envelopes 210 Xerox VersaL...

Page 211: ...ize type and color Ensure that the paper type is set to Envelope Note To change the paper settings when the tray is set to Dedicated mode refer to Configuring Dedicated Paper Trays 9 To confirm the se...

Page 212: ...ng edge load envelopes with the flaps face down and closed Keep the flaps toward the left Note An envelope such as 6 x 9 in 152 x 228 mm with the flap on the short edge insert the envelope with the fl...

Page 213: ...any unused sheets of labels to the original packaging and reseal it Do not store labels in extremely dry or humid conditions or extremely hot or cold conditions Storing them in extreme conditions can...

Page 214: ...ze of labels you are loading 3 Remove any paper that is a different size or type 4 To move out the length or width paper guide release the guide lock then slide out the length or width paper guide 5 L...

Page 215: ...s to fit the labels For short edge feed insert labels face down with the bottom edge toward the front of the tray W Wa ar rn niin ng g Do not load paper above the maximum fill line Overfilling can cau...

Page 216: ...e tray back into the printer 7 At the control panel select the correct paper size type and color Ensure that the paper type is set to Labels Note To change the paper settings when the tray is set to D...

Page 217: ...erox VersaLink B625 Multifunction Printer User Guide 217 Maintenance This chapter contains General Precautions 218 Cleaning the Printer 219 Supplies 225 Managing the Printer 246 Moving the Printer 247...

Page 218: ...that is not described in the documentation supplied with your printer W Wa ar rn niin ng g When cleaning your printer do not use organic or strong chemical solvents or aerosol cleaners Do not pour fl...

Page 219: ...Po ow we er r W Wa ak ke e button then touch S Slle ee ep p 2 To remove fingerprints and smudges clean the touch screen and control panel with a soft lint free cloth 3 To return the printer to Ready m...

Page 220: ...Note For best results use Xerox Glass Cleaner to remove marks and streaks 1 Slightly dampen a soft lint free cloth with water 2 Remove any paper or other media from the output tray 3 Open the documen...

Page 221: ...e document cover until it is clean and dry 8 Close the document cover Cleaning the Document Feed Rollers Dirt on the document feed rollers can cause paper jams or deteriorate print quality For best pe...

Page 222: ...ers wipe the rollers with a clean lint free cloth moistened with water W Wa ar rn niin ng g Do not use alcohol or chemical cleaners on the document feed rollers 3 Close the document feeder top cover 2...

Page 223: ...e second side scanning lens assembly and separate the document cover form the lens assembly 2 Using a soft lint free cloth moistened with water wipe the mirrored glass metal strip both sides of the wh...

Page 224: ...turn the document cover to the original position If you touch the document cover before you close the document feeder clean the cover 224 Xerox VersaLink B625 Multifunction Printer User Guide Maintena...

Page 225: ...nder strict quality controls by Xerox for specific use with this printer ROUTINE MAINTENANCE ITEMS Routine maintenance items are printer parts that have a limited life and require periodic replacement...

Page 226: ...tem touch the item required 4 To return to the Supplies screen touch X X 5 To view more details touch O Ot th he er r S Su up pp plliie es s Scroll through the list then select an option 6 To return t...

Page 227: ...To replace a toner cartridge W Wa ar rn niin ng g Do not perform this procedure when the printer is copying or printing 1 Open the front door A of the printer 2 Firmly grip the cartridge handle then r...

Page 228: ...it When it is time to replace the imaging unit the printer displays a message appears on the control panel W Wa ar rn niin ng g Do not perform this procedure when the printer is copying or printing To...

Page 229: ...Open the front door A of the printer 2 Remove the toner cartridge from the printer 3 Remove the used imaging unit from the printer Xerox VersaLink B625 Multifunction Printer User Guide 229 Maintenanc...

Page 230: ...light for more than 10 minutes Extended exposure to light may cause print quality problems W Wa ar rn niin ng g Do not touch the shiny photoconductor drum under the imaging unit Doing so may affect th...

Page 231: ...EED ROLLER ASSEMBLY Replacing the Tray 1 Feed Roller To replace the feed roller in the standard paper trays 1 Power off the printer then unplug the power cord from the electrical outlet 2 Remove Tray...

Page 232: ...C Ca au ut tiio on n To avoid the risk of fire or electrical shock connect the power cord to an appropriately rated and properly grounded electrical outlet that is near the product and easily accessib...

Page 233: ...he feed roller rotate the left end of the feed roller clockwise as shown then remove it from the bypass tray 4 Unpack and insert the new feed roller in the bypass tray Xerox VersaLink B625 Multifuncti...

Page 234: ...ppropriately rated and properly grounded electrical outlet that is near the product and easily accessible Separator Pad R Re ep plla ac ciin ng g t th he e S Se ep pa ar ra at to or r P Pa ad d To rep...

Page 235: ...a Release the separator pad b Tilt it right and take out from the tray 3 Unpack and insert the new separator pad Xerox VersaLink B625 Multifunction Printer User Guide 235 Maintenance...

Page 236: ...Automatic Document Feeder DADF Feed Roller To replace the document feeder roller 1 Power off the printer 2 Open the top cover of the document feeder 3 Remove the document feeder pick roller cover in t...

Page 237: ...ert the new document feeder roller then place the pick roller back to its position W Wa ar rn niin ng g To avoid damage and poor printer performance handle this part with clean hands 6 Insert the docu...

Page 238: ...ocument Feeder DADF Pick Roller To replace the pick roller in the document feeder 1 Power off the printer 2 Open the top cover of the document feeder 3 Remove the document feeder pick roller cover in...

Page 239: ...ew document feeder pick roller W Wa ar rn niin ng g To avoid damage and poor printer performance handle this part with clean hands 6 Insert the document feeder pick roller cover in the downward direct...

Page 240: ...the separator roller in the document feeder 1 Power off the printer 2 Open the top cover of the document feeder 3 To remove the document feeder separator roller unlock and remove the separator roller...

Page 241: ...an hands 5 Close the top cover of the document feeder 6 Power on the printer TRANSFER ROLLER ASSEMBLY Replacing the Transfer Roller When the transfer roller needs to be replaced a message appears on t...

Page 242: ...1 Open the front door A 2 Remove the toner cartridge from the printer 3 Remove the imaging unit from the printer 242 Xerox VersaLink B625 Multifunction Printer User Guide Maintenance...

Page 243: ...om a hot component allow the surface of the printer to cool down before touching 5 Unpack and insert the new transfer roller Refer to the installation instructions in the Transfer Roller Maintenance K...

Page 244: ...r the system administrator login information then touch D Do on ne e For details refer to the System Administrator Guide at www xerox com office VLB625docs 3 Touch D De ev viic ce e T To oo olls s D D...

Page 245: ...9 Touch the L Lo og g I In n button then touch L Lo og go ou ut t Xerox VersaLink B625 Multifunction Printer User Guide 245 Maintenance...

Page 246: ...inter 1 At the printer control panel press the H Ho om me e button 2 Touch D De ev viic ce e B Biilllliin ng g U Us sa ag ge e 3 To view more details touch U Us sa ag ge e C Co ou un nt te er rs s the...

Page 247: ...from the back of the printer To avoid spilling toner keep the printer level Note When moving the printer over a long distance remove the toner cartridges to prevent toner from spilling Package the pri...

Page 248: ...248 Xerox VersaLink B625 Multifunction Printer User Guide Maintenance...

Page 249: ...ox VersaLink B625 Multifunction Printer User Guide 249 Troubleshooting This chapter contains General Troubleshooting 250 Paper Jams 258 Print Copy and Scan Problems 273 Fax Problems 282 Getting Help 2...

Page 250: ...st ta ar rt t A message appears on the control panel that warns you that the printer is restarting b If the printer does not restart after several minutes power off the main power switch To restart t...

Page 251: ...ersists contact your Xerox representative The printer is connected to an uninterruptible power supply UPS extension cord or power strip Only use an extension cord designed to handle the electrical cur...

Page 252: ...nd a print job check the connection between the printer and the computer There is a wireless or network connectivity issue To test the printer print an Information Page such as the Basic Configuration...

Page 253: ...en spooling them to the printer Spooling can slow print speeds To test the speed of the printer print multiple copies of an information page such as a demo page If the page prints at the rated speed o...

Page 254: ...e The P Pr riin nt t O On n A Allt te er rn na at te e P Pa ap pe er r option is enabled using the Embedded Web Server For details about the Print On Alternate Paper option refer to the System Adminis...

Page 255: ...d d EMPTY OR PARTIALLY PRINTED DOCUMENT P PR RO OB BA AB BL LE E C CA AU US SE ES S S SO OL LU UT TI IO ON NS S Packaging materials are not removed from the toner cartridge 1 Ensure to remove the pack...

Page 256: ...l NTP Disabled To change the Date and Time to Automatic in the Embedded Web Server enable NTP For details refer to the System Administrator Guide at www xerox com office VLB625docs The time zone date...

Page 257: ...the Wireless Network Adapter For details refer to the System Administrator Guide at www xerox com office VLB625docs If the wireless signal strength is low do the following Place the wireless router o...

Page 258: ...per jams can occur along the paper path 1 Door C Back Door 2 Standard 550 sheet Paper Trays 1 4 3 Bypass Tray 4 Door A Front Door 5 Center Output Tray 6 Duplex Automatic Document Feeder DADF MINIMIZIN...

Page 259: ...paper when they are not supported Paper that is folded wrinkled or excessively curled Loading more than one type size or weight of paper in a tray at the same time Loading hole punched paper or paper...

Page 260: ...and the remaining original documents in the document feeder input tray Do not put the original documents that are scanned already in the document feeder input tray If the original documents continue...

Page 261: ...top cover Cover D 4 Open document cover 5 Push the latches to open Cover E then remove the jammed paper Note Ensure that all paper fragments are removed Xerox VersaLink B625 Multifunction Printer Use...

Page 262: ...vice continues printing the job from where the job stopped If further paper tray jams are experienced try to load fresh paper in the paper tray The paper could have excessive curl excessive moisture o...

Page 263: ...re settings when the prompt is displayed update the R Re eq qu uiir re ed d P Pa ap pe er r P Po olliic ciie es s in Embedded Web Server For details refer to the System Administrator Guide at www xero...

Page 264: ...select a new paper size touch S Siiz ze e To select a new paper type touch T Ty yp pe e To select a new paper color touch C Co ollo or r 6 To confirm the settings touch C Co on nf fiir rm m Clearing J...

Page 265: ...irect light for more than 10 minutes Extended exposure to light may cause print quality problems W Wa ar rn niin ng g Do not touch the shiny photoconductor drum under the imaging unit Doing so may aff...

Page 266: ...nsure that all paper fragments are removed 5 Insert Tray 1 back into the printer 6 Insert the imaging unit back into the printer 7 Insert the toner cartridge back into the printer 266 Xerox VersaLink...

Page 267: ...pen Door C C Ca au ut tiio on n The inside of the printer might be hot To reduce the risk of injury from a hot component allow the surface of the printer to cool down before touching 2 Remove the jamm...

Page 268: ...3 Remove the jammed paper that is present below the fuser assembly 4 Remove jammed paper from the Door C cover 5 Close Door C 268 Xerox VersaLink B625 Multifunction Printer User Guide Troubleshooting...

Page 269: ...ew dry paper Too much static electricity is present Try a new ream of paper Using unsupported paper Use only Xerox approved paper For details refer to Supported Paper Humidity is too high for coated p...

Page 270: ...tray Adjust the paper guides in the tray to match the size of the paper The paper tray is too full Remove some of the paper Do not load paper past the fill line The paper guides are not correctly adju...

Page 271: ...f seal or non adhesive flap on a short edge load envelopes with the flaps face down and closed Insert the envelopes with the flaps toward the feed direction For the custom size envelopes when the flap...

Page 272: ...ee Supported Paper Paper type is set incorrectly in the print driver Ensure that the paper type is set correctly in the driver and that the paper is loaded in the correct tray For details see Supporte...

Page 273: ...de that you have printed b Check the quality of the copy output c For any symptom of poor scan quality refer to Copy and Scan Problems PRINT QUALITY PROBLEMS Your printer is designed to produce consis...

Page 274: ...d in more than one tray let the printer select the proper tray according to media and tray priority Do not load more than one type size or weight of paper in the tray at a time Store your paper and ot...

Page 275: ...at the paper is supported and in good condition use the following steps to isolate the problem 1 From the control panel of the printer print the pages for Diagnosing Print Quality For details see Prin...

Page 276: ...nter If the names do not match install the proper print driver for the printer 3 If the problem persists delete then reinstall the print driver 4 If the document printed without a print quality proble...

Page 277: ...er Change the paper type settings in the print driver In the print driver on the Printing Options tab select P Pa ap pe er r then change the O Ot th he er r T Ty yp pe e setting Verify the Print Quali...

Page 278: ...ge Replace the toner cartridge If the error persists contact your Xerox representative Black or white streaks appear on the output Replace the toner cartridge If the error persists contact your Xerox...

Page 279: ...idge is approved for use in this printer and replace the toner cartridge as needed For best results use a Genuine Xerox toner cartridge Replace the toner cartridge For details refer to Replacing the T...

Page 280: ...you observe quality problems use the information in this section to troubleshoot the problem For more information go to www xerox com office VLB625support W Wa ar rn niin ng g The Xerox Warranty or Se...

Page 281: ...Scanner Manual Registration When the scanned output on physical or digital copies are not centered perform Scanner Manual Registration S SY YM MP PT TO OM MS S S SO OL LU UT TI IO ON NS S Scanned outp...

Page 282: ...Position the document correctly The document glass is dirty Clean the document glass The text in the document is too light Adjust the resolution Adjust the contrast There is a problem with the telepho...

Page 283: ...e connection or with the fax machine of the sender Verify that the printer can make clean copies If it can have the sender fax the document again The sender loaded the pages incorrectly Contact the se...

Page 284: ...ne is operating correctly If the problem persists for online support information go to www xerox com office VLB625support PRINTING FAX REPORTS You can print the following fax reports from the printer...

Page 285: ...touch a fault or alert 6 To exit the Notifications screen touch X X 7 To return to the Home screen press the H Ho om me e button VIEWING THE ERROR HISTORY ON THE CONTROL PANEL When errors occur on th...

Page 286: ...DED WEB SERVER The Embedded Web Server is the administration and configuration software that is installed in the printer It allows System Administrators to modify network and system settings on the pr...

Page 287: ...a list of common print quality problems and tips to help solve them Supplies Usage Page The Supplies Usage Page provides coverage information and part numbers for reordering supplies Graphics Demo Pa...

Page 288: ...our individual needs www xerox com office businessresourcecenter Local sales and Technical Customer Support www xerox com office worldcontacts Printer registration www xerox com register Xerox Direct...

Page 289: ...ns This appendix contains Printer Configurations and Options 290 Physical Specifications 292 Clearance Requirements 295 Environmental Specifications 300 Electrical Specifications 301 Performance Speci...

Page 290: ...t Feeder Color touch screen control panel Tray 1 Standard 550 sheet Tray Optional Trays 2 4 each with 550 sheet capacities Optional High Capacity Feeder Tray with total 2100 sheet capacity 4 GByte DDR...

Page 291: ...eless Network Adaptor that requires installation in the front USB port and you have a USB Card Reader do not install the Card Reader into the USB port of the Wireless Network Adaptor Use the rear USB...

Page 292: ...kg 97 2 lb BASE CONFIGURATION WITH 3 OPTIONAL STANDARD TRAY MODULES AND CASTER BASE Width 55 9 cm 22 in Depth 69 3 cm 27 3 in Height 119 5 cm 47 0 in Weight 62 7 kg 138 2 lb Note Caster Base is optio...

Page 293: ...Weight 61 8 kg 136 2 lb Note Caster Base is required for High Capacity Feeder Tray configurations BASE CONFIGURATION WITH OPTIONAL STANDARD TRAY AND HIGH CAPACITY FEEDER WITH CASTER BASE Width 55 9 c...

Page 294: ...nfigurations CONFIGURATION WITH OPTIONAL TRAYS AND PRINTER STAND Width 70 9 cm 27 9 in Depth 71 4 cm 28 1 in Height 139 9 cm 55 1 in Weight 71 3 kg 157 1 lb Note The weight of the printer stand is 14...

Page 295: ...llation Space Width 86 4 cm 34 0 in Depth 113 8 cm 44 8 in Height 89 2 cm 35 1 in Clearance Front 40 6 cm 16 0 in Rear 15 2 cm 6 0 in Left 15 2 cm 6 0 in Right 15 2 cm 6 0 in Xerox VersaLink B625 Mult...

Page 296: ...6 4 cm 34 0 in Depth 113 8 cm 44 8 in Height 134 7 cm 53 0 in Clearance Front 40 6 cm 16 0 in Rear 15 2 cm 6 0 in Left 15 2 cm 6 0 in Right 15 2 cm 6 0 in Note Caster Base is optional for Standard 550...

Page 297: ...34 0 in Depth 113 8 cm 44 8 in Height 136 7 cm 53 9 in Clearance Front 40 6 cm 16 0 in Rear 15 2 cm 6 0 in Left 15 2 cm 6 0 in Right 15 2 cm 6 0 in Note Caster Base is required for High Capacity Feede...

Page 298: ...Width 86 4 cm 34 0 in Depth 113 8 cm 44 8 in Height 158 7 cm 62 5 in Clearance Front 40 6 cm 16 0 in Rear 15 2 cm 6 0 in Left 15 2 cm 6 0 in Right 15 2 cm 6 0 in Note Caster Base is required for High...

Page 299: ...nstallation Space Width 86 4 cm 34 0 in Depth 113 8 cm 44 8 in Height 155 2 cm 61 1 in Clearance Front 40 6 cm 16 0 in Rear 15 2 cm 6 0 in Left 15 2 cm 6 0 in Right 15 2 cm 6 0 in Xerox VersaLink B625...

Page 300: ...URE Operating 10 32 C 50 90 F RELATIVE HUMIDITY Operating 15 80 non condensing ELEVATION For optimum performance use the printer at elevations below 2896 m 9500 ft 300 Xerox VersaLink B625 Multifuncti...

Page 301: ...F FR RE EQ QU UE EN NC CY Y C CU UR RR RE EN NT T R RE EQ QU UI IR RE ED D 65 prints per minute 100 110 VAC 10 50 Hz 3 Hz 60 Hz 3 Hz 11 6 A 115 127 VAC 10 50 Hz 3 Hz 60 Hz 3 Hz 10 3 A 220 240 VAC 10 5...

Page 302: ...paper long edge feed Paper size Letter 8 5 x 11 in and A4 210 x 297 mm sizes share the faster print speeds Paper weight Lightweight prints faster than heavier paper such as Cardstock and Labels Paper...

Page 303: ...upplies contact United States and Canada only 1 800 ASK XEROX 1 800 275 9376 Web address Environmental Health Sustainability Xerox Email request world wide EHS Europe xerox com For product safety info...

Page 304: ...304 Xerox VersaLink B625 Multifunction Printer User Guide Specifications...

Page 305: ...ink B625 Multifunction Printer User Guide 305 Regulatory Information This appendix contains Basic Regulations 306 Copy Regulations 313 Fax Regulations 316 Safety Certification 319 Material Safety Data...

Page 306: ...CC regulations shielded cables must be used with this equipment Operation with non approved equipment or unshielded cables is likely to result in interference to radio and TV reception W Wa ar rn niin...

Page 307: ...fil de 2 4 GHz et 5 GHz conforme aux exigences sp cifi es dans la r glementation Industrie du Canada RSS 210 This device complies with Industry Canada s licence exempt RSSs Operation is subject to the...

Page 308: ...environment W Wa ar rn niin ng g Changes or modifications to this equipment not specifically approved by the Xerox Corporation may void the user s authority to operate this equipment External radiatio...

Page 309: ...gistered United States trademarks The ENERGY STAR Imaging Equipment Program is a team effort between United States European Union Japanese governments and the office equipment industry to promote ener...

Page 310: ...ings This device is ENERGY STAR qualified under the ENERGY STAR Program Requirements for Imaging Equipment The transition time from Ready mode to Sleep mode can be set from 0 60 or 0 120 minutes depen...

Page 311: ...nstitute for Quality Assurance and Labeling has awarded the following configuration of this device the Blue Angel Environmental Label Network printer with automatic 2 sided printing and USB or network...

Page 312: ...S COMPLIANCE 3 2008 1057 The equipment complies with requirements of the Technical Regulation approved by the Resolution of Cabinet of Ministry of Ukraine as of December 3 2008 in terms of restriction...

Page 313: ...done provided the reproduction of the document is performed for lawful purposes Postage Stamps canceled or uncanceled For philatelic purposes Postage Stamps may be photographed provided the reproducti...

Page 314: ...For more information about these provisions contact the Copyright Office Library of Congress Washington D C 20559 Ask for Circular R21 CANADA Parliament by stature has forbidden the reproduction of t...

Page 315: ...inclusive and no liability is assumed for its completeness or accuracy In case of doubt consult your solicitor OTHER COUNTRIES Copying certain documents may be illegal in your country Penalties of fi...

Page 316: ...plug is provided with this product It connects to a compatible modular jack that is also compliant See installation instructions for details You can safely connect the printer to the following standar...

Page 317: ...tariffs Contact the state public utility commission public service commission or corporation commission for information Your office could have specially wired alarm equipment connected to the telepho...

Page 318: ...xembourg Sweden Germany Malta If you have problems with your product contact your local Xerox representative This product can be configured to be compatible with other country networks Before reconnec...

Page 319: ...fication This device is compliant with IEC and EN product safety standards certified by a National Regulatory Test Laboratory NRTL Xerox VersaLink B625 Multifunction Printer User Guide 319 Regulatory...

Page 320: ...printer go to Web address Xerox Safety Documents and Compliance Information United States and Canada only 1 800 ASK XEROX 1 800 275 9376 Other markets send an email request to EHS Europe xerox com 32...

Page 321: ...Xerox VersaLink B625 Multifunction Printer User Guide 321 Recycling and Disposal This appendix contains All Countries 322 North America 323 European Union 324 Other Countries 325...

Page 322: ...ble at the time that the product was placed on the market For recycling and disposal information contact your local authorities Perchlorate Material This product may contain one or more Perchlorate co...

Page 323: ...1 800 ASK XEROX to determine if this Xerox product is part of the program For more information about Xerox environmental programs visit www xerox com environment For recycling and disposal information...

Page 324: ...here you purchased the items In some member states when you purchase new equipment your local retailer may be required to take back your old equipment free of charge For more information contact your...

Page 325: ...Other Countries Please contact your local waste management authority to request disposal guidance Xerox VersaLink B625 Multifunction Printer User Guide 325 Recycling and Disposal...

Page 326: ...326 Xerox VersaLink B625 Multifunction Printer User Guide Recycling and Disposal...

Page 327: ...Xerox VersaLink B625 Multifunction Printer User Guide 327 Apps Features This appendix contains Apps Features 328...

Page 328: ...Apps Features 328 Xerox VersaLink B625 Multifunction Printer User Guide Apps Features...

Page 329: ...Siid de ed d S Sc ca an nn niin ng g You can use the 2 sided options to set the device to scan one or both sides of an original document For Copy jobs you can specify 1 sided or 2 sided output P Pa ap...

Page 330: ...finishing options required for your printed output R Re ed du uc ce e E En nlla ar rg ge e You can reduce the image to as little as 25 of the original size or enlarge it to as much as 400 When you res...

Page 331: ...ar rp pn ne es ss s Use this option to sharpen the output image or print For best results sharpen text images and soften photos S Sa at tu ur ra at tiio on n Saturation allows you to adjust the color...

Page 332: ...ift the printed image along the X and Y axes of each sheet of paper A Au ut to o B Ba ac ck k g gr ro ou un nd d S Su up pp pr re es s s siio on n Use the Auto Background Suppression setting to reduce...

Page 333: ...ma ag ge e Negative Image reverses the light and dark areas in your document and prints the image as if it is a photo negative Printing a negative image is useful for documents that have a substantia...

Page 334: ...r when folded P Pa ag ge e L La ay yo ou ut t You can print the selected number of pages on one side of a sheet of paper Selecting multiple pages per sheet saves paper and provides a way to review the...

Page 335: ...e a variety of original documents that require different settings or to scan multiple page jobs from the document glass The job is scanned in segments After all the segments are scanned the job is pro...

Page 336: ...Image resolution is measured in dots per inch dpi R Re em mo ov ve e B Blla an nk k P Pa ag ge es s Remove Blank Pages configures the printer to ignore blank pages F Fr ro om m Use the From option to...

Page 337: ...e the Message option to enter information to accompany the email Q Qu ua alliit ty y F Fiille e S Siiz ze e The Quality File Size option lets you choose from three settings that balance the quality of...

Page 338: ...an nd d A At tt ta ac ch h m me en nt t Use this option to specify a name for the file that contains the scanned images U Up pd da at te e W Wo or rk kf fllo ow ws s Use Update Workflows to refresh t...

Page 339: ...as received To receive a Confirmation Report only if an error occurred during transmission choose Print on Error Only S St ta ar rt tiin ng g R Ra at te e Select the highest starting rate for transmit...

Page 340: ...CA AR RD D C CO OP PY Y S Se en nd d H He ea ad de er r T Te ex xt t It is unlawful to send a message from a fax machine without the proper transmission header text Ensure that the name and telephone...

Page 341: ......

Page 342: ......

Reviews: