background image

Description

Option

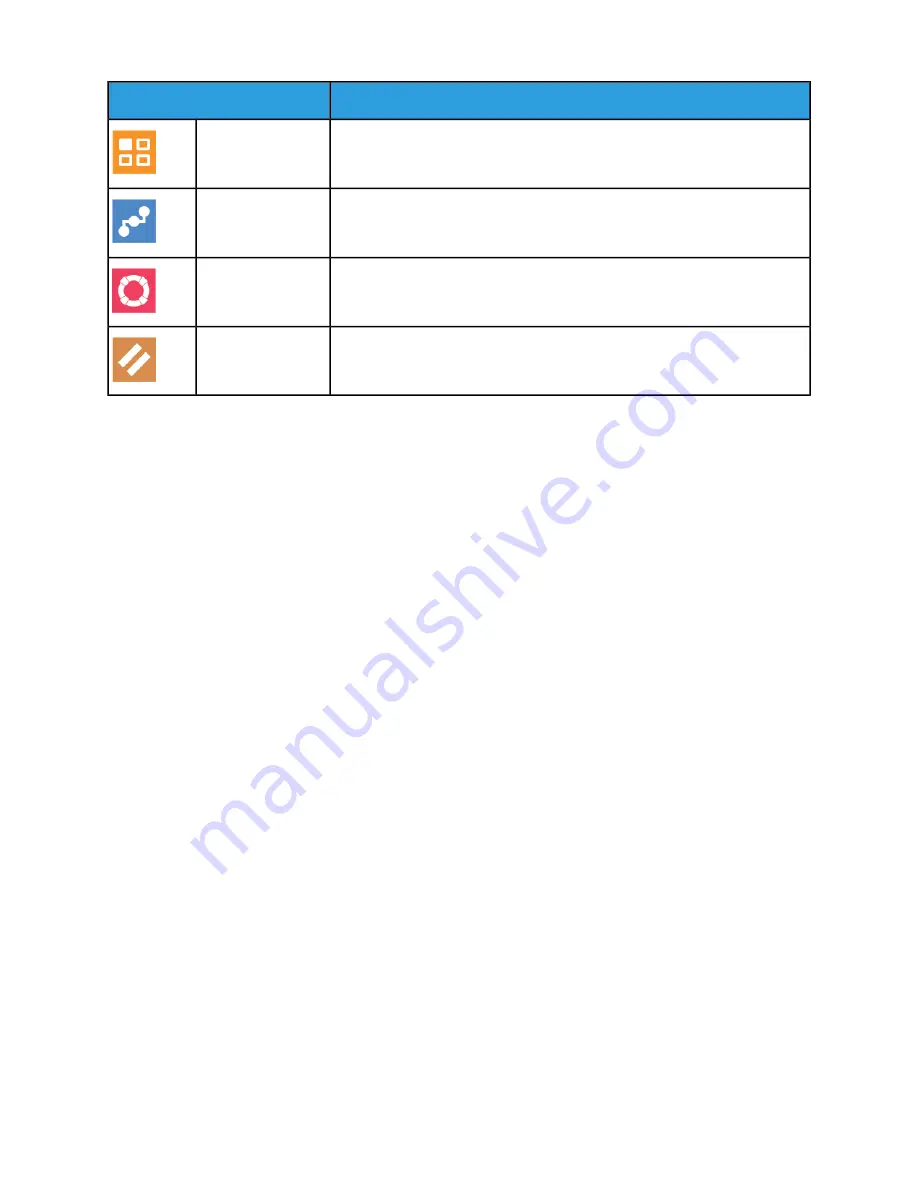
Use Apps to select settings for the Apps installed on your device.

Apps

Use the Connectivity option to configure network settings at the control
panel, or join another wireless network.

Connectivity

Use this option to access and print the Support Pages to assist with
troubleshooting errors.

Support

Use the Resets option to reset device settings and font, forms, and macros
to the factory-default settings.

Resets

For details on configuring the printer settings, refer to the System Administrator Guide at

www.xerox.com/office/VLB600_VLB610docs

.

About

The About option provides an overview of your device and current settings and status. You can access

Information Pages

and reports using this option.

Supply Status

You can check the status and percentage of life remaining for your printer supplies at the control panel
or from the Embedded Web Server. When printer supplies near their replacement time, warning alerts
appear on the control panel. You can customize the alerts that appear on the control panel and configure
email alert notifications.

To check the supplies status and set up alerts using the Embedded Web Server, refer to the System
Administrator Guide 
at

www.xerox.com/office/VLB600_VLB610docs

.

Checking the Supplies Status at the Control Panel

1. To view status information for the printer supplies, touch Device > Supplies.
2. To view details about a specific item, including part numbers for reordering, touch the specific item.
3. To return to the Supplies screen, touch X.
4. To return to the Device screen, touch the back arrow.

Customizing Supplies Alert Settings

1. To customize the alerts that appear for printer supplies, touch Device > Supplies > Alerts Setup.
2. To enable supplies alerts that appear on the control panel, touch the Enable Alerts toggle button.
3. To configure the printer to display an alert when an item reaches a specific usage percentage level,

touch the item, then select the percentage.

4. To customize the alerts for each supply item, or to enable or disable an alert, touch the toggle button.
5. To return to the Supplies screen, touch X.
6. To return to the Device screen, touch the back arrow.

4-5

Xerox

®

VersaaLink

®

B600/B610 Printer

User Guide

Xerox

®

Apps

Summary of Contents for VersaaLink B600

Page 1: ...Xerox VersaaLink B600 B610 Printer User Guide Version 1 0 May 2017 702P05530...

Page 2: ...poration in the United States and or other countries IBM and AIX are registered trademarks of International Business Machines Corporation in the United States and or other countries Microsoft Windows...

Page 3: ...ont View 2 1 Internal Parts 2 2 Rear View 2 2 Options 2 3 Control Panel 2 3 Power Options 2 5 Powering On the Printer or Exiting Low Power or Sleep Mode 2 5 Restarting Placing in Sleep Mode or Powerin...

Page 4: ...ng Google Cloud Print 2 22 Installing the Software 2 23 Operating System Requirements 2 23 Installing the Print Drivers for a Windows Network Printer 2 23 Installing the Print Drivers for a Windows US...

Page 5: ...ting Up Email Alerts 4 6 Billing and Usage Counters 4 6 Reset to Factory Defaults 4 6 Remote Services 4 7 Jobs 4 7 Jobs Overview 4 7 Managing Jobs 4 7 Pausing the Print Job with the Option to Delete I...

Page 6: ...rinting from a Linux Workstation 5 6 Mobile Printing Options 5 6 Printing with Wi Fi Direct 5 6 Printing with AirPrint 5 7 Printing from a MOPRIA Enabled Mobile Device 5 7 Printing Features 5 8 Managi...

Page 7: ...Paper Size at the Control Panel 5 18 6 Paper and Media 6 1 Paper and Media Overview 6 1 Supported Paper 6 1 Recommended Media 6 1 Ordering Paper 6 2 General Paper Loading Guidelines 6 2 Paper That Can...

Page 8: ...ation 7 6 Performing a Paper Registration Adjustment 7 7 Adjusting the Density 7 8 Refreshing the Toner 7 8 Transfer Voltage Adjustment 7 9 Adjusting the Fuser 7 9 Adjusting the Altitude 7 9 Performin...

Page 9: ...r Jams from the Fuser Area 8 13 Clearing Paper Jams from the Finisher 8 14 Clearing Paper Jams from the Mailbox 8 14 Troubleshooting Paper Jams 8 15 Multiple Sheets Pulled Together 8 15 Paper Misfeeds...

Page 10: ...nts for Optional 550 Sheet Feeder A 6 Clearance Requirements for Optional Cabinet with Casters A 7 Environmental Specifications A 7 Temperature A 7 Relative Humidity A 7 Elevation A 7 Electrical Speci...

Page 11: ...Material Safety Data Sheets B 7 C Recycling and Disposal C 1 All Countries C 1 North America C 1 European Union C 1 Domestic Household Environment C 1 Professional Business Environment C 2 Collection...

Page 12: ...Xerox VersaaLink B600 B610 Printer x User Guide Table of Contents...

Page 13: ...ct have been verified using Xerox materials only Note Unauthorized alterations which can include the addition of new functions or connection of external devices can affect the product certification Fo...

Page 14: ...ing fire and electrical codes regarding length of cord conductor size grounding and protection Do not use a ground adapter plug to connect the printer to an electrical outlet that does not have a grou...

Page 15: ...the printer promptly and contact your local Xerox representative Warning The metallic surfaces in the fuser area are hot Always use caution when removing paper jams from this area and avoid touching...

Page 16: ...se irritation and inflammation Do not attempt to disassemble the cartridge which can increase the risk of skin or eye contact Caution Use of non Xerox supplies is not recommended The Xerox Warranty Se...

Page 17: ...inter to cool for the specified time before touching the fuser Caution Indicates a mandatory action to take in order to avoid damage to the property Do not touch the part or area of the printer Do not...

Page 18: ...e information on Environment Health and Safety in relation to this Xerox product and supplies contact the following customer help lines United States and Canada 1 800 ASK XEROX 1 800 275 9376 Europe 4...

Page 19: ...ed Parts of the Printer Front View 5 1 Power Wake Button Tray 2 Optional 550 Sheet Feeder 2 6 Tray 1 Control Panel 7 3 Output Tray Extension Bypass Tray 4 Front Door 2 1 Xerox VersaaLink B600 B610 Pri...

Page 20: ...SB Port Type A Transfer Roller 2 7 Fuser USB Port Type A 8 3 Ethernet Connection Rear Door 4 9 Wireless Network Adapter Port Cover FDI Port 10 5 Power Connector Left Side Cover Access to optional Prod...

Page 21: ...print copy and scan features Provides access to reference materials Provides access to Tools and Setup menus Prompts you to load paper replace supplies and clear jams Displays errors and warnings Pro...

Page 22: ...but in a low power or Sleep mode pressing this button wakes the printer When the printer is powered on holding this button for 5 seconds powers off the printer This button also blinks to indicate the...

Page 23: ...Power or Sleep Mode To power on the printer or to exit Low Power mode or Sleep mode press the Power Wake button Note The Power Wake button is the only power button on the printer The printer exits Low...

Page 24: ...he touch screen goes dark and the Power Wake button flashes To power off the printer touch Power Off If the printer does not respond to a single press of the Power Wake button then press and hold the...

Page 25: ...are a gateway to the features and functions of your device Standard Apps are already installed on the device and appear on the Home screen Some Apps are installed as standard but hidden the first time...

Page 26: ...e The Job History Report provides retained information on previous print jobs including the date time job type document name paper size number of pages and results The status of a maximum of 20 jobs p...

Page 27: ...ontrol panel or on the Configuration Report Note To view the TCP IP address on the control panel wait until the printer has been on for 2 minutes If the TCP IP address is 0 0 0 0 or begins with 169 it...

Page 28: ...to the Embedded Web Server For more information refer to the System Administrator Guide at www xerox com office VLB600_VLB610docs Selecting a Location for the Printer 1 Select a dust free area with t...

Page 29: ...outers network hubs network switches modems Ethernet cables and USB cables are not included with your printer and must be purchased separately USB If you connect the printer to one computer and do not...

Page 30: ...e print driver Connecting to a Wired Network 1 Ensure that the printer is powered off 2 Attach a Category 5 or better Ethernet cable from the printer to the network or router socket Use an Ethernet sw...

Page 31: ...k To install the Wireless Network Adapter 1 Power off the printer 2 To remove the Wireless Network Adapter Port Cover press down on the latch then pull the cover away from the printer 3 Remove the pac...

Page 32: ...tion refer to Removing the Wireless Network Adapter 5 Power on the printer 6 Configure the Wi Fi settings from the front panel or the embedded web server if connected via ethernet For more information...

Page 33: ...the printer and push the release lever toward the front of the printer Hold the release lever in this position and gently pull the Wireless Network Adapter away from the printer Note Do not use force...

Page 34: ...back of the printer until it latches into place 6 Place the left side cover into place then slide it toward the front of the printer 7 To latch the cover swing the handle toward the front of the prin...

Page 35: ...ng to a Network with a Wi Fi Protected Setup Wi Fi Protected Setup WPS is a network standard for setting up a wireless network The WPS protocols enable you to set up devices in a secure wireless netwo...

Page 36: ...Off to On touch the Wi Fi toggle button b To activate your Wi Fi setting changes press the Home button c At the prompt touch Restart Now d After the printer restarts touch Device Connectivity Wi Fi 4...

Page 37: ...nicates with the wireless router to resolve setup and configuration information When the printer has the correct information it connects to the router and restarts with the proper setup and configurat...

Page 38: ...connection attempt stops 11 After the printer restarts wait 20 seconds then to get the network information that includes the IP address print a Configuration Report For more information refer to Prin...

Page 39: ...nter Setup Before installing the printer software verify that the printer is set up correctly Setup includes enabling the optional features and assigning an IP address for the Ethernet network connect...

Page 40: ...click Home Connectivity Note If this feature does not appear log in as a system administrator 3 For Mobile Printing click AirPrint 4 To enable AirPrint click the Enable toggle button Note AirPrint is...

Page 41: ...printer name appears in this format Model name MAC address Installing the Software Before installing driver software verify that the printer is plugged in powered on connected correctly and has a val...

Page 42: ...le click the Setup exe installer file 2 Click Install Software 3 At the License Agreement select I Agree then click Next 4 To install the printer support software select Software then click Next 5 In...

Page 43: ...open System Preferences 2 Click Printers Scanners The list of printers appears on the left of the window 3 For the list of printers click the Plus icon 4 At the top of the window click the Default ico...

Page 44: ...printer you want to use does not appear in the list click the Cancel button Add the WSD printer manually using the Add Printer Wizard 4 Click Close Using the Add Printer Wizard to Install a WSD Print...

Page 45: ...610support Technical support information for your printer including online technical support Online Support Assistant and print driver downloads Print from the control panel For details refer to Infor...

Page 46: ...Xerox VersaaLink B600 B610 Printer 2 28 User Guide Getting Started...

Page 47: ...ize the device to meet specific user needs You can configure your personal Home page to hide or show only the apps you use Each of the feature lists can be tailored to your job requirements Default se...

Page 48: ...Screen 1 At the printer control panel press the Home button 2 Touch Customize 3 Touch and hold the required app 4 Drag the app to the new location 5 Release the app 6 Touch Done 7 Verify that the apps...

Page 49: ...e required feature touch the Eye icon To signify a feature is visible the Eye icon appears with no line across it 6 To reorder the menu features touch and drag the features into the appropriate order...

Page 50: ...sponds with the preset that you want to delete 6 At the prompt touch Delete 7 Touch Done Removing App Customization To remove the current App customization settings 1 At the printer control panel pres...

Page 51: ...res or capabilities for your device The Xerox App Gallery provides direct access to Apps that can improve your pro ductivity simplify workflows and enhance your user experience The Xerox App Gallery e...

Page 52: ...formation and instructions on using the Xerox App Gallery refer to the Xerox App Gallery User Guide available at www xerox com XeroxAppGalleryDocumentation 4 Touch the Enter your email address Enter a...

Page 53: ...ery 3 Enter your User Name using the touch screen keypad then touch Enter 4 Enter your Password using the touch screen keypad then touch Enter 5 Touch Log In The Xerox App Gallery appears 6 Touch the...

Page 54: ...software updates and configure update settings Software Update Use the Notifications option to see details of current alerts or faults on the device A History button displays fault codes and the date...

Page 55: ...appear on the control panel and configure email alert notifications To check the supplies status and set up alerts using the Embedded Web Server refer to the System Administrator Guide at www xerox c...

Page 56: ...Impression Counters This option provides the number of impressions made by the printer The number of impressions cannot equal the number of sheets counted depending on the printer setup If your print...

Page 57: ...iew job progress or job details for a selected job From the Jobs window in the Embedded Web Server you can view a list of active and completed print jobs For more information refer to Managing Jobs Us...

Page 58: ...s about a job touch the job 5 To return to the Home screen press the Home button Printing a Job Held for Resources 1 At the printer control panel press the Home button 2 Touch Jobs 3 From the jobs lis...

Page 59: ...ob touch the Trash icon then at the prompt touch Delete To delete all the jobs in the folder touch Delete All Note After a Secure Print job is printed it is deleted automatically 7 To return to the Ho...

Page 60: ...ese features A Sample Set job appears in a folder named after the user ID associated with the print job A Sample Set job does not use a passcode Any user can print or delete a Sample Set job A Sample...

Page 61: ...he printer then press Enter or Return 2 In the Embedded Web Server click Jobs 3 Click the job name 4 Do one of the following To pause the print job click Pause To resume the print job click Resume To...

Page 62: ...Flash drive into the USB memory port on the printer 2 At the USB Drive has been detected screen touch Print from USB Note If this feature does not appear enable the feature or contact the system admin...

Page 63: ...0_VLB610docs 3 Add files using the Browse USB screen To print a group of print ready files for the USB drive or folder touch the Select All icon Verify that the files are selected To print a specific...

Page 64: ...Xerox VersaaLink B600 B610 Printer 4 14 User Guide Xerox Apps...

Page 65: ...size color and type 3 Access the print settings in your software application For most software applications press CTRL P for Windows or CMD P for Macintosh 4 Select your printer 5 To access the print...

Page 66: ...ion for which you need information Windows Printing Options Selecting Printing Options for an Individual Job for Windows To use special printing options for a particular job you can change the Printin...

Page 67: ...right click the Start icon Control Panel Devices and Printers Note If you are using a custom Start menu application it can change the navigation path to your list of printers 2 In the list of printers...

Page 68: ...Presets Save Current Settings as Preset 5 Type a name for the printing options To save the set of options in the Presets list click OK 6 To print using these options select the name from the Presets...

Page 69: ...file downloads 8 To install the Xerox Print Driver package a Open the package with your OS package manager b To install using a command line utility change to the directory where you downloaded the f...

Page 70: ...files 3 Follow the instructions that are included with the PPD file Adding the Printer 1 Verify that the CUPS Common UNIX Printing System daemon is running 2 Open a Web browser and type http localhost...

Page 71: ...A is a software feature that enables users to print from mobile devices without requiring a print driver You can use MOPRIA to print from your mobile device to MOPRIA enabled printers Note MOPRIA and...

Page 72: ...the Home button Viewing Printing or Deleting Jobs 1 At the printer control panel press the Home button 2 To view a list of active and completed jobs touch Jobs 3 To view a list of specific job types...

Page 73: ...applications press CTRL P for Windows or CMD P for Macintosh 2 Select your printer then open the print driver For Windows click Printer Properties Depending on your application the title of the button...

Page 74: ...are in the Print window for Preview To view more printing options click Show Details The following scaling options are available Automatically Scale scales the document to fit the selected Output Pape...

Page 75: ...esult for documents with portrait and landscape orientations respectively Note 2 Sided Printing is part of the Earth Smart settings To change your default print driver settings see Setting Default Pri...

Page 76: ...on the Preview list To print a border around each page select Page Borders Printing Booklets With 2 sided printing you can print a document in the form of a small booklet You can create booklets from...

Page 77: ...e prints are delivered to the selected mailbox bin Using Special Pages The Special Pages options control how covers inserts and exception pages are added to your printed document For Windows the Speci...

Page 78: ...ages in the job You can specify differences such as page size page type and page color You can also change the side of the paper on which to print as your job requires A print job can contain multiple...

Page 79: ...cture To locate the picture click the Browse icon 5 Specify the scaling angle and position of the watermark Select the scaling option that specifies the size of the picture in relation to the original...

Page 80: ...180 degrees and with the long bottom side up Note For Macintosh to print portrait text and images in landscape orientation clear the Auto Rotate check box Printing Banner Pages To enable or disable B...

Page 81: ...en click OK 6 In the Print dialog box click Print Printing on Custom Paper Size from Macintosh 1 Load the custom size paper 2 In the application click File Print 3 From the Paper Size list select the...

Page 82: ...and width of the new custom paper size 6 Click the arrow for the Non Printable Area field then select the printer from the list Or for User Defined margins set the top bottom right and left margins 7...

Page 83: ...e printing If you have the same size paper loaded in more than one tray ensure that the proper tray is selected in the print driver Store your paper and other media properly for optimum print quality...

Page 84: ...olded or wrinkled Paper with cutouts or perforations Stapled paper Envelopes with windows metal clasps side seams or adhesives with release strips Padded envelopes Plastic media Transparencies Caution...

Page 85: ...you are ready to use it Keep unused media in the bag and reseal it for protection Supported Paper Types and Weights Weights Paper Types Trays 60 80 g m Recycled Tray 1 and Trays 2 5 Bypass Tray 60 90...

Page 86: ...Folio 216 x 330 mm 8 5 x 13 in A5 148 x 210 mm 5 8 x 8 3 in A4 210 x 297 mm 8 3 x 11 7 in B5 ISO 176 x 250 mm 6 9 x 9 8 in Tray 1 and Trays 2 5 Letter 216 x 279 mm 8 5 x 11 in A4 210 x 297 mm 8 3 x 11...

Page 87: ...lowing options are available Fully Adjustable If you select this paper setting you can change the paper size type and color when you load paper into the tray Dedicated If you select this paper setting...

Page 88: ...ze or type 2 For larger paper sizes pull out then open the Bypass Tray extension 3 Move the width guides to the edges of the tray 4 Flex the sheets back and forth and fan them then align the edges of...

Page 89: ...Do not load paper above the maximum fill line on the width guides Overfilling the tray can cause the printer to jam Load hole punched paper with the holes to the left For 1 sided printing load letter...

Page 90: ...d color are correct touch OK b If the paper type size or color are incorrect change the settings To select a paper type touch the current paper type then from the list select the type To select a shee...

Page 91: ...e tray until it stops Lift the front of the tray slightly then pull it out 2 Remove all paper from the tray 3 To compress the tray for shorter paper hold the back of the tray with one hand With the ot...

Page 92: ...e tray before inserting it back into the printer Loading Paper in Trays 1 5 To load paper in Tray 1 and optional Trays 2 5 1 To remove the tray from the printer pull out the tray until it stops Lift t...

Page 93: ...ibility of jams 5 Load paper into the tray with the print side face up Load hole punched paper with the holes to the left Load label sheets in the tray face up For 1 sided printing load letterhead pap...

Page 94: ...er jams do not remove the paper cover while printing is in progress 8 If the tray is extended for Legal size paper the tray protrudes when it is fully inserted into the printer You can place a cover o...

Page 95: ...tton b Touch Device Paper Trays c Touch the appropriate tray d To dedicate the tray for a paper size type or color touch Tray Mode then touch Dedicated To select a paper size touch the current size se...

Page 96: ...er type size and color are correct touch OK b If the paper type size or color are incorrect change the settings To select a paper type touch the current paper type then from the list select the type T...

Page 97: ...g touch OK 7 To return to the Home screen press the Home button Configuring the Tray Mode for Trays 1 5 1 At the printer control panel press the Home button 2 Touch Device Paper Trays 3 Touch the desi...

Page 98: ...ct print quality and cause wrinkling Excessive moisture can cause the envelopes to seal before or during printing Remove air bubbles from the envelopes before loading them into the tray by setting a h...

Page 99: ...e and can cause a jam or misfeed Load envelopes up to 16 5 mm 65 in in height This is approximately 10 20 envelopes depending on brand size and texture If you do not load envelopes in the Bypass Tray...

Page 100: ...ps open and down and the bottom of the envelope going into the printer Load envelopes with the print side up flaps closed and down and flaps going into the printer For C5 envelopes perform one of the...

Page 101: ...If the paper type size and color are correct touch OK b If the paper type size or color are incorrect change the settings To select a paper type touch the current paper type then from the list select...

Page 102: ...the width guides until they touch the edges of the envelopes 6 Slide the tray all the way into the printer 7 If the Tray Mode is set to Fully Adjustable the printer prompts you to set the paper type s...

Page 103: ...abels only Store unused labels flat in their original packaging Leave the label sheets inside the original packaging until ready to use Return any unused label sheets to the original packaging and res...

Page 104: ...printer prompts you to verify the type size and color of the label sheets a If the type size and color are correct touch OK b If the type size or color are incorrect change the settings To select the...

Page 105: ...ength and width guides 3 Load the label sheets in the tray face up Note Do not load paper above the maximum fill line Overfilling can cause paper jams 4 Slide the tray back into the printer 5 Push the...

Page 106: ...ize touch the current size setting then from the list select the size To select the paper type touch the current paper type then from the list select Labels To select a different color touch the curre...

Page 107: ...with screws You cannot maintain or service any parts that are behind these covers and guards Do not attempt any maintenance procedure that is not described in the documentation supplied with your prin...

Page 108: ...immediately Power off the printer immediately and wait 40 minutes for the fuser to cool Try to remove the jam after the printer has cooled If you spill any toner in the printer remove the toner using...

Page 109: ...e printer Place the removed Toner Cartridge on a level surface 3 Caution Do not expose the drum cartridge to direct sunlight or strong indoor fluorescent lighting Do not touch or scratch the green sur...

Page 110: ...idge Replacement Kit 6 In necessary install a new cleaning pad onto the cleaning tool 7 To remove any debris or toner dust set the cleaning tool on the LED Lens Block Slide the cleaning tool until it...

Page 111: ...nto its storage location inside the Front Door 9 Slide the Drum Cartridge into the printer until it stops 10 Slide the Toner Cartridge into the printer until it stops 7 5 Xerox VersaaLink B600 B610 Pr...

Page 112: ...er tray for the registration print a Touch Paper Supply b Touch the desired tray 5 If your printer has automatic 2 sided printing select the sides that you want to optimize To select a sample registra...

Page 113: ...n select the source paper tray a Touch Paper Supply b Touch the desired tray 5 Using the chart printed in Verifying Paper Registration select the side for registration a For adjusting Side 1 touch Adj...

Page 114: ...er control panel press the Home button 2 Touch Device Support Adjust Density Density Level 3 To adjust the density level move the slider 4 To save your setting touch OK 5 To return to the Home screen...

Page 115: ...vice Support Fuser Temperature Adjustment 3 To select the paper type touch Paper Type then touch the name of the paper type in the list 4 To increase or decrease the fusing temperature touch the arrow...

Page 116: ...y toner designed and manufactured under strict quality controls by Xerox for specific use with this printer Routine Maintenance Items Routine maintenance items are printer parts that have a limited li...

Page 117: ...h Device About Information Pages 3 Touch Supplies Usage Report 4 To return to the Home screen press the Home button Toner Cartridges General Precautions Warning When replacing a toner cartridge be car...

Page 118: ...You can enable Remote Services to send billing meter readings to Xerox automatically so that you do not have to collect the readings manually For more information refer to the System Administrator Gu...

Page 119: ...rinter If the optional 550 Sheet Feeder is not fixed to the printer securely it could fall to the ground and cause injury Follow these instructions when moving the printer 1 Power off the printer then...

Page 120: ...y 4 Remove any paper or other media from the Output Tray 5 If the Output Tray Extension is extended close it 6 Remove any paper from Tray 1 then close the tray Xerox VersaaLink B600 B610 Printer 7 14...

Page 121: ...packing material and boxes or a Xerox Repackaging Kit Failure to repackage the printer properly for shipment can result in damage not covered by the Xerox Warranty Service Agreement or Total Satisfact...

Page 122: ...Xerox VersaaLink B600 B610 Printer 7 16 User Guide Maintenance...

Page 123: ...er cord securely into the outlet The power cord is not plugged into the outlet correctly Power off the printer then unplug the power cord and wait 30 seconds Plug the power cord into the outlet se cur...

Page 124: ...o save power Printer Does Not Print Solutions Probable Causes On the control panel press the Power Wake button The printer is in Power Saver mode If the Status LED is blinking amber follow the instruc...

Page 125: ...Configuration Report For more in formation refer to Printing the Configuration Re port 4 If the TCP IP address is 0 0 0 0 the printer needs more time to acquire an IP address from the DHCP server Wai...

Page 126: ...ed in the print driver 2 Access the page setup or printer settings of the application from which you are printing 3 Set the paper source to match the tray selected in the print driver or set the paper...

Page 127: ...s located If the paper lift plate at the back of the tray is not locked down replace the tray Condensation Has Formed Inside the Printer Moisture can condense in the printer when room humidity exceeds...

Page 128: ...s This can permanently damage the printer The following illustration shows where paper jams can occur along the paper path 4 1 Bypass Tray Tray 2 2 5 Optional Mailbox or Finisher Tray 1 3 Fuser Minimi...

Page 129: ...ays at the control panel select the correct paper type and size Before printing select the correct type and size paper in the print driver Store paper in a dry location The following can cause paper j...

Page 130: ...4 Remove the jammed paper 5 Insert Tray 1 into the printer then push it all the way in Note If the tray is extended for legal size paper the tray protrudes when it is inserted into the printer If remo...

Page 131: ...rent setting then select a new setting When finished touch OK 8 To return to the Home menu press the Home button Clearing Paper Jams from the Tray 1 Area To resolve the error displayed on the control...

Page 132: ...is extended for legal size paper the tray protrudes when it is inserted into the printer If removed in a previous step replace the tray cover 6 Insert the Bypass Tray completely into the printer 7 Wh...

Page 133: ...om the Trays 2 5 Areas To resolve the error displayed on the control panel clear all paper from the paper path 1 For the tray reported on the Touch Screen Display pull out the tray until it stops 2 To...

Page 134: ...e tray protrudes when it is inserted into the printer If removed in a previous step replace the tray cover 6 When paper trays are set to Fully Adjustable you are prompted to verify or change the paper...

Page 135: ...nel clear all paper from the paper path 1 Lift the rear door release and pull open the door 2 To open the paper guide on the top of the fuser lift the paper guide tab 3 Remove any jammed paper from th...

Page 136: ...or Open the door then remove any jammed paper 2 Close the jam access door To clear any remaining errors follow the instructions on the control panel Clearing Paper Jams from the Mailbox To resolve the...

Page 137: ...paper For more information refer to Supported Paper Using unsupported paper With a clean lint free cloth moistened with water wipe the feed rollers until they are clean For more informa tion refer to...

Page 138: ...tray face up For more information refer to Labels Do not use any sheet where labels are missing curled or pulled away from the backing sheet Labels are missing curled or pulled away from the backing...

Page 139: ...ervice Agreement or Xerox Total Satisfaction Guarantee does not cover damage caused by using unsupported paper or specialty media The Xerox Total Satisfaction Guarantee is available in the United Stat...

Page 140: ...tray ensure that the proper tray is selected in the print driver Store your paper and other media properly for optimum print quality For more information refer to Paper Storage Guidelines Solving Prin...

Page 141: ...o Lightweight Card The output has stains on the back side stock In the print driver Printing Options tab select Paper then change the Other Type setting Verify that the paper is the correct size type...

Page 142: ...e paper is the correct size type and weight Change the paper settings to match the pa per in the tray Ensure that the humidity in the room is within spe cifications For more information refer to Relat...

Page 143: ...er Change the Paper Type settings in the print driver In the print driver Printing Options tab select Paper then change the Other Type setting Check if the crease is within 30 mm 1 2 in of the four ed...

Page 144: ...on the prints 1 Print the Repeating Defects pages At the control panel touch Device Support Support Pages Repeating Defects 2 To determine the cause of the problem measure the distance between the pr...

Page 145: ...n the most recent printer errors For more information refer to Printing Information Pages Printing the Error History Report 1 At the printer control panel press the Home button 2 To print the Error Hi...

Page 146: ...the Home screen press the Home button More Information about Your Printer To obtain more information about your printer refer to More Information Xerox VersaaLink B600 B610 Printer 8 24 User Guide Tr...

Page 147: ...roll down the page and select Office Products 3 From the Office Products page scroll down the page to find your device 4 From your device listing select the PDF downloads link 5 From the PDF downloads...

Page 148: ...eet Feeder 550 sheets up to 4 feeders Optional High Capacity Feeder 2000 sheets Optional Finisher 500 sheets Optional Mailbox 400 sheets Maximum Print Size Legal 216 x 356 mm 8 5 x 14 in 2 Sided Print...

Page 149: ...Adapter IEEE 802 11 b g n compliant and supports 2 4 GHz and 5 GHz frequencies 550 Sheet Feeder depending on configuration up to 4 feeders 2000 Sheet High Capacity Feeder with Casters Finisher 4 Bin M...

Page 150: ...Width 42 7 cm 16 8 in Depth 46 5 cm 18 3 in Height 43 9 cm 17 3 in Weight 22 3 kg 49 2 lb Base Configuration with Optional Finisher Width 42 7 cm 16 8 in Depth 46 5 cm 18 3 in Height 68 7 cm 27 1 in...

Page 151: ...Optional 4 Bin Mailbox Width 42 7 cm 16 8 in Depth 46 5 cm 18 3 in Height 68 7 cm 27 1 in Clearance Requirements Clearance Requirements for Base Configuration A 5 Xerox VersaaLink B600 B610 Printer Us...

Page 152: ...e Configuration with Optional Finisher Clearance Requirements for Base Configuration with Optional 4 Bin Mailbox Clearance Requirements for Optional 550 Sheet Feeder Xerox VersaaLink B600 B610 Printer...

Page 153: ...midity Operating Humidity Range 15 85 Optimal Humidity Range 20 70 relative humidity at 28 C 82 F Note Under extreme environmental conditions such as 10 C and 85 relative humidity printing defects can...

Page 154: ...d Frequency Power Supply Voltage 12 A 50 60 Hz 3 Hz 110 127 VAC 10 99 0 139 7 VAC 8 A 50 60 Hz 3 Hz 220 240 VAC 10 198 264 VAC Power Consumption Power Saver Mode Sleep 0 9 W Ready 66 W Continuous prin...

Page 155: ...ode The fastest print modes are Standard and Enhanced Paper size Letter 8 5 x 11 in size prints slightly faster than A4 210 x 297 mm size Larger sizes reduce print speeds Paper type and weights For fa...

Page 156: ...Xerox VersaaLink B600 B610 Printer A 10 User Guide Specifications...

Page 157: ...Imaging Equipment Program is a team effort between United States European Union Japanese governments and the office equipment industry to promote energy efficient copiers printers fax multifunction p...

Page 158: ...User Guide at www xerox com office VLB600_VLB610docs For further assistance contact your System Administrator or refer to the System Administrator Guide To enable Auto Power Off mode contact your Sys...

Page 159: ...ustry Canada RSS 210 and European Council Directive 2014 53 EU Radio Frequency RF output power of this device will not exceed 20 dBm in either frequency band Operation of this device is subject to the...

Page 160: ...ienced radio TV technician for help Changes or modifications to this equipment not approved by Xerox can void the authority of the user to operate this equipment Warning To ensure compliance with Part...

Page 161: ...model VersaLink B600 B610 is in compliance with Directive 2014 53 EU The full text of the EU declaration of conformity can found at the following internet address www xerox com environment_europe Thi...

Page 162: ...vironmental Label This label distinguishes it as a device that satisfies Blue Angel criteria for environmental acceptability in terms of device design manufacture and operation For more information go...

Page 163: ...60950 1 2005 A1 2009 A2 2013 EN 60950 1 2006 A11 2009 A1 2010 A12 2011 A2 2013 Underwriters Laboratories Inc Europe Material Safety Data Sheets For Material Safety Data information regarding your prin...

Page 164: ...Xerox VersaaLink B600 B610 Printer B 8 User Guide Regulatory Information...

Page 165: ...aste perchlorate North America Xerox operates an equipment take back and reuse recycle program Contact your Xerox representative 1 800 ASK XEROX to determine if this Xerox product is part of the progr...

Page 166: ...nd used batteries please take them to applicable collection points in accordance with your national legislation and the Directive 2002 96 EC and 2006 66 EC By disposing of these products and batteries...

Page 167: ...only be replaced by a manufacturer approved service facility Other Countries Please contact your local waste management authority to request disposal guidance C 3 Xerox VersaaLink B600 B610 Printer U...

Page 168: ...Xerox VersaaLink B600 B610 Printer C 4 User Guide Recycling and Disposal...

Page 169: ......

Page 170: ......

Reviews: