background image

2

2-27

Preparing to work with Command WorkStation or Command WorkStation LE

When you select the Local Printer option in Command WorkStation, you can print 
the following pages:

Archive Log

—Lists all jobs displayed in the Archive panel.

Queues

—Lists all jobs displayed in the Active Jobs window.

5.

Click Print (Command WorkStation) or OK (Command WorkStation LE).

EX7750 information pages printed with the Print Pages command appear in the 
EX7750 Job Log with the user name Operator, even if you logged in as Administrator.
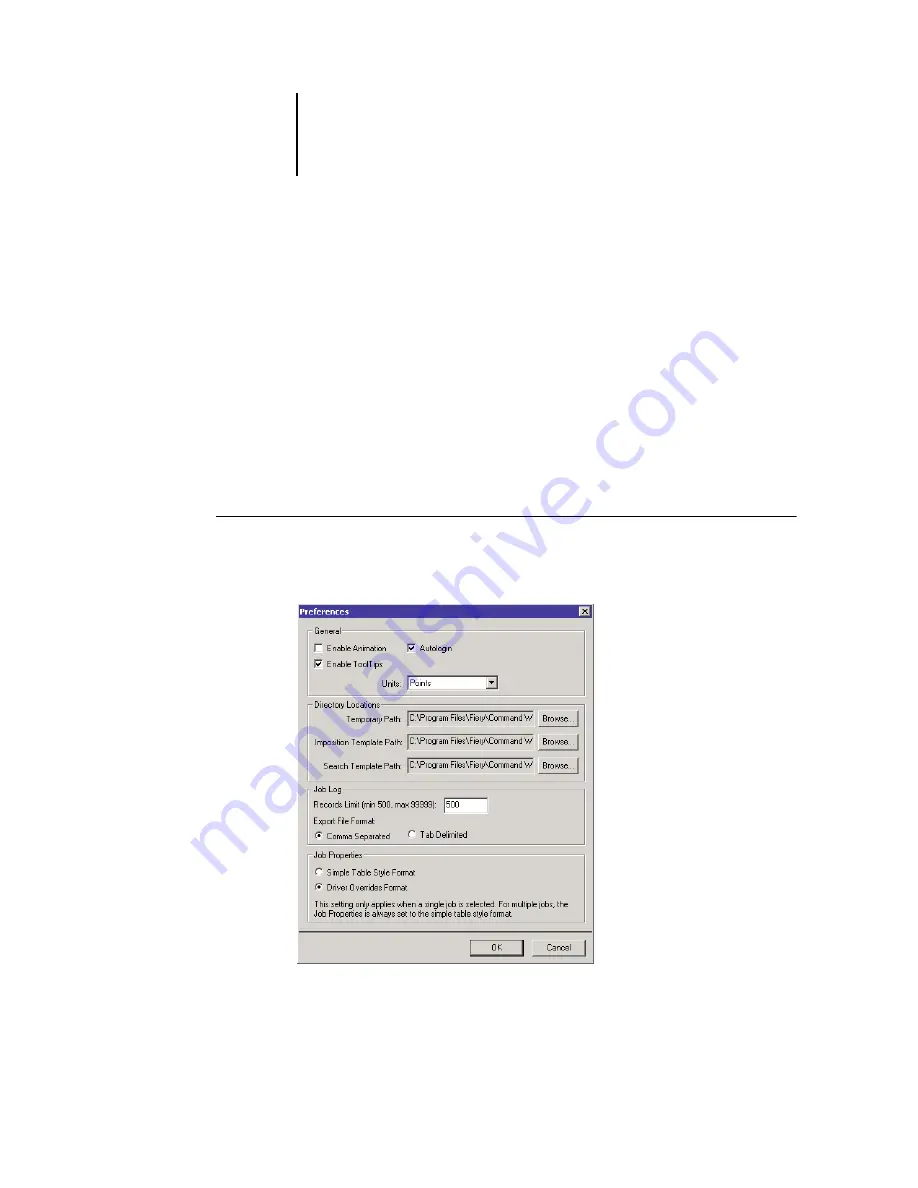
Setting preferences

The Preferences dialog box enables you to control application settings.

T

O


SET


PREFERENCES


FOR

 C

OMMAND

 W

ORK

S

TATION

*

1.

Choose Preferences from the Edit menu.

The Preferences dialog box appears.

Summary of Contents for Phaser EX7750

Page 1: ...OB ANAGEMENT UIDE...

Page 2: ...Guide describes the printing features of the Xerox EX7750 for users who send jobs from their computers The Color Guide provides information about managing the color output of the Xerox EX7750 It expla...

Page 3: ...roteus RIP While Print Splash and Spot On are registered trademarks of Electronics for Imaging Inc in the U S Patent and Trademark Office and or certain other foreign jurisdictions Bestcolor is a regi...

Page 4: ...d by turning the equipment off and on the user is encouraged to try to correct the interference by one or more of the following measures Reorient or relocate the receiving antenna Increase the separat...

Page 5: ...ight or license of any kind is granted You receive no rights or license under any patents copyrights trade secrets trademarks whether registered or unregistered or other intellectual property You agre...

Page 6: ...NT SHALL EFI AND ITS SUPPLIERS BE LIABLE FOR COST OF PROCUREMENT OF SUBSTITUTE SOFTWARE PRODUCTS OR SERVICES LOST PROFITS OR DATA THIRD PARTY CLAIMS OR ANY SPECIAL INDIRECT RELIANCE CONSEQUENTIAL EXEM...

Page 7: ...eement will be governed in all respects by the laws of the State of California exclusively as such laws apply to contracts between California residents performed entirely within California The United...

Page 8: ...This page is intentionally blank...

Page 9: ...sing and printing 1 3 Visualizing job flow 1 4 Communicating with users 1 5 What the operator should check 1 7 Overview of the job management utilities 1 8 Command WorkStation 1 8 Command WorkStation...

Page 10: ...references 2 27 Correcting tray alignment 2 30 Managing EX7750 fonts 2 31 Chapter 3 Using Command WorkStation and Command WorkStation LE Starting up and logging in 3 1 Logging in to the EX7750 3 2 Acc...

Page 11: ...ing and Manipulating Jobs Previewing jobs 4 1 Displaying thumbnail previews 4 1 Preview window controls 4 2 Displaying full screen previews 4 3 Editing and merging jobs 4 6 Editing jobs 4 6 Merging jo...

Page 12: ...ging templates 6 24 Tips for using the Imposition feature of DocBuilder Pro 6 26 Page level operations 6 26 Saving imposed jobs 6 26 Chapter 7 Fiery Spooler Tracking and managing jobs with Fiery Spool...

Page 13: ...own the EX7750 8 6 Appendix A Basics of Imposition Printing books with the Imposition feature of DocBuilder Pro A 1 Basics of imposition layout A 1 Printer s marks A 4 Additional sheets A 6 Binding me...

Page 14: ...Error messages C 1 Troubleshooting C 2 Command WorkStation or Command WorkStation LE does not respond C 2 Unexpected printing results C 3 Clearing the server C 4 Users are unable to connect to the EX...

Page 15: ...mmand WorkStation LE are denoted by a dagger In cases where the two applications are nearly identical only Command WorkStation illustrations are shown About this manual This manual is organized as fol...

Page 16: ...s messages and icons you might see and also explains how to start up and shut down the EX7750 if you have the Fiery Advanced Controller Interface FACI installed Appendix A provides an overview of the...

Page 17: ...at describe the graphics sampled images and text that should appear on each page of a document and the printer options that should be used in printing such as media or finishing options Spool Write to...

Page 18: ...This page is intentionally blank...

Page 19: ...environment controls the entire job flow and all printing Print jobs arriving from remote users are spooled to the EX7750 hard disk and stored until the operator decides it is time to print them Addi...

Page 20: ...l jobs sent by remote users are spooled and held on the EX7750 in preparation for job management by the operator Establish communication between users and the operator The operator and remote users mu...

Page 21: ...age data associated with each dot is rendered on the printer The raster data tells the printer whether or not to apply toner to each position on the page Printing After processing the job typically mo...

Page 22: ...tus flags you may see in the Command WorkStation or Command WorkStation LE Active Jobs window Boldface items represent commands you can issue from a job management utility to release held jobs Printed...

Page 23: ...he job is released for processing and then held in processed held status indefinitely To release the job for immediate printing you must issue the Print command A raster copy of the original job remai...

Page 24: ...nd standard tray media configurations Printing information Duration for jobs to be held on the EX7750 before deletion Instructions for setting up the printer on client computers Sources of PostScript...

Page 25: ...d by users by checking job ticket information To display user defined print options choose Properties in Command WorkStation or Command WorkStation LE see Viewing and overriding print settings on page...

Page 26: ...r defined print option settings Editing and merging job files Tracking job activity through the Job Log Command WorkStation The most powerful of the job management utilities Command WorkStation can be...

Page 27: ...formation about Command WorkStation LE see Chapters 2 and 3 Fiery Spooler Fiery Spooler must be installed on a networked Mac OS computer and can only be used on that computer Fiery Spooler offers job...

Page 28: ...This page is intentionally blank...

Page 29: ...g application preferences and managing EX7750 fonts NOTE Unless otherwise specified information in this chapter applies to both Command WorkStation and Command WorkStation LE Sections that apply exclu...

Page 30: ...ons show the components of Command WorkStation and Command WorkStation LE 1 Menu bar see page 2 14 2 Job status indicators see page 2 10 3 Action buttons see page 2 11 4 Active Jobs window see page 2...

Page 31: ...ng sections describe each component in Command WorkStation and Command WorkStation LE 1 Action buttons see page 2 11 2 Active Jobs window see page 2 4 3 Jobs window see page 2 5 4 Activity Monitor see...

Page 32: ...tored The Active Jobs window is always displayed You cannot hide or drag it to a different location By issuing job management commands you release held jobs in the window for processing and printing c...

Page 33: ...750 The window is divided into four layered panels Click the selection tabs at the bottom of the window to move between different panels The following illustration shows the Jobs window for Command Wo...

Page 34: ...limit determined by the administrator in EX7750 Setup is reached When the first job over the limit is printed the oldest job is deleted from the Printed Jobs list NOTE The Printed Jobs panel does not...

Page 35: ...e FreeForm panel is not available if you logged in as Guest For information about working with FreeForm jobs and the FreeForm panel see Printing FreeForm variable data documents on page 3 24 Job Log p...

Page 36: ...rs view In Command WorkStation the All Servers view of the Activity Monitor summarizes the activity on all connected EX7750 servers Server Name Each EX7750 appears in a Server Name bar Click the bar t...

Page 37: ...mages provide visual indications of the job activity Jobs being held waiting to process or waiting to print are not displayed Four sections appear for a selected server Click the title bar for each se...

Page 38: ...s to job flow on the EX7750 see Understanding job flow on page 1 2 In Command WorkStation a key for the job status indicators is displayed below the menu bar The color coded job status indicators iden...

Page 39: ...e on page 2 14 TO ISSUE AN ACTION BUTTON COMMAND 1 Select a job in the Active Jobs window or the Jobs window 2 Click the desired Action button When a command is unavailable in the current context its...

Page 40: ...jobs on the specified EX7750 servers are displayed Customizing the graphical interface Command WorkStation and Command WorkStation LE offer you the flexibility of showing hiding rearranging and docki...

Page 41: ...window to different locations These components always appear in the Command WorkStation or Command WorkStation LE window TO SHOW OR HIDE A COMPONENT Choose the command associated with the component f...

Page 42: ...ion or Command WorkStation LE window When one or more jobs are selected you can choose job management commands from context sensitive menus In addition you can issue some job management commands by cl...

Page 43: ...applications continue to run in the background Show All Maximizes and brings to the foreground all applications that are currently running on the computer Quit CWS LE Exits the Command WorkStation LE...

Page 44: ...s window Printed Jobs panel FreeForm panel or Archive panel You cannot delete jobs currently spooling processing or waiting to print Duplicate Duplicates the selected held job in the Active Jobs windo...

Page 45: ...in the Printed Jobs panel FreeForm panel or Archive panel Archive Archives the selected held job in the Active Jobs window moving it to the Archive panel Send To Sends the selected held job in the Ac...

Page 46: ...ting down the EX7750 hard disk drive This command is available only if you are logged in as Administrator NOTE After you restart the EX7750 you may need to log in to the EX7750 again to reestablish th...

Page 47: ...bout the EX7750 to the local printer Archive Log Queues Suspend Printing Suspends or pauses printing on the EX7750 Resume Printing Resumes printing on the EX7750 Window Layouts Default Displays the fo...

Page 48: ...at the Printed Jobs window is displayed Activity Monitor Switches the Activity Monitor on or off A check mark next to the command indicates the Activity Monitor is displayed Action Buttons Switches th...

Page 49: ...dow For details on how to select jobs see page 3 9 2 Right click the selected job Command WorkStation or Control click the selected job Command WorkStation LE When multiple jobs are selected you can r...

Page 50: ...multiple EX7750 servers simultaneously In Command WorkStation LE you can maintain a connection to one EX7750 server at a time TO CONNECT TO THE EX7750 1 Choose Log in Log out from the Server menu The...

Page 51: ...the connection 4 Select the Administrator Operator or Guest option and then click Log In Command WorkStation or Login Command WorkStation LE NOTE If you are an Administrator to use Command WorkStatio...

Page 52: ...nformation for setting up or troubleshooting the EX7750 TO PRINT EX7750 INFORMATION PAGES 1 In the Active Jobs window select the EX7750 for which you want to print information pages NOTE To print info...

Page 53: ...ing to work with Command WorkStation or Command WorkStation LE NOTE Local Printer options are available in Command WorkStation only Server options Local Printer options Command WorkStation Command Wor...

Page 54: ...ion Provides the current EX7750 and printer configuration This page lists general information about the hardware and software configuration of the EX7750 current settings for all Setup options informa...

Page 55: ...yed in the Active Jobs window 5 Click Print Command WorkStation or OK Command WorkStation LE EX7750 information pages printed with the Print Pages command appear in the EX7750 Job Log with the user na...

Page 56: ...the temporary path by clicking Browse and specifying a folder General Units Specifies the units of measurement used to display attributes such as page sizes and custom sizes in the Job Properties dial...

Page 57: ...pecify the following preferences Show Import Options Dialog When enabled this preference setting displays a dialog box that allows you to specify the destination queue Hold or Print for each job impor...

Page 58: ...y alignment from the EX7750 Control Panel by choosing Tray Alignment from the Functions menu NOTE To perform tray alignment you must be logged in to the EX7750 with Administrator privileges TO ALIGN T...

Page 59: ...hree sides of the page Determine which number on the scale each fold line crosses 8 In the Enter alignment values section enter the value where the fold crosses each of the three scales marked A B and...

Page 60: ...ab and set up the Font Substitution Table as necessary To print a list of fonts currently resident on the EX7750 use the Print Pages command see page 2 24 TO MANAGE FONTS 1 In the Active Jobs window s...

Page 61: ...o select multiple sequential fonts in Command WorkStation select the first font and Shift click the last font Ctrl click to select multiple non sequential fonts NOTE The printer fonts included with th...

Page 62: ...u browse to the folder containing the font s that you want to download The Filename field displays the name of the selected file 3 Select the font name and click Add You can navigate to different driv...

Page 63: ...Job Log For background information about job flow and job management see Chapter 1 For an introduction to the Command WorkStation and Command WorkStation LE user interfaces see Chapter 2 NOTE Unless o...

Page 64: ...the CWS LE file to start the application When you start Command WorkStation LE for the first time the server list does not display any EX7750 servers For instructions on configuring and adding EX7750...

Page 65: ...ose Log in Log out Command WorkStation or Login Logout Command WorkStation LE from the Server menu The server list appears The EX7750 must appear in the server list before you can log in to it Login b...

Page 66: ...33 4 Using Command WorkStation and Command WorkStation LE 2 Click the Login button for the desired EX7750 The Login dialog box appears Command WorkStation Command WorkStation LE...

Page 67: ...ou are an Administrator to use Command WorkStation you must log on with the default password Fiery 1 If you are an Operator or Guest you do not need a password For more information about changing the...

Page 68: ...thout entering a password and are given full privileges After the administrator has performed Setup and specified passwords Command WorkStation and Command WorkStation LE user options depend on your l...

Page 69: ...CONNECTED EX7750 IN COMMAND WORKSTATION LE 1 Choose Login Logout from the Server menu 2 Click the Logout button or key icon for the connected EX7750 in the server list Command WorkStation LE disconnec...

Page 70: ...printing Flag colors indicate the status of each job and job ticket columns provide additional job information Jobs that contain raster data as a result of processing are marked with a halo around the...

Page 71: ...s To select multiple jobs in Command WorkStation LE hold down Shift and click additional jobs NOTE To select multiple jobs the jobs must be located in the same window and panel Sorting job displays So...

Page 72: ...onal Settings control panel from the Start Settings Control Panel menu or Start Control Panel menu Windows XP Server 2003 only in the Windows taskbar TO CUSTOMIZE JOB TICKET INFORMATION FOR THE ACTIVE...

Page 73: ...ant displayed To add a column select the column name in the list on the right and click Add To remove a column select the column name in the list on the left and click Remove 4 Click OK to apply your...

Page 74: ...TATION 1 Choose Import from the File menu and then choose Job or Archived Job The Select Files to Import dialog box appears 2 Locate and select the job file to import and click Add The job appears in...

Page 75: ...X7750 for printing The job does not appear in the Active Jobs window or Printed Jobs panel 4 Click Import TO IMPORT A JOB INTO COMMAND WORKSTATION LE 1 Choose Import from the File menu and then choose...

Page 76: ...iguration Guide If you choose Hold the job is imported into the Active Jobs window and held for future action If you choose Print the job is imported into the Active Jobs window and released for immed...

Page 77: ...obs window or the selected job in the Printed Jobs or Archive panel and marks the job with either the spooled held flag or the processed held flag Held on the EX7750 hard disk indefinitely if raster d...

Page 78: ...Station you can override print settings for multiple jobs at once To select multiple jobs Ctrl click the jobs in the Active Jobs window or Printed Jobs panel 2 Choose Properties from the Actions menu...

Page 79: ...iewed but not changed by the operator Their contents are transcribed to the Job Log just as the user sent them Instructions fields are intended to be viewed and annotated by the operator but their con...

Page 80: ...reating custom color profiles 3 To override a setting expand the blue bar for a print setting category In Command WorkStation specify the desired setting In Command WorkStation LE click the current se...

Page 81: ...Command WorkStation to print the current list of print settings on a local printer click Print Properties 5 To apply the print setting overrides to the selected job click OK Command WorkStation LE In...

Page 82: ...der Jobs from the Server menu 2 Click the tab corresponding to the jobs that you want to reorder You can reorder either jobs that are waiting to process or jobs that are waiting to print 3 Select the...

Page 83: ...itor For more information see Monitoring single or multiple EX7750 servers on page 2 12 With servers that support the feature you can use the Send to command to transfer jobs between servers For examp...

Page 84: ...e Active Jobs window select the job and choose Cancel Printing from the Actions menu or choose Cancel Job from the EX7750 Control Panel When the print job is canceled a Canceling message appears on th...

Page 85: ...and choose Mixed Media Setup from the Actions menu The Mixed Media dialog box appears This dialog box lists any previously defined media settings and includes buttons for adding modifying and deleting...

Page 86: ...iginal document If you use the Chapter Start feature all media specified in the Paper menu per chapter must share the same dimensions for example all Letter all Tabloid or all A4 7 To apply finishing...

Page 87: ...option when they send a job These numbers can be changed to a master number from 1 to 100 with job overrides from the Job Properties dialog box When the first 15 FreeForm master numbers have been used...

Page 88: ...e Delete from the Actions menu Using FreeForm masters with variable data jobs To print a variable data job with a particular FreeForm master users must specify a number for the Use Master print settin...

Page 89: ...master numbers to a number greater than 15 for FreeForm masters they want available on the EX7750 At sites where a large number of users print FreeForm jobs the Operator may want to instruct users not...

Page 90: ...ived it appears in the Archive panel of the Jobs window You can issue the following Actions menu commands described on page 2 14 for jobs in the Archive panel Print Delete Rename Hold Process and Hold...

Page 91: ...rkstation LE The Archive Options dialog box displays external devices as available archive volumes 6 In Command WorkStation if applicable select Archive rasters in the Archive Options dialog box The A...

Page 92: ...text file or clear it manually Using the Job Log Setup the administrator can specify preferences to print the Job Log automatically every 55 jobs or print and clear the Job Log automatically every 55...

Page 93: ...g panel to make it active 3 In Command WorkStation choose Job Log from the Server menu and then choose Export In Command WorkStation LE choose Export from the File menu and then choose Job List or Job...

Page 94: ...pear in the Active Jobs window and in the Printed Jobs Archive FreeForm and Job Log panels of the Jobs window In Command WorkStation you can also perform advanced searches based on the file sizes and...

Page 95: ...Log panels of the Jobs window 4 Click the General tab and specify parameters for the search NOTE To clear all fields in the Find dialog box at any time click New Search Command WorkStation or New Find...

Page 96: ...alog box Command WorkStation LE lists found jobs In Command WorkStation you can customize the appearance of the Search Results window in the same manner as the Active Jobs and Jobs windows For example...

Page 97: ...have certain print options click the selection box for each desired print option in the list To specify additional search values for a selected option right click the field next to the option name an...

Page 98: ...K Saved templates appear in the Queries menu To remove a template from the menu select the template and click Delete In Command WorkStation saved templates are stored in the folder location you specif...

Page 99: ...rwise specified information in this chapter applies to both Command WorkStation and Command WorkStation LE In cases where the two applications are nearly identical only Command WorkStation illustratio...

Page 100: ...e various controls represented by icons that are available in the Preview window Each control is described in more detail in other sections of this chapter Full screen Preview Duplicate Delete Undo Sa...

Page 101: ...ears at the end of its filename and a lock icon appears in the upper right corner of the Preview window You cannot edit locked PDF files Displaying full screen previews You can open a selected page in...

Page 102: ...w moments to open The full screen preview window is independent of Command WorkStation or Command WorkStation LE and may appear behind the application on the screen Bring the full screen preview windo...

Page 103: ...in the full screen preview to change the zoom level rotate the page display other pages or return to the thumbnail preview Scroll bar to view other pages Rotate 90 180 or 270 degrees Next Page Thumbn...

Page 104: ...ying thumbnails of the pages in the job 3 Select the pages you want to edit Shift click to select multiple sequential pages Ctrl click Command WorkStation or Command click Command WorkStation LE to se...

Page 105: ...es the destined location of the page you are dragging In Command WorkStation the following icons indicate the result of your action If the icon does not have an arrow existing pages are overwritten an...

Page 106: ...the common print settings desired for final output For example to create a merged job that prints to duplexed pages make sure both original jobs have been processed with the duplex setting enabled Ov...

Page 107: ...ocument Preview window click to select the pages and hold down the mouse button as you drag the selected pages to the new location in the destination document Preview window Source document preview De...

Page 108: ...fore the first page or after the last page in the first Preview window Moving the selection to the left or right of a page places the selection in that location and renumbers the pages To replace page...

Page 109: ...eview window to the other the first window is designated as the source and the other window the destination During a merging session you can drag pages only from the source window to the destination w...

Page 110: ...e job 5 When you have finished merging pages click the Save control see page 4 2 6 Enter a new name for the merged job and click Yes Command WorkStation or Save Command WorkStation LE NOTE When multip...

Page 111: ...to preview edit and merge PostScript and PDF jobs that have been spooled and held You can apply all of the features discussed in Chapter 4 to spooled held jobs and processed held jobs alike Detailed d...

Page 112: ...page 6 21 Merging jobs You can merge pages from several spooled held jobs together in a new file see page 4 8 To merge jobs both jobs must have the same status that is both jobs must be spooled held...

Page 113: ...hoose Impose from the menu that appears You can open a PostScript or PDF Portable Document Format file but it must indicate a spooled held job status NOTE If you have installed the DocBuilder Pro opti...

Page 114: ...nvoked from the Imposition window as described in Using templates on page 5 11 Job previews The Imposition window provides a preview of a job s pages allowing you to manipulate the source PDF Pages ap...

Page 115: ...a printer s spread is known as a sheet In duplex printing each sheet has two imageable surfaces one on the front side and one on the back side of the sheet Each imageable surface contains one printer...

Page 116: ...ails of actual content to Layout mode page numbers only Switch between Mixed Page mode document with varying page sizes and Fixed Page mode document with a single page size For more information about...

Page 117: ...e or Fixed Page mode a blue border appears around the selected view and the appearance of the job in the Imposition window changes immediately Imposition settings appear grouped in the Sheet Layout Sc...

Page 118: ...different sets of printer s marks For more information see the following table NOTE Preview mode puts more stress on your system s processor than Layout mode To improve performance on slower systems d...

Page 119: ...Position the magnifying glass cursor over a page and click to zoom in The magnifying glass cursor displays a plus sign to indicate increased magnification of page views Each time you click the current...

Page 120: ...t you can use this tool to drag a particular portion of the sheet into view At the bottom of the window you can manipulate the content view using a standard scroll bar or the Surface menu The Surface...

Page 121: ...You can apply any template to any job making it easy to apply layout and printing settings quickly and efficiently DocBuilder Pro supplies built in templates that define settings for commonly used la...

Page 122: ...k Yes In the Save As dialog box the name of the original spooled source file appears with a new extension dbp If you mistakenly close the Imposition window when you intend to keep working click Cancel...

Page 123: ...ing the corresponding icons at the top of the main imposition window Fixed Page mode allows you to impose documents that contain pages that are all the same size Mixed Page mode allows you to impose d...

Page 124: ...Page mode Sheet Size Yes Yes Creep Adjustment Yes Yes Orientation Yes Yes Duplex Yes Yes Layout Rows Columns Yes Yes Printer s Marks Yes Yes Printer s Marks Pull into Page Edge No Yes Bleeds Yes No Sc...

Page 125: ...the job Specify imposition settings using controls in the Sheet Layout Scale and Finishing panes on the left side of the main window To view or hide a settings pane click the bar for that settings gr...

Page 126: ...In general experimentation with job settings does not cause permanent changes or potentially loss of original job data until the job is printed or saved with the new settings Size You can choose an it...

Page 127: ...value to compensate automatically for binder s creep see Shingling and creep on page A 8 NOTE Even if you select Thick from the Creep Adjustment menu your job is printed on Plain paper unless you spe...

Page 128: ...aces The layout you select should correspond to the number of pages in your job Rows Click the Rows up and down arrows to specify the number of rows up to five in a layout or specify the number of row...

Page 129: ...eet DocBuilder Pro provides a visual warning For more information see Clipping indicators on page 6 12 When you change the Columns value you are prompted with a message that all custom page edits Add...

Page 130: ...formation and date and time You can also enter values from 72 to 72 points 1 0 to 1 0 inch or 25 4 to 25 4 mm in the Horizontal Offset and Vertical Offset fields to fine tune the placement of trim mar...

Page 131: ...al lengths of marks from 1 to 216 points type dotted or solid width from 1 to 3 points and color NOTE The Printer s Marks option enables marks globally throughout a job To disable or enable an individ...

Page 132: ...nch or 0 to 25 4 mm in the Define Bleeds dialog box The Bleeds option is not available in Mixed Page mode NOTE When you specify a bleed you move the trim marks into the page by the bleed value on both...

Page 133: ...the Rows and Columns values The slot size is determined by dividing the maximum imageable area of the sheet by the number of slots Current Slot Applies scaling to the currently selected page Row on Al...

Page 134: ...ew scaling values The original height and width values are displayed for your reference When you specify a value DocBuilder Pro automatically updates the other fields to preserve the height to width a...

Page 135: ...age within its predefined slot on the sheet For example if the page has been scaled smaller than the slot you can align the page to the upper left corner of the slot by clicking the Alignment control...

Page 136: ...umber of pages in a saddle group the layout in use and the size of the job NOTE If you are using a layout with more than two columns or rows the Binding selection is unavailable You can specify the fo...

Page 137: ...ld the value in the paper thickness field the specified binding type and the ordering and orientation of pages specified by the current layout Gang Up To enable gang printing and disable binding setti...

Page 138: ...all pages in the job are imaged Documents laid out in this order may tend to be collated more easily than when printed in another order The Repeat option enables what is commonly known as step and re...

Page 139: ...This option minimizes the need for collating by hand and is most appropriate for printing single copies of a document 2 3 4 5 6 7 8 9 10 11 12 1 4 7 10 1 2 5 8 11 3 6 9 12 3 6 9 12 2 5 8 11 4 7 10 1...

Page 140: ...ose a job its pages are automatically arranged in a particular order according to the layout you select Each page number in Layout mode represents the page from the source document that DocBuilder Pro...

Page 141: ...age number that does not already exist in your job For example if your job has 10 pages you cannot type 12 Adding duplicating and deleting sheets You can add duplicate or delete sheets by right clicki...

Page 142: ...Sheet s from the menu that appears The Delete Sheet s dialog box appears 2 To delete a single sheet select Delete Sheet and specify the number of the sheet you want to delete To delete a range of shee...

Page 143: ...deleting sheets Editing page content causes the cancellation of all previous sheet level operations TO USE PITSTOP WITH DOCBUILDER PRO 1 Right click a sheet in Preview or Layout mode and choose Edit P...

Page 144: ...o save the changes 4 Click Yes 5 Click the Command WorkStation window to bring it to the foreground The edited file appears in the full screen preview window Rotating pages To manually rotate individu...

Page 145: ...et press the Ctrl key and click the Rotate icon on any page in that location on any sheet For example in the preceding graphic if you press the Ctrl key and click the Rotate icon on Page 1 then Pages...

Page 146: ...e custom margins Managing templates You can name and save the current combination of Sheet Layout Scale and Finishing settings as a custom template Choose Preferences from the File menu to set the fol...

Page 147: ...e choose a descriptive name such as 4 Up Nested Saddle If you plan to use the same template for a particular document name the template after the document type for example Status Report 3 Click OK or...

Page 148: ...ts will be lost when you apply imposition settings that alter the page layout Saving imposed jobs When you save an imposed job DocBuilder Pro does the following If new data has been added to the tempo...

Page 149: ...the Imposition feature of DocBuilder Pro TO SAVE AN IMPOSED JOB 1 Click the Close Window icon in the upper right corner of the DocBuilder Pro window 2 Enter a name for the imposed job in the Save As d...

Page 150: ...This page is intentionally blank...

Page 151: ...orm the following functions from your workstation Override current job option settings Delete jobs and cancel processing Duplicate or rename jobs RIP a job and hold the raster data Hold jobs in the sp...

Page 152: ...in as Administrator enter the Administrator password and click OK To log in as Operator enter the Operator password and click OK To log in as Guest click OK without entering a password NOTE If you ar...

Page 153: ...the Fiery Spooler window the background color for the yellow and white printer icons is the same Spooled jobs Jobs listed in the area below the Spool status bar are PostScript or PCL files stored on...

Page 154: ...ewed with Fiery Spooler To check this contact the operator or go to the Command WorkStation screen Manipulating job options and job flow Using the commands in the Job menu you can alter the destinatio...

Page 155: ...il the job limit is reached Temporarily held on the server until the job has completed printing Print and Hold Print the job in its turn RIP the job first if it does not have raster data After printin...

Page 156: ...When you override these types of options the job is automatically reRIPped for printing Thumbnail A Open the selected held raster data job in the Thumbnail A window where you can view a full screen p...

Page 157: ...nter icons PostScript PCL or raster data headed for printing top or after printing bottom PostScript or PCL data headed for Print and Hold or job on Hold after printing Hold Raster icon PostScript PCL...

Page 158: ...Direct Connection Jobs printed to the Direct connection are not displayed in the job lists They are displayed briefly in the status bars where they cannot be selected and are included in the Job Log...

Page 159: ...tact the job can be reprinted from the Printed queue Printed jobs are represented by a white PostScript icon Icon 1 If the job was printed from a held raster job in the RIP area the raster data in the...

Page 160: ...ndows also allow you to open a thumbnail view of any held raster data job in the RIP area and perform electronic collation or document merging For more information about this feature see page 7 13 Pre...

Page 161: ...EW THUMBNAILS OF ANY RASTER DATA FILE 1 Select any raster data job in the RIP area 2 Choose Thumbnail A or Thumbnail B from the Job menu NOTE Wait until all pages have been displayed before opening an...

Page 162: ...e window You can also display full screen previews by double clicking the page in Thumbnail A NOTE If you have edited a job using the thumbnail windows you must save the edited file before you can vie...

Page 163: ...e merged file which has references to the original PostScript files Before editing or merging raster files with the thumbnail windows make sure the source files were RIPped using the print option sett...

Page 164: ...have edited the job you are prompted to save the job 5 Enter a new name and click OK The new file is now located in the RIP area ready to print If you saved the edited file with a new name the origin...

Page 165: ...op of pages in Thumbnail A To add pages drag the pages to a new position in Thumbnail A a blue highlight appears in the new position when the pages are ready to be added Multiple levels of undo are av...

Page 166: ...all users may see the results of those changes If you are unable to view changes in a job or if selecting a thumbnail window results in a message indicating zero pages close and restart Command WorkSt...

Page 167: ...ob including status document name user name date start time end time process time page description language file size device paper size media number of originals total number of pages and Notes The St...

Page 168: ...nu or click the Delete button to clear the Job Log The system administrator can also print and clear the Job Log from the Control Panel 7 To save the Job Log choose Export Job Log from the File menu o...

Page 169: ...following procedure to connect to a different EX7750 TO CONNECT TO A DIFFERENT EX7750 1 Choose Open Fiery from the File menu 2 Select the EX7750 in the Chooser window For information about setting up...

Page 170: ...This page is intentionally blank...

Page 171: ...ar is available as part of the FACI For more information contact your authorized service support technician Introduction to FieryBar FieryBar located at the top of the monitor screen includes the foll...

Page 172: ...cessing or printing a job or communicating with a remote computer Check the RIPping area the RIP status area and the printing area for details No light The EX7750 is starting up Command WorkStation St...

Page 173: ...or print another job first Jobs continue to process on the EX7750 After you make the copies choose Resume Print to continue printing jobs from the EX7750 Resume Print Resumes communication between th...

Page 174: ...g On to Windows prompt on the monitor keep Administrator in the user name field enter Fiery 1 in the password field and press Enter NOTE The default password is set to Fiery 1 For information about ch...

Page 175: ...ue processing and print after the EX7750 is restarted If a job sent to the Direct connection is processing it will not finish processing or printing 2 Press the Menu button choose Down from the Functi...

Page 176: ...ob has just finished processing or printing wait at least five seconds after the RIPping and Printing areas switch to Idle before proceeding to the next step NOTE If a job from the Print queue is proc...

Page 177: ...large number of copies Until recently the only way around these limitations was to use traditional printing systems to impose your document that is to arrange its pages in the correct order and orien...

Page 178: ...he final booklet their ordering and positioning on the sheet must differ from the normal book reading order You can demonstrate this for yourself using an ordinary sheet of paper TO MODEL AN EIGHT PAG...

Page 179: ...The front cover of the booklet should be page 1 and the back cover of the booklet should be page 8 You can also underline each number to highlight the page orientation NOTE Printing on both sides of t...

Page 180: ...tion about page placement which you can use to create a plan or sketch of how pages are placed on the sheet This plan is called a layout DocBuilder Pro frees you from the process of creating accurate...

Page 181: ...efined by a dotted line called a fold mark similarly the location of a cut is defined by a solid line called a trim mark Specialized marks also define the size and locations of margins space surroundi...

Page 182: ...out to accommodate the discrepancy For example if your layout places 8 pages on a sheet and the total page count in the book is 12 one of its signatures holds only 4 content pages with the rest of th...

Page 183: ...n fold line and gluing them together this is called a nested saddle The binding method you use affects the order in which pages are placed on the sheet for example the page ordering used to perfect bi...

Page 184: ...edge of each page relative to the others The result is that the edges of pages furthest from the saddle s innermost fold seem to move away from the edges of pages closest to the innermost fold As the...

Page 185: ...ou change any aspect of the imposed job that is affected by creep Gang Up printing Layout is essential for defining the elements of complex print jobs such as booklets and books but it can also be use...

Page 186: ...f you need to print business cards for several different clients you could perform a Gang Up Repeat printing job for each but you might still wind up wasting paper and time if the jobs do not fit easi...

Page 187: ...nt one page per sheet The printer s marks indicate where to cut the paper so that the color content extends to the edge of the paper The following settings are applied for this layout Bleeds Printer s...

Page 188: ...a perfect bound book Each sheet is folded once and stacked on top of one another For more information about binding methods see page A 7 The following settings are applied for this layout Duplex Blee...

Page 189: ...al blank pages will be added if necessary Pages will be ordered in groups of four so that when folded each sheet has four sequential pages For example 4 pages 8 pages NOTE The Creep Adjustment option...

Page 190: ...a saddle bound book All of the sheets are folded together one inside the other For more information about binding methods see page A 7 The following settings are applied for this layout Duplex Bleeds...

Page 191: ...any number of pages Additional blank pages will be added if necessary Pages will be ordered so that when sheets are folded and stitched together the pages will be sequential For example 4 pages 8 page...

Page 192: ...three sections Although the three sections are the same width the space between each section varies so that the leftmost panel can be folded over the other two panels The following settings are applie...

Page 193: ...h jobs that have six pages If the job contains more or less than six pages an error message appears The pages will be ordered as follows The 3 Up Trifold Brochure is usually folded as shown in the fol...

Page 194: ...most often in the case of a four panel brochure The finished brochure unfolds to double then four times the original size The following settings are applied for this layout Duplex Printer s Marks fold...

Page 195: ...bs that have eight pages If the job contains more or less than eight pages an error message appears The pages will be ordered as follows The 4 Up Gate Fold is usually folded as shown in the following...

Page 196: ...rinted sheet By rotating the two topmost pages the signature can be folded both horizontally and vertically and trimmed The finished booklet will have all pages in the correct order and rotation The f...

Page 197: ...folds at 90 degrees trimmed and stitched together into signatures the pages will be sequential Note that although this layout requires two folds the template applies a fold mark on the spine fold onl...

Page 198: ...ny panels to be folded on top of one another without stressing the folded spine The most common example is a road map The following settings are applied for this layout Duplex Printer s Marks fold mar...

Page 199: ...that have eight pages If the job contains more or less than eight pages an error message appears The pages will be ordered as follows The 4 Up Z Fold is usually folded as shown in the following illus...

Page 200: ...This page is intentionally blank...

Page 201: ...r the EX7750 sometimes remains displayed on Command WorkStation or Command WorkStation LE even after you resolve the error There might be a brief delay while the EX7750 communicates the resolution of...

Page 202: ...Alt Delete and use the Task Manager to close Command WorkStation To force an exit from Command WorkStation LE press Esc Command Option and then click Force Quit in the dialog box that appears If the...

Page 203: ...d queue jobs that had a PostScript error are displayed in a light red job row Double click anywhere in the row to see the error message There are font errors If user specified fonts that are not resid...

Page 204: ...sters Users are unable to connect to the EX7750 If users are unable to connect to the EX7750 or are unable to find the EX7750 from their workstations the network administrator may need to troubleshoot...

Page 205: ...connection If you are unable to connect and you cannot print the Test Page check the printer s touch panel display Setup error messages For information about Setup error messages see the Configuration...

Page 206: ...This page is intentionally blank...

Page 207: ...7 saddle stitch 6 14 A 7 bleeds A 5 setting 6 10 C Cancel Printing command from Command WorkStation 3 22 from Fiery Spooler 7 4 on FieryBar 8 3 Cancel Processing command 3 22 Cancel RIP command on Fi...

Page 208: ...3 duplexing 6 5 Duplicate page command 4 6 7 14 Duplicate Job command Fiery Spooler 7 5 E Enable Animation preference 2 28 error messages during Setup C 5 F Fiery Spooler Cancel Printing command 7 4...

Page 209: ...H held jobs 7 8 Hide FieryBar command on FieryBar 8 3 Hold command 3 15 7 5 Hold queue 1 2 3 12 3 14 I icons clipping 6 6 6 12 Delete Template 6 25 Print area 7 9 RIP area 7 8 Save Template 6 25 Spoo...

Page 210: ...6 displaying 7 16 exporting to a file 3 31 panel 2 7 3 30 printing on local printer 3 31 using from Fiery WebSpooler 7 16 viewing printed jobs 7 4 Job menu commands 7 4 job name 6 8 Job Properties dia...

Page 211: ...24 Notes fields 1 6 1 7 3 16 O offsetting pages 6 13 Operator password 3 6 7 1 operator controlled environment setting up 1 2 orientation setting 6 5 Override Print Settings command 7 5 overriding pri...

Page 212: ...arks bleeds A 5 customizing 6 9 date 6 8 defining 6 8 disabling 6 8 6 9 enabling 6 7 Fold Marks 6 8 A 5 gutters A 5 job label 6 8 A 5 job name 6 8 margins A 5 overview A 5 properties 6 9 sheet informa...

Page 213: ...settings 6 11 Alignment and Offsets 6 13 Apply To 6 11 Scale Mode 6 12 scaling selected pages 6 11 Search Template Path preference 2 28 searching for jobs 3 32 selecting jobs 3 9 Send to server comma...

Page 214: ...rint command on FieryBar 8 3 T target file 7 13 template applying 5 11 defined 5 11 deleting 6 25 limitations 6 24 saving 6 25 saving imposition settings 6 25 selecting 5 11 Template menu 5 11 tempora...

Page 215: ...iews 4 11 7 15 Units preference 2 28 units setting 2 28 Use Master option 3 25 3 26 V variable data printing 3 24 View menu 5 7 5 9 view modes compared 5 8 layout 5 8 preview 5 8 view only Guest acces...

Page 216: ...This page is intentionally blank...

Reviews: