Appendix
267
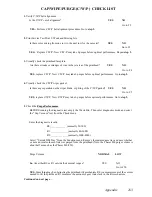
POWER-UP CHECKLIST
P1.
Is there a failure message on the front panel?
YES
NO
Go to # P2
YES
, the message is:
__
RAM ERROR
- Neither RAM socket has a supported RAM DIMM installed.
Ensure that supported RAM is being used. Reseat and then replace the RAM
DIMM.
__
POST Error XX.XX
- Note the POST Error code: _______________. Refer
to the Service Quick Reference Guide for specific actions to take for each
message.
__
Other Message
- The above messages are the only ones that occur during
power-up. Refer to the Operating Failure Checklist.
P2
. Is the display blank with the rear panel LEDs flashing a pattern?
YES
NO
Go to # P3
YES
, The flashing pattern is:
__
BIST Error 1, 2, or 3
(PE LED flashing rapidly and PS LED flashing "1, 2, or
3") - Reseat all main board components. Next replace the ID Chip, then Code
ROM, and if necessary the Main Board.
__
POST Error 4
(both LEDs flashing "4") - Neither I/O Right or the front panel
are detected, verify that the IIC cable is connected, then replace I/O Right.
__
POST Error 5
(both LEDs flashing "5" - one long flash) - The front panel is
not detected, verify that the IIC cable is connected, then replace the front panel.
__
Other Pattern
- Note the LED Pattern:
_______________________________. Refer to the Service Quick Reference
Guide for other LED patterns.
P3
. Is the display blank with the rear panel LEDs on solid?
YES
NO
Go to # P4
YES
, ensure that all DIP switches are up and then reseat the main board and the Printer ID
Chip. In early main boards the MIG chip is socketed and not soldered down, this chip looks
very similar to the Printer ID Chip. Ensure that these chips did not get swapped. If the
problem continues, replace the main board.
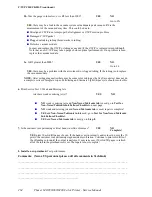
P4
. Does the electronics fan twitch and/or the rear LEDs blink before the printer goes silent?
YES
NO
Go to # P5
YES, check for shorted motor drivers. Removing the 40V jumper from the power control
board will disconnect all motor drivers. When turned on without the 40V jumper, the printer
will get through POST testing and crash with the Xerox logo on the display. If the printer still
does not respond with the 40V jumper removed, go to # P5. To isolate a shorted driver,
reconnect the 40V jumper and systematically try disconnecting each cable from the power
control board. If this does not isolate the problem, replace the power control board.
P5
. Is there no response to turning on the power switch?
YES
NO
YES, verify that the power source is good. Then check for open fuses (measure from fuse to
line). If open, replace the power supply. Also, note which fuse was open and refer to the
Service Quick Reference Guide to identify any heaters connected to that fuse. If the fuse in
the new power supply also opens, the problem is likely a shorted heater.
Summary of Contents for Phaser 840
Page 2: ......
Page 12: ...vi Phaser 840 850 860 8200 Color Printer Service Manual ...
Page 52: ...1 36 Phaser 840 850 860 8200 Color Printer Service Manual ...
Page 88: ...2 72 Phaser 840 850 860 8200 Color Printer Service Manual Blank Page ...
Page 134: ...3 118 Phaser 840 850 860 8200 Color Printer Service Manual ...
Page 174: ...4 158 Phaser 840 850 860 8200 Color Printer Service Manual ...
Page 188: ......
Page 250: ...8 234 Phaser 840 850 860 8200 Color Printer Service Manual ...
Page 286: ...270 Phaser 840 850 860 8200 Color Printer Service Manual ...
Page 287: ...071 0723 00 ...

