background image

FRU Disassembly

6-173

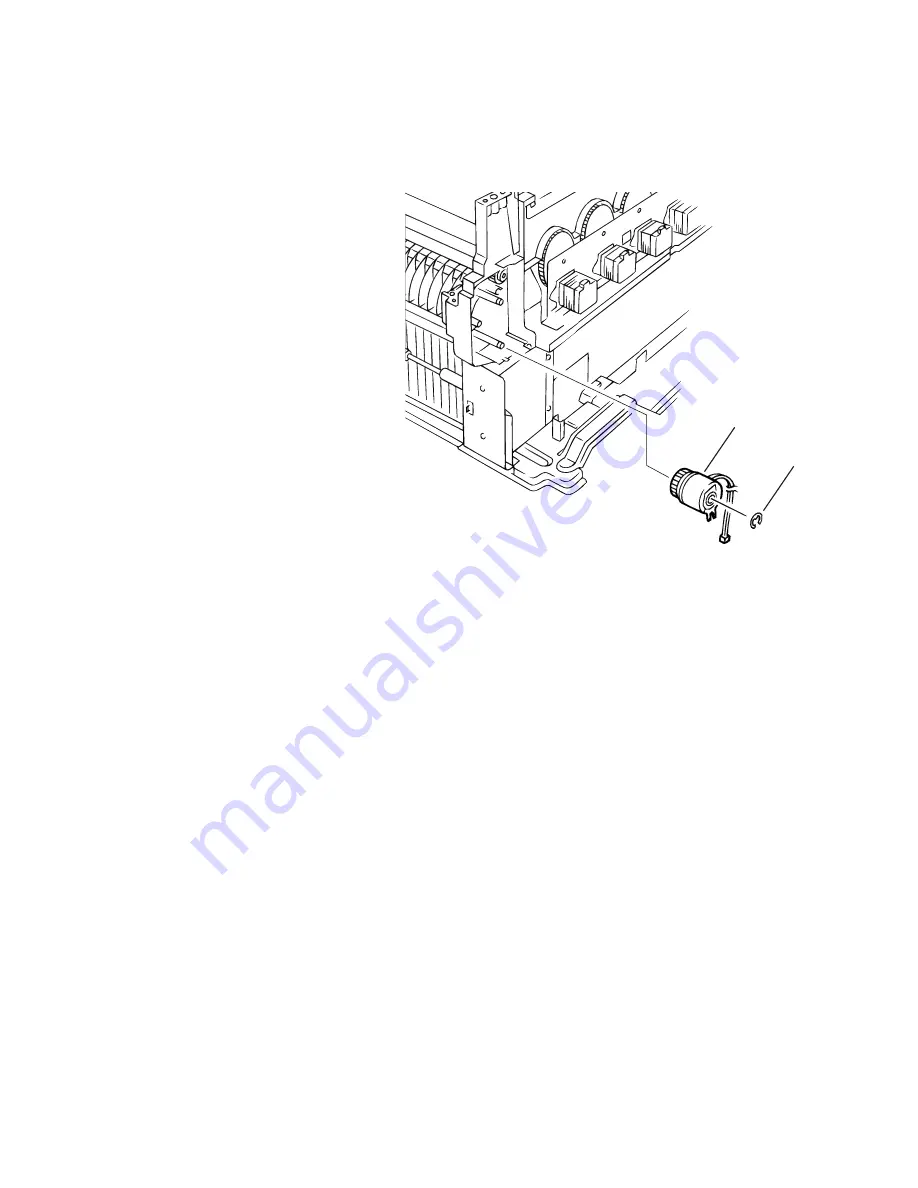
Registration Clutch (PL 5.1.20)

1.

Remove the Rear Shield Plate (see pg. 6-146).

2. 

Disconnect the RCL connector from the Engine Controller Board.

3. 

Remove 1 screw securing the ground strap to the motor bracket.

4. 

Remove the e-ring (item #1) securing the clutch to the registration shaft B.

5. 

Remove the Registration Clutch (item #2).

Reassembly

Note: 

Be sure the fork on the bottom of the registration clutch 

straddles the plastic tab on reassembly.

S7300-68

2

1

Summary of Contents for Phaser 7300B

Page 1: ...Service Manual P h a s e r C o l o r P r i n t e r 7300...

Page 2: ......

Page 3: ...arning The following servicing instructions are for use by qualified service personnel only To avoid personal injury do not perform any servicing other than that contained in operating instructions un...

Page 4: ...S and AppleTalk are registered trademarks of Apple Computer Incorporated PCL and HP GL are registered trademarks of Hewlett Packard Corporation MS DOS and Windows are registered trademarks of Microsof...

Page 5: ...task A NOTE may also provide additional information related to a specific subject or add a comment on the results achieved through a previous action CAUTION A CAUTION indicates an operating or mainten...

Page 6: ...o install a properly grounded outlet If the product loses it s ground connection contact with conductive parts may cause an electrical shock Disconnecting Power Warning Turning the power off using the...

Page 7: ...unit under test to avoid potential shock After removing a static sensitive assembly from it s anti static bag place it on a grounded conductive surface such as aluminum foil If the anti static bag is...

Page 8: ...ct with dangerous voltages and currents Power source This product is intended to operate from a power source that will not apply more then 250 volts rms for a 220 volt AC outlet or 130 volts rms for a...

Page 9: ...ervicing so that you may power down the printer during an emergency Warning Do not touch any electrical component unless you are instructed to do so by a service procedure Servicing Mechanical compone...

Page 10: ...unity compliance and could void the user s authority to operate this product To ensure compliance use shielded interface cables A shielded parallel cable can be purchased directly from Xerox at www xe...

Page 11: ...95 A1 1998 A2 1 998 IEC61000 3 2 Part 3 Limits Section 2 Limits for harmonic current emissions equipment input current less than or equal to 16A per phase EN61000 3 3 1 995 IEC61000 3 3 Part 3 Limits...

Page 12: ...s das le r glement sur le brouillage radio letrique du Minist re des Communcations du Canada European Notice This equipment was tested and is determined to be compliant with VDE requirements for a Cla...

Page 13: ...1 13 Physical Dimensions Print Engine 1 13 Physical Dimensions Options 1 13 Printer Clearances 1 13 Functional Specifications 1 14 Print Speeds 1 14 Electrical Specifications 1 15 Environmental Speci...

Page 14: ...and NVRAM Resets 4 111 Test Print Samples 4 112 Automatic Density Control ADC Calibration Procedure 4 116 Automatic Thickness Sensor ATS Calibration Procedure 4 118 Color Calibration 4 121 Margin Cal...

Page 15: ...e Printer 8 220 Summary of the Printing Process 8 221 Summary of the Paper Path 8 226 Paper Fed from Tray 1 8 227 Paper Fed from Optional Trays 8 228 Paper Fed from the Multi Purpose Tray 8 229 Transf...

Page 16: ...xiv Phaser 7300 Color Printer Service Manual...

Page 17: ...wer Saver Mode 1 4 Printer Memory and RAM Capabilities 1 5 Parts of the Printer 1 6 Print Engine Base Configuration 1 6 Printer Options Lower Tray Deck LTD and Lower Tray Assembly LTA 1 7 Printer Opti...

Page 18: ...a bi directional parallel interface An optional Ethernet port for host communication is also available The Ethernet port supports EtherTalk 10 100baseT Novell and TCP IP All printer versions support t...

Page 19: ...Job Pipelining Std Std Std Std Std Proof print Secure print Saved jobs Opt Opt Opt Std Std PDF Direct print Opt Opt Opt Std Std 2400 dpi resolutions No Std Std Std Std A3 Bleeds No Std Std Std Std Job...

Page 20: ...opies the job can be cancelled from the printer s front panel Saved Print Stores jobs on the printer s hard drive for print on demand PDF Direct Printing The printer supports a native PDF image proces...

Page 21: ...tile memory NVRAM NVRAM is used to store configuration values that can be set on the printer RAM modules have the following characteristics 144 pin SODIMM Serial presence detect 3 3 Volt 100 MHz PC100...

Page 22: ...t view Item Description Table No Description No Description 1 Top Output Tray 7 Tray 1 2 Top Cover 8 Paper Level Gauge 3 Front Panel 9 Top Cover Release 4 Power Switch 10 Multi Purpose Tray 5 Duplex U...

Page 23: ...r Tray Assembly LTA Item Description Table No Description No Description 1 Tray 2 6 Right Door B 2 Tray 3 7 Right Door C 3 Tray 4 8 Right Door D 4 Tray 5 9 Right Door E 5 Lower Tray Assembly 550 sheet...

Page 24: ...er Service Manual Printer Options cont d Duplex Unit 1 Duplex Unit The Duplex Unit attaches to the top of Tray 1 When opening the Duplex Unit Tray 1 opens also to support the Duplex Unit Duplex Unit s...

Page 25: ...300 Printer Front Panel Configuration Front Panel Key Descriptions 1 LED Power Status 5 Up Arrow Key scrolls up the menu system 2 Graphic front panel display 6 Down Arrow Key scrolls down the menu sys...

Page 26: ...No Description 1 LED GI02 health Flashes to indicate proper CPU operation 2 Hard Drive optional 3 Memory RAM SODIMM 1 and SODIMM 2 4 Configuration Upgrade Chip i Button 5 NVRAM 6 LED GI03 On indicates...

Page 27: ...D TD light is Off when the printer is connected to an ethernet network It blinks yellow while data is transmitted to the host 5 Ethernet Port Not supported on the 7300B 6 The ethernet port LED RD ligh...

Page 28: ...en Open Service Mode Open Closed Developer Mode no POST Closed Closed Disaster Recovery Vx Works only Closed Open Switch 3 selects whether PostScript CLOSED or Vx Works OPEN is available on the rear p...

Page 29: ...Weight 68 kgs 149 lbs Physical Dimensions Options Dimensions Specification Optional 550 Sheet Feeder Tray 2 Width 666 mm 26 2 in Depth 626 cm 24 6 in Weight 23 kgs 50 lbs Optional 1650 Sheet High Capa...

Page 30: ...ot Available on the Phaser 7300B or Phaser 7300N Operating Modes Running Mode Print Engine capable of making prints immediately Ready Mode 15 seconds from completion of a print Power Saver Mode Entere...

Page 31: ...voltage high voltage power supply 12V High voltage power supply Paper thickness sensor power supply High Voltage Power Supply CH 1000 to 1400 50V Voltage to charge roller DB 50 to 300V 300V Voltage to...

Page 32: ...210 x 297 mm A3 297 x 420 mm SRA3 320 x 450 mm A5 148 x 210 mm A6 105 x 148 mm ISO B5 176 x 250 mm B5 JIS 182 x 257 mm B4 JIS 257 x 364 mm Custom Sizes Banner 12 9 x 36 in Trays All Trays All Trays A...

Page 33: ...229 x 324 mm C5 Envelope 162 x 229 mm C6 Envelope 114 x 162 mm B5 Envelope 176 x 250 mm Use only paper envelopes Do not use envelopes with windows or metal clasps All Envelopes print from the MPT Only...

Page 34: ...1 18 Phaser 7300 Color Printer Service Manual...

Page 35: ...al failures not associated with a front panel message or code refer to the section Troubleshooting on page 3 67 If an error message or code is not visible on the front panel the usage profile report a...

Page 36: ...2 43 C4 Insert Tray 4 61 2 43 C5 Insert Tray 5 60 2 43 E1 Misfeed at Tray 1 1 2 42 E2 Misfeed at Tray 2 2 2 42 E3 Misfeed at Tray 3 3 2 42 E4 Misfeed at Tray 4 4 2 42 E5 Misfeed at Tray 5 5 2 42 E12 T...

Page 37: ...2 61 U26 Yellow Imaging Unit Failure 150 2 62 U27 Magenta Imaging Unit Failure 151 2 62 U28 Cyan Imaging Unit Failure 152 2 62 U29 Black Imaging Unit Failure 153 2 62 U30 Flash Hardware Failure 161 2...

Page 38: ...2 53 Replace Black Toner Cartridge 68 2 53 Replace Cyan Imaging Unit 69 2 52 Replace Magenta Imaging Unit 70 2 52 Replace Yellow Imaging Unit 71 2 52 Replace Black Imaging Unit 72 2 52 Replace Transfe...

Page 39: ...nstall or Reseat Toner Cartridge Magenta 115 2 53 Install or Reseat Toner Cartridge Yellow 116 2 53 Install or Reseat Toner Cartridge Black 117 2 53 Install or Reseat Cyan Imaging Unit 118 2 52 Instal...

Page 40: ...wer 2 Disconnect the AC power cord from the wall outlet 3 Verify the power cord is free from damage or short circuit and is connected properly 4 Remove the Imaging Unit and protect it from light 5 Ins...

Page 41: ...a printer component The section FRU Disassembly on page 6 129 provides detailed steps for removing and replacing all major parts of the printer The section Field Replaceable Units FRU Parts List on pa...

Page 42: ...sage is displayed on the front panel Service Diagnostics V Initializing and then release the keys 4 The front panel displays the Service Diagnostics Menu You can print a Service Diagnostics Menu Map b...

Page 43: ...Hard Drive is Present Absent Duplex is Present Absent Tray 1 n Installed Displays current memory installed Detects presence of Hard Drive option Detects presence of Duplex option Detects presence of...

Page 44: ...micro Amps for each color Thick Media thickness microns Temp Fuser Temp deg C Regist Regist Motor speed Exit Exit Motor Speed press Up Down more reports press Cancel to abort Select page Count Engine...

Page 45: ...2 Feed Motor Tray 3 Feed Motor Tray 4 Feed Motor Tray 5 Feed Motor Tray Feed Motor On Off The tray must be removed to run this test Press OK to continue Press Back or Cancel to abort Auto abort in 10...

Page 46: ...ate changes and observe proper function Interlock Switches Top Cover Interlock Top Cover is Open Closed Right Door Interlocks Door A is Open Closed Door B is Open Closed Door C is Open Closed Door D i...

Page 47: ...ING USE ONLY Media Weight Sensor Media Weight is nnnh ENGINEERING USE ONLY Fuser Temp Sensors Fuser Temp Upper is nnn deg C Fuser Temp Lower is nnn deg C Fuser Temp UpperSide is nnn deg C See Fuser an...

Page 48: ...s Back or Cancel to abort Auto abort in 10 seconds Optional Tray 2 3 4 Feed Clutch Clutch is On Off Feed Roller 1 Clutch Clutch is On Off Feed Roller 2 3 4 5 Clutch Clutch is On Off Reg Roller A Clutc...

Page 49: ...operation is verified Density Adj Test Passed Failed Press Back or Cancel to abort Density Calibration Results Results from Calibration run during this power on session Passed Calibration Error Densi...

Page 50: ...to exit Paper Thickness 1 nnn um 2 nnn um 3 nnn um CHK nnn um Press Down for more data Measured Paper Thickness in microns Press Info for help Press Back or Cancel to exit Calc Values mV um 1 n n 2 n...

Page 51: ...sor No Paper Samples 3 33V Press Info to toggle display Press Back or Cancel to exit No Paper Average 1 nnV 2 nnV 3 nnV CHK nnV Paper Average 1 nnV 2 nnV 3 nnH CHK nnV Press Down for more data Measure...

Page 52: ...w IU Count Resetting IU Count Reset Magenta IU Count Resetting IU Count Reset Cyan IU Count Resetting IU Count No Reset Reset Fuser Count Reset Fuser Count Y N Resetting Fuser Count Press Info to togg...

Page 53: ...an and remove any obstruction in the paper path Complete Go to step 3 3 Check the fuser for fuser wrap debris or contamination Remove the Fuser covers and ensure the thermistors are not broken or disl...

Page 54: ...ion Rollers for gaps between rollers and ensure the grounding strap is in place properly Is there a gap between the Registration Rollers Replace the Registration Roller Assembly Go to step 10 10 Use s...

Page 55: ...d feed rollers for the problem tray Did this fix the problem Go to step 5 Replace the problem roller 5 Inspect the paper tray and pick area to see if the paper is picked and feeds correctly from the t...

Page 56: ...13 Inspect the wiring harness for the Duplex Unit Is the wiring harness properly connected and free from defects Replace the Duplex Unit Replace the Engine Controller Board 14 Use service diagnostics...

Page 57: ...lex Unit Did this correct the problem Complete Go to step 3 3 Clean and check the Duplex Unit s rollers Do the rollers move freely and are free of dirt or debris Go to step 4 Replace the Duplex Unit 4...

Page 58: ...step 3 Install or replace tray 3 Inspect the pick and feed rollers for dirt debris defects or excessive wear Clean or replace the pick rollers Go to step 4 4 Use service diagnostics to test the Tray...

Page 59: ...from damage or defects Tray 1 Replace the Engine Controller Board Tray 2 3 4 5 Replace the LTA Controller Board Replace the wiring harness Troubleshooting Procedure Table Steps Actions and Questions...

Page 60: ...ED Pin 2 for 0 volts Replace the Engine Controller Board Replace the MPT Pick Assembly Troubleshooting Procedure Table Steps Actions and Questions Yes No 1 Ensure the paper is loaded correctly in the...

Page 61: ...tings Go to step 3 Change the orientation of the paper 3 Use service diagnostics to test the MPT Entrance Sensor and Actuator Does the sensor operate correctly and does the actuator move freely Go to...

Page 62: ...th the tray Replace the tray Go to step 4 4 Inspect the paper size plate on the back of the tray Does the plate move while adjusting the tray guides Go to step 5 Replace the tray 5 Use service diagnos...

Page 63: ...and try printing again Note If the error is for tray 1 you cannot swap this tray go on Does the problem move with the tray Replace the tray Go to step 4 4 Inspect the paper size plate on the back of...

Page 64: ...Clean or replace the Top Cover Interlock Switch 4 Check to see if the Top Cover actuator located on the Top Cover Inner frame is broken or damaged Is the actuator damaged or broken Replace the Top Co...

Page 65: ...he Duplex Unit s wiring harness If defective replace the wiring harness Is the harness properly seated and free from defects Replace the Engine Controller Board Replace the Duplex Unit Troubleshooting...

Page 66: ...ction correctly Replace the Engine Controller Board Go to step 4 4 Close the door and check for 5 volts at pin 3 of the STDUCOV on the LTA Controller Board Replace the wiring harness and or Switch Rep...

Page 67: ...ng within the humidity specifications See Environmental Specifications on page 1 15 Go to step 2 Advise the customer on humidity specifications 2 Use service diagnostics to verify the printers current...

Page 68: ...ity between the IU Sensor Board and the Engine Controller Board at the JODEN connector Y pin 9 to pin 12 M pin 1 to pin 3 C pin 5 to pin 6 K pin 10 to pin 13 Replace the Engine Controller Board Go to...

Page 69: ...the sensor function correctly Replace the Engine Controller Board Go to step 6 6 Is the toner sensor board wiring harness free from defects and securely connected Replace the Engine Controller Board R...

Page 70: ...gine Controller Board Low Voltage Power Supply and wiring harness Troubleshooting Procedure Table Steps Actions and Questions Yes No 1 Use service diagnostics to check the Fuser life Is the fuser at o...

Page 71: ...er Supply and wiring harness Troubleshooting Procedure Table Steps Actions and Questions Yes No 1 Use service diagnostics to check the life of the Transfer Unit Is the Transfer Unit at or near end of...

Page 72: ...the rollers Replace the Fuser Go to step 4 4 Is there AC voltage to the low voltage power supply CN1 connector Replace the Engine Controller Board Replace Low Voltage Power Supply Troubleshooting Proc...

Page 73: ...ions and Questions Yes No 1 Check for proper clearances around the printer and ensure proper fan operation Go to step 2 Advise customer on clearance for the printer Replace an inoperable fan 1 Verify...

Page 74: ...Table Steps Actions and Questions Yes No 1 Visually inspect the LVPS fans for proper operation and airflow Are the fans operating correctly Go to step 4 Go to step 2 2 Verify 34 volts is being suppli...

Page 75: ...the sensor function correctly Replace the Engine Controller Board Go to step 4 4 Inspect the wiring harness to the MPT Is the wiring harness defective Replace the wiring harness Replace the Engine Co...

Page 76: ...s Go to step 3 3 Verify the Low Voltage Power Supply to the POWER connector on the Engine Controller Board is supplying 34 volts to pins 12 13 and 14 Replace the Engine Controller Board Replace the Lo...

Page 77: ...Engine Controller Board Replace the problem wiring harness or connector Troubleshooting Procedure Table Steps Actions and Questions Yes No 1 Cycle power to the printer Does the error still appear Go...

Page 78: ...pin 9 to pin 12 M pin 1 to pin 3 C pin 5 to pin 6 K pin 10 to pin 13 Replace the Engine Controller Board Go to step 5 5 Check the wiring harness Is the wiring harness defective Replace the wiring har...

Page 79: ...dure Table Steps Actions and Questions Yes No 1 Cycle power to the printer Does the error reappear Replace the Engine Controller Board Complete Troubleshooting Procedure Table Steps Actions and Questi...

Page 80: ...installed Replace the Engine Controller Board Have the customer replace the Fuser Unit Troubleshooting Procedure Table Steps Actions and Questions Yes No 1 Verify the correct Phaser 7300 Duplex Unit i...

Page 81: ...it and verify the fuse blows Does the error still appear Go to step 2 Complete 2 Check the JODEN wiring harness between Imaging Unit Sensor Board and Engine Controller Board Is there a short in the wi...

Page 82: ...2 66 Phaser 7300 Color Printer Service Manual...

Page 83: ...Prints in Only One Color 3 83 Blank Prints 3 85 Mottled or Splotchy Prints 3 87 Unexpected Colors 3 89 Background Contamination 3 91 Toner on Back of Print 3 93 Repeating Defects Bands Lines Marks or...

Page 84: ...a quick means of isolating a defective subsystem associated with the Image Processor Board and SDRAM POST returns control to the boot loader and the operating system is loaded The operating system th...

Page 85: ...t presentation method All soft faults are printed on the StartPage and three hard fault presentation methods The Image Processor Board health LED flashes according to the fault code The front panel LE...

Page 86: ...chip is present If no chip is present the test will fail and the front panel message Please Install i Button will display Extended Memory 7 Soft POST_TEST_DIMM1 2 EEPROM 10 Hard This test checks addre...

Page 87: ...halts and will only become ready when the Image Processor Board successfully boots 1 Check for unreported jams within the printer and clear the jam area 2 Power cycle the printer 3 Verifying Image Pro...

Page 88: ...etween 110 to 127 VAC 110 VAC nominal or 220 to 240 VAC 220 VAC nominal 2 DC Output With the DMM set to measure DC voltages measure the voltages at the POWER connector on the bottom of the Engine Cont...

Page 89: ...over or Right Door A are open the 34 VDC supply and the high voltage power supply are shut down Generally a Close Right Door A or Close Top Cover error message will display on the front panel Door saf...

Page 90: ...to isolate the short Replace the defective wiring harness or component and the Engine Controller Board 2 Verify all wiring harnesses are connected seated correctly and not damaged Replace any damaged...

Page 91: ...D of the lower roller will be open The fuse indicates a new fuser and is blown within seconds of being installed to indicate a fuser now in use Upper Pins C D and E F are thermistor resistances Lower...

Page 92: ...e correct weight and type of media is loaded in the tray See Media and Tray Specifications on page 1 16 for approved media types and weights 2 Make sure that the media is properly installed in the tra...

Page 93: ...g switch background printing to off Try printing the job again 4 If the error returns turn ON the PostScript error handler through the front panel PostScript Error Info under the Support menu or Centr...

Page 94: ...image is selected to print in portrait or landscape orientation to match the document Also ensure the selected paper size is correct Network Problems The Phaser 7300 printer maintains 4 logs in memory...

Page 95: ...present when printing on approved media from an unopened ream of paper software applications environmental conditions and printer hardware need to be researched Ensure the front panel and driver setti...

Page 96: ...ection across the page perpendicular to paper travel Uneven Density Voids Repeating Defects Mis registration Transfer Unit Toner on the back side of the printed page simplex mode Light Prints Repeatin...

Page 97: ...lts for most documents Go to step 3 Set the color correction to automatic and reprint the job 3 Perform the Light and Darkness Color Balance Procedure Did this correct the problem Complete Go to step...

Page 98: ...connector pins 12 13 and 14 on the Engine Controller Board Go to step 10 Replace the LVPS or wiring harness 10 Is 34V supplied to the HVOLT connector Pin 2 on the Engine Controller Board Go to step 11...

Page 99: ...to step 3 Set the color correction to automatic and reprint the job 3 Print the 100 Solid Fill test print Can the problem be isolated to only one primary color Go to step 4 see Light Prints in All Col...

Page 100: ...harness 9 Is 5V supplied to Pin 1 of the problem LED Head assembly KPOW2 YPOW2 MPOW2 CPOW2 Replace the Imaging Unit Go to step 10 10 Is 5V supplied to the POWER connector pins 1 2 3 4 5 6 7 and 8 on...

Page 101: ...to step 3 Remove the packaging material 3 Remove the toner cartridge and check for toner starvation inside the Imaging Unit Is there evidence of toner starvation Replace the toner cartridge Go to ste...

Page 102: ...Replace the LVPS or wiring harness 8 Is 34V supplied to the HVOLT connector Pin 2 on the Engine Controller Board Go to step 9 Replace the Engine Control Board 9 Inspect the high voltage wiring harness...

Page 103: ...rs operating within it s environmental specifications Low humidity less than 20 relative humidity can cause mottling on prints Go to step 3 Advise customer regarding the environmental specifications f...

Page 104: ...ngine Controller Board Go to step 7 Replace the Engine Control Board 7 Inspect the high voltage wiring harnesses Are the wiring harnesses defective Replace any defective wiring harnesses Replace in th...

Page 105: ...es Page to check the Imaging Unit life remaining If the imaging unit is reaching it s maximum image count the printer will not hard stop due to pixel count but this can reduce print quality Have the c...

Page 106: ...wiring harness 10 Is 5V supplied to Pin 1 of each LED Head assembly KPOW2 YPOW2 MPOW2 CPOW2 Go to step 12 Go to step 11 11 Is 5V supplied to the POWER connector pins 1 2 3 4 5 6 7 and 8 on the Toner S...

Page 107: ...re a film of toner across the surface of the drum Replace the Imaging Unit Go to step 4 4 Verify the printer is operating within it s environmental specifications see Environmental Specifications on p...

Page 108: ...ng condition and not contaminated Clean the or replace the Drum Contacts Go to step 9 9 Remove the Imaging Units and the Transfer Unit and check for toner contamination on the high voltage contacts Cl...

Page 109: ...to step 3 Advise customer on the environmental settings for this printer 3 Inspect the Transfer Unit cleaning blade See Transfer Unit on page 8 230 for information on blade flipping Has the blade fli...

Page 110: ...to step 7 Replace the Fuser 7 Use service diagnostics to generate an engine test print and monitor the upper and lower fuser roller temperatures to verify they are operating within specifications See...

Page 111: ...Pages from the printer s front panel Identify the primary color causing the defect Print the Repeating Defects Page Measure the defect and compare it to the Repeating Defects Page to identify the pro...

Page 112: ...problem may be a repeating defect that is not noticeable on smaller media If the areas look like a repeating defect see Repeating Defects Bands Lines Marks or Spots on page 3 95 Random missing spots...

Page 113: ...2 Check the media loaded in the tray for spots or contamination that exists prior to printing Replace with fresh paper Go to step 3 3 Print the Color Test Pages to determine which primary color s are...

Page 114: ...occurs on media if the fuser s temperature setting does not match the media type loaded in the tray See Media and Tray Specifications on page 1 16 to identify the media types approved for this printe...

Page 115: ...or the media loaded in the tray Go to step 4 Advise the customer of the correct media settings 4 Try setting the front panel media type to the next lightest type of paper than that loaded in the tray...

Page 116: ...er than that loaded in the tray See Fuser Temperature Settings on page 8 237 Did this correct the problem Advise customer on the appropriate media type selection Go to step 3 3 Perform the ATS 4 Sheet...

Page 117: ...ntation to evaluate Are the colors shifted left to right Go to step 3 Go to step 9 3 Process Direction Remove the Imaging Units and Transfer Unit Inspect the registration sensors for dirt debris or to...

Page 118: ...to check in and around the registration shutter Clean the sensor Go to step 12 12 Verify the Color Registration Shutter opens and closes by actuating the registration shutter solenoid from service di...

Page 119: ...with the printer Go to step 2 Advise the customer of the problem with the application 2 Are the paper guides set snugly against the paper in the tray Go to step 3 Adjust the guides 3 Run the Calibrat...

Page 120: ...r Engine Controller Board or LTA Controller Board 8 Inspect the tray pick and feed rollers for dirt debris or excessive wear Clean or replace the roller Go to step 9 9 Generate a service test print pa...

Page 121: ...nd might not leave a repeating bar Troubleshooting Procedure Step Check Yes No 1 Print the 100 Solid Fill Test print Is the problem with one primary color Replace the defective Imaging Unit Go to step...

Page 122: ...Go to step 2 See Missing Bands Voids or Streaks in a Single Color or All Colors Parallel to the Leading Edge of the Paper Scan Direction on page 3 105 2 Are there any obstructions dirt or debris in th...

Page 123: ...or moved with the Imaging Unit Replace the defective Imaging Unit Go to step 7 7 Check the Fuser housing for damage or warping Replace the Fuser Go to step 8 8 Verify the ribbon cables and wiring harn...

Page 124: ...Replace the Imaging Unit of the defective color Go to step 2 2 Perform the Remove Print Smears routine from the printer s front panel Did this fix the problem Complete Go to step 3 3 Inspect the Fuser...

Page 125: ...remove obstructions Go to step 3 3 Visual inspect the Imaging Units and rollers for signs of damage Note Exposure to light can damage the Imaging Unit examine the unit quickly and out of direct sunli...

Page 126: ...3 110 Phaser 7300 Color Printer Service Manual...

Page 127: ...ntrol ADC Color and Margin Calibration procedures Resetting NVRAM Resetting NVRAM returns all the Image Processor Board NVRAM stored parameters to their factory default values The details and paramete...

Page 128: ...mples Analyzing the 100 Solid Fill Pages This print consists of 6 pages 100 solid fill in CMYK Blue and Green Things to look for on the 100 Solid Fill Wrinkling Creases Roller marks Scratches Repeatin...

Page 129: ...h color should be consistent across the width of the page with no voids 2 No separation or misconvergence where each bar meets its neighbor Each bar is separated by a thin black line 3 Look for thin w...

Page 130: ...uniformly colored with no mottling 4 Density The color bars should have even density from top to bottom 5 Margins Margins should be 8 mm from the edge of the paper to the line 6 Image Size The image h...

Page 131: ...istent across the width of the page with no voids 2 No separation or mis registration where each bar meets its neighbor Each bar is separated by a thin black line 3 Color Registration Horizontal The c...

Page 132: ...oller Board Caution Clean the color chip with API to remove any oil that may have been left by your fingers from handling the color chip It is critical the color chip is clean 1 Entering the New Tag N...

Page 133: ...Execute Density Calibration and press OK b The printer will perform the calibration then report whether the Density Control Calibration has Passed or Failed c If the procedure fails repeat the calibra...

Page 134: ...Sensor you MUST use Phaser 35 Series Premium Transparencies Using any other transparency will cause significant damage to the fuser and fail the adjustment 1 ATS Anvil Adjustment a Open the Right Cove...

Page 135: ...on a Enter Service Diagnostics b Scroll to Adjustments Calibrations and press OK c Select ATS 4 Sheet Calibration and press OK d Select Edit Thickness Data and press OK e When prompted to Select thick...

Page 136: ...he fourth sheet to test the calibration If the fourth sheet falls within the expected thickness range the printer displays Thickness Calibration Passed l If the fourth sheet does not measure as expect...

Page 137: ...finer adjustment of the primary colors cyan magenta and yellow is needed continue with the Balance Colors Procedure Print the Color Calibration Tutorial from the printer s front panel and follow the i...

Page 138: ...ore Previous Settings Color You can return the color settings to the ones that existed before you saved the last color balance adjustments 1 From the Main Menu highlight Support and press OK 2 Highlig...

Page 139: ...From the Main Menu highlight Print Setup Menu and press OK 2 Highlight Job Defaults Menu and press OK 3 Reset Job Defaults is displayed press OK 4 Highlight Reset Job Defaults NOW and press OK to res...

Page 140: ...margin and calibrations to their factory default values The print counts and the Adobe firmware serial number are not affected by this reset 1 From the Main Menu highlight Support and press OK 2 High...

Page 141: ...aceable Consumables Part Name Display or Warning Condition Recommended Condition for Replacement Adjustment after Replacement Toner Cartridge OK Low Empty When 15 000 high capacity cartridge or 7 500...

Page 142: ...D Head lens or the LED Head connector block Clean with an alcohol wipe if necessary The LED lens must be cleaned when the printed paper has white lines or irregular colors such as a void or light prin...

Page 143: ...Sensor or Color Chip Clean both the ADC Sensor and Color Chip located on the underside of the Registration Shutter with a slightly dampened lint free cloth Cleaning the Registration Sensor Color mis...

Page 144: ...5 128 Phaser 7300 Color Printer Service Manual...

Page 145: ...2 3 6 141 Multi Purpose Tray Sensors PL 2 0 6 141 Temperature Humidity Sensor Board PL 1 22 6 141 Image Processor Board IP PL 3 6 6 142 Rear Shield Plate PL 3 1 6 146 Electrical Card Cage PL 3 10 and...

Page 146: ...e Front PL 5 1 4 6 180 Fuser Latching Handle Rear PL 5 2 1 6 181 Fuser Exit Roller PL 5 1 1 6 182 Fuser Exit Sensor Assembly PL 5 1 3 6 183 Eject Guide Assembly PL 4 8 6 184 Stack Full Sensor PL 4 5 a...

Page 147: ...power cord 2 Remove the Imaging Units and protect them from exposure to light by covering them with a light proof bag or placing them in a light tight container 3 Disconnect all computer interface ca...

Page 148: ...direction is always given in reference to the print engine not the individual part Refer to the printer orientation graphic on page 6 131 for locating the Right Left Front and Back sides of the print...

Page 149: ...sor Board see pg 6 142 2 Remove the Rear Cover see pg 6 135 3 Remove the 10 B screws securing the top cover to the Top Cover Inner Frame item 1 Note The screws circled in the illustration are difficul...

Page 150: ...Front Panel Harness PL 4 2 1 Remove the Top Cover see pg 6 133 2 Carefully separate the Front Panel from the Top Cover by releasing the tabs 3 Lift the Front Panel and disconnect the wiring harness i...

Page 151: ...te wiring harnesses out of the slot in the Rear Cover Note routing for reinstallation 5 Pull out at the top of the cover then lift to remove it from the printer Reassembly Caution When reinstalling th...

Page 152: ...1 9 1 Remove the Duplex Unit and Tray 1 see pg 6 154 2 Remove 3 B and 1 G screws from the top of the Front Cover 3 Remove 3 G screws from the lower front of the Front Cover 4 Lift the Front Cover str...

Page 153: ...Tray item 1 approximately 1 inch 2 Free the end of the Side Output Tray Links item 2 from the sides of the tray 3 To free the links from the printer rotate them up so they are parallel with the cabin...

Page 154: ...e Cover PL 1 4 1 Remove the Rear Cover see pg 6 135 2 Remove the Front Cover see pg 6 136 3 Remove the Side Output Tray see pg 6 137 4 Remove the 2 B and 2 G screws from the Left Side Cover 5 Pull the...

Page 155: ...ring the link strap item 2 to the printer frame 2 Open the right door about 30o Using a small screwdriver see callout in the illustration below push the tab toward the back of the printer to release i...

Page 156: ...6 140 Phaser 7300 Color Printer Service Manual Multi Purpose Tray MPT Pick Assembly PL 2 0 B B B B B S7300 151...

Page 157: ...inter 8 Disconnect the wiring harness to the ATS Sensor 9 Lift and remove the Multi Purpose Tray Note If replacing the Multi purpose Tray Drive Gear continue with Step 11 Drive Gear PL 2 3 10 Remove t...

Page 158: ...there are several components that must be transferred to the replacement board before it is reinstalled Note Print a Configuration Page prior to removing the IP Board This provides a record of the net...

Page 159: ...e following items from the old board to the new board before installing the new Image Processor Board RAM DIMMS Optional Hard Drive Configuration Chip NVRAM chip RAM DIMMs PL 3 2 Warning Switch off th...

Page 160: ...he board securing the Hard Drive to the board 5 Carefully lift the back of the Hard Drive about 1 4 inch away from the Image Processor Board to clear surface mount parts and gently slide the Hard Driv...

Page 161: ...restraint latch slightly and pull out the configuration chip Warning Do not lift the Configuration Chip restraint too far or it will break Caution Do not confuse the Configuration Chip with the batte...

Page 162: ...6 Phaser 7300 Color Printer Service Manual Rear Shield Plate PL 3 1 1 Remove the Rear Cover see pg 6 135 2 Remove 34 G screws securing the Rear Shield Plate 3 Remove the Rear Shield Plate S7300 45 G G...

Page 163: ...d blow into the cage Improper replacement of the fan will damage the printer Card Cage Removal 1 Remove the Image Processor Board see pg 6 142 2 Remove the Rear Shield Plate see pg 6 146 3 Remove 4 G...

Page 164: ...5 screws securing the print Engine Controller Board 9 Remove the Engine Controller Board see pg 6 149 10 Remove the harnesses from the front of the electrical card cage 11 Remove the 13 G screws secur...

Page 165: ...ostatic Discharge ESD precautions 1 Remove the Image Processor Board see pg 6 142 2 Remove the Rear Cover see pg 6 135 3 Remove the Rear Shield Plate see pg 6 146 Wiring 4 Disconnect all connectors to...

Page 166: ...ge Spring Front PL 1 5 Top Cover Hinge Spring Rear PL 1 7 Top Cover Hinge Shaft PL 1 6 1 Remove the Top Cover see pg 6 133 2 Remove the Left side Cover see pg 6 138 3 Remove the Front Cover see pg 6 1...

Page 167: ...Top Cover Front Damper item 6 Tilt the Top Cover forward slightly and remove the damper 12 Supporting the weight of the Top Cover Inner Frame gently lower the inner frame into its closed position 13...

Page 168: ...ame 4 Remove 3 B screws securing the Toner Sensor Board 5 Rotate the board to expose the underside of the board Note When reassembling the ribbon cables are routed under the sensor board in the follow...

Page 169: ...ponent side of the board 3 From the underside of the Top Cover Inner Frame use a small screwdriver to carefully push up the arms of the actuator until they pop free 4 Remove the Toner Cartridge Sensor...

Page 170: ...ease lever next to the guide pin and pull forward to release the Duplex Unit from Tray 1 3 Holding tray 1 force the duplex unit backwards about 5 cm and lift the duplex unit to separate it from the pa...

Page 171: ...G screws and 3 B screws 4 Disconnect the Front Power Supply Fan s wiring harness item 1 from the Low Voltage Power Supply Board 5 Remove 2 B screws securing the fan and slide the Front Power Supply Fa...

Page 172: ...hield Plate and remove 8 Remove the Multi Purpose Tray see pg 6 140 9 Remove the 4 G and 4 B screws securing the Top Shield Plate to the Electrical Card Cage and remove the plate 10 Disconnect the LED...

Page 173: ...termediate power connectors and clear them from the fan duct retainer Toner Sensor Board connector Top Fuser Fan connector Rear Fuser Fan connector 14 Disconnect the serial port wiring harness at the...

Page 174: ...DUCOV RSNS FSENS FEED REG I D JODEN BELTHET POWER JOBOFF FAN HOPFF SHUTTER FCOVER TR1OP GEARED FRPUCL HOPLIFT DUPLEX PSIZE RCL OPTN COVOPN 3 4 F8 F6 25 2 8 1 1 2 1 2 1 1 1 6 5 16 16 1 15 16 15 1 2 22...

Page 175: ...r RCL Note Route loose wiring harnesses and connectors through chassis openings and EMI suppressors Note routing for reassembly 18 Disconnect the following at the front of the printer The Front Chassi...

Page 176: ...ce Manual Note 1 G screw is located in the channel at the back left side of the printer 21 Remove 12 screws securing the Printer Unit Chassis to the frame 4 GB screws 4 G and 4 B screws S7300 157 1 B...

Page 177: ...When access to the connector is achieved remove the connector using needle nose pliers The chassis is now free to be removed 24 Carefully lift the chassis straight up from the printer frame Rest the c...

Page 178: ...oltage Power Supply Fan connector is on before reassembling the chassis 2 Remove 1 screw securing the fan to the fan duct 3 Slide the Rear Power Supply Fan out of the duct 2 screws secure the duct in...

Page 179: ...chassis upside down and remove the Registration Roller B Assembly see pg 6 178 4 Remove the spring loaded Registration Entrance Sensor Actuator see pg 6 170 Note Note the orientation of the actuator...

Page 180: ...move 2 screws from the Front Power Supply Fan Let the fan rest on the front of the lower plate 3 Disconnect the Front Chassis Fan from the front of the low voltage power supply board item 1 4 Remove 4...

Page 181: ...sconnect CN1 from the High Voltage Power Supply 3 Disconnect CN3 from the Low Voltage Power Supply 4 Remove 3 screws securing the High Voltage Power Supply to the chassis 5 Lift the High Voltage Power...

Page 182: ...Printer Unit Chassis see pg 6 156 2 Unplug connectors CN1 CN2 CN3 and AC IN from the Low Voltage Power Supply 3 Disconnect the AC power switch wiring harness interconnect 4 Remove the 8 B screws secur...

Page 183: ...nd of the feed rollers 3 Slide the feed rollers to the front to remove them Note Note the position of the clutch on the shaft behind the upper roller and the torque limiter on the shaft behind the low...

Page 184: ...PL 6 1 1 1 Remove Tray 1 2 Reach in through the printer cavity left by tray 1 and disconnect the ribbon cable attached to the Paper Size Sensor Board 3 Remove the 4 G screws securing the Paper Size Se...

Page 185: ...itional connectors that are brown black and red 5 Remove the main feeder cross brace it is held in place with 5 screws 6 Remove the 4 G screws around the outer edge of the Main Feeder Assembly Note Do...

Page 186: ...tion Entrance Sensor Actuator B PL 5 1 15 1 Remove the Printer Unit Chassis see pg 6 156 2 Turn the Printer Unit Chassis upside down and carefully squeeze the actuator s two locking tabs to remove the...

Page 187: ...Entrance Sensor Board see pg 6 163 4 From the bottom squeeze the two locking tabs securing the MPT Entrance Sensor Actuator item 1 and remove the actuator 5 From the bottom squeeze the two locking ta...

Page 188: ...pg 6 136 2 Remove the Front Shield Plate 3 Free the Front Power Supply Fan and let it hang 4 Disconnect the wiring harness from the Top Side Output Solenoid item 1 5 Disconnect the wiring harness from...

Page 189: ...he Engine Controller Board 3 Remove 1 screw securing the ground strap to the motor bracket 4 Remove the e ring item 1 securing the clutch to the registration shaft B 5 Remove the Registration Clutch i...

Page 190: ...e pg 6 135 2 Remove the Rear Shield Plate see pg 6 146 3 Remove the Registration Clutch see pg 6 173 4 Remove 1 small G and 3 B screws securing the motor to the bracket item 1 5 Disconnect the harness...

Page 191: ...d after reinstalling 1 Remove the Front Cover see pg 6 136 2 Remove the Rear Cover see pg 6 135 3 Remove the MPT Pick Assembly see pg 6 140 4 Remove the Pickup Cover Assembly from the Pickup Plate Ass...

Page 192: ...ed part of Registration Roller A Note The ATS Anvil and 4 Sheet Calibration Procedures see pg 4 118 need to be performed after reinstalling 1 Remove the Registration Roller A Assembly see pg 6 177 2 R...

Page 193: ...Assembly A 6 Lift the roller assembly and remove Note If replacing the Drive Gear continue with Step 7 7 Remove the E ring securing the drive gear to the back end of the Registration Roller Assembly 8...

Page 194: ...ove the Printer Unit Chassis see pg 6 156 2 Turn the Printer Unit Chassis upside down and remove the 4 B screws securing Registration Roller Assembly B to the underside of the Printer Unit Chassis 3 L...

Page 195: ...e Assembly PL 5 1 2 1 Grasp the Duplex Guide Assembly and pull the assembly straight up and out of the printer Note Be careful not to lose the springs when removing the Duplex Guide Assembly Leave the...

Page 196: ...hing Handle Front PL 5 1 4 1 Remove the Front Cover see pg 6 136 2 Remove the Fuser 3 Release the fuser latching handle spring item 2 4 Remove 2 B screws securing the Fuser Latching Handle item 1 to t...

Page 197: ...Remove the Printer Unit Chassis see pg 6 156 2 Release the fuser latching handle spring item 3 3 Remove the e ring item 2 securing the Rear Fuser Latching Handle to its shaft 4 Slide the rear Fuser La...

Page 198: ...e pg 6 147 6 Lift and remove the Duplex Guide Assembly see pg 6 179 7 At the rear of the Fuser Exit Roller item 2 remove 1 G screw securing the ground contact item 3 8 Remove the bearing 1 B screw and...

Page 199: ...int Unit Chassis see pg 6 156 3 From the Engine Controller Board remove the connector to the Fuser Exit Sensor Assembly PARTTEMP 4 Lift and remove the Duplex Exit Gate 5 Remove 1 B screw securing the...

Page 200: ...Color Printer Service Manual Eject Guide Assembly PL 4 8 1 Remove the Top Cover Inner Frame see pg 6 150 2 Remove 7 B screws securing the Eject Guide Assembly to the Top Cover Inner Frame 3 Remove the...

Page 201: ...or PL 4 5 and Actuator PL 4 4 1 Remove the Top Cover see pg 6 133 2 Disconnect the cable from the Stack Full Sensor 3 Release the 4 locking tabs securing the Stack Full Sensor item 2 and remove the se...

Page 202: ...ack Plate Assembly to the frame 3 Disconnect the wiring harnesses from all four Imaging Unit Motors 4 Lift the front of the Back Plate Assembly about 2 cm 3 4 in and carefully guide the ribbon cable t...

Page 203: ...Fuser Motor and Transfer Unit Motor Assembly to the chassis and tilt the assembly into the chassis 3 Disconnect the two in line connectors item 2 leading to the Fuser Motor and Transfer Unit Motor Ass...

Page 204: ...the T shaped plastic guides which can happen if lifting the plate shutter to far 3 Carefully lift the tabs on the right end of the shutter over the stopper and continue to move the shutter toward the...

Page 205: ...the Color Registration Shutter Plate and perform the ADC Calibration Procedure see pg 4 116 1 Remove the Color Registration Plate Shutter see pg 6 188 2 Remove 2 B screws securing the Color Registrati...

Page 206: ...ssis see pg 6 156 2 Remove the Color Registration Plate Shutter see pg 6 188 3 Disconnect the Color Registration Shutter Solenoid s in line connector 4 Release the solenoid harness item 2 from all cab...

Page 207: ...4 9b 1 Disconnect the LED Head y power harness from the Toner Sensor Board 2 Carefully disconnect both cables item C from the LED Head Note the cable routing for reassembly 3 With small screwdriver ca...

Page 208: ...vice Manual Imaging Unit Drum Contact Assembly PL 5 1 27 1 Use a small screwdriver to carefully pry the Drum Contact Assembly from the Printer Unit Chassis Caution When reinstalling ensure the springs...

Page 209: ...art 3 and part 4 An asterisk following a part name indicates the page contains a note about this part A notation part of item 1 1 indicates that the part is included with parent assembly Part 1 1 PL1...

Page 210: ...7 194 Phaser 7300 Color Printer Service Manual PL 1 0 Covers S7300 100a 9 10 15 12 8 7 6 5 1 18 17 1 PL 6 1 4 3 2 14 19 21 22 23 24 13 PL 2 0 11 20 21...

Page 211: ...Front 9 116 1551 00 1 Front Cover 10 116 1039 00 1 Duplex Slot Cover 11 116 1056 00 1 Top Cover Damper Rear 12 116 1005 00 1 Rear Cover 13 116 1561 00 1 MPT Pick Assembly PL 2 0 14 116 1066 00 1 Fron...

Page 212: ...7 196 Phaser 7300 Color Printer Service Manual PL 2 0 MPT Pick Assembly S7300 101 4 3 5 8 9 7 2 1 2...

Page 213: ...1 MPT Tray 2 012E12690 2 MPT Links Front and Rear 3 Gear Kit 1 MPT Drive Gear 4 116 1025 00 1 Top Cover Interlock Switch 5 116 1561 00 1 MPT Pick Assembly with 5 7 8 9 6 7 not spared 1 MPT Roller Home...

Page 214: ...7 198 Phaser 7300 Color Printer Service Manual PL 3 0 Printer Control Components Boards S7300 105...

Page 215: ...S SDRAM 64MB PC133 SODIMM 128MB PC133 SODIMM 256MB PC133 SODIMM 3 1 NVRAM 4 163 1481 00 163 1484 00 1 1 Configuration Chip Base Network Upgrade 5 650 4240 00 1 Optional Hard Drive 6 671 5273 80 1 Imag...

Page 216: ...7 200 Phaser 7300 Color Printer Service Manual PL 4 0 Top Cover Inner Frame S7300 102 14 12 12 13 14 15 13 15 10 8 2 1 6 3 7 4 19 18 17 16 5 9a 9b...

Page 217: ...xit Rollers 7 116 1057 00 1 Top Output Tray 8 116 1549 00 1 Eject Guide Assembly 9a 9b 116 1547 00 116 0012 00 4 4 LED Head 600 dpi LED Head Holder 10 Hardware Kit 1 LED Assembly Spring 11 12 LED Harn...

Page 218: ...7 202 Phaser 7300 Color Printer Service Manual PL 5 1 Printer Unit Chassis 1 of 2 S7300 103 26 24 25 1 28 2x 27 4x 22 31 30 21 29 5 3 4 17 16 15 14 12 13 20 19 18 11 10 8 6 7 2 9 23 ADC...

Page 219: ...dware Kit 1 Registration Shutter Spring 13 116 1569 00 1 Color Registration Shutter Solenoid 14 116 1558 00 1 Printer Unit Chassis 15 Flag Kit 1 Registration Entrance Sensor Actuator B 16 116 1015 00...

Page 220: ...7 204 Phaser 7300 Color Printer Service Manual PL 5 2 Printer Unit Chassis 2 of 2 and Power Supplies S7300 104 N...

Page 221: ...Assembly 4 116 1215 00 1 Front Chassis Fan 5 116 1034 00 1 LVPS Insulator 6 116 1067 00 1 Duplex Exit Paper Guide 7 116 1033 00 1 HVPS Insulator 8 116 1557 00 Imaging Unit Contact Assembly HV 9 116 15...

Page 222: ...7 206 Phaser 7300 Color Printer Service Manual PL 6 1 Paper Tray 1 S7300 106 10 8 9 2 3x 6 7 5 3 2x 4 1...

Page 223: ...ss 2 116 1062 00 Paper Feed Roller Kit 3 Rollers 3 116 1216 00 Bearing One Way Feed Roller 4 116 1562 00 Torque Limiter Retard Roller 5 116 1065 00 Door A Interlock Switch 6 116 1553 00 Main Feeder As...

Page 224: ...7 208 Phaser 7300 Color Printer Service Manual PL 6 2 Lower Tray Deck Lower Tray Assembly Trays 2 3 4 5 S7300 107 9 8 5 4 3 2 1 7 6 4x 99 1 9 7300LTA 7300LTD...

Page 225: ...ay Assembly LTA 1 116 1040 00 1 LTA Top Connector 2 116 1044 00 1 LTA Rear Cover 3 116 1581 00 1 LTA Controller Board 4 116 1047 00 116 1645 00 1 1 Lower Feeder Assembly LTA 1st 2nd Tray of LTD LTD Fe...

Page 226: ...ck Registration Shutter Spring Fuser Latch Handle Springs Screw T3x8 Screw T3x10 Screw T4x10 Screw M2x8 Screw M3x6 Screw M3x8 Screw M4x8 Screw SP3x10 Screw T4X6 Screw T4X8 Exit Rollers Gear kit Part n...

Page 227: ...Registration Sensor and ADC Sensor Imaging Unit Sensor Board Entrance Sensor Board Tray Sensors Duplex Unit Engine Controller Board LVPS Right Door A Face Up Tray Inline Connector Job Offset Fuser Fa...

Page 228: ...lag Kit Stack Full Sensor Actuator Toner Sensor Actuator qty of 4 Exit Sensor Actuator Registration Entrance Sensor A Actuator Registration Entrance Sensor B Actuator Registration A Exit Sensor Actuat...

Page 229: ...065 0617 00 Repackaging Kit Phaser 7300 065 0621 00 7300 Shipping Box 004 5229 00 Replacement Shipping Box LTD 004 4523 00 Replacement Shipping Box LTA 004 5290 00 Manuals and CD s Description Part Nu...

Page 230: ...rtridges Standard Capacity Yellow 016 1975 00 Standard Capacity Magenta 016 1974 00 Standard Capacity Cyan 016 1973 00 Standard Capacity Black 016 1976 00 High Capacity Yellow 016 1979 00 High Capacit...

Page 231: ...0 lb book A Letter U S 8 5 x 11 in A4 Metric Letter 210 x 297 mm 11 x 17 in A3 SRA3 12 x 18 in 100 sheets 100 sheets 50 sheets 50 sheets 50 sheets 50 sheets 016 1704 00 016 1705 00 016 1718 00 016 171...

Page 232: ...Letter 210 x 297 mm 60 lb 163 g m2 100 sheets 016 1824 00 Phaser CD DVD Labels and Inserts Item Description Part Number A Letter U S 8 5 x 11 in 10 sheets 2 labels per sheet 20 sheets 1 insert per she...

Page 233: ...pes Size A7 Item Description Part Number A Letter U S 8 5 x 11 in 70 lb 25 sheets envelopes 016 1987 00 A4 Metric Letter 210 x 297 mm 190 g m2 25 sheets envelopes 016 1988 00 Cleaning Kit Item Descrip...

Page 234: ...7 218 Phaser 7300 Color Printer Service Manual...

Page 235: ...maging Unit Up Down Movement 8 231 Transfer Unit Arm and Gear Up Down Movement of the Imaging Units 8 232 Fuser and Paper Exit 8 233 Duplex Unit 8 234 Paper Jam Detection 8 235 Paper Size Sensing 8 23...

Page 236: ...Toner Cartridge Transfer Roller Registration Roller 1 Paper loading Hopping Roller Power Supply Registration Roller 2 Paper Ejection Fusing Cleaning Transfer Paper carriage Paper advance Paper traveli...

Page 237: ...latent electrostatic image on the drum surface 4 Developing and recovery of excessive toner Toner is attracted to the electrostatic image on the drum the areas exposed by the LED light forming a visi...

Page 238: ...is reduced according to the magnitude of the light A latent image is formed on the surface of the drum according to the resulting surface potentials Developing Developing applies toner to the latent i...

Page 239: ...of a conductive sponge presses the paper against the surface of the drum This process sandwiches the paper between the surface of the drum and the transfer roller When the positive charge supplied by...

Page 240: ...roller Similarly the fluorine coated surface of the lower roller is heated by a 500 watt heater a halogen lamp The temperature of the upper and lower roller surfaces are controlled by the thermistors...

Page 241: ...is scraped off by a cleaning blade and collected into the waste toner bin located on the inside of the toner cartridge Transfer Unit Cleaning Toner remaining on the transfer unit is scraped off by a c...

Page 242: ...Roller Eject Roller Eject roller 4 x LED Heads 4 x IU Units and Toner Cartridges Pick Rollers MPT Pick Roller Tray 1 Tray 2 Tray 3 Tray 4 Tray 5 MPT Registration Roller Assy A Registration Roller Assy...

Page 243: ...e paper feed operation when the paper s leading edge touches the registration roller assembly A With this rotation the registration roller assembly A and the registration clutch are engaged 4 At this...

Page 244: ...Color Printer Service Manual Paper Fed from Optional Trays S7300 123 Feed Roller Feed Motor Feed Roller Tray Feed Clutch Feed Sensor Hop Sensor Feed Roller Pick Roller Feed Roller Upper tray Optional...

Page 245: ...or senses the leading edge of the paper the paper is transported forward for a specified length The paper stops when its leading edge reaches the registration roller assembly A 4 Concurrently the cam...

Page 246: ...ust under the imaging unit for each color with the transfer belt sandwiched between them When the transfer belt motor and imaging unit motors are activated they carry the paper on the transfer belt to...

Page 247: ...er 2 reaches the lowest position the one way gear idles 2 Rotating the imaging unit main motor in the direction of the arrow b causes lever 1 to push up the imaging unit via lever 2 Once the imaging d...

Page 248: ...or Printer Service Manual Transfer Unit Arm and Gear Up Down Movement of the Imaging Units Note The Black Imaging Unit does not move Board Pin Plate S7300 140 Imaging Drum Contact Spring S7300 186 Gea...

Page 249: ...r sets of eject rollers rotate to eject the print 3 The eject route to the left side output tray is selected by a spring loaded separator gate With the left side output tray open the face up gate dire...

Page 250: ...s switched when roller 1 turns just as the paper begins to exit and the paper is retracted back into the printer 2 When the leading edge of the paper passes through the duplex entrance sensor the roll...

Page 251: ...sor does not turn OFF within a specified amount of time meaning the jam occurs along the path of the sensor Misfeeds occur when the paper can not be loaded from the tray Paper size errors occur when t...

Page 252: ...t positions indicate to the paper size sensor board the size of the paper in the tray 1 Paper Size Sensor Board 2 Plate on the back of the Paper Tray Paper Size Detection State of Microswitch Paper Si...

Page 253: ...lems associated with fuser temperature Light Medium Medium Heavy and Heavy Paper are found in the Special Menu Media Type Upper Roller Temperature Lower Roller Temperature Order from Lowest to Highest...

Page 254: ...al CVOPN indicating the status and reporting the error message Close Top Cover or Close Right Door A At this time the engine controller board receives the FCOVER signal and implements the cover open p...

Page 255: ...s at a constant rate a stirring bar and a magnet on the stirring bar The toner state is detected by measuring the contact time between the toner cartridge sensor actuator and the magnet on the stirrin...

Page 256: ...ted by the printer When the toner low state is detected 3 consecutive times a toner low state is established When the toner full state is detected 2 consecutive times the toner low state is cancelled...

Page 257: ...type optical sensors read to measure the amount of misalignment base on the position of the black toner patch According to this measurement the printer determines the correct value and automatically a...

Page 258: ...been printed Customer Replaceable Consumable CRC Life Counter Behavior Internal counters track Customer Replaceable Consumable CRCs life usage and store the values on the Engine Controller Board EEPR...

Page 259: ...averages over 2 to 4 toner cartridges Customer Replaceable Consumable CRC Print Life 1 Fuser 80 000 2 Transfer Unit 80 000 3 Toner Cartridges Standard High Capacity 7 500 15 000 4 Imaging Units Note...

Page 260: ...r board converts the data from the print jobs into bitmap images The data passes through the engine controller board to switch the laser diode on and off during the printing process The image processo...

Page 261: ...ine Controller Board Connectors on page 8 246 4 Toner Sensor Board 5 Low Voltage Power Supply 6 High Voltage Power Supply 7 Entrance Sensor Board contains the following sensors Transfer belt entrance...

Page 262: ...board BELTHET Fuser and Transfer Motors JOBOFF Top and rear fuser fans right and left offset solenoids HVOLT STDUCOV RSNS FSENS FEED REG I D JODEN BELTHET POWER JOBOFF FAN HOPFF SHUTTER FCOVER TR1OP...

Page 263: ...uplex unit PSIZE Paper size sensor board HVOLT High voltage power supply COVOPN Top cover interlock switch POWER Low voltage power supply board CN1 STDUCOV Right Door A interlock and side output tray...

Page 264: ...Sensor Feed Sensor Lower Fuser Roller Duplex Entrance Sensor Duplex Roller Duplex Rear Sensor Duplex Feed Rollers Duplex Exit sensor Registration Roller B Registration Roller A MPT Entrance Sensor Re...

Page 265: ...fer belt 12 ATS Sensor Adjusts the fuser temperature according to the thickness of media loaded in the tray This only functions when the front panel media type is set to plain or letterhead 13 Temp Hu...

Page 266: ...tor 3 Transfer Unit Motor 4 Fuser Motor 5 Job Offset Motor 6 Exit Solenoid 7 Duplex Solenoid 8 Color Registration Shutter Solenoid 9 Tray Lift Motor 10 Cyan Imaging Unit Motor 11 Magenta Imaging Unit...

Page 267: ...r Contents Description Page Motors and Drum Contacts 10 252 Power and Fans 10 253 Paper Path Sensors A 10 254 Paper Path Sensors B 10 255 Front Panel and Toner Sensor Board 10 256 High Voltage and Low...

Page 268: ...ID MOT_A Blue 13 C_ID MOT_A Blue 12 M_ID MOT_B Red 11 M_ID MOT_B Red 10 M_ID MOT_A Red 9 M_ID MOT_A Red 8 Y_ID MOT_B Yellow 7 Y_ID MOT_B Yellow 6 Y_ID MOT_A Yellow 5 Y_ID MOT_A Yellow 4 K_ID MOT_B Bla...

Page 269: ...EFANERROR White 2 GND Black 1 CCAGEFANON 34V Red 2 GND Black 1 FFUSERFAN0N 34V Red 10 REARFUSFANERROR Red 9 GND Red 8 REARFUSFANON 34V Red 7 MIDFUSFANERROR Red 6 GND Red 5 MIDFUSFANON 34V Red 4 OFFSET...

Page 270: ...MOT_A Black 2 FF_MOT_A Black 3 FF_MOT_B Black 4 FF_MOT_B Black 1 5V White Flexcable 2 SW4 3 SW3 4 SW2 5 SW1 6 GND 2 FEEDSNS Brown 3 GND Brown 4 5V Brown 5 LIFTSNS Brown 1 FEEDCL 34V White 2 COM 34V Wh...

Page 271: ...d 6 GND Red 7 GND Black 8 LIFTPLATEUP Black 9 TEMP Green 10 5V Green 11 GND Green 12 HUMID Green 13 5V Yellow 14 THICKSIG Yellow 15 GND Yellow 16 THICKSIG Yellow 1 GND Black 2 REGENTSNS 3 Not used 4 D...

Page 272: ...t Sensor Left Offset Sensor Not Used Not Used OPTN Engine Controller Board FDWPAP OPTN JOBOFFS STUCK TNRSNSC TNRSNSM TNRSNSY TNRSNSK PANEL 6 1 3 1 4 1 1 20 1 3 10 1 20 1 Toner Sensor Board JOBOFFPE GN...

Page 273: ...HVSIG 7 HVSIG 8 HVSIG 9 HVSIG 10 HVSIG 11 HVSIG 12 HVSIG 13 GND 14 GND 15 GND 16 GND 1 5V Red 2 5V Red 3 12V Yellow 4 12V Yellow 5 GND Black 6 GND Black 7 GND Black 8 GND Black Top Cover Interlock Swi...

Page 274: ...e Controller Board 26 1 S7300 181 5 5V Black 6 5V Black 7 5V Black 8 5V Black 11 5V Black 10 5V Black OPTN Low Voltage Power Supply Board CN1 CN2 26 1 14 1 14 5VLOOP Black POWER 1 14 Toner Sensor Boar...

Page 275: ...3P 4P 6P 3P Feed cable 7 brown 2P Cover Open cable 8 red cable 11 black cable 9 black 2P 2P 2P 1 PSZ 6 2P 3P Cable 3 white red Feed Roller Clutch Deleted from tray 5 2P PCB B73 6P This side is the cut...

Page 276: ...10 260 Xerox 7300 Printer Service Guide...

Page 277: ...071 0862 00...

Reviews: