background image

2-28

Phaser 6128MFP Service Manual

Theory of Operation

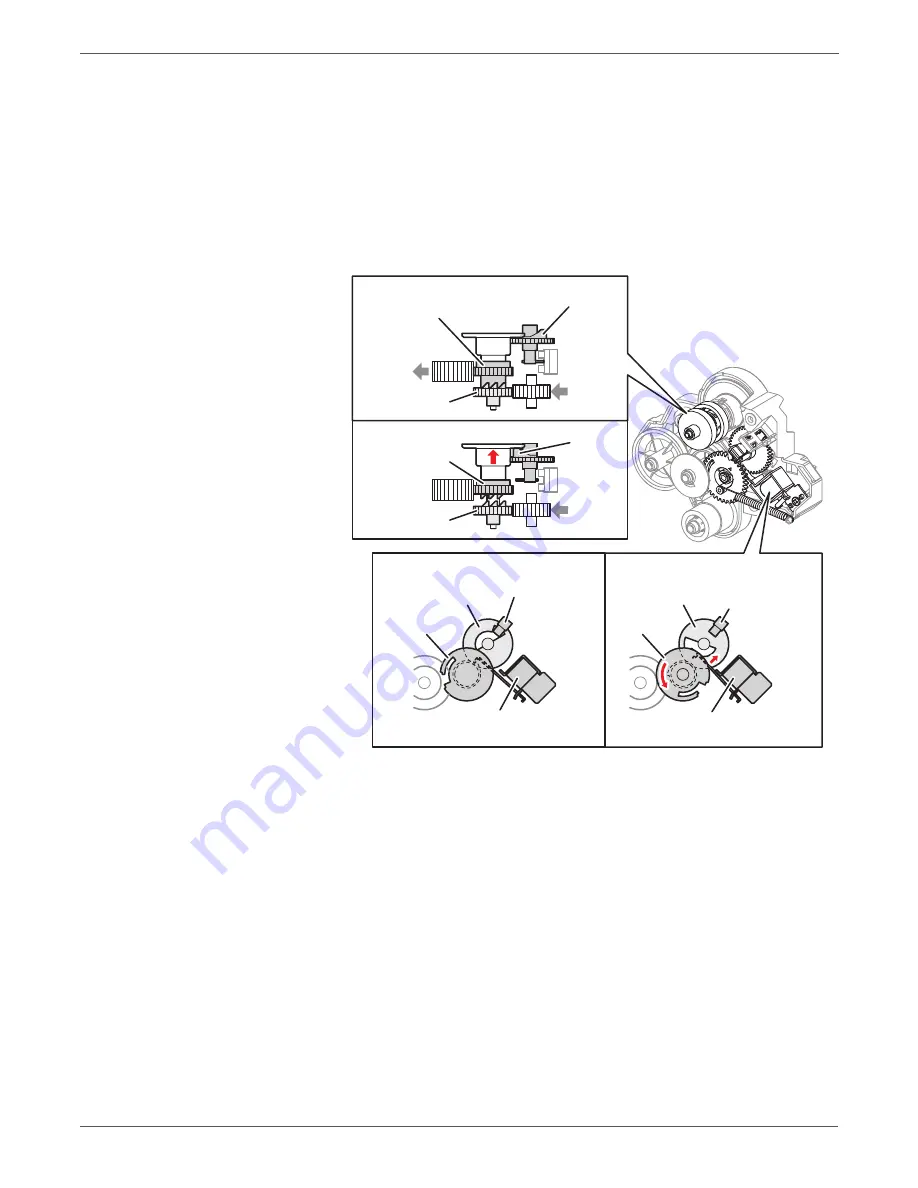
Feed Drive Assembly

The Feed Drive Assy transmits the driving force from the Sub Drive Assembly 
to relevant parts.

The drive path is changed by the Color Mode Switching Solenoid in the Feed 
Drive Assy to allow drive from the Main Drive Assy to reach only the Black 
Developer. This is done to ensure that the Sub Drive Assembly cannot rotate 
the Yellow, Magenta, and Cyan Developers during B/W printing.

The Color Mode Switching Sensor detects whether the drive path is set for B/W 
or full color.

s6128-030

Black And White Mode

Black And White Mode

Full Color Mode

Full Color Mode

Drive From
Sub Motor

Gear D3 In

Color Mode
Switching Sensor

Color Mode
Switching Solenoid

Gear D3 Out

Cam C

Cam C

Gear C

Color Mode
Switching Sensor

Color Mode
Switching Solenoid

Cam C

Gear C

Drive From
Sub Motor

Drive To
Developer 
(Y, M, C)

Gear D3 In

Gear D3 Out

Cam C

Summary of Contents for Phaser 6128 MFP

Page 1: ...Phaser 6128MFP Multi Function Printer Phaser 6128MFP Service Manual ...

Page 2: ......

Page 3: ...lowing servicing instructions are for use by qualified service personnel only To avoid personal injury do not perform any servicing other than that contained in the operating instructions unless you are qualified to do so First Printing March 2009 ...

Page 4: ...ger ATM and PostScript are trademarks of Adobe Systems Incorporated in the United States and or other countries Apple AppleTalk Bonjour EtherTalk LaserWriter LocalTalk Macintosh Mac OS and TrueType are trademarks of Apple Computer Inc in the United States and or other countries HP GL HP UX and PCL are trademarks of Hewlett Packard Corporation in the United States and or other countries Windows Vis...

Page 5: ...nternal View 1 6 Control Panel 1 7 Maintenance Items 1 9 Consumables 1 10 Specifications 1 11 Printer Specifications 1 11 Scanning Specifications 1 12 Copy Specifications 1 13 Fax Specifications 1 14 Memory Specifications 1 15 Electrical Specifications 1 15 Print Speed 1 16 Environmental Specifications 1 16 Operating Mode 1 17 First Print Output Time FPOT 1 18 First Copy Output Time 1 18 Image Spe...

Page 6: ...er Belt and Fuser 2 22 Laser Unit 2 23 Toner Cartridge Dispenser 2 25 Imaging Unit 2 26 Drive 2 27 Electrical 2 29 Printer Modes 2 33 Operational Modes 2 33 Printer Control 2 33 Paper Size Detection 2 33 Laser Unit Light Quantity Control 2 33 Process Control 2 34 Color Registration Control 2 35 Fuser Control 2 36 Drive Transmission 2 37 Main Drive 2 37 Sub Drive Assembly 2 39 Scanner 2 48 CCD Imag...

Page 7: ...agenta Cartridge Error 3 60 Low Density Cyan Cartridge Error 3 62 Low Density Black Cartridge Error 3 63 Non Xerox Toner Cartridge Error 3 65 Insert Cartridge Error 3 66 Non Xerox Toner 3 68 IU CRUM Error 3 69 Imaging Unit Life Replace Imaging Unit Error 3 70 Check Imaging Unit Error 3 71 Insert Imaging Unit Error 3 72 Tray and Media Errors 3 73 Load Tray or Manual Feed 3 73 Load Tray or Illegal S...

Page 8: ...Errors 3 118 SMB Errors 3 120 SMB Login Error 3 120 SMB or DNS Error 3 121 SMB Login Error 3 122 SMB Error 3 123 SMB or FTP Errors 3 124 Scanner and Copier Errors 3 126 PC Scan Time Out 3 126 Scanner Error 3 128 Scanner Error 3 129 Scanner Error 3 130 Copier Error Last Sheet not Copied 3 131 Controller Error 3 132 Fax Errors 3 133 Memory Full Fax Communications 3 133 Fax Codec Error 3 134 MFD Cont...

Page 9: ...lt 4 53 Other Fax Problems 4 54 Fax Failure After Installation Relocation 4 55 Fax Failure After Continuous Normal Operation 4 58 Color Fax Troubleshooting 4 60 Engine Test Print 4 62 Inoperable Printer Troubleshooting 4 63 Engine Power Up Sequence 4 63 Printer Continually Displays Warming Up 4 63 AC Power Supply Troubleshooting 4 63 DC Power Supply Troubleshooting 4 64 LVPS Overcurrent Protection...

Page 10: ...5 31 Skew 5 33 Damaged Media 5 35 Unfused Image 5 38 Color Registration 5 39 Wavy Lines 5 41 Incorrect Magnification 5 42 Lines or Streaks from ADF 5 43 Spots from ADF 5 44 Test Prints 5 45 No Image IOT Test Print 5 45 Pattern IOT Test Print 5 45 Grid 2 ESS Test Print 5 46 Cyan 20 ESS Test Print 5 46 Magenta 20 ESS Test Print 5 47 Yellow 20 ESS Test Print 5 47 Black 20 ESS Test Print 5 48 CMY 20 E...

Page 11: ...g 6 11 7 Cleaning and Maintenance Service Maintenance Procedure 7 2 Recommended Tools 7 2 Cleaning 7 2 Maintenance 7 3 RIP Repair Inspect and Prevent Procedure 7 3 8 Service Parts Disassembly Overview 8 2 Standard Orientation of the Printer 8 2 Preparation 8 3 Notations in the Disassembly Text 8 5 Fastener Types 8 6 Maintenance Items and Consumables 8 7 Separator Roller 8 7 Imaging Unit 8 8 Feed R...

Page 12: ...0 Right Side Door Switch 8 51 Interlock Harness 8 52 HVPS 8 54 Power Switch Harness 8 54 GFI Breaker 8 56 MCU Board 8 57 Main Drive Assembly 8 58 Sub Drive Assembly 8 60 Chassis 8 62 Duct Plate 8 62 Breaker Chassis 8 64 LVPS Card Cage 8 66 Upper Frame Assembly 8 68 Feeder Assembly 8 75 IIT Procedures 8 77 ADF Feed Roll Assembly 8 77 ADF Seperator Pad 8 78 ADF Input Tray 8 78 ADF Assembly 8 79 IIT ...

Page 13: ...List 10 10 ADF 9 32 Xerox Supplies and Accessories 9 34 Service Kits 9 34 10 Wiring Plug Jack Designations and Locator Diagrams 10 2 Print Engine Plug Jack Designators 10 2 System Connections 10 5 Plug Jack Locators 10 6 Wiring Diagrams 10 10 Notations Used in the Wiring Diagrams 10 10 Wiring Diagram Descriptions 10 13 LVPS 10 14 Media Feed 10 15 Main Drive 10 16 Laser Unit 10 17 Xerographics 10 1...

Page 14: ...xii Phaser 6128MFP Service Manual Contents ...

Page 15: ...g a procedure or action Be aware of all symbols and terms when they are used and always read Note Caution and Warning statements Warning A warning indicates an operating or maintenance procedure practice or condition that if not strictly observed results in injury or loss of life Caution A caution indicates an operating or maintenance procedure practice or condition that if not strictly observed r...

Page 16: ...or situations where error indicator is not available Chapter 5 Print Quality Troubleshooting This section focuses on techniques to correct image quality problems associated with the printer output Chapter 6 Adjustments and Calibrations This section provides procedures for the adjustment of print engine components Chapter 7 Cleaning and Maintenance This section provides periodic cleaning procedures...

Page 17: ...rd exists in the area where you see the sign Danger invisible laser radiation when open Avoid direct exposure to beam Hot surface on or in the printer Use caution to avoid personal injury Use caution or draws attention to a particular component Refer to the manual s for information It may take 30 minutes for the Fuser to cool down Do not touch the item Do not expose the item to sunlight Do not exp...

Page 18: ...If the product loses its ground connection contact with conductive parts may cause an electrical shock A protective ground connection by way of the grounding conductor in the power cord is essential for safe operation Disconnecting Power Warning Turning the power Off using the power switch does not completely de energize the printer You must also disconnect the power cord from the printer s Altern...

Page 19: ... applying power to the unit under test to avoid potential shock After removing a static sensitive assembly from its anti static bag place it on a grounded conductive surface If the anti static bag is conductive you may ground the bag and use it as a conductive surface Do not use freon propelled chemicals These can generate electrical charges sufficient to damage some devices Do not remove a replac...

Page 20: ...Labels Read and obey all posted warning labels Throughout the printer warning labels are displayed on potentially dangerous components As you service the printer check to make certain that all warning labels remain in place Safety Interlocks Make sure all covers are in place and all Interlock Switches are functioning correctly after you have completed a printer service call If you bypass an Interl...

Page 21: ...ucted to do so by a service procedure Servicing Mechanical Components When servicing mechanical components within the printer manually rotate the Drive Assemblies Rollers and Gears Warning Do not try to manually rotate or manually stop the drive assemblies while any motor is running Servicing Fuser Components Warning This printer uses heat to fuse the image to paper When operating the Fuser is ver...

Page 22: ...ere is no guarantee that interference will not occur in a particular installation If this equipment does cause harmful interference to radio or television reception which can be determined by turning the equipment Off and On the user is encouraged to try to correct the interference by one or more of the following measures Reorient or relocate the receiver device being interfered with Increase the ...

Page 23: ... if used properly in accordance with the user s instructions is neither dangerous for the consumer nor for the environment To ensure compliance with European Union regulations use shielded interface cables A signed copy of the Declaration of Conformity for this product can be obtained from Xerox January 1 1995 Low Voltage Directive 73 23 EEC as amended by 93 68 EEC January 1 1996 Electromagnetic C...

Page 24: ...xxii Phaser 6128MFP Service Manual ...

Page 25: ...1 Chapter General Information In this chapter Printer Introduction and Overview Printer Configurations Parts of the Printer Maintenance Items Consumables Specifications Controller Functions ...

Page 26: ...MFP provides a 35 sheet Automatic Document Feeder ADF a 250 sheet Tray a manual feed slot supporting single sheet feed of specialty media card stock and envelopes The Output Tray holds 150 sheets facedown Technical Support Information The Xerox Service Manual is the primary document used for repairing maintaining and troubleshooting the printer To ensure complete understanding of this product part...

Page 27: ...MHz Memory Configurationa a The Phaser 6128MFP has one memory slot with 256 MB DDR2 DIMM installed to provide the maximum of 384 MB 384 MB Print Speed Color Mono 12 16 Resolutions dpi Standard 600 x 600 x 1 bit Enhanced 600 x 600 x 4 bit PCL6 Fonts Standard USB 2 0 Support Standard Ethernet Interface 10 100 Base TX Manual Feed Slot Single sheet Standard Standard Tray 250 Sheets Standard Wireless L...

Page 28: ... Information Parts of the Printer Front and Side Views 1 Automatic Document Feeder ADF 2 Output Tray 3 Front Door Release 4 Power Switch 5 Right Side Door 6 Sheet Feeder 7 Paper Tray 8 Front Door 9 Control Panel 1 2 3 4 5 6 7 8 9 s6128mfp 126 ...

Page 29: ...Phaser 6128MFP Service Manual 1 5 General Information Rear View 1 ADF Cover 2 ESS Cover 3 USB Port 4 Ethernet Port 5 Phone Line out 6 Phone Line in 7 Power test 8 AC input 1 2 3 4 5 6 7 8 s6128mfp 127 ...

Page 30: ...1 6 Phaser 6128MFP Service Manual General Information Internal View 1 Fuser 2 Imaging Unit 3 Toner Cartridges 4 Transfer Belt 5 Front Cover Release s6128mfp 128 2 1 3 4 5 ...

Page 31: ...rol Panel consists of multiple LEDs a display and several function buttons These buttons are used to navigate the menu system perform functions and select modes of operation Control Panel Button Descriptions s6128mfp 129 1 4 7 8 2 3 5 6 9 10 11 12 13 14 15 16 17 18 19 21 20 22 ...

Page 32: ...a copy scan or fax job 11 Error LED The red light indicates an error condition 12 Speed Dial button Press to access directories of group or individual fax telephone numbers 13 Clear button Deletes a single character each time the button is pressed For use when entering email addresses and telephone numbers 14 Redial Pause button Press the button to recall the last fax number used or to insert paus...

Page 33: ...int life is based on 3 page jobs using letter size paper LED State Printer State Green Ready to Print or in Power Saver mode Flashing Green Processing print job Red Error occurs can be fixed by user Flashing Red Error occurs cannot be fixed by user Mode Buttons Pressed at Power On Service Diagnostics Up Down arrow buttons Reset Password to 0000 used when the Control Panel menus are locked System B...

Page 34: ... monochrome mode or when printing Gray scale Internal counters track consumables and maintenance life Life ratings are based on A size sheets at 5 coverage Toner Cartridge Print Life C M Y Black Standard Capacity 1 000 pages 1 000 pages High Capacity 2 500 pages 3 100 pages s6128mfp 130 PL10 10 3 ADF Feed Roller Assembly PL10 10 4 ADF Separator Pad Assembly PL6 1 1 Fuser Assembly PL4 1 21 PHD Asse...

Page 35: ...nt Volume Average 450 PV month Maximum 40 000 PV month Median 300 PV month Color Medium Cyan Magenta Yellow and Black Toner Cartridges Resolution Addressability dpi Standard 600 x 600 x 1 Enhanced 600 x 600 x 4 Print Quality Mode 600 x 600 x 1bit Standard 600 x 600 x 4bit Enhanced Average Image Coverage Color 5 each CMYK Mono 5 Maximum Image Coverage 240 for all C M Y K combined Printer Life 100 0...

Page 36: ...m 5 8 in Slow Scan Direction 210 mm 8 3 in Maximum Fast Scan Direction 215 9 mm 8 5 in Slow Scan Direction 355 6 mm 14 0 in USB Scanning Resolution Up to 9600 dpi Scan Interface File Formats TWAIN WIA BMP JPG PDF TIFF Network Scanning Resolution Up to 600 dpi Color Mode Color Black White Original Type Text Photo Mixed File Format JPG PDF TIFF Lighter Darker 7 levels Sharpness 3 levels Contrast 3 l...

Page 37: ...c Network Scan to E mail Document Glass 150 dpi mixed letter size 9 sec 10 sec Copy Specifications Characteristic Specifications Resolution Black White 600 x 600 dpi Color 600 x 600 dpi Copy Mode Color Black White Output Type Standard Enhanced Best Original Type Text Photo Text Photo Reduce Enlarge 25 400 Lighter Darker 7 levels Color Saturation 3 levels Sharpness 3 levels Color Balance 4 colors 3...

Page 38: ...PEG Color Fax Incoming Call Control Telephone Mode Fax Mode Telephone Fax Mode Answering Machine Mode Distinctive Ring Pattern Detection DRPD Lighter Darker 7 levels DM Protection Reject junk Fax Forwarding Local Print Supported Color Fax Resolution is fixed by 200 x 200 dpi Fax Address Book Up to 200 Speed Dial numbers and up to 6 Group Dial numbers stored in device memory The Group Dial Numbers ...

Page 39: ...ecifications Memory Minimum 128 MB Onboard memory Maximum 384 MB Supported RAM Supports one 256 MB DDR2 DIMM in one expansion slot with 128 MB mounted onboard Characteristic Specification Power Supply Voltage Frequency Line Voltages 110 127 VAC 10 220 240 VAC 10 Frequency Range 50 60 Hz 3 Hz Current Capacity 110 V Engine 9 A 220 V Engine 5 A Power Consumption with all options 110 or 220 V Power Sa...

Page 40: ...rd 12 12 16 16 600 Enhanced 12 12 16 16 Characteristic Specification Temperature Operating 5 to 32 C 41 to 90 F Standby 20 to 40 C 4 to 104 F Humidity RH Operating 15 to 85 RH Standby 5 to 85 RH Altitude Operating 0 to 3 100 meters 10 171 feet Acoustic Noise LWA B Sound Power Level B Sound Pressure dBA Printing 6 16 51 6 Standby 4 3 25 7 ...

Page 41: ...ng The system keeps the standby temperature Exposure The system is at Pause Recording The system is at Pause Cooling Fan The fan operates at low speed Control Panel Operation LCD Backlight On LED If printer is online Ready LED is turned On Power Saver Mode Deep Sleep The printer enters into the Power Saver mode to reduce power consumption when it has not received print data for the specified time ...

Page 42: ...e First Copy Output Time FCOT is defined as the time when the Start button is pressed until the trail edge of the first copied media passes the printer Exit Roller The following conditions are applied The Controller does not keep the print engine waiting The printer is at Ready mode Laser Unit Motor Off Fuser Ready Paper is A size Short Edge Feed SEF Document is on the document glass Document sett...

Page 43: ... 6 mm 13 8 inches Guaranteed Print Area 207 9 mm 8 2 inches x 347 6 mm 13 7 inches Skew 190 mm 1 2 mm Perpendicularity 114 5 mm 0 8 mm Parallelism Horizontal 180 mm 1 2 mm Vertical 234 mm 1 2 mm Linearity Horizontal 190 mm 0 5 mm Vertical 234 mm 0 5 mm Slant 269 mm 1 2 mm Magnification Error Horizontal Simplex 234 mm 0 5 mm Horizontal Duplex 234 mm 0 8 mm Vertical Simplex 190 mm 0 5 mm Vertical Du...

Page 44: ...ons Minimum Clearances Height 585 mm 23 Width 420 mm 16 7 in Depth 507 mm 20 Weight base printer without consumables 25 kg 55 lb s6128mfp 131 250 mm 9 84 inches 425 mm 16 73 inches 100 mm 3 94 inches 100 mm 3 94 inches 585 mm 23 03 inches 507 mm 19 96 inches 600 mm 23 62 inches 320 mm 12 60 inches ...

Page 45: ...must be within the specified range The printer must not be tipped or tilted more than 10 degrees or 7 mm Known problems that occur as a result of exceeding the mounting surface specifications are Color to Color mis registration primarily in the horizontal laser scan direction A smear or line of toner approximately 40 mm from the trailing edge of the print s6128mfp 132 10 10 10 10 ...

Page 46: ...ted Paper Types and Weights Paper Type Dimension Manual Feed Tray Plain Paper 65 90 g m2 Yes Yes Letter Head 85 120 g m2 22 32 lb Bond Yes Yes Pre Punched 65 90 g m2 17 24 lb Bond Yes Yes Color Thin Card Stock 100 163 g m2 Yes Yes Special 100 163 g m2 30 60 lb Cover Yes Yes Thick Card Stock 170 216 g m2 Yes No Glossy Paper 100 163 g m2 Yes Yes Thick Glossy Paper 164 216 g m2 Yes Yes Label N A Yes ...

Page 47: ...ive specified IP addresses IP filter is available only to LPD and Port9100 Job Recovery When a print job fails due to a jam the printer automatically restarts the job after the jam is removed Job Timeout When job transmission is interrupted for a certain period of time the print data is deleted as an error The timeout setting can be changed using the menu on the printer s Control Panel Print Volum...

Page 48: ...ngth string so that a password will not be required when requesting job output from the printer Document Name consists of a variable length from 0 to 24 characters 20H FFH that specifies the document name The data will not be printed until the same password user name and document name are provided via the printer menu on the Control Panel User can remove or keep the data after printing the documen...

Page 49: ...t stop at the end of the Toner Cartridge rated life however the printer will display an end of life message on the Control Panel Counter Description Color Print Counter Counts the number of pages printed in color 7 digits Mono Print Counter Counts the number of pages printed in mono 7 digits Total Print Counter Count the total number of pages printed in color and mono 7 digits Toner Cartridge Cont...

Page 50: ...n it is turned on It is checked whether hardware ROM RAM ASIC etc operates properly 2 Manual Diagnostics Only qualified service personnel can perform manual diagnostics using the Service Mode in the Control Panel Non Xerox Toner Cartridge Manufacturer Non Xerox Toner Cartridge No Life Tracking Replace Toner Cartridge Prints with full functionality Updated Firmware Windows Via USB IEEE1284 Via Netw...

Page 51: ... document Product Name Logo Prints organization s logo General Total Impressions Total Color Impressions Total Black Impressions Memory Capacity Printer Language Number of Fonts Available PostScript Version PostScript Serial Number Firmware Version Boot Version Engine Version PostScript CRD Version Default Paper Default Language Current Temperature Current Humidity Print Volume Print Volume for ea...

Page 52: ...ame File Name Output Color User Name Host Name Number of Printed Pages Color Mono Number of Printed Impressions Color Mono Paper Size Result successful error etc USB Setup Adobe Protocol System Setup PowerSaver Time Audio Tones Time Out Language Auto Log Print Print ID Print Text Banner Sheet RAM Disk Tray Switching mm inch Start Up Page Maintenance Auto Reg Adj Non Xerox Toner PCL Paper Tray Pape...

Page 53: ...rors Item No Total Print Count Chain Link Code Print Meter Print Volume Report The Print Meter page contains Date of Initialization Job Accounting User Name Pages Sheets and Date Time Phaser 6128MFP N Color Multifunction Printer Error History Report System Fail History Paper Jam History Date 10 30 2008 Time 11 13 Paper Jam Type IOT Remain Registration Jam Date Time 10 30 2008 11 14 Page 1 Last Pag...

Page 54: ...1 30 Phaser 6128MFP Service Manual General Information ...

Page 55: ...2 Chapter Theory of Operation In this chapter Phaser 6128MFP Operational Overview Printing Process Media Path Major Assemblies and Functions Printer Modes Printer Control Drive Transmission ...

Page 56: ...or CMYK process The tandem system consists of four color drums C M Y and K which creates the toner image The following block diagram provides the sequence of events for the xerographic process dashed lines and the paper flow solid lines into and out of the printer Print Process Block Diagram s6128mfp 001 Imaging Unit 1 Charge 2 Exposure 3 Development 5 Cleaning 7 Cleaning 6 Fusing 4 Transfer Drum ...

Page 57: ...r color finished toner image on the Drums is transferred onto the paper 5 Imaging Unit Excess toner is removed from the Drum and BCR 6 Excess Toner Collection Excess toner is moved to the collection box 7 Fusing The Fuser applies toner on to paper using heat and pressure s6128mfp 002 Exit Roller Fuser Heat Roller Fuser Exit Pinch Roller Fuser Fuser Belt Fuser BTR Printer PHD Drive Roller Printer F...

Page 58: ...rotations of the drum The BCR is a conductive roller which receives negative voltage from the High Voltage Power Supply HVPS and discharges a negative Direct Current DC voltage The drum surface is uniformly and negatively charged with DC bias voltage The drum surface is a photoreceptor which is an insulator in a dark area and a conductor when receiving light and the drum inside is composed of cond...

Page 59: ...lectrostatic latent image on the drum surface The process is performed in parallel for Cyan Magenta Yellow and Black colors The area on the surface where the laser beam strikes becomes conductive The negative charge on the surface flows to the more positive drum lowering the voltage potential In this way the surface areas exposed to the laser beam become the electrostatic latent image Laser beams ...

Page 60: ...er Beams Laser Beam Laser Beam Laser Beam Negative Electric Charge Positive Electric Charge Photoreceptor Photoreceptor Conductor Conductor Drum Electrostatic Latent Image Electrostatic Latent Image Potential on Drum Surface V 0 Drum Surface Concept of Drum s6128mfp 005 ...

Page 61: ...e magnetic roller The magnet roller is covered by a thin semi conductive sleeve The developer bias voltage is supplied to the sleeve by the HVPS Developer bias is negative DC voltage combined with AC voltage The magnet roller is kept at constant negative voltage against the photoreceptor layer of the drum by DC voltage Therefore at the area on the drum surface where the negative electric charge do...

Page 62: ...he toner is transferred onto the paper in the order of Y M C and K Drum Surface Toner Image Electric Potential on Drum Developing Bias V 0 s6128 007 s6128 008 Drum Surface Black Toner Image Drum Surface Cyan Toner Image Drum Surface Magenta Toner Image Drum Surface Yellow Toner Image Paper Black Toner Image Cyan Toner Image Magenta Toner Image Yellow Toner Image ...

Page 63: ...d from the Drum and the BCR surfaces while excess charge is also eliminated from the drum surface Drum Cleaning The cleaning blade contacts the surface of the drum collecting the excess toner by scraping off toner Cleaning Roller The Cleaning Roller contacts the surface of the BCR collecting the excess toner by scraping off toner Charge Cleaning When the Drum is charged by the BCR any excess charg...

Page 64: ...ration Excess Toner Collection The excess toner is collected by the cleaner blade contacting the drum and is moved to the Toner Cartridge collection box by two augers s6128mfp 010 Toner Cartridge Collection Box Auger Cleaning Side Auger Cleaner Blade ...

Page 65: ...user The heat roller with the heat lamp melts the toner particles Toner is fused onto the media by the combination of heat and pressure Warm Up Stand By Printing Main Heater Lamp On On Off On s6128 011 Paper Nip Spring Felt Belt Nip Head Belt Frame Sheet Unfixed Toner Heater Lamp Heat Roller Fixed Toner ...

Page 66: ...he printer along the paper path as shown in the diagram s6128 012 Manual Feed Slot Tray Multiple Sheet Feed Prevention Motor Drive Solenoid Feed Roller Leading Edge Registration Except SSI Registration Assembly Transfer Belt Fuser Exit Roller in the Fuser Top Cover Motor Drive Clutch Registration Roller Motor Drive Belt Motor Drive Heat Roller Pressure Belt ...

Page 67: ...the printer are shown in the following figure s6128mfp 013 Laser Beam Paper Transfer Paper Sensors Exit Roller Heat Roller Pressure Belt Belt Rubber Registration Roller Metal Registration Roller Exit Sensor Manual Feed No Paper Sensor Registration Sensor Separator Roller Feed Roller Tray No Paper Sensor ...

Page 68: ...Dispenser Imaging Unit Drive Electrical Tray Separator Roller The Separator Roller and Feed Roller pinch the media to prevent multiple sheets from feeding Left Right Side Guide The side guides move at a right angle to the paper transfer direction to align the paper width Tray End Guide The end guide moves in toward the paper transfer direction to determine the paper size s6128 014 Bottom Plate Sid...

Page 69: ...le feed or a jam The sheets are fed by the Feed Roller to a position between the Feed Roller and the Separator Roller Normally when only one sheet is fed both the Feed Roller and Separator Roller rotate to allow the sheet to pass However when two sheets are fed concurrently only the Feed Roller rotates The Separator Roller is locked allowing the upper sheet to pass separated from the lower sheet t...

Page 70: ...FP Service Manual Theory of Operation Feeder Tray No Paper Sensor Detects the presence absence of paper in the Tray based on the position of No Paper Actuator s6128mfp 016 Feed Roller Feed Solenoid Tray No Paper Sensor ...

Page 71: ...n Drive Assembly to the Feed Roller Feed Roller When the Feed Solenoid operates it allows the Feed Roller to rotate and feed the paper s6128 017 Tray No Paper Sensor No Paper Actuator No Paper Position Tray No Paper Sensor Paper No Paper Actuator Bottom Plate s6128 018 Feed Roller Feed Solenoid Main Drive Feed Roller Drive ...

Page 72: ...n the Registration Sensor detects the media Registration Sensor The Registration Sensor detects paper when the paper leading edge reaches the registration chute When paper is fed from the manual feed slot the Registration Sensor measures the paper length The On time of the Registration Sensor determines the media length s6128 019 Manual Sheet Feed No Paper Sensor Manual Sheet Feed No Paper Sensor ...

Page 73: ...ts feeding from the Registration Assembly is adjusted by the duration of the Registration Clutch operation so that the toner image on the drum is transferred to the correct position on the sheet s6128 020 Registration Sensor Rubber Registration Roller Metal Registration Roller Registration Clutch Registration Output Spring Registration Actuator Spring Registration Output Actuator Registration Inpu...

Page 74: ... the BTRs Before the registration rollers are energized the paper is advanced from the tray to the rollers This process aligns the leading edge as shown below By pushing the edge of the sheet against the registration roller that is not turning the lead edge of the sheet is registered Paper Size Control The printer doesn t have switches for detecting paper size and the length of paper is detected o...

Page 75: ...er from the Tray The movement of the Registration In Actuator does not affect the Registration Roller Actuator Front s6128 023 Registration Output Spring Registration Actuator Spring Registration Output Actuator Registration Input Actuator Registration Input Actuator Registration Input Actuator Registration Input Actuator Registration Input Actuator Registration Roller Actuator Registration Roller...

Page 76: ...aper toward the direction of the Fuser ADC Sensor The ADC Sensor detects the toner patches on the Belt and converts them to voltage value The voltage value is used to control the density of toner Exit Roller Transfer Belt Belt ADC Sensor Blade Assembly Fuser s6128 024 Heat Roller Heater Lamp Thermostat STS Temperature Sensor NCS Temperature Sensor Pressure Belt Rear View Exit Sensor Front ...

Page 77: ...consists of the following components Heat Roller Heater Lamp Thermostat Temperature Sensor Pressure Belt Exit Roller and Exit Sensor Exit Sensor The Exit Sensor detects passage of printed pages after fusing on the Actuator s position changes Laser Unit Windows Laser Unit s6128 025 Front Laser Diode Board Polygon Mirror Scanner SOS Board Lens Lens Mirror Mirror Mirror Mirror Rear View SOS Sensor ...

Page 78: ...d and a polygon mirror that is mounted on the motor shaft The laser light output from the LD is directed onto the polygon mirror The polygon mirror provided with six reflecting mirror faces changes the reflection angle of the laser light as it rotates thereby allowing the laser light to scan the drum along its axial direction Scanning is performed using one reflecting mirror face for each line Sta...

Page 79: ...and writes the CRUM data Printer specific information is stored in the CRUM Dispenser Motor C M Y K The Dispenser Motor provides the drive for the Agitator and Auger in the Toner Cartridge and supplies toner to the Developer Dispenser Motor K Dispenser Motor C Dispenser Motor M Dispenser Motor Y Toner Cartridge K Toner Cartridge C Toner Cartridge M Toner Cartridge Y CRUM Connector Y CRUM Connector...

Page 80: ...he four Developers includes the Augers that distribute the toner and the Magnet Roller that applies toner to the Drum to develop the latent image Drums Each drum is given a latent image to which toner is applied by the Developer The resulting toner image is transferred to the paper CRUM Information specific to the Developer Imaging unit is stored in the CRUM Erase Lamp LED Print Cartridge Drum K L...

Page 81: ...eliminates the charge on the drum Drive The drive consists of three assemblies Main Drive Assembly Drives the Imaging Unit Transfer Belt Registration Rollers and Feeder Sub Drive Assembly Supplies drive to the Fuser and Developers C M Y K Imaging Unit Erase Lamp Erase Lens LED Assembly Drum s6128 028 s6128 029 Sub Drive Main Drive Feed Drive ...

Page 82: ...sure that the Sub Drive Assembly cannot rotate the Yellow Magenta and Cyan Developers during B W printing The Color Mode Switching Sensor detects whether the drive path is set for B W or full color s6128 030 Black And White Mode Black And White Mode Full Color Mode Full Color Mode Drive From Sub Motor Gear D3 In Color Mode Switching Sensor Color Mode Switching Solenoid Gear D3 Out Cam C Cam C Gear...

Page 83: ...eat from the printer to prevent overheating Power Switch The Power Switch turns the printer AC Power Supply On Off s6128mfp 031 Control Panel Interlock Switch Side Cover Switch Power Switch LVPS IP Board GFI Breaker EEPROM Humidity Sensor Multi Protocol Network Card MPC HVPS MCU Board Fan ...

Page 84: ...when main power is cycled after certain period of time Deep Sleep Mode Power Saver The output of the following power supply are stopped according to the signals Machine Control Unit Board The Machine Control Unit MCU Board controls the printing process based on the communication with the printer Image Processor Board and information from the Sensors or Switches Major functions include 1 Communicat...

Page 85: ...ction of the I P Board is to receive host data through one of the available ports USB or Ethernet the Scannner or FAX The received host data is buffered stored and sent to the print engine in a rasterized format When installing a new I P Board in the printer you must transfer the following parts from the old board to the new board Memory DIMM FAX Board Humidity Temperature Sensor The Humidity Temp...

Page 86: ...s any voltage or current or leakage current that exceeds the rating of the AC power supply Data Flow The electrical signal flow for the print data from the printer I P Board is shown in the following diagram Host Electric Signal Electronic Sub system Control Board Electric Signal Machine Control Unit Electric Signal Laser Unit Laser Beams Electrostatic Latent On Drum Invisible Image Toner Image On...

Page 87: ...tch the size sent in the print data an error is reported to the Image Processor Laser Unit Light Quantity Control Image data is sent to the Laser Unit as an electric signal data are expressed with high and low voltage values and the laser diodes convert the image data from electric signals to optical signals data are expressed with blinking laser beams Variations in light quantity of laser beams o...

Page 88: ...ty Sensor detects the density of the patch on the Belt 4 The drum charging voltage developing DC voltage and the Laser Unit beam intensity are adjusted for each color according to the detected patch density Toner Density Control Toner density must be kept constant to attain stable printing The control system for this purpose is called toner density control 1 PCDC Pixel Count Dispense Control The a...

Page 89: ...measurement the surface of the ADC sensor is cleaned to remove soil due to toner etc and the light amount adjustment is made so that the reflected light amount satisfies the prescribed value when creating the patch for potential control and toner density control Color Registration Control The printer uses a tandem electro photographic system with Organic Photo Conductor OPC Drums and direct transf...

Page 90: ... Contact Sensor NCS in the middle of the Heat Roller and the Temp Sensor at the edge of it The target temperature set up varies depending on the time of Warm up Printing or Process Control The target set temperature is changed based on the printer s interior temperature detected by the Humidity Sensor Cool Down As printing continues the distribution of temperature in the Heat Roller becomes uneven...

Page 91: ...ransmits power as shown in the following diagram Main Drive Belt Transfer Belt Name Of Moving Parts Gear P3 Paper Feed Drive Registration Feeder Chute Registration Clutch Rubber Registration Gear Metal Registration Gear Gear P2 Gear T4 Gear P4 Gear P5 Registration Roller Metal Registration Roller Feed Gear Feed Solenoid Drive Gear Feed Roller HSG Xerographics K Drum K HSG Xerographics C Drum C Ima...

Page 92: ...ed Roller Registration Feeder Chute Registration Clutch Registration Roller Rubber Registration Gear Metal Registration Gear Metal Registration Roller Feed Solenoid Imaging Unit Gear 2 Drum M Drum Y Imaging Unit Gear 1 Imaging Unit Gear 2 Drum K Drum C Transfer Belt Gear T4 Drive Gear Belt Name Of Moving Parts Indicates The Engagement Of Gears Front ...

Page 93: ...in the following figures Black and White Mode Gear D1 Gear D2 Gear DK Gear D1 Gear P2 Main Drive Sub Motor Gear D5 Magnet Gear K Gear D3 In Sub Drive Gear D3 Out Flange D3 Cam C Gear C Gear P4 2 Gear P4 Gear P3 Color Mode Switching Solenoid Imaging Unit Drive Hsg Assy Deve K Magnet Roller K Name of Moving Parts Imaging Unit s6128 038 Black And White Mode ...

Page 94: ...K Magnet Roll K Sub Drive Print Cartridge Drive HSG Developer K Gear D3 In Gear D3 Out Gear P2 Gear P3 Color Mode Switching Solenoid Gear P4 Gear C Cam C Flange D3 Gear P4 2 Imaging Unit Main Drive Cam C Flange D3 Gear D2 Gear D4 Gear D3 In Gear D3 Out Indicates The Engagement Of Gears Name Of Moving Parts Black And White Mode ...

Page 95: ... Sub Drive Imaging Unit Drive Gear D3 In Gear D3 Out Developer Housing K Magnet Roll K Magnet Gear C Magnet Roll C Magnet Gear M Developer Housing M Magnet Roll M Magnet Gear Y Gear D5 Gear D5 Gear D5 Gear D4 Gear D4 Developer Housing Y Magnet Roll Y Imaging Unit s6128 040 Name Of Moving Parts Full Color Mode Developer Housing K ...

Page 96: ...ler K Sub Drive Imaging Unit Drive Developer K Gear D4 Magnet Gear C Magnet Roller C Developer C Magnet Gear M Magnet Roller M Magnet Gear Y Magnet Roller Y Developer Y Developer M Gear D5 Gear D5 Gear D4 Gear D5 Imaging Unit Gear D2 Gear D4 Gear D3 In Gear D3 Out Name Of Moving Parts Full Color Mode Indicates The Engagement Of Gears Front ...

Page 97: ...K Drum Print Cartridge Gear 2 Cleaning Auger Gear Magnet Idler Gear Paddle Idler Gear Paddle Gear Auger Gear Auger Gear Side Auger Idler Gear Side Auger Gear Side Cleaning Auger Developer Paddle Auger Front Auger Rear Auger Developer Housing Y M C K Magnet Roller Magnet Gear Y M C K Name Of Moving Parts Development And Excess Toner Collecting Imaging Unit s6128 042 ...

Page 98: ...m Imaging Unit Gear 2 Drum Xerographics Housing Y M C K Drum Cleaning Auger Gear Auger Magnet Idler Gear Gear Idler Paddle Paddle Gear Developer Paddle Auger Gear Front Auger Auger Gear Rear Auger Side Auger Idler Gear Side Auger Gear Side Cleaning Auger Developer Housing Y M C K Development And Excess Toner Collecting Indicates The Engagement Of Gears Name Of Moving Parts ...

Page 99: ...gitator Y Auger Gear K Idler Gear C Dispenser Motor C Auger C Auger Idler Gear C Auger Idler Gear C Auger Gear C Idler Gear M Dispenser Motor M Auger M Auger Idler Gear M Auger Idler Gear M Auger Gear M Idler Gear Y Dispenser Motor Y Auger Y Auger Idler Gear Y Auger Idler Gear Y Auger Gear Y s6128 044 s6128 045 Right Left Dispenser Toner Cartridge K Idler Gear K Dispenser Motor K Agitator Gear K A...

Page 100: ...aser 6128MFP Service Manual Theory of Operation Fuser Drive Sub Drive Name Of Moving Parts Heat Roller Idler Gear Fuser Heat Roller Gear Exit Idler Gear Exit Gear Fuser Drive Exit Roller Heat Roller s6128 046 ...

Page 101: ...e Manual 2 47 Theory of Operation s6128 047 Front Sub Drive Fuser Heat Roller Idler Gear Heat Roller Gear Heat Roller Exit Idler Gear Exit Gear Exit Roller Fuser Drive Indicates The Engagement Of Gears Name Of Moving Parts ...

Page 102: ...lly to the control circuit which areas are white and which black as binary data 1 0 digital data 1 bit To scan the original the CCD device is shifted a distance of one line after each line is scanned When the original is scanned directly on the document glass the CCD is moved across the original When the ADFis used scanning is performed by moving the original with the CCD fixed at one position Thi...

Page 103: ...n Sensor is a part of the rear section of the Scanner Assembly frame that functions as an Actuator which shields the Scanner Home Position Sensor thus detecting the Registration position Cold Cathode Fluorescent Lamp Exposure Lamp The Cold Cathode Fluorescent Lamp exposes the document Charged Coupled Device Board The Charged Coupled Device CCD Board Image Sensor converts optical images into electr...

Page 104: ...g AGC the Scanner Assembly is moved to the position of the white reference plate and the Exposure Lamp is illuminated The light reflected from the white reference plate is read by the CCD Image Sensor as the white reference value which is used to adjust the CCD Image Sensor output 2 AOC Auto Offset Control AOC is performed by turning Off the Exposure Lamp after AGC This state is read by the CCD Im...

Page 105: ...green B blue and one line for B W black and white s6128mfp 051 Status Command Fax Board Scanner Controller Board Drive Signal Image Signal Message Signal Drive Signal Drive Signal CCD Clock Sensor Signal Image Signal Sensor Signal Switch Signal Telephone Line ADF Sensor Board Motor Control Panel Switch Display LED Scanner CCD Board Motor Sensor Lamp R G B Y M C K MCU Board ...

Page 106: ...ocument The following components are installed on the Scanner Assembly Exposure Lamp that illuminates light onto the document CCD Image Sensor that reads light reflected from the document and Lenses and mirrors comprising the light path for the optical image s6128 052 Scanner Assy Scanner Home Position Sensor Carriage Motor ...

Page 107: ...lded blocked Cover Open Sensor The Cover Open Sensor detects whether or not the ADF Top Cover is open ADF Board The ADF Board controls the sensors and motor in the ADF Feed Sensor The Feed Sensor is located downstream from the Feed Roller to detect completion of document feed Document Present Shielded blocked Document Absent Unshielded unblocked s6128 053 ADF Motor Automatic Document Feeder Board ...

Page 108: ...osition and the media is ejected through the Exit Roller Media Setting When media is set in the paper tray and pushed into the tray until its lead edge stops an Actuator moves to place the ADF Document Sensor in the unshielded unblocked state indicating media detection Preparation for Feed The media in the paper tray starts feeding when the Start button is pressed The Nudger Roller moves down and ...

Page 109: ...ccording to the copy magnification When the media passes the CVT position at the specified speed the images on the media are exposed by scanning with the Exposure Lamp of the Scanner Assembly and read by the CCD Image Sensor Simplex Document For simplex document media feed is performed as follows 1 The media is fed to the Takeaway Roller and then fed to the scan feed reference position 2 The media...

Page 110: ... Motor is transferred to each Document Feeding Roller as show in the following diagram Automatic Document Feed Motor Gear A Gear B Gear C Gear D Gear E Gear F Gear G Spring Clutch Gear J Gear H Gear I Takeaway Roll Exit Roll Feed Roll Nudger Roll Feed Roller Assembly Name of moving parts s6128 056 ...

Page 111: ...tion Gear Layout s6128 057 ADF Motor Takeaway Roller Exit Roller Gear A Gear D Gear E Gear F Spring Clutch Feed Roller Feed Roller Assembly Nudger Roller Gear G Gear I Gear B Gear B Gear C Gear C Gear H Gear H Gear J Gear J Gear B Gear C Gear H Gear J ...

Page 112: ...eceiving Fax machine and restored to a digital signal The black white information obtained from the AD conversion is sent to the printer where black cells are reproduced on the paper at the positions where they were on the original Fax Scans For a G3 Fax normal mode G3 Normal scanning is performed at the resolution of 8 divisions per millimeter 200 dpi in the horizontal direction and 3 85 division...

Page 113: ...AD conversion to restore the incoming digital data to analog data DA conversion analog signal transmission analog signal reception and AD conversion are all performed by a modem modulator demodulator in the control circuit A modem consists of a Network Control Unit NCU for connecting to the telephone line and an A D conversion unit for performing DA and AD conversions s6128 060 CCD 1 1 1 1 1 1 1 1...

Page 114: ...matically answers when it receives the call signal and the hook switch is activated The local switch on the receiving party side receives a response signal and stops sending tones to the sending and receiving parties thereby establishing a communications path between both parties In the case of a telephone call only voice conversion between the two parties follows For Fax preparation for delivery ...

Page 115: ...ve phases from Phase A to Phase E Phase A Call Establishment Phase B Capability Negotiations Phase C Image Data Transfer Phase D Post transfer Procedure Phase E Call Release The following flow chart provides a typical G3 fax session of a one page document Phase A Call Establishment In order for a fax to be established both ends of the line must recognize that the other end is a non voice Fax termi...

Page 116: ...with Failure to Train FTT which requests retransmission of NSS TSI DCS and TCF signals Phase C Image Data Transfer The sending side transmits the image data based on the parameters agreed upon in Phase B Also carried out are the signaling control procedures including synchronization error detection correction and line supervision Phase D Post transfer Procedure In the Post transfer Procedure the s...

Page 117: ... with Partial Page Request PPR ECM A transmission method that manages the encoded data by dividing it in units called frames and by numbering them In the event of image corruption due to noise etc image quality can be corrected by retransmitting only the corrupted units specified by number Multiple frames form a unit called block One block transmitted or multiple frames retransmitted are called pa...

Page 118: ... detection of incoming CED signal to the transmission of DCN signal Receiving side From the transmission of CED signal to the detection of incoming DCN signal The following illustrates the different Fax reports available and includes an example Protocol Monitor report with the descriptions of signals handled by Protocol Monitor s6128mfp 327 ...

Page 119: ...Standards Standard Minimum Transmission Time for Single Page A4 Document Maximum Resolution Maximum Transmission Speed Features Group 1 G1 Approx 6 min 100 x 100 dpi Analog Analog transmission No band compression Group 2 G2 Approx 3 min 100 x 100 dpi Analog Analog transmission Band compression technology adopted Group 3 G3 Approx 1 min 200 x 200 dpi 14 4kbps Super G3 33 6kbps Connection to analog ...

Page 120: ...2 66 Phaser 6128MFP Service Manual Theory of Operation ...

Page 121: ...des In this chapter Introduction Servicing Instructions Messages Codes and Procedures Jam Errors Consumable Routine Maintenance Errors Tray and Media Errors Configuration Memory and Firmware Errors Email Errors SMB Errors Fax Errors ...

Page 122: ... include Error messages and codes displayed on the Control Panel Engine fatal and Jam Error logs displayed on the Control Panel or listed on the Error History Report Accessing Error History Report 1 From the Control Panel press the System button 2 Information Pages is displayed Press the OK button 3 Press the Up or Down arrow button to find Error History Press the OK button 4 The Error History Rep...

Page 123: ...rint Count and Chain Link code Paper Jam History Paper Jam History contains Item No Total Print Count and Paper Jam Type information Phaser 6128MFP N Color Multifunction Printer Error History Report System Fail History Paper Jam History Date 10 30 2008 Time 11 13 Paper Jam Type IOT Remain Registration Jam Date Time 10 30 2008 11 14 Page 1 Last Page XEROX CORPORATION and Fui Xerox Co Ltd 2008 ...

Page 124: ...m from light 5 Remove the Transfer Belt 6 Inspect the printer interior and remove any foreign matter such as paper clips staples pieces of paper dust or loose toner 7 Do not use solvents or chemical cleaners to clean the printer interior 8 Do not use any type of oil or lubricant on printer parts 9 Use only an approved toner vacuum 10 Clean all rubber rollers with a lint free cloth dampened slightl...

Page 125: ...ges include abbreviations The most common abbreviations used throughout this chapter are listed here Term Definition ADC Automatic Density Control ASIC Application Specific Integrated Circuit BLK Black COMM Communication CRT Cartridge CRUM Customer Replaceable Unit ER ERR Error ENV Environment FUNC Function MACaddress Media Access Control Address MCU Machine Control Unit MFD Multi Function Device ...

Page 126: ...te Error Write error at Image Data FlashROM page 3 135 FAX Controller MFD Controller Error Error 017 972 Press OK Button FlashROM Erase Error Erase error at Image Data FlashROM page 3 135 FAX Controller MFD Controller Error Error 017 973 Press OK Button FlashROM Suspend Error Suspend error at Image Data FlashROM page 3 135 FAX Controller MFD Controller Error Error 017 974 Press OK Button FlashROM ...

Page 127: ...utton CODEC Error The Codec process aborted by read error during manual dialing page 3 145 FAX Controller Fax Error Error 033 502 Press OK Button File Open Error The File Open error occurred page 3 135 FAX Controller MFD Memory Full Error 033 503 Press OK Button Memory Full Memory full at reception page 3 133 FAX Controller Fax Codec Error Error 033 510 Press OK Button CODEC Error The Decoded Line...

Page 128: ... The FAX Function setting is not set correctly Set the Fax of the Function Enable on the Secure Settings of the Admin Menu correctly FAX Controller Fax Codec Error Error 033 520 Press OK Button JBF Error Call Back The incoming data error occurred at the Call Back page 3 134 FAX Controller Fax Codec Error Error 033 521 Press OK Button JBF Error Marker Abort The Abort Marker is detected page 3 134 F...

Page 129: ... 033 755 Press OK Button Phase2 Error The Phase 2 Line Probing error occurred page 3 137 FAX Controller Fax Communication Error Error 033 756 Press OK Button Phase3 Error The Phase 3 Primary Channel Equalizer Trimming error occurred page 3 137 FAX Controller Fax Communication Error Error 033 757 Press OK Button Primary Channel Synchronization Error The Primary Channel re Synchronization error occu...

Page 130: ...Error Error 033 766 Press OK Button Target File Opening The Target File Empty at Decoding page 3 142 FAX Controller Fax Communication Error Error 033 767 Press OK Button MMR MN86064 Decode Error The Decode error of MN86064 at MMR Decoding page 3 142 FAX Controller Fax Codec Error Error 033 768 Press OK Button AT Move Counter Over The AT Move Count per Stripe 5 or more page 3 134 FAX Controller Fax...

Page 131: ...cation Error Error 033 782 Press OK Button NSS DCS Function disagreement The Incoming NSS DCS Function Not supported page 3 148 FAX Controller Fax Codec Error Error 033 784 Press OK Button Buffer Error The Incoming FAX Buffer overflow at JBIG Decode Output page 3 141 FAX Controller Scan Codec Error Error 033 785 Press OK Button Buffer Error The MHR Decode Output Buffer overflow at PushScan page 3 ...

Page 132: ...ror Error 034 515 Press OK Button DIS DCS Illegal Command Receive Unsupported Command received page 3 146 FAX Controller Fax Number Error Error 034 799 Press OK Button No Dial Data The Autodial Started but No Data Ready page 3 139 FAX Controller Target Fax No Answer Error 035 701 Press OK Button Send T1 Time Out The T1 Time Out error occurred at the data is transmitting page 3 147 FAX Controller F...

Page 133: ...tton Receive T1 Time Out The T1 Time Out error occurred at receiving the data page 3 146 FAX Controller Fax Communication Error Error 035 720 Press OK Button Not Receive Ability Source Lacking Receive Capacity page 3 147 FAX Controller Fax Communication Error Error 035 728 Press OK Button G3 EOL Not Receive Unable to Receive EOL for 13 sec at G3 Reception page 3 148 FAX Controller Fax Communicatio...

Page 134: ...detected page 3 137 FAX Controller Fax Communication Error Error 035 793 Job Failure Press OK Button Digital Line Detection The telephone line is a digital line Change to an analog line FAX Controller Scan Error Error 116 396 Restart Printer Software Bag Fatal Maillib Related Error Other File2Net Lib Error page 3 135 FAX Controller Scan Error Error 116 987 Restart Printer Software Bag A Fatal Erro...

Page 135: ...5 FAX Controller Error 117 350 Restart Printer Task Initialize Error The task initializing start up error occurred page 3 135 FAX Controller MFD Controller Error Error 117 352 Restart Printer AIOC IIT Communication Error Communication error between I P Board and IIT page 3 132 FAX Controller MFD EEPROM Error Error 117 362 Restart Printer EEPROM Sum Check Error The EEPROM Check Sum error occurred p...

Page 136: ...er Memory Pool Get Error The Memory Pool acquisition error occurred OS error page 3 142 FAX Controller Fax Error Error 133 242 Restart Printer Memory Pool Rerese Error A Memory Pool release error occurred OS error page 3 142 FAX Controller Fax Error Error 133 243 Restart Printer Message Send Error The Message communication error occurred OS error page 3 142 FAX Controller Fax Error Error 133 244 R...

Page 137: ...roller Fax Error Error 133 269 Restart Printer File Close Error The File Close error occurred page 3 142 FAX Controller Fax Error Error 133 271 Restart Printer Memory Pool Get Error The Memory Pool acquisition error occurred OS error page 3 142 FAX Controller Fax Error Error 133 272 Restart Printer Message Send Error The Message send error occurred OS error page 3 142 FAX Controller Fax Error Erro...

Page 138: ...roller Fax Error Error 133 286 Restart Printer OS Call Error The OS Call error occurred page 3 142 FAX Controller Fax Error Error 133 287 Restart Printer File Open Error The File Open error occurred page 3 142 FAX Controller Fax Error Error 133 288 Restart Printer File Close Error The File Close error occurred page 3 142 FAX Controller Fax Error Error 133 289 Restart Printer File Erase Error The F...

Page 139: ...sity Yellow Cartridge IOT Y Toner Low Density Detects low density of yellow page 3 59 Toner Low Density Magenta Cartridge IOT M Toner Low Density Detects low density of yellow page 3 60 Toner Low Density Cyan Cartridge IOT C Toner Low Density Detects low density of yellow page 3 62 Toner Low Density Black Cartridge IOT K Toner Low Density Detects low density of yellow page 3 63 Toner I U CRUM Erro...

Page 140: ...g Unit not detected page 3 72 Toner Replace Yellow Cartridge IOT Y CRU Life Over Cartridge reached end of life page 3 58 Toner Replace Magenta Cartridge IOT M CRU Life Over Cartridge reached end of life page 3 58 Toner Replace Cyan Cartridge IOT C CRU Life Over Cartridge reached end of life page 3 58 Toner Replace Black Cartridge IOT K CRU Life Over Cartridge reached end of life page 3 58 Server E...

Page 141: ...ge 3 118 or check the server side Server Network Not Ready Error 016 790 Press OK Button Network Error F2N Module starting up or IP address not Determined page 3 118 Server Network Not Ready Scan Aborted Error 016 794 Press OK Button Network Error The Scan to SMB can not be executed because the SMB over TCP has not woke up page 3 118 Server Email Size Limit Error 016 985 Press OK Button Mail Size ...

Page 142: ...tton SMB Error The connection with a server has a problem on SMB scan page 3 121 Server SMB Login Error Error 031 529 Press OK Button SMB Error The login name or the password for SMB scan has a problem page 3 124 Server SMB Path Error Error 031 530 Press OK Button SMB Error The storage of scanned images has a problem on SMB scan server page 3 124 Server SMB List Error Error 031 531 Press OK Button...

Page 143: ...or Server SMB Login Error Error 031 541 Press OK Button SMB Error SMB protocol error 4 008 The scan user name is wrongly specified page 3 124 Server SMB initializing Error 031 542 Press OK Button SMB Error SMB TCP IP has not been started See System Administra tor Server SMB Login Error Error 031 543 Press OK Button SMB Error SMB protocol error 4 045 The time when no login to the scan is allowed Se...

Page 144: ... Cancel was selected for resolving the file name overlap Cycle system power If the error persists replace the I P Board page 8 41 Server DNS Error Error 031 574 Scan Name Resolve Error Press OK Button DNS Library Call Error Resolving host names has failed on FTP scan See System Administra tor Server DNS Error Error 031 575 Server Address Error Press OK Button DNS Library Call Error No DNS server h...

Page 145: ...OK Button DEL command failed FTP scan file could not be successfully deleted page 3 124 Server FTP Error Error 031 587 RMD Command Error Press OK Button RMD command failed FTP scan folder could not be successfully deleted page 3 124 Server FTP Error Error 031 588 Write Error Press OK Button Write failed Data write to FTP scan server failed page 3 124 Server FTP Error Error 031 590 Write Error Pres...

Page 146: ...rge Press OK Button IOT Disk Full The RAM Disk is full page 3 92 ESS Font ROM Error Error 116 310 Restart Printer ESS Font ROM Error Font ROM error detected page 3 114 ESS MACaddress Error Error 116 314 Restart Printer I P Board Network MAC Address Checksum Error Checksum error in Network MAC address is detected page 3 114 ESS RAM Error Error 116 315 Restart Printer ESS On Baord RAM W R Check Fail...

Page 147: ... Error Error 116 350 Restart Printer CONT AIO Network Communication Fail I P Board Communication error page 3 114 ESS Network Error Error 116 351 Restart Printer CONT AIO Network Ethernet BIST parity RAM R W Error Network Ethernet parity error page 3 114 ESS Network Error Error 116 352 Restart Printer CONT AIO Network Internal Loopback Error Network Loopback error page 3 114 ESS Network Error Erro...

Page 148: ...ystem Controller Error Error 116 398 Restart Printer Communication Error Communication Error between system modules page 3 135 System Controller Communication Error Error 117 313 Restart Printer Data Send Error Failed in the ESS data transfer page 3 117 System Report Error Error 117 314 Restart Printer Report Program Error The Report Creating Program error occurred page 3 135 System MFD EEPROM Err...

Page 149: ...type is not for duplex copy page 3 75 Copy Illegal Settings Specified Size Does Not Match Tray size Copy Dup Size Limit Copy failed because media type is not for duplex copy page 3 75 Copy Illegal Settings Tray Selected is Empty Copy Select Tray NoPaper Copy failed because there is no paper in the paper tray page 3 75 Copy Illegal Settings Tray Selected is Empty Copy Select Tray NoPaper Unable to ...

Page 150: ... IOT Side 2 No paper Media was not reloaded in Tray for duplex printing page 3 77 Jam Jam at Manual Feed Slot Chk Manual Feed Open Front Cover IOT SSF Misfeed JAM Registration Sensor is not turned ON within the specified time after feeding from manual feed slot page 3 47 Jam Jam at Front Cover Open Front Cover and Remove Paper IOT SSF Insert JAM Manual feed No Paper Sensor detected when media inse...

Page 151: ...r IOT Exit Jam Media does not pass through the Exit Sensor on time page 3 45 Jam Jam at Exit Open Front Cover IOT Remain Exit JAM Media remains at Exit Sensor page 3 45 Jam Jam at Reg Roll Open Front Cover IOT Remain Regi JAM Media remains at Registration Sensor page 3 50 Media Load Tray XXX Paper Size Load Tray YYY Paper Type IOT Paper Size Mismatch in Tray 1 Paper size mismatch for Tray detected...

Page 152: ...tamination Dusty CTD Sensor detected page 3 111 Belt Check Unit CTD Sensor IOT CTD ADC Sensor Contamination Dusty CTD Sensor detected page 3 111 Belt Copy Scan Fax CTD Sensor IOT Transfer Assy Life Pre Warning Transfer Belt near end of life page 3 111 Belt DTB Life Over Error 094 351 Restart Printerr IOT Transfer Assy Life Over Transfer Belt at end of life page 3 111 Motor Motor Error Error 042 32...

Page 153: ... Sensor page 3 55 Fuser 010 317 Reseat Fuser Restart Printer IOT Fuser Detached Fuser is disconnected page 3 56 Fuser Copy Scan Fax Fuser Life IOT Fuser Life Pre Warning Fuser is near end of life page 3 54 ADF Jam at Scanner Open ADF Cover R and remove paper Turn the Green Dial to remove paper or return the removed original and Press Start PICKUP JAM The Pick Up jam occurred page 3 53 ADF Jam at S...

Page 154: ...PAGEC Timeout Error The PAGEC timeout error is detected page 3 91 MCU MCU NVRAM Error Error 041 340 Error Code xxxxxxxx Restart Printer IOT NVRAM Error Error detected at MCU NVM check Code 1000 17FF PWBA MCU NVM 3000 30FF PHD CRUM 3100 31FF Y Toner CRUM 3200 32FF M Toner CRUM 3300 33FF C Toner CRUM 3400 34FF K Toner CRUM 3800 38FF PWBA EEPROM page 3 96 Covers Front Cover Open Close FrontCover IOT ...

Page 155: ...download file is broken or communication error detected page 3 94 Other Invalid IDError Error 016 742 Press OK Button Download ID Error The download file of other models different ID is detected page 3 94 Other Range Chk Error Error 016 743 Press OK Button Download Range Error Due to the wrong data downloaded writing was attempted to the nonmodifiable area page 3 94 Other Check Sum Error Error 016...

Page 156: ...l Error Error 042 372 Restart Printer IOT K Mode Solenoid Error Color Mode Switching Solenoid error detected page 3 99 Other Env Sensor Error Error 092 661 Error Code XX Restart Printer IOT Environment Sensor Error Environment sensor error detected Code XX 01 Humid Sensor Error 02 Temp Sensor Error 03 Humid Temp Sensors Error page 3 113 Other Copy Scan Fax Non Xerox Toner Custom Toner Mode The pri...

Page 157: ...tempt to establish a jam rate prior to starting any work If possible print an Error History Report and note the page count between jams 5 Determine if jamming is occurring in one tray but not another This helps to identify any dirty or defective parts 6 Clear the paper path of any jams and paper debris Start at the Turn Chute and work up to the Registration Chute Assembly 7 Clean the paper Feed an...

Page 158: ...o step 2 2 Check the Front Cover latch Does the Front Cover latch correctly Go to step 3 Repair or replace the Front Cover page 8 15 3 Run the Main Motor test DO 00 on page 4 41 Does the motor rotate Go to step 4 Go to step 15 4 Run the Feed Roller Rotation test DO 0b on page 4 45 Do the Feed and Registration rollers rotate Go to step 5 Repair or replace the Feed Drive Assembly page 8 37 5 Does th...

Page 159: ...ged or misaligned Repair or replace the Registration Roller Actuator PL3 2 8 Replace the MCU Board page 8 57 15 Check connectors P J21 and P J211 between the MCU Board and Main Motor Assembly Are the connectors secure Go to step 16 Reconnect the connectors 16 Check the Main Drive harness continuity Disconnect P J21 from the MCU Board and P J211 from the Main Drive to check continuity Is the harnes...

Page 160: ...ard page 8 57 25 Check Registration Sensor operation Does the voltage between ground J23 5 on the MCU Board change when the Registration Actuator In is used to block the sensor Replace the MCU Board page 8 57 Replace the Registration Sensor page 8 29 26 Check connectors P J26 and P J262 between the MCU Board and Registration Clutch Are the connectors secure Go to step 27 Reconnect the connectors 2...

Page 161: ... page 10 15 Troubleshooting Procedure Table Step Actions and Questions Yes No 1 Run the Manual Feed Sensor test DI 0 page 4 39 Use the actuator to toggle the sensor output Does the sensor operate Go to step 2 Go to step 3 2 Cycle system power Does the error persist Replace the MCU Board page 8 57 Complete 3 Check connectors P J23 and P J233 between the MCU Board and the Manual Feed No Paper Sensor...

Page 162: ...aper Sensor signal Does the voltage between ground J23 8 on the MCU Board change when the actuator blocks the sensor Replace the MCU Board page 8 57 Replace the Manual Feed No Paper Sensor page 8 28 Troubleshooting Procedure Table continued Step Actions and Questions Yes No ...

Page 163: ...on In Actuator PL3 2 11 Registration Sensor PL3 2 13 Left Side Harness PL10 4 18 MCU Board PL10 7 7 Map 2 Feed and Laser Unit on page 10 7 Media Feed on page 10 15 Main Drive on page 10 16 Troubleshooting Procedure Table Step Actions and Questions Yes No 1 Check the media condition Is the media damaged or damp Replace the media Go to step 2 2 Check the Registration Rollers Are the rollers touching...

Page 164: ...the voltage between ground J23 5 on the MCU Board change when the Registration Actuator In is used to block the sensor Replace the MCU Board page 8 57 Replace the Registration Sensor page 8 29 10 Check connectors P J26 and P J262 between the MCU Board and Registration Clutch Are the connectors secure Go to step 27 Reconnect the connectors 11 Check KSNR Registration Clutch harness continuity Discon...

Page 165: ... problem persists follow the procedure below Troubleshooting Reference Table Applicable Parts Wiring and Plug Jack Map References Fuser PL6 6 1 MCU Board PL10 7 7 Fuser Harness PL10 8 6 Map 4 Imaging on page 10 9 Fuser on page 10 21 Troubleshooting Procedure Table Step Actions and Questions Yes No 1 Run the exit sensor test DI 03 page 4 33 Does the display change when the actuator blocks the exit ...

Page 166: ...pin on the MCU Board Go to step 5 Replace the MCU Board page 8 57 5 Check exit sensor signal Does the voltage between ground J17 3 on the MCU Board change when the exit sensor actuator blocks the sensor Replace the MCU Board page 8 57 Replace the Fuser page 8 11 Troubleshooting Procedure Table continued Step Actions and Questions Yes No ...

Page 167: ...tration Sensor PL3 2 13 Main Drive Assembly PL7 1 2 Feed Drive Assembly PL7 1 4 Left Side Harness PL10 4 18 MCU Board PL10 7 7 Main Motor Harness PL10 8 7 Registration KSNR Harness PL10 8 9 Map 2 Feed and Laser Unit on page 10 7 Map 4 Imaging on page 10 9 Media Feed on page 10 15 Main Drive on page 10 16 Troubleshooting Procedure Table Step Actions and Questions Yes No 1 Check the media size Does ...

Page 168: ...ation Roller Actuator PL3 2 8 Go to step 9 9 Run the Registration Sensor test DI 2 page 4 35 Use the Registration Actuator In to toggle the sensor output Does the sensor operate Replace the MCU Board page 8 57 Go to step 14 10 Check connectors P J23 and P J233 between the MCU Board and Manual Feed Sensor Are the connectors secure Go to step 11 Reconnect the connectors 11 Check Left Side Harness co...

Page 169: ...sensor Replace the MCU Board page 8 57 Replace the Registration Sensor page 8 29 18 Check connectors P J26 and P J262 between the MCU Board and Registration Clutch Are the connectors secure Go to step 19 Reconnect the connectors 19 Check KSNR Registration Clutch harness continuity Disconnect P J26 from the MCU Board and P J262 from the Registration Clutch Is the harness damaged Repair or replace t...

Page 170: ...8 Registration Roller PL3 2 9 Registration Roller Metal PL3 2 10 Registration In Actuator PL3 2 11 Registration Sensor PL3 2 13 Transfer Belt PL6 1 7 Main Drive Assembly PL7 1 2 Left Side Harness PL10 4 18 MCU Board PL10 7 7 Main Motor Harness PL10 8 7 Registration KSNR Harness PL10 8 9 Map 2 Feed and Laser Unit on page 10 7 Map 4 Imaging on page 10 9 Media Feed on page 10 15 Main Drive on page 10...

Page 171: ... 4 48 Does the Registration Clutch and Registration Rollers operate Go to step 9 Go to step 13 9 Check connectors P J23 and P J232 between the MCU Board and Registration Sensor Are the connectors secure Go to step 10 Reconnect the connectors 10 Check Left Side Harness continuity Disconnect P J23 from the MCU Board and P J232 from the Registration Sensor Is the harness damaged Repair or replace the...

Page 172: ...ance across J262 1 and J262 2 about 280 Ohms Replace the MCU Board page 8 57 Replace the Registration Clutch page 8 35 17 Check connectors P J21 and P J211 between the MCU Board and Main Motor Assembly Are the connectors secure Go to step 18 Reconnect the connectors 18 Check the Main Drive harness continuity Disconnect P J21 from the MCU Board and P J211 from the Main Drive to check continuity Is ...

Page 173: ...6 ADF Assembly PL10 10 1 Map 3 Electrical and Drive on page 10 8 ADF on page 10 23 Imaging on page 10 24 Troubleshooting Procedure Table Step Actions and Questions Yes No 1 Check the original document Does the document meet the ADF specifications Go to step 2 Use the document glass 2 Check the ADF Is the ADF completely closed Go to step 3 Close the ADF 3 Check the ADF Feed Roller for damage or exc...

Page 174: ... printer power If problem persists follow the procedure below Troubleshooting Reference Table Applicable Parts Wiring and Plug Jack Map References Fuser PL6 1 1 MCU Board PL10 7 7 Map 4 Imaging on page 10 9 Fuser on page 10 21 Troubleshooting Procedure Table Step Actions and Questions Yes No 1 Check the Fuser life count Has the count reached end of life Replace the Fuser page 8 11 Go to step 2 2 I...

Page 175: ... Harness PL10 8 6 Map 4 Imaging on page 10 9 Fuser on page 10 21 Troubleshooting Procedure Step Actions and Questions Yes No 1 Check the connectors P J17 and P J171 between the MCU Board and the Fuser Are the connectors secure Go to step 2 Reconnect the connectors 2 Check the Fuser harness for continuity Disconnect P J17 from the MCU Board Disconnect P J171 from the Fuser Disconnect P J47 from the...

Page 176: ...set the Fuser life counter after installation of a new Fuser Go to step 5 Complete 5 Replace the LVPS page 8 47 Does the error persist Replace the MCU Board page 8 57 Complete Troubleshooting References Applicable Parts Wiring and Plug Jack Map References Fuser PL6 1 1 MCU Board PL10 7 7 Fuser Harness PL10 8 6 Map 4 Imaging on page 10 9 Fuser on page 10 21 Troubleshooting Procedure Step Actions an...

Page 177: ...air the Fuser harness 3 Check the Fuser temperature sensor resistance at these pins on the Fuser connector J171 J171 5 J171 4 J171 6 J171 8 J171 6 J171 7 Is there a measurable resistance between each pair of pins Replace the MCU Board page 8 57 Go to step 4 4 Replace the Fuser page 8 11 Does the error persist NOTE Reset the Fuser life counter after installation of a new Fuser Replace the MCU Board...

Page 178: ...rtridge Initial Actions Check that the Toner Cartridge is properly installed Cycle printer power If problem persists follow the procedure below Troubleshooting Reference Table Applicable Parts Wiring and Plug Jack Map References Toner Cartridge PL5 1 21 24 MCU Board PL10 7 7 Toner Dispense on page 10 20 Troubleshooting Procedure Table Step Actions and Questions Yes No 1 Replace the Toner Cartridge...

Page 179: ...side to side Check for sealing tape on the Imaging Unit Cycle system power If problem persists follow the procedure below Troubleshooting Reference Table Applicable Parts Wiring and Plug Jack Map References Imaging Unit PL4 1 21 Dispense Assembly PL5 1 1 Transfer Belt PL6 1 7 Toner Cartridge PL5 1 24 MCU Board PL10 7 7 Map 1 MCU Board on page 10 6 Toner Dispense on page 10 20 Troubleshooting Proce...

Page 180: ...for sealing tape on the Imaging Unit Cycle system power If problem persists follow the procedure below 3 Check P J18 and P J181 connections between the MCU Board and the Yellow toner motor Are the connections secure Go to step 4 Reseat the connectors 4 Disconnet P J18 and P J181 and check the harness continuity Is the harness damaged Repair the harness Go to step 5 5 Check for 24 V at P J18 3 of t...

Page 181: ...p 2 Go to step 3 2 Check the Dispense Assembly gears Is the Magenta cartridge gear damaged Replace the Dispense Assembly page 8 91 Go to step 6 3 Check P J18 and P J182 connections between the MCU Board and the Magenta toner motor Are the connections secure Go to step 4 Reseat the connectors 4 Disconnet P J18 and P J182 and check the harness continuity Is the harness damaged Repair the harness Go ...

Page 182: ... to side Check for sealing tape on the Imaging Unit Cycle system power If problem persists follow the procedure below Troubleshooting Reference Table Applicable Parts Wiring and Plug Jack Map References Imaging Unit PL4 1 21 Dispense Assembly PL5 1 1 Transfer Belt PL6 1 7 Toner Cartridge PL5 1 22 MCU Board PL10 7 7 Map 1 MCU Board on page 10 6 Toner Dispense on page 10 20 Troubleshooting Procedure...

Page 183: ...aling tape on the Imaging Unit Cycle system power If problem persists follow the procedure below 3 Check P J19 and P J191 connections between the MCU Board and the Cyan toner motor Are the connections secure Go to step 4 Reseat the connectors 4 Disconnet P J19 and P J191 and check the harness continuity Is the harness damaged Repair the harness Go to step 5 5 Check for 24 V at P J19 4 of the MCU B...

Page 184: ...ep 2 Go to step 3 2 Check the Dispense Assembly gears Is the Black cartridge gear damaged Replace the Dispense Assembly page 8 91 Go to step 6 3 Check P J19 and P J192 connections between the MCU Board and the Black toner motor Are the connections secure Go to step 4 Reseat the connectors 4 Disconnet P J19 and P J192 and check the harness continuity Is the harness damaged Repair the harness Go to ...

Page 185: ...heck installation of the Toner Cartridge Cycle printer power If problem persists follow the procedure below Troubleshooting Reference Table Applicable Parts Wiring and Plug Jack Map References Toner Cartridge PL5 1 21 24 MCU Board PL9 2 13 Toner CRUM Harness PL5 1 26 Dispense Assembly PL5 1 1 Map 4 Imaging on page 10 9 Toner Dispense on page 10 20 Troubleshooting Procedure Table Step Actions and Q...

Page 186: ...lem persists follow the procedure below 3 Check the toner CRUM voltage at P J31 on the MCU Board Measure the voltage across Ground P J31 3 pin Yellow Ground P J31 7 pin Magenta Ground P J31 11 pin Cyan Ground P J31 15 pin Black Is 3 3 V available at the indicated CRUM connector Replace the Dispense Assembly page 8 91 Go to step 4 4 Check for 3 3 V at P J14 on the MCU Board Is 3 3 V available at P1...

Page 187: ...J311 Magenta J312 Cyan J313 Black J324 Is the Toner CRUM harness damaged Repair the harness Go to step 3 3 Check the toner CRUM voltage at P J31 on the MCU Board Measure the voltage across Ground P J31 3 pin Yellow Ground P J31 7 pin Magenta Ground P J31 11 pin Cyan Ground P J31 15 pin Black Is 3 3 V available at the indicated CRUM connector Replace the Dispense Assembly page 8 91 Go to step 4 4 C...

Page 188: ...problem persists follow the procedure below Troubleshooting Reference Table Applicable Parts Wiring and Plug Jack References Image Processor Board PL10 6 6 Troubleshooting Procedure Table Step Actions and Questions Yes No 1 Is the cartridge a Xerox cartridge Go to step 2 Complete 2 Check the Non Xerox Toner setting in the Set Up menu Is the Set the value to Off Go to step 3 3 Check the installed c...

Page 189: ... procedure below Troubleshooting Reference Table Applicable Parts Wiring and Plug Jack Map References Imaging Unit PL4 1 21 MCU Board PL10 7 7 Imaging Unit Harness PL10 8 11 Map 1 MCU Board on page 10 6 Xerographics on page 10 18 Troubleshooting Procedure Table Step Actions and Questions Yes No 1 Check the Imaging Unit CRUM harness Disconnect P J42 and P J422 and check continuity Is the harness da...

Page 190: ... Remove and reseat the Imaging Unit Cycle system power If the problem persists follow the procedure below Troubleshooting Reference Table Applicable Parts Wiring and Plug Jack Map References Imaging Unit PL4 1 21 MCU Board PL10 7 7 Map 1 MCU Board on page 10 6 Xerographics on page 10 18 Troubleshooting Procedure Table Step Actions and Questions Yes No 1 Replace the Imaging Unit page 8 8 NOTE Remov...

Page 191: ... follow the procedure below Troubleshooting Reference Table Applicable Parts Wiring and Plug Jack Map References Imaging Unit PL4 1 21 MCU Board PL10 7 7 Map 1 MCU Board on page 10 6 Xerographics on page 10 18 Troubleshooting Procedure Table Step Actions and Questions Yes No 1 Remove the Imaging Unit and inspect for damage debris or sealing tapes Does the error persist Go to step 2 Complete 2 Repl...

Page 192: ...eference Table Applicable Parts Wiring and Plug Jack Map References Imaging Unit PL4 1 21 MCU Board PL10 7 7 Imaging Unit Harness PL10 8 11 Map 1 MCU Board on page 10 6 Xerographics on page 10 18 Troubleshooting Procedure Table Step Actions and Questions Yes No 1 Check the Imaging Unit CRUM harness Disconnect P J42 and P J422 and check continuity Is the harness damaged Repair the harness Go to ste...

Page 193: ... persists follow the procedure below Troubleshooting Reference Table Applicable Parts Wiring and Plug Jack Map Reference Tray No Paper Sensor PL3 2 13 Manual No Paper Sensor PL3 2 13 Image Processor Board PL10 6 6 MCU Board PL9 2 13 Map 2 Feed and Laser Unit on page 10 7 Media Feed on page 10 15 Troubleshooting Procedure Table Step Actions and Questions Yes No 1 Is the error Load Tray Go to Step 2...

Page 194: ...s the sensor operate Go to step 8 Go to step 9 8 Cycle system power Does the error persist Replace the MCU Board page 8 57 Complete 9 Check connectors P J23 and P J233 between the MCU Board and the Manual Feed No Paper Sensor Are the connectors secure Go to step 10 Reconnect the connectors 10 Check Left Side Harness continuity Disconnect P J23 from the MCU Board and P J233 from the Manual Feed No ...

Page 195: ... PL3 2 19 Left Side Harness PL10 4 18 MCU Board PL10 7 7 Map 2 Feed and Laser Unit on page 10 7 Media Feed on page 10 15 Troubleshooting Procedure Table Step Actions and Questions Yes No 1 Check the paper size Does the media size match print job specifications Go to step 2 Correct the media size 2 Check the No Paper Actuator Does the actuator operate smoothly Go to step 3 Replace the Feeder Assemb...

Page 196: ...k the No Paper Sensor signal Disconnect P J23 from the MCU Board Is there 3 3 V across ground J23 5 pin on the MCU Board Go to step 7 Replace the MCU Board page 8 57 7 Check the No Paper Sensor Measure the voltage across ground J23 11 on the MCU Board Does the voltage change when the No Paper Sensor is activated Replace the MCU Board page 8 57 Replace the No Paper Sensor page 8 33 Troubleshooting ...

Page 197: ... page 10 7 Media Feed on page 10 15 Troubleshooting Procedure Table Step Actions and Questions Yes No 1 Run the No Paper Sensor test DI 01 page 4 40 Use the actuator to toggle the sensor output Does the sensor operate Replace the MCU Board page 8 57 Go to step 2 2 Check connectors P J23 and P J234 between the MCU Board and the No Paper Sensor Are the connectors secure Go to step 3 Reconnect the co...

Page 198: ... Replace the MCU Board page 8 57 Replace the No Paper Sensor page 8 33 Troubleshooting Reference Table Applicable Parts Wiring and Plug Jack Map References Registration Roller PL3 2 9 Metal Registration Roller PL3 2 10 Manual No Paper Sensor PL3 2 13 Manual Feed Actuator PL3 2 14 Registration Spring R PL3 2 24 Registration Spring L PL3 2 29 Left Side Harness PL10 4 18 MCU Board PL10 7 7 Map 2 Feed...

Page 199: ...uator to toggle the sensor output Does the sensor operate Replace the MCU Board page 8 57 Go to step 7 7 Check connectors P J23 and P J233 between the MCU Board and the Manual Feed No Paper Sensor Are the connectors secure Go to step 8 Reconnect the connectors 8 Check Left Side Harness continuity Disconnect P J23 from the MCU Board and P J233 from the Manual Feed No Paper Sensor Is the harness dam...

Page 200: ...e 10 7 Media Feed on page 10 15 Troubleshooting Procedure Table Step Actions and Questions Yes No 1 Was media inserted for the second side of the duplex job Go to step 2 Insert media when indicated 2 Run the Manual Feed Sensor test DI 0 page 4 39 Use the actuator to toggle the sensor output Does the sensor operate Replace the MCU Board page 8 57 Go to step 3 3 Check connectors P J23 and P J233 bet...

Page 201: ...he voltage between ground J23 8 on the MCU Board change when the actuator blocks the sensor Replace the MCU Board page 8 57 Replace the Manual Feed No Paper Sensor page 8 28 Troubleshooting Reference Table Applicable Parts Wiring and Plug Jack Map References Manual No Paper Sensor PL3 2 13 Manual Feed Actuator PL3 2 14 Left Side Harness PL10 4 18 MCU Board PL10 7 7 Map 2 Feed and Laser Unit on pag...

Page 202: ...ide Harness continuity Disconnect P J23 from the MCU Board and P J233 from the Manual Feed No Paper Sensor Is the harness damaged Repair or replace the harness PL10 4 18 Go to step 5 5 Check for 3 3 V at J23 on the MCU Board Is 3 3 V available between J23 6 ground Go to step 6 Replace the MCU Board page 8 57 6 Check No Paper Sensor signal Does the voltage between ground J23 8 on the MCU Board chan...

Page 203: ...References Registration Roller Actuator PL3 3 8 Registration Sensor PL3 2 13 Manual Feed Actuator PL3 2 14 Main Drive Assembly PL7 1 2 Feed Drive Assembly PL7 1 4 Left Side Harness PL10 4 18 MCU Board PL10 7 7 Main Motor Harness PL10 8 7 Registration KSNR Harness PL10 8 9 Map 2 Feed and Laser Unit on page 10 7 Media Feed on page 10 15 Main Drive on page 10 16 Troubleshooting Procedure Table Step A...

Page 204: ...isaligned Repair or replace the Registration Roller Actuator PL3 2 8 Go to step 9 9 Run the Registration Sensor test DI 2 page 4 35 Use the Registration Actuator In to toggle the sensor output Does the sensor operate Replace the MCU Board page 8 57 Go to step 14 10 Check connectors P J23 and P J233 between the MCU Board and Manual Feed No Paper Sensor Are the connectors secure Go to step 11 Reconn...

Page 205: ...sensor Replace the MCU Board page 8 57 Replace the Registration Sensor page 8 29 18 Check connectors P J26 and P J262 between the MCU Board and Registration Clutch Are the connectors secure Go to step 19 Reconnect the connectors 19 Check KSNR Registration Clutch harness continuity Disconnect P J26 from the MCU Board and P J262 from the Registration Clutch Is the harness damaged Repair or replace t...

Page 206: ...led Func Error A disabled operation was attempted This troubleshooting procedure applies to this error Applicable Error 016 758 Disabled Func Error Initial Actions Check the print driver version Cycle printer power If the problem persists follow the procedure below Troubleshooting Procedure Table Step Actions and Questions Yes No 1 Check user account setup Does the error persist Configure the user...

Page 207: ...e Applicable Parts Wiring and Plug Jack Map References Image Processor Board PL10 6 6 Map 3 Electrical and Drive on page 10 8 Troubleshooting Procedure Table Step Actions and Questions Yes No 1 Check network connections Is the system connected to the network Go to step 2 Connect the network 2 Reseat the Image Processor Board connections Cycle system power Does the error persist Replace the I P Boa...

Page 208: ...rocedure Table Step Actions and Questions Yes No 1 Check the User Registration value under the Print Auditron setting Maximum value is 50 Has the user count exceeded the setting Reset the count to 50 or less Go to step 2 2 Reseat the Image Processor Board connections Cycle system power Does the error persist Replace the I P Board page 8 41 Complete Troubleshooting Reference Table Applicable Parts ...

Page 209: ...ce the Image ProcessorBoard page 8 41 Reseat the Memory Card and reprint the Configuration page to check memory 3 Replace the Memory Card Does the error still occur Replace the Image ProcessorBoard page 8 41 Complete Troubleshooting Reference Table Applicable Parts Wiring and Plug Jack Map References MCU Board PL10 7 7 Map 1 MCU Board on page 10 6 Troubleshooting Procedure Table Step Actions and Q...

Page 210: ...are version Cycle printer power If the problem persists follow the procedure below Troubleshooting Reference Table Applicable Parts Wiring and Plug Jack Map References Image Processor Board PL10 6 6 MCU Board PL10 7 7 Map 1 MCU Board on page 10 6 Troubleshooting Procedure Table Step Actions and Questions Yes No 1 Check the MCU Board installation Cycle system power Does the error persist Replace th...

Page 211: ...ycle printer power If the problem persists follow the procedure below Troubleshooting Reference Table Applicable Parts Wiring and Plug Jack Map References Image Processor Board PL10 6 6 Map 3 Electrical and Drive on page 10 8 Troubleshooting Procedure Table Step Actions and Questions Yes No 1 Check the Image Processor Board installation Cycle system power Does the error persist Replace the I P Boa...

Page 212: ...rence Table Applicable Parts Wiring and Plug Jack Map References Image Processor Board PL10 6 6 Memory Card PL10 6 8 Troubleshooting Procedure Table Step Actions and Questions Yes No 1 Print a small size file example as a Windows test print Does the error persist Go to step 2 Add memory resize the RAM Disk or partition the print job 2 Print the Configuration Page System Information Pages Configura...

Page 213: ...roubleshooting Reference Table Applicable Parts Wiring and Plug Jack Map References Image Processor Board PL10 6 6 Memory Card PL10 6 8 Troubleshooting Procedure Table Step Actions and Questions Yes No 1 Reduce the RAM Disk size setting to allow space for collation Does the error persist Go to step 2 Complete 2 Print the Configuration Page System Information Pages Configuration Does the memory amo...

Page 214: ... If the problem persists follow the procedure below Troubleshooting Reference Table Applicable Parts Wiring and Plug Jack Map References Image Processor Board PL10 6 6 Troubleshooting Procedure Table Step Actions and Questions Yes No 1 Check the system firmware version Is the system firmware the correct version Go to step 2 Update the firmware 2 Check the network or USB connection connection then ...

Page 215: ...ard PL10 6 6 MCU Board PL10 7 7 ESS Harness PL10 8 1 System Connections on page 10 5 System Control on page 10 22 Troubleshooting Procedure Table Step Actions and Questions Yes No 1 Reseat connections to the I P and MCU Boards then cycle system power Does the error persist Go to step 2 Complete 2 Check P J901 and P J10 connections between the I P and MCU Boards Are the connections secure Go to ste...

Page 216: ...L10 7 6 Imaging Unit Harness PL10 8 11 Map 1 MCU Board on page 10 6 Map 4 Imaging on page 10 9 Xerographics on page 10 18 Toner Dispense on page 10 20 Troubleshooting Procedure Table Step Actions and Questions Yes No 1 Check these connections P J311 Yellow Cartridge CRUM P J312 Magenta Cartridge CRUM P J313 Cyan Cartridge CRUM P J314 Black Cartridge CRUM P J31 and P J42 on the MCU Board P J144 on ...

Page 217: ...from the Imaging Unit Is the harness damaged Repair the harness Go to step 4 4 Check for 3 3 V at the MCU Board connector P J42 Is there 3 3 V between P42 3 ground Replace the EEPROM Board Go to step 5 5 Reseat the MCU Board connections Does the error persist Replace the MCU Board page 8 57 Complete Troubleshooting Procedure Table continued Step Actions and Questions Yes No ...

Page 218: ...0 6 6 A OP ESS Harness PL10 8 12 Map 2 Feed and Laser Unit on page 10 7 System Control on page 10 22 Troubleshooting Procedure Table Step Actions and Questions Yes No 1 Check the Control Panel connections Is P J202 on the Control Panel and P J5301 secure Go to Step 2 Secure the connection 2 Check the A OP ESS harness continuity Disconnect P J202 from the Control panel and P5301 Is the harness dama...

Page 219: ...rive on page 10 16 Troubleshooting Procedure Table Step Actions and Questions Yes No 1 Run the K Mode Solenoid test DO a on page 4 44 Does the solenoid opearate Go to step 2 Go to step 3 2 Reseat the Feed Drive Assembly Does the error persist Go to step 6 Complete 3 Check the solenoid connection Is P J24 on the MCU Board secure Go to Step 4 Secure the connection 4 Check for 24 V at J24 on the MCU ...

Page 220: ...ard Is there 3 3 V between ground J26 1 on the MCU Board when the Interlock Switch is closed Go to step 9 Replace the MCU Board page 8 57 9 Run the K Mode Sensor test DI 04 on page 4 37 1 Remove the Feed Drive Assembly leaving P J261 and P J24 connected 2 Close the Front Cover Does the display change when the sensor is blocked Replace the MCU Board page 8 57 Replace the Feed Drive Assembly page 8 ...

Page 221: ...and P J211 between the MCU Board and Main Motor Assembly Are the connectors secure Go to step 5 Reconnect the connectors 5 Check the Main Drive harness continuity Disconnect P J21 from the MCU Board and P J211 from the Main Drive to check continuity Is the harness damaged Repair or replace the harness PL10 8 7 Go to step 6 6 Check the Main Drive Assembly for correct installation Is the Main Drive ...

Page 222: ...he Transfer Belt Fuser and Imaging Unit for correct installation Are the parts correctly installed Go to step 3 Correct any problems found 2 Does the error persist when the power is turned On Go to step 3 Complete 3 Run the Sub Motor test DO 05 on page 4 43 Does the motor rotate Go to step 4 Go to step 15 4 Check connectors P J22 and P J221 between the MCU Board and Sub Drive Assembly Are the conn...

Page 223: ...le Parts Wiring and Plug Jack Map References Fan PL10 6 7 LVPS PL106 16 MCU Board PL10 7 7 LVPS Harness PL10 8 3 Map 1 MCU Board on page 10 6 Map 3 Electrical and Drive on page 10 8 LVPS on page 10 14 Troubleshooting Procedure Table Step Actions and Questions Yes No 1 Run the Fan test DO 1e or DO 1f page 4 46 Does the Fan rotate Replace the MCU Board page 8 57 Go to Step 2 2 Check P J503 on the LV...

Page 224: ...47 Does the error persist Replace the MCU Board page 8 57 Complete Troubleshooting Reference Table Applicable Parts Wiring and Plug Jack Map References Laser Unit PL4 1 1 ROS RE Harness PL4 1 22 ROS Video Harness PL4 1 23 MCU Board PL10 7 7 Map 2 Feed and Laser Unit on page 10 7 Laser Unit on page 10 17 Troubleshooting Procedure Table Step Actions and Questions Yes No 1 Check the Laser Unit for co...

Page 225: ...s Go to step 4 4 Does the error still occur when the power is turned On Go to step 5 Complete 5 Check the ROS RE and ROS Video harnesses for continuity Is the harness damaged Repair the harness then go to step 6 Go to step 7 6 Does the error still occur when the power is turned On Go to step 7 Complete 7 Replace the Laser Unit page 8 98 Does the error persist Replace the MCU Board page 8 57 Comple...

Page 226: ... 4 36 Does the Switch operate Replace the MCU Board page 8 57 Go to step 2 2 Check the Interlock Harness connections P J14 and P J501 Are the connections secure Go to step 3 Secure the connections 3 Check continuity of the LVPS Main Harness Disconnect P J14 from the MCU Board and P J501 from the LVPS Is the harness damaged Repair the harness Go to step 4 4 Check for 24 V on P44 of the LVPS Is ther...

Page 227: ... and Questions Yes No 1 Check Right Side Door Switch operation Run the Side Switch test DI 06 page 4 38 Does the switch operate Replace the MCU Board page 8 57 Go to step 2 2 Check the Side Switch Harness connections P J29 and P J291 Are the connections secure Go to step 3 Secure the connections 3 Check continuity of the Side Switch Harness Disconnect P J29 from the MCU Board and P J291 from the s...

Page 228: ...Troubleshooting Reference Table Applicable Parts Wiring and Plug Jack Map References Image Processor Board PL10 6 6 ADF Assembly PL10 10 1 Map 3 Electrical and Drive on page 10 8 ADF on page 10 23 Troubleshooting Procedure Table Step Actions and Questions Yes No 1 Check the ADF rear cover Is the cover installed correctly and undamaged Go to step 2 Repair or replace the ADF 2 Check the connector P ...

Page 229: ...edure below Troubleshooting Reference Table Applicable Parts Wiring and Plug Jack Map References Imaging Unit PL4 1 21 Dispense Assembly PL5 1 1 Toner Cartridge CMYK PL5 1 21 24 Toner Motor harness PL5 1 25 Transfer Belt PL6 1 7 Left Side Harness PL10 4 18 MCU Board PL10 7 7 Map 1 MCU Board on page 10 6 Map 4 Imaging on page 10 9 Xerographics on page 10 18 Toner Dispense on page 10 20 Troubleshoot...

Page 230: ... step 7 Reconnect the connectors 7 Check Toner Motor harness continuity Disconnect P J18 from the MCU Board and the connection to the indicated toner motor Is the harness damaged Repair or replace the harness PL10 8 7 Go to step 8 8 Check for 24 V at J18 or J19 on the MCU Board Is 24 V available at J18 3 Y J18 8 M J19 4 C J19 9 K when the Interlock Switch is closed Replace the Dispense Assembly pa...

Page 231: ... 18 MCU Board PL10 7 7 Map 1 MCU Board on page 10 6 Map 4 Imaging on page 10 9 Xerographics on page 10 18 Troubleshooting Procedure Table Step Actions and Questions Yes No 1 Check the Transfer Belt installation Is the Transfer Belt correctly installed Go to step 3 Reseat the Transfer Belt Go to step 2 2 Does the error still occur when the printer is turned On Go to step 3 Complete 3 Check connecto...

Page 232: ...page 10 18 Troubleshooting Procedure Table Step Actions and Questions Yes No 1 Check the Transfer belt life counter Has the counter reached end of life Replace the Transfer Belt page 8 103 Go to step 2 2 Check the Transfer Belt installation Is the Transfer Belt correctly installed Go to step 3 Reseat the Transfer Belt Go to step 2 3 Does the error still occur when the printer is turned On Go to st...

Page 233: ...estions Yes No 1 Check the Humidity Temperature Sensor for correct installation Is the Humidity Temperature Sensor correctly installed Go to step 2 Reseat the Humidity Temperature Sensor Go to step 2 2 Does the error still occur when the printer is turned On Go to step 3 Complete 3 Check connectors P J20 and P J201 between the MCU Board and the Humidity Temperature Sensor Are the connectors secure...

Page 234: ...r 116 317 Controller Error 116 323 NVRAM Error 116 324 Controller Error 116 326 NVRAM Error 116 327 Controller Error 116 328 Controller Error 116 343 ASIC Error 116 350 Network Error 116 351 Network Error 116 352 Network Error 116 355 Network Error 116 390 NVRAM Error 117 365 Verify Flash Error 131 397 Verify Flash Error Initial Actions Cycle printer power If the problem persists follow the proced...

Page 235: ...rd for correct installation Is the Image Processor Board correctly installed Go to step 2 Reseat connectionson the Image Processor Board page 8 41 2 Does the error still occur when the printer is turned On Replace the Image ProcessorBoard page 8 41 Complete Troubleshooting Reference Table Applicable Parts Wiring and Plug Jack Map References Image Processor Board PL10 6 6 Map 3 Electrical and Drive...

Page 236: ... the Image Processor Board Does the error persist Replace the Image ProcessorBoard page 8 41 Complete Troubleshooting Reference Table Applicable Parts Wiring and Plug Jack Map References Image Processor Board PL10 6 6 Memory Card PL10 6 8 Troubleshooting Procedure Table Step Actions and Questions Yes No 1 Check the Memory Card If the Memory Card was recently installed it may not be compatible Is t...

Page 237: ...Initial Actions Cycle printer power If the problem persists follow the procedure below 3 Replace the Memory Card Does the error persist Replace the Image ProcessorBoard page 8 41 Complete Troubleshooting Reference Table Applicable Parts Wiring and Plug Jack Map References Image Processor Board PL10 6 6 Imaging on page 10 24 Troubleshooting Procedure Table Step Actions and Questions Yes No 1 Reseat...

Page 238: ...6 786 Network Scan Error Communication Time Out 016 790 Network Not Ready Error 016 794 Network Not Ready Scan Aborted Error Initial Actions Check network connectivity Cycle printer power If the problem persists follow the procedure below Troubleshooting Reference Table Applicable Parts Wiring and Plug Jack Map References Image Processor Board PL10 6 6 Troubleshooting Procedure Table Step Actions ...

Page 239: ...ect address book information 4 Check the printer configuration Does the printer configuration match the server requirements Go to step 5 Change the configurations to match 5 Check the Image Processor Board installation Does the error persist when connecting to the server Replace the I P Board page 8 41 Complete Troubleshooting Procedure Table continued Step Actions and Questions Yes No ...

Page 240: ... Reference Table Applicable Parts Wiring and Plug Jack Map References Image Processor Board PL10 6 6 Troubleshooting Procedure Table Step Actions and Questions Yes No 1 Check the scan setting Default Settings Scan Scan Defaults Scan to Network Are the network settings correct Go to step 2 Set to Computer 2 Check the network connection using ping command Is the printer and computer connected to the...

Page 241: ... and has the correct name Cycle printer power If the problem persists follow the procedure below Troubleshooting Reference Table Applicable Parts Wiring and Plug Jack Map References Image Processor Board PL10 6 6 Troubleshooting Procedure Table Step Actions and Questions Yes No 1 Check the Address Book setting Does the Share Name in the Server Address tab of the address book match the target syste...

Page 242: ...le printer power If the problem persists follow the procedure below Troubleshooting Reference Table Applicable Parts Wiring and Plug Jack Map References Image Processor Board PL10 6 6 Troubleshooting Procedure Table Step Actions and Questions Yes No 1 Check the server setting Is the User Limit in the Sharing tab set to Maximum Allowed Go to step 2 Set the user limit to Maximum Allowed 2 Cycle syst...

Page 243: ...00 or later Cycle printer power If the problem persists follow the procedure below Troubleshooting Reference Table Applicable Parts Wiring and Plug Jack Map References Image Processor Board PL10 6 6 Troubleshooting Procedure Table Step Actions and Questions Yes No 1 Check the operating system version Is the client computer running Windows 2000 or later Go to step 2 Upgrade the client computer 2 Cy...

Page 244: ... SMB Login Error 031 546 SMB Login Error 031 547 SMB Login Error 031 576 FTP Error 031 578 SMB Login Error 031 579 SMB Path Error 031 580 FTP Error 031 580 FTP Error 031 581 SMB Login Error 031 582 FTP Error 031 584 FTP Error 031 585 FTP Error 031 587 FTP Error 031 588 FTP Error Initial Actions Check network connectivity Check the system adress book configuration settings Cycle printer power If th...

Page 245: ...e Address Book setting Is the Server Addresss tab in the Address Book setting correct Go to step 2 Reset the ServerAddress setting 2 Check the sharing folder Is the Sharing tab of the sharing foler set correctly Go to step 3 Reset the Sharing tab setting 3 Cycle system power Does the error persist Replace the I P Board page 8 41 Complete ...

Page 246: ...rinter menu Applicable Error 017 988 Scan Time Out Initial Actions Check for scanner driver installation Check connections between the PC and printer USB Cycle system power If the problem persists follow the procedure below Troubleshooting Reference Table Applicable Parts Wiring and Plug Jack Map References Image Processor Board PL10 6 6 USB Cable System Control on page 10 22 Troubleshooting Proce...

Page 247: ...estination directory esists on the PC Go to step 5 Correct the settings Image Type Resolution Paper Type Output Destination 5 Check the scanner utility software Start Settings Control Panel Scanners and Cameras Xerox Phaser 6128MFP Scanner 1 Highlight and right click on Phaser 6180MFP Scanner to open the Properties window 2 Click the Events tab 3 Check that the Select an event option is correctly ...

Page 248: ...page 10 8 Imaging on page 10 24 Troubleshooting Procedure Table Step Actions and Questions Yes No 1 Check connectors P J1001 and P J1002 on the Image Processor Board Reseat the connectors Does the error persist Go to step 2 Complete 2 Clear system memory then scan a document Does the error persist Go to step 3 Complete 3 Check the Color scan default setting Is the scan default for Color set to Pho...

Page 249: ...If the problem persists follow the procedure below Troubleshooting Reference Table Applicable Parts Wiring and Plug Jack Map References Image Processor Board PL10 6 6 IIT Sub Assembly PL10 9 2 Map 3 Electrical and Drive on page 10 8 Imaging on page 10 24 Troubleshooting Procedure Table Step Actions and Questions Yes No 1 Check connectors P J1001 and P J1002 on the Image Processor Board Reseat the ...

Page 250: ...ollow the procedure below Troubleshooting Reference Table Applicable Parts Wiring and Plug Jack Map References Image Processor Board PL10 6 6 Imaging on page 10 24 Troubleshooting Procedure Table Step Actions and Questions Yes No 1 Turn the printer Off wait 5 seconds then turn the power On Does the error persist Go to step 2 Complete 2 Check IIT connections to the Image Processor Board Does the er...

Page 251: ...d Plug Jack Map References Image Processor Board PL10 6 6 Imaging on page 10 24 Troubleshooting Procedure Table Step Actions and Questions Yes No 1 Does the error message disappear within 70 seconds automatically or disappear after pressing the OK button Go to step 2 Go to step 4 2 Does the error persist when copying faxing or scanning Go to step 3 To to step 4 3 Print a Configuration page System ...

Page 252: ...ctions Cycle printer power If the problem persists follow the procedure below Troubleshooting Reference Table Applicable Parts Wiring and Plug Jack Map References Image Processor Board PL10 6 6 IIT Sub Assembly PL10 9 2 Imaging on page 10 24 Troubleshooting Procedure Table Step Actions and Questions Yes No 1 Reseat connectors P J1001 and P J1002 on the I P Board then cycle system power Does the er...

Page 253: ...a single fax transmission exceeds 75 To send more than 75 sheets at a time divide the documents in blocks Initial Actions Cycle printer power If the problem persists follow the procedure below Troubleshooting Reference Table Applicable Parts Wiring and Plug Jack Map References Image Processor Board PL10 6 6 Memory Card PL10 6 8 System Control on page 10 22 Troubleshooting Procedure Table Step Acti...

Page 254: ...6 Fax Codec Error 033 768 Fax Codec Error 033 769 Fax Codec Error 033 771 Fax Codec Error 033 772 Fax Codec Error 033 773 Fax Codec Error 033 786 Fax Codec Error Initial Actions Cycle printer power If the problem persists follow the procedure below 3 Replace the Memory Card Does the error persist Replace the I P Board page 8 41 Complete Troubleshooting Reference Table Applicable Parts Wiring and P...

Page 255: ...er 017 978 Controller Error File Page Over 017 979 Controller Error Double File Open 017 980 Report Error 017 986 Controller Error Create 0 Byte File 017 987 Controller Error File Read Error 017 989 Controller Error File Write Error 033 502 Fax Error 033 787 Memory Full 033 789 Fax Job Cancelled 033 790 Fax Job Cancelled 033 791 Fax Job Cancelled Troubleshooting Procedure Table Step Actions and Qu...

Page 256: ... Task Initialize Error 117 362 EEPROM Error Initial Actions Cycle printer power If the problem persists follow the procedure below Troubleshooting Reference Table Applicable Parts Wiring and Plug Jack Map References Image Processor Board PL10 6 6 System Control on page 10 22 Troubleshooting Procedure Table Step Actions and Questions Yes No 1 Print any files stored in memory then cycle system power...

Page 257: ...033 760 Fax Communication Error 033 761 Fax Communication Error 035 706 Fax Communication Error 035 792 Fax Communication Error Initial Actions Cycle printer power If the problem persists follow the procedure below Troubleshooting Reference Table Applicable Parts Wiring and Plug Jack Map References Image Processor Board PL10 6 6 Imaging on page 10 24 Troubleshooting Procedure Table Step Actions an...

Page 258: ...ror 035 792 Fax Communication Error Initial Actions Cycle printer power If the problem persists follow the procedure below 3 Check the system firmware Is the system firmware current Reseat connections to the I P Board then go to step 4 Reload system firmware 4 Cycle system power Does the error persist Replace the I P Board page 8 41 Complete Troubleshooting Reference Table Applicable Parts Wiring ...

Page 259: ...p Actions and Questions Yes No 1 Check the system firmware Is the system firmware current Reseat connections to the I P Board then go to step 2 Reload system firmware 2 Cycle system power Does the error persist Replace the Fax Board page 8 47 then go to step 3 Complete 3 Cycle system power Does the error persist Replace the I P Board page 8 41 Complete Troubleshooting Reference Table Applicable Pa...

Page 260: ...he setting 4 Check the system firmware Is the system firmware current Reseat connections to the I P Board then go to step 5 Reload system firmware 5 Cycle system power Does the error persist Replace the I P Board page 8 41 Complete Troubleshooting Reference Table Applicable Parts Wiring and Plug Jack Map References Image Processor Board PL10 6 6 Imaging on page 10 24 Troubleshooting Procedure Tabl...

Page 261: ...ycle system power Does the error persist Replace the I P Board page 8 41 Complete Troubleshooting Reference Table Applicable Parts Wiring and Plug Jack Map References Image Processor Board PL10 6 6 Imaging on page 10 24 Troubleshooting Procedure Table Step Actions and Questions Yes No 1 Check the system firmware Is the system firmware current Go to step 2 Reload system firmware 2 Reseat all connec...

Page 262: ...33 774 Fax Codec Error 033 776 Fax Codec Error 033 785 Scan Codec Error 117 310 MFD Controller Error 117 311 MFD Controller Error 117 312 MFD Controller Error 133 236 Fax Error 133 237 Fax Codec Error 133 238 Fax Codec Error 133 239 Fax Error 133 240 Fax Error 133 241 Fax Error 133 242 Fax Error 133 243 Fax Error 133 244 Fax Error 133 246 Fax Error 133 247 Fax Error 133 248 Fax Error 133 249 Fax E...

Page 263: ...r 133 290 Fax Error Initial Actions Cycle printer power If the problem persists follow the procedure below Troubleshooting Reference Table Applicable Parts Wiring and Plug Jack Map References Image Processor Board PL10 6 6 Imaging on page 10 24 Troubleshooting Procedure Table Step Actions and Questions Yes No 1 Check the system firmware Is the system firmware current Reseat connections to the I P ...

Page 264: ...blem persists follow the procedure below Troubleshooting Reference Table Applicable Parts Wiring and Plug Jack Map References Image Processsor Board PL10 6 6 Imaging on page 10 24 Troubleshooting Procedure Table Step Actions and Questions Yes No 1 Check the password setting Is the password correct Go to step 2 Set the password 2 Set the Panel Lock Set to Disable Does the error persist Replace the ...

Page 265: ...rence Table Applicable Parts Wiring and Plug Jack Map References Image Processor Board PL10 6 6 IIT Sub Assembly PL10 9 2 Imaging on page 10 24 System Connections on page 10 5 Troubleshooting Procedure Table Step Actions and Questions Yes No 1 Check the system firmware Is the system firmware current Reseat connections to the I P Board then go to step 2 Reload system firmware 2 Cycle system power D...

Page 266: ...Connections on page 10 5 Troubleshooting Procedure Table Step Actions and Questions Yes No 1 Check the user operation Does the user operate the Fax correctly Go to step 2 Retry the Fax operation 2 Check Fax line connections at both ends of the cable Reconnect the Fax line to the Fax Board Does the error still occur Go to step 3 Complete 3 Check system operation using a known good Fax to receive th...

Page 267: ...oubleshooting Procedure Table Step Actions and Questions Yes No 1 Check Fax line connections at both ends of the cable Reconnect the Fax line to the Fax Board Does the error still occur Go to step 2 Complete 2 Check system operation using a known good Fax to receive the data Does the error persist Go to step 3 Complete 3 Check the Line Type Tone Pulse and Country settings Are the settings correct ...

Page 268: ...08 Fax Communication Error 035 709 Fax Communication Error 035 710 Fax Communication Error 035 716 Fax Communication Error 035 717 Fax Communication Error 035 728 Fax Communication Error 035 729 Fax Communication Error 035 737 Fax Communication Error 035 739 Fax Communication Error 035 740 Fax Communication Error 035 742 Fax Communication Error Initial Actions Cycle printer power If the problem pe...

Page 269: ...l occur Go to step 2 Complete 2 Check system operation using a known good Fax to receive the data Does the error persist Go to step 3 Complete 3 Replace the Fax Board page 8 47 Does the error persist Go to step 4 Complete 4 Check the system firmware Is the system firmware current Reseat connections to the I P Board then go to step 5 Reload system firmware 5 Cycle system power Does the error persis...

Page 270: ...3 150 Phaser 6128MFP Service Manual Error Messages and Codes ...

Page 271: ... On Self Test POST Service Diagnostics Service Diagnostics Menu Maps Service Diagnostic Tests Control Panel Troubleshooting Inoperable Printer Troubleshooting AC Power Supply Troubleshooting DC Power Supply Troubleshooting 24 VDC Interlock Switch Abnormal Noise and Electrical Problems ...

Page 272: ...ter requires approximately 20 seconds to complete this sequence 1 When the power switch is turned On the Health LED on the Image Processor Board turns On immediately 2 The Boot Loader checks for RAM present and functional If an error is detected RAM ERROR is displayed and the Health LEDs alternately blink at 1 2 second intervals 3 The Boot Loader then loads and runs POST diagnostics 4 POST turns O...

Page 273: ...CodeROM 116 317 This test calculates the ROM checksum chip by chip and compares it with the value stored in CodeROM FontROM This test calculates the FontROM checksum chip by chip and compares it with the value stored in FontROM 116 310 Checksum error is in the built in FontROM 116 317 Checksum error is in the main program ROM EEPROM This test verifies the EEPROM 116 323 Error in EEPROM0 during ini...

Page 274: ...ltaneously and turn the printer power On 3 Release the Arrow buttons when Please Wait message is displayed 4 The Service Mode menu appears with FAX Scanner Diag and Printer Diag and test groups listed to indicate the printer is in service mode Using Service Diagnostics Two test groups FAX Scanner Diag and Printer Diag are avilable to test components of the ADF Scanner Fax or printer Most of the di...

Page 275: ...VM by pressing OK Exiting Service Diagnostics Mode Scroll to Complete in the Fax Scanner Diag group Exit Mode in the Printer Diag test group then press OK Service Diagnostics Button Functions Button Function Up Moves or selects an item or parameter Down Moves or selects an item or parameter Left Moves the cursor to the left Right Moves the cursor to the right OK Confirms settings or runs the selec...

Page 276: ...rint Prefix Dial Prefix Dial Number Discard Size ECM Extel Hook Threshhold Modem Speed Country Ethernet TCP IP Protocol Host Access List Initialize NVM Information Pages Menu Map Configuration PCL Fonts List PCLMacro List Job History Error History Protocol Monitor Demo Page Tray Settings Tray Defaults Settings Copy Defaults Scan Defaults Fax Defaults www xerox com office 6128MFPdocs Nederlands Sve...

Page 277: ...up Color 2 Backup B W Backup Total Backup FullColor Error Color 2 Error B W Error Color B W Total Color Backup B W Backup Total Backup Color Error B W Error SMB FTP Email SMB FTP Backup Email Backup SMB FTP Error Email Error Slow Scan KtoP Slow Scan 600M Slow Scan 600Y Slow Scan 600C Fast Scan KtoM Fast Scan KtoY Fast Scan KtoC Fast Scan M Feed Fast Scan Tray Fast Scan 2 KtoM Fast Scan 2 KtoY Fast...

Page 278: ...REEN Coeff FB BLUE Coeff FB GRAY Coeff ADF RED Coeff ADF GREEN Coeff ADF BLUE Coeff ADF GRAY Target RED Target GREEN Pattern No Pt03 Grid Size Pt04 Gradation Pt05 Gradation Pt06 R Level Pt06 G Level Pt06 B Level Pt07 Step Cycle Pt08 Step Cycle Pt11 R Level Target BLUE Target GRAY All Clear User Clear System Clear User System Clear System Data Init Document Clear Home Pos Sensor Tray Sensor Counter...

Page 279: ... SRAM Run this test when error 117 311 117 362 117 363 133 254 017 970 033 503 or 033 787 occurs I F Test FAX CardTest Ready Now checking Check OK or NG This test checks communication with the FAX Board Run this test when FAX related errors occur AFE Serial Test Ready Now checking Check OK Check NG This test checks communication with the AFE serial interface Run this test when FAX or Scanner relat...

Page 280: ...gle interval is 10ms Time CV x 10ms Data 1 Default is 2 seconds Hook Set Test Hook Set Test Set ON Set OFF Complete This test switches the telephone line between on or off hook states Set ON Connect the on hook circuit Set OFF Connect the off hook circuit Single Tone Send Single Tone Send 0Hz 400Hz 462Hz 1100Hz 1300Hz 1500Hz 1650Hz 1850Hz 2100Hz 500Hz 600Hz 900Hz 1000Hz Now Sending Signal Complete...

Page 281: ...parately 3 seconds after off hook After 10 digit signal is transmitted the signal stops but off hook status continues Ring Back Tone Ring Back Tone Now Sending Signal Checks the tone output signals for the ring back tone at 400Hz 16Hz Data Send Data Send V 34 33600bps V 34 31200bps V 34 28800bps V 34 26400bps V 34 24000bps V 34 21600bps V 34 19200bps V 34 16800bps V 34 14400bps V 34 12000bps V 34 ...

Page 282: ...se to configure the White Balance by correcting C2 value for document glass with auto adjustment Auto Adjust ADF Auto Adjust ADF Ready Now Adjusting Adjust OK or NG Use to configure the White Balance by correcting C2 value for ADF with auto adjustment Shading Parameter Coeff FB Coeff ADF Hex 00 Target Hex 00 Displays the values stored for shading correction R G B and Grey applied to platen ADF and...

Page 283: ...p Cycle Value Hex FFFF IIT I O Check Test IIT sensors and motors Home Position Sensor Status Off or On Checks the function of the sensor Tray Sensor Status Off or On Checks the function of the sensor Feed Sensor Status Off or On Checks the function of the sensor ADF Cover Sensor Status Off or On Checks the function of the sensor Lamp See procedure Checks lamp function Scanner Motor See procedure R...

Page 284: ...diate output Immediate output refers to an automatic image output to accommodate incoming data that exceeds memory capacity Values range from 0 to 99 The larger the value the sooner the immediate output is initiated Thresh Memory TX Sets the percentage of memory reserved when data is sent Values range from 0 to 100 The smaller the value the greater the available memory for scanned documents Thresh...

Page 285: ...s the ring tone duration of the external telephone terminal for FAX telephone switching Values range from 0 to 255 When the value is 100 the duration is 100 sec Num Check 1 0s Sets the autodialing delay duration when different sets of document data bound for the same destination are placed consecutively in the transmission queue This pause allows the receiving side to make time for processing Valu...

Page 286: ...ble 0db Equal to a cable length of 0km 4db Equal to a cable length of 1 9km 8db Equal to a cable length of 3 6km 12db Equal to a cable length of 7 2km G3M V34 Bit Rate Sets the signaling rate for the Super G3 V34 mode Values range from 2400bps to 33600bps in 14 steps 2400 4800 7200 9600 12000 14400 16800 19200 21600 24000 26400 28800 31200 33600 Capability V34 Sets the communication capability of ...

Page 287: ...ar displays a list of country Clears stored document data communication management data and history Initializes system data User System Clear User System Clear displays a list of country Clears stored document data address information communication management data and history Initializes system data System Data Init System Data Init provides a list of country Initializes system data in accordance ...

Page 288: ...otor test 4 Perform the FAX Scanner Diag Scanner Maintenance IIT I O Check Home Position Sensor test 5 Check the ControL Panel display for Status OFF 6 Press Stop to return one step higher menu 7 Reverse the carriage with the FB Motor test 8 Perform the FAX Scanner Diag Scanner Maintenance IIT I O Check Home Position Sensor test again 9 Check the ControL Panel display for Status ON s6128mfp 065 Ho...

Page 289: ... Perform the FAX Scanner Diag Scanner Maintenance IIT I O Check Tray Sensor test 4 Check the Control panel display for Status ON 5 Press Stop to return one step higher menu 6 Remove the media from the ADF Tray 7 Perform the FAX Scanner Diag Scanner Maintenance IIT I O Check Tray Sensor test 8 Check the sensor Status OFF s6128mfp 066 Control Panel Normal Home Position Sensor Status OFF Home Positio...

Page 290: ...Feeder 4 Perform the FAX Scanner Diag Scanner Maintenance IIT I O Check Feed Sensor test 5 Check the Control panel display for Status ON 6 Press Stop to return one step higher menu 7 Remove the media from the ADF Tray 8 Perform the FAX Scanner Diag Scanner Maintenance IIT I O Check Feed Sensor test 9 Check the Control panel display for Status OFF s6128mfp 067 Control Panel Normal Tray Sensor Statu...

Page 291: ...he FAX Scanner Diag Scanner Maintenance IIT I O Check ADF Cover Sensor test 4 Check the Control panel display for Status ON 5 Press Stop to return one step higher menu 6 Close the ADF cover 7 Perform the FAX Scanner Diag Scanner Maintenance IIT I O Check ADF Cover Sensor test 8 Check the Control panel display for Status OFF s6128mfp 068 Control Panel Normal Feed Sensor Status ON Feed Sensor Status...

Page 292: ...ner Maintenance IIT I O Check Lamp test 4 Press the Arrow buttons to select Set OFF 5 Press OK to run the test 6 Check that the Lamp is Off 7 Press Stop to return one step higher menu 8 Repeat the Lamp test FAX Scanner Diag Scanner Maintenance IIT I O Check Lamp test 9 Press the Arrow buttons to select Set ON 10 Check that the Lamp is ON s6128mfp 069 Control Panel Normal ADF Cover Sensor Status ON...

Page 293: ...ten Cover 3 Perform the FAX Scanner Diag Scanner Maintenance IIT I O Check FB Motor test 4 Press the Arrow buttons to select Forward 5 Press OK to run the test 6 Check that the carriage moves to the Right 7 Press Stop to return one step higher menu 8 Repeat the Lamp test FAX Scanner Diag Scanner Maintenance IIT I O Check FB Motor test 9 Press the Arrow buttons to select Reverse 10 Check that the c...

Page 294: ...DF Motor Note Close the ADF Cover before testing the ADF Motor 1 Enter Service Diagnostics page 4 4 2 Perform the FAX Scanner Diag Scanner Maintenance IIT I O Check ADF Motor test 3 Press the Arrow buttons to select Forward 4 Press OK to run the test 5 Listen for motor operation s6128mfp 071 ...

Page 295: ...errors occur Test result NG Go to FIP OK cycle main power EEPROM Test Start Processing Check OK or NG This test checks the diag area of the EEPROM Run this test when 116 323 and 116 390 errors occur Test result NG Go to FIP OK cycle main power DRAM Test Start Processing Check OK or NG This test checks the DRAM address lines Execute this test when 116 315 116 316 and 116 320 errors occur Test resul...

Page 296: ...o run the selected test Exit the Sensor Test by pressing the Stop button The display returns to the Service Mode menu NOTE During the Sensor Test no other diagnostic functions can be performed The printer only accepts DI components and exit commands The device code for each component is listed below Code Component DI 0 Manual Feeder Sensor DI 1 No Paper Seneor DI 2 Registration Sensor DI 3 Exit Se...

Page 297: ...CU ESS OK Saved Please wait Saves MCU NVM to the Controller Board Load NVM from ESS Load NVM MCU ESS OK Processing Loaded Please wait Loads MCU NVM from the Controller Board into the replacement MCU Board Print NVM Info Processing Please wait Prints NVRAM information saved in the Controller Print Info Provides printer configurations and settings information Info Page Ready Processing Prints the so...

Page 298: ...s the limit due to machine to machine variation Sets the printer Tone Correction mode On Off NOTE Note When the Tone Correction has been changed an is displayed next to the text Display Counter Not used in this printer Hex Dump OFF ON Sets HexDump On Off Used to analyze received data in case of an error Setting Hex Dump to On enables printing of received data via Info Page under Print info Pixel C...

Page 299: ...Color n Color 2 n B W n Total n Color 2 Error n B W Error n Color copies Mono color or 2 color copies Black and White copies Total of all copies Errors in toner saving Color 2 copies Errors in Black and White copies FAX Service Color n B W n Total n Color Error n B W Error n Color FAX received Black and White FAX received Total FAX received Errors in color FAX reception Errors in Black and White F...

Page 300: ...est Print Test prints for troubleshooting the printer See Chapter 5 for examples and descriptions of test prints No Image IOT Ready Processing Prints a blank page Pattern IOT Ready Processing Prints the Engine Test print at 600 DPI This page isolates the print engine IOT from the I P Board Grid 2 Ready Processing Prints a built in grid pattern This print isolates ESS function Cyan 20 Ready Process...

Page 301: ...before changing the value of the registration Slow Scan K to P 128 127 Adjusts registration in the feed direction Slow Scan 600M 128 127 Slow Scan 600Y 128 127 Slow Scan 600C 128 127 Fast Scan KtoM 128 127 Adjusts registration in the scan direction Fast Scan KtoY 128 127 Fast Scan KtoC 128 127 Fast Scan M feed 30 30 Fast Scan Tray 30 30 Fast Scan 2 KtoM 1 2 Adjusts registration in the scan directi...

Page 302: ...ste toner life count Life K Waste Toner 0 Black waste toner life count Life IU Y Time 0 Yellow drum cycle count Life IU M Time 0 Magenta drum cycle count Life IU C Time 0 Cyan drum cycle count Life IU K Time 0 Black drum cycle count Life IU Xero 0 Imaging Unit motor operating time Life IU Deve K 0 K Developer sheet count Life Manual Feed 0 manual feed slot sheet count Life Tray Sheet 0 Tray sheet ...

Page 303: ... starting the procedure 1 Enter Service Diagnostics page 4 4 2 Open the Front Cover 3 Perform the Exit Sensor test Engine Diag Sensor Test Exit Sensor 4 Move the Sensor up and down and check the information on the Control Panel display The Low and High values change from 0 up 99 s6128mfp 073 Exit Sensor Side Switch Manual Feeder Sensor Registration Sensor K Mode Sensor Interlock Switch Tray 2 No P...

Page 304: ... 34 Phaser 6128MFP Service Manual General Troubleshooting 5 Press the Stop button to stop the Exit Sensor test s6128mfp 074 Exit Sensor Control Panel Normal Digital Input DI 3 L 0 Digital Input DI 3 L 1 ...

Page 305: ...form the Registration Sensor test Engine Diag Sensor Test Regi Sensor 4 Operate the actuator while checking the information on the Control Panel display The Low and High values change from 0 up 99 5 Press the Stop button to stop the Registration Sensor test s6128mfp 075 Control Panel Normal Actuator Digital Input DI 3 L 0 Digital Input DI 3 L 1 ...

Page 306: ...lace in a dark location 4 Perform the Interlock Switch test Engine Diag Sensor Test Interlock Switch 5 Open and close the Front Door while checking the information on the Control Panel display The Low and High values change from 0 up to 99 6 Press the Stop button to stop the Cover Open Sensor test s6128mfp 076 Control Panel Normal Digital Input DI 7 L 0 Digital Input DI 7 L 1 ...

Page 307: ...e the Feed Drive Assembly page 8 37 but do not unplug any of the cables 6 Perform the K Mode Sensor test Engine Diag Sensor Test K Mode Sensor 7 Press the lever mounted on the Solenoid to retract the actuator from the sensor 8 Move a strip of paper in and out of the sensor arms to simulate the action of the actuator The Low and High values change from 0 up to 99 9 Press the Stop button to stop the...

Page 308: ...e Side Switch test Engine Diag Sensor Test Side Switch 3 Open and close the Toner Access Door while checking the information on the Control Panel display The Low and High values change from 0 up to 99 4 Press the Stop button to stop the Side Switch test Control Panel Normal s6128mfp 078 Digital Input DI 6 L 0 Digital Input DI 6 L 1 ...

Page 309: ...4 2 Perform the Tray 1 MPT Sensor test Engine Diag Sensor Test Manual Feed Sensor 3 Slide a sheet of paper in and out of the manual feed slot The Low and High values change from 0 up to 99 4 Press the Stop button to stop the Tray 1 No Paper test s6128mfp 079 Control Panel Normal Digital Input DI 0 H 0 Digital Input DI 0 H 1 ...

Page 310: ...per test Engine Diag Sensor Test Tray No Paper 3 Remove Tray 4 Move the Actuator up and down while checking the information on the Control Panel display The Low and High values change from 0 up to 99 5 Press the Cancel button to stop the Tray No Paper test s6128mfp 080 Control Panel Normal Digital Input DI 1 H 0 Digital Input DI 1 H 1 ...

Page 311: ...e 4 4 2 Open the Front Cover 3 Perform the Main Motor test Engine Diag Motor Test Main Motor DO 0 DO 1 DO 2 The rotational speed order of the Main Motor test is DO 2 DO 0 DO 1 4 Verify that the Main Motor is running the imaging unit drums are rotating and the transfer belt is moving s6128mfp 081 Black Drum Erase Lamp Yellow Magenta And Cyan Drum Erase Lamp Sub Motor Main Motor K Mode Solenoid Tray...

Page 312: ...4 42 Phaser 6128MFP Service Manual General Troubleshooting 5 Press the Stop button to stop the Main Motor test s6128mfp 082 ...

Page 313: ...k override to provide power to the device under test 1 Enter Service Diagnostics page 4 4 2 Open the Front Cover 3 Perform the Sub Motor test Engine Diag Motor Test Sub Motor DO 5 DO 6 DO 7 The rotational speed order of the test is DO 7 DO 5 DO 6 4 Verify that the Sub Motor is running and the Exit Roller is rotating 5 Press the Stop button to stop the Sub Motor test s6128mfp 083 ...

Page 314: ...rlock override to provide power to the device under test 1 Remove the Feed Drive Assembly page 8 37 but leave all harnesses connected 2 Enter Service Diagnostics page 4 4 3 Perform the K Mode Solenoid test Engine Diag Motor Test K Mode Solenoid DO a 4 Press the Stop button to stop the K Mode Solenoid test 5 Turn off the printer and install the Feed Drive Assembly s6128mfp 084 ...

Page 315: ...ull rotation 1 Enter Service Diagnostics page 4 4 2 Remove the Paper Tray 3 Perform the Tray 2 Feed Solenoid Half or Init test Engine Diag Motor Test Feed Roller DO b DO c The rotational speed of the solenoid is DO c DO b Note To repeat either the DO b or DO c test it is necessary to press the Stop button first However to perform the DO c test after the DO b test it is only necessary to select the...

Page 316: ...ce Manual General Troubleshooting Fan 1 Enter Service Diagnostics page 4 4 2 Perform the Fan test Engine Diag Motor Test Fan DO 1e DO 1f 3 Verify that the fan is running 4 Press the Stop button to stop the Fan test s6128mfp 086 ...

Page 317: ...de power to the device under test 1 Enter Service Diagnostics page 4 4 2 Remove the Toner Cartridge page 8 13 of the color under test 3 Open the Toner Cartridge Holder of the color under test 4 Perform the Toner Motor test Engine Diag Motor Test CMYK Toner Motor DO 21 DO 23 DO 25 DO 27 5 Check that the Toner Motor for the chosen color is running and the gear is rotating 6 Press the Stop button to ...

Page 318: ...or DO 0 test Engine Diag Motor Test Main Motor DO 0 5 While the Main Motor is running press the Up Arrow button to find Regi Clutch Press the OK button to run the Regi Clutch test Note The Registration Rollers rotate when the Main Motor DO 0 and Registration Clutch DO 29 tests are executed 7 Verify that the Main Motor is running and the Registration Rollers are rotating 8 Press the Stop button to ...

Page 319: ...er to the device under test Run this test when the Feed Roller fails to rotate during the Feed Solenoid DO b test 1 Remove the Left Side Cover page 8 17 2 Enter Service Diagnostics page 4 4 3 Perform the Tray 2 Feed Solenoid Auto test Engine Diag Motor Test Tray Feed Solenoid DO 2f 4 Observe the Feed Solenoid movement 6 Press the Stop button to stop the Feed Solenoid Auto test s6128mfp 089 ...

Page 320: ...provide power to the device under test 1 Enter Service Diagnostics page 4 4 2 Open the Front Cover 3 Remove the Imaging Unit page 8 8 4 Perform the Drum Erase Lamp K test Engine Diag Motor Test Drum Erase Lamp K DO 3d 5 Verify that the Lamp is operating 7 Press the Stop button to stop the Drum Erase Lamp K test s6128mfp 090 ...

Page 321: ...ovide power to the device under test 1 Enter Service Diagnostics page 4 4 2 Open the Front Cover 3 Remove the Imaging Unit page 8 8 4 Perform the Drum Erase Lamp YMC test Engine Diag Motor Test Drum Erase Lamp YMC DO 3f 5 Verify that the Lamps are operating 7 Press the Stop button to stop the Drum Erase Lamp YMC test s6128mfp 091 ...

Page 322: ...here is no improvement contact the telephone company If the copy function s printing results are incorrect it can be determined if the fault is in the scanner or printer by operating each unit separately via a computer Transmission Fault 1 Problem with printing quality at receiving Fax such as corrupt image lines in image or top bottom cut off a If a copy is normal Cause Degraded telephone line co...

Page 323: ... Action Refer to the appropriate fault error procedures to resolve the problem d Distinctive ring pattern detection fails Cause The distinctive ring pattern set for the DRPD mode is incorrect applicable only in USA and Canada Corrective Action Check the ring pattern provided by the telephone service provider and select the correct pattern for fax e Cannot detect Calling Tone CNG signal Cause Commu...

Page 324: ...ior checking for a ring tone Other Fax Problems Branch Connection Parallel Connection During Fax reception if the handset of another telephone on a branch connection is lifted the received image may be corrupted or a transmission error may occur Branch connection may also interfere with Caller ID Call Waiting or the receiving operation of the connected telephones Call Waiting If a call comes in du...

Page 325: ...ronic equipment may degrade the line condition Also a telephone line acting as an antenna may absorb electric waves generated from wireless or broadcasting equipment Because Fax data is audio data the line quality affects the quality stability of image data as well as that of conversation Fax Failure After Installation Relocation The Fax has failed to send after installation The following troubles...

Page 326: ... this order 2 Is there a connection Go to step 3 Request the phone company for a line repair 3 1 Manually dial any out of area phone number 2 Is there a connection Go to step 6 Check if the transmission route consists of multiple telephone service providers Confirm that your telephone line supports faxing 4 1 Check the line type Confirm that the line is not an ISDN xDSL IP phone line but an analog...

Page 327: ... Go to step 9 9 1 Check for the pulse Manually dial using pulse 20PPM 2 Is there a connection Go to step 3 Set pulse to 10PPM Go to step 3 10 1 Receive a fax from another fax machine 2 Did the reception complete Complete Connect additional devices such as external telephone and answering machine Check the Secure settings System Admin Menu Secure Settings Secure Receive Is Secure Rcv Set Disable th...

Page 328: ...dure Table Step Actions and Questions Yes No 1 1 Check the error message on the Control Panel 2 Is there an error code Refer to the appropriate error code procedure Go to step 2 2 Has the Fax machine been relocated Refer to Fax Failure After Installation Relocation on page 4 55 Go to step 3 3 Do all calls fail Go to step 4 Go to step 11 4 Has the line contract been switched to ISDN xDSL or IP phon...

Page 329: ... the Delayed Start On Go to step 13 Go to step 15 13 Is the Delayed Start on a specified time Complete Go to step 14 14 Is the Local Time setting correct Replace the I P Board page 8 41 Set the Local Time setting 15 Is a ring tone present Go to step 16 Go to step 17 16 Is the modem sound present Analyze the Protocol Monitor Report Replace the I P Board page 8 41 17 Is the setting correct for the l...

Page 330: ...the problem persists follow the procedure below 21 Is a modem sound present at transmission Go to step 22 Replace the I P Board page 8 41 22 1 Check the Junk Fax Filter setting System Admin Menu Fax Settings Junk Fax Filter 2 Is the Junk Fax Filter On Go to step 23 Analyze the Protocol Monitor Report 23 Is the number of sending fax registered Analyze the Protocol Monitor Report Complete Troublesho...

Page 331: ...ax menu 3 Check the Fax settings System Admin Menu Fax Settings Color Fax Is the Color Fax setting On Go to step 4 Turn the Color Fax setting On 4 Check the original document Is the customer using a color document Go to step 5 Complete 5 Did the user select Color Fax mode Replace the IIT Sub Assembly page 8 82 Complete Troubleshooting Procedure Table continued Step Actions and Questions Yes No ...

Page 332: ...ting Reference Table Applicable Parts Wiring and Plug Jack Map References Image Processor Board PL10 6 6 MCU Board PL10 7 7 System Control on page 10 22 Troubleshooting Procedure Table Step Actions and Questions Yes No 1 Print the Pattern IOT test print from Service Diagnostics Did the test pattern print Replace the Image Processor Board page 8 41 Replace the MCU Board page 8 57 s6128mfp 093 ...

Page 333: ...g Up 1 Verify the correct Fuser 110 V vs 220 V is installed in the printer 2 Refer to the Engine Power Up Sequence page 4 63 AC Power Supply Troubleshooting Troubleshooting Reference Table Applicable Parts Wiring and Plug Jack References LVPS PL9 1 4 LVPS on page 10 14 Troubleshooting Procedure Table Step Actions and Questions Yes No 1 Check the voltage at the AC wall outlet Is there approximately...

Page 334: ...2 VDC or less for 24 VDC 7 VDC or less for 5 VDC or 4 4 VDC for 3 3 VDC LVPS Troubleshooting Reference Table Applicable Parts Wiring and Plug Jack Map References LVPS PL10 6 16 MCU Board PL10 7 7 LVPS on page 10 14 Troubleshooting Procedure Table Step Actions and Questions Yes No 1 Check the AC power supply page 4 73 Does the problem persist Go to step 2 Complete 2 Turn the Power Switch Off Is the...

Page 335: ...the problem still occur Go to step 7 Complete 7 1 Turn the Power Switch Off 2 Connect J501 to the LVPS then turn the Power Switch On 3 Measure the voltage between P501 1 P501 2 Is there 5 V present Go to step 9 Replace the MCU Board page 8 57 then go to step 8 8 Does the error still occur Go to step 9 Complete 9 1 Turn the Power Switch Off 2 Connect J502 to the LVPS then turn the Power Switch On 3...

Page 336: ...Map References Interlock Harness PL10 6 4 LVPS PL10 6 16 LVPS on page 10 14 Troubleshooting Procedure Table Step Actions and Questions Yes No 1 Check the Interlock Harness for continuity 1 Disconnect P J44 2 Check continuity between P J44 1 P J44 3 Is the circuit continuous when the Interlock is activated Complete Replace the Interlock Harness page 8 52 ...

Page 337: ...tor FULL2 Is the noise still present Go to step 2 Go to step 5 2 1 Reseat the Imaging Unit 2 Perform the Main Motor test page 4 41 Service Mode Engine Diag Motor Test Main Motor FULL2 Is the noise still present Go to step 3 Complete 3 1 Reseat the Transfer Belt connectors 2 Perform the Main Motor test page 4 41 Service Mode Engine Diag Motor Test Main Motor FULL2 Is the noise still present Go to s...

Page 338: ...otor FULL2 Is the noise still present Go to step 8 Complete 8 1 Reseat the Sub Drive Assembly 2 Perform the Sub Motor test page 4 43 Service Mode Engine Diag Motor Test Sub Motor FULL2 Is the noise still present Try replacing one after another Imaging Unit page 8 8 Fuser page 8 11 Sub Drive Assembly page 8 60 Complete Troubleshooting Reference Table Applicable Parts Wiring and Plug Jack Map Refere...

Page 339: ...from Tray 1 Is the noise still present Go to step 4 Complete 4 1 Remove the Tray 2 Rotate the Separator Roller with your finger Does the roller rotate smoothly Go to step 5 Replace the Separator Roller page 8 7 5 Check the Feed Roller rotation 1 Remove the Tray 2 Start the Main Motor FULL2 test page 4 41 Service Mode Engine Diag Motor Test Main Motor FULL2 then while the motor is running start the...

Page 340: ...LL2 Is the noise still present Go to step 12 Complete 12 Check for dirt or debris on the registration rollers Clean the rollers then go to step 13 Go to step 14 13 Check for noise when printing Is the noise still present Go to step 14 Complete 14 Check registration roller rotation 1 Start the Main Motor test page 4 41 Service Mode Engine Diag Motor Test Main Motor FULL2 and while the motor is runn...

Page 341: ...FULL2 Is the noise still present Go to step 18 Complete 18 1 Reseat the Fuser 2 Perform the Sub Motor test page 4 43 Service Mode Engine Diag Motor Test Sub Motor FULL2 Is the noise still present Go to step 19 Complete 19 1 Reseat the Sub Drive Assembly 2 Perform the Sub Motor test page 4 43 Service Mode Engine Diag Motor Test Sub Motor FULL2 Is the noise still present Try replacing one after anot...

Page 342: ... or relocate the printer at least 6 meters away from other electrical appliances Does the error still occur Go to step 2 Complete 2 Check the AC ground Is AC power supply outlet wired and grounded appropriately Go to step 3 Request the client to fix AC power supply outlet 3 1 Open the Front Cover 2 Inspect the four Transfer Belt HV connections Are the four terminals on the Transfer Belt and the fo...

Page 343: ...ectrical outlet 2 Turn the printer power On Does the printer operate normally Complete Go to step 3 3 1 Turn the printer power Off 2 Reconnect the printer power cord 3 Turn the printer power On Does the printer operate normally Complete Go to step 4 4 Test the GFI Breaker Does the GFI Breaker operate normally Complete Go to step 5 5 1 Turn the printer power Off 2 Disconnect the power cord and wait...

Page 344: ...urn the printer power Off 2 Disconnect the power cord and wait for one minute 3 Reseat the LVPS connectors 4 Turn the printer power On Does the printer operate normally Complete Go to step 2 2 Check the Control Panel connection Reconnect the Control Panel connector P J220 Does the Control Panel operate normally Complete Go to step 3 3 Reseat all MCU Board connectors Does the printer operate normal...

Page 345: ...d Verify that the LPR and AppSocket settings are set as desired Interpreters Auto PCL or PostScript depending on your driver 2 Verify that the client is logged into the network and printing to the correct print queue The user should also have access to the Phaser printer queue Verify Driver Installation 1 From the desktop right click My Network Places and select Properties 2 Right click Local Area...

Page 346: ... perform the steps below For TCP IP proceed to step 2 a From the printer s Control Panel verify that the EtherTalk is enabled If it not enable EtherTalk and reset the printer b Print the Configuration page and verify that EtherTalk is enabled c From the Configuration page verity the Zone If you have multiple zones on your network verify that your printer appears in the desired zone 2 Open the Netw...

Page 347: ...rint Quality Troubleshooting In this chapter Print Quality Problems Overview Checklist Before Troubleshooting Print Quality Print Quality Troubleshooting Print Quality Specifications Print Quality Troubleshooting ...

Page 348: ...ompare this to the Environmental Specifications on page 1 16 Extreme temperature and humidity can adversely affect print quality When analyzing a print quality defect first determine if the defect occurs in all colors or only one color and if it is repeating or a random occurrence Continuous defects in the process direction such as voids and lines are the most difficult to diagnose Inspect the vis...

Page 349: ...kground Contamination Fuser Vertical Stripes Horizontal Stripes Repeating Bands Lines Marks or Spots Unfused Image Imaging Unit Light or Undertone Print Blank Print Black Print Vertical Blank Lines Horizontal Band Voids or Streaks Vertical Stripes Horizontal Stripes Partial Band Random Spots Repeating Bands Lines Marks or Spots Background Contamination Unfused Image ...

Page 350: ...prior to performing troubleshooting These actions may help resolve the problem without troubleshooting the printer 1 Color is out of alignment Note This problem can occur after installing a new black Toner Cartridge if the Imaging Unit has not been cleaned a Clean inside the printer b Clean the Laser Unit lenses using a Q tip or a dry lint free cloth to wipe the lenses c Check the Transfer Belt fo...

Page 351: ...ner Cartridge s to make sure that it is installed correctly b Change the Toner Cartridge s 5 Entire page is white or one color is missing from image a Ensure the packaging material is removed from the Toner Cartridge b Check the Toner Cartridge to make sure that it is installed correctly c The toner may be low Change the Toner Cartridge 6 Streaks appear on the page a The toner may be low Change th...

Page 352: ...nts in cyan magenta yellow or black a Check the Toner Cartridges to make sure they are installed correctly 9 The job prints but the top and side margins are incorrect a Make sure the Paper Size setting in the Tray Settings is correct b Make sure the margins are set correctly in the software application Fuzzy Text Chrysanthemum x morifolium nthemumx nthemum x nthemum x Chrysanthemum x morifolium nt...

Page 353: ...ntal Stripes There are dark lines running parallel with the leading edge of the print page 5 22 Partial Band Areas of the image are extremely light or missing page 5 24 Random Spots Spots of toner are randomly scattered page 5 26 Repeating Bands Lines Marks or Spots Recurring lines marks or spots on the page page 5 28 Background Contamination There is toner contamination on all or most of the page...

Page 354: ...er Cartridge K PL5 1 21 Toner Cartridge C PL5 1 22 Toner Cartridge M PL5 1 23 Toner Cartridge Y PL5 1 24 Transfer Belt PL6 1 7 IP Board PL10 6 6 MCU Board PL10 7 7 Troubleshooting Procedure Table Step Actions and Questions Yes No 1 Check the toner type Are the cartridges genuine Xerox Go to step 2 Replace with Xerox toner 2 Check the media condition Is the media the recommended type Go to step 4 R...

Page 355: ...ws of the Laser Unit Are the laser windows clean Go to step 12 Clean with soft cloth or cotton swab 12 Check the laser beam path Are there any obstructions between the Laser Unit and Imaging Unit Remove any obstructions Go to step 13 13 Perform the Toner Motor test for each color Service Mode Engine Diag Motor Test Yellow Magenta Cyan Black Toner Motor Does the Toner Dispenser Motor function norma...

Page 356: ...to step 20 20 Replace the Dispense Assy page 8 91 Is the image printed correctly Complete Go to step 21 21 Replace the Laser Unit page 8 98 Is the image printed correctly Complete Replace the IP Board page 8 41 Troubleshooting Reference Table Applicable Parts Example Print Laser Unit Kit PL4 1 99 Imaging Unit PL4 1 21 Dispense Assy PL5 1 1 Toner Cartridge K PL5 1 21 Toner Cartridge C PL5 1 22 Tone...

Page 357: ...5 Go to step 6 5 Is the image printed correctly Complete Go to step 6 6 Check the paper condition Is the paper dry and recommended paper Go to step 8 Replace the paper with a new dry and recommended one then go to step 7 7 Is the image printed correctly Complete Go to step 8 8 Check the Toner Cartridge life Are one or more of the Toner Cartridges near end of life Replace the Toner Cartridge s page...

Page 358: ...92 from the Toner Motors Is each cable of J18 J181 and J182 continuous Is each cable of J19 J191 and J192 continuous Go to step 16 Replace the Dispense Assy page 8 91 16 Check for power to Toner Motors Y M C K 1 Disconnect J18 and J19 from the MCU Board 2 Measure the voltage across P18 3 P18 8 P19 4 and P19 9 ground on the MCU Board Is the voltage about 24 VDC when the Front Cover interlock switch...

Page 359: ... the image printed correctly Complete Go to step 22 22 Replace the Imaging Unit page 8 8 Is the image printed correctly Complete Go to step 23 23 Replace the Transfer Belt page 8 103 Is the image printed correctly Complete Go to step 24 24 Replace the Laser Unit page 8 98 Is the image printed correctly Complete Replace the IP Board page 8 41 Troubleshooting Procedure Table continued Step Actions a...

Page 360: ...o 1 Run the Gradation ESS test print Service Mode Test Print Toner Gradation ESS Is the image printed correctly Go to step 2 Go to step 3 2 Run the Pattern IOT test print Service Mode Test Print Toner Pattern IOT Is the image printed correctly Replace the IP Board page 8 41 Go to step 3 3 Reseat the Imaging Unit Is the image printed correctly Complete Go to step 4 4 Reseat all MCU Board connectors...

Page 361: ...ctly Complete Go to step 9 9 Replace the Imaging Unit page 8 8 Is the image printed correctly Complete Go to step 10 10 Replace the IP Board page 8 41 Is the image printed correctly Complete Go to step 11 11 Replace the HVPS Board page 8 54 Is the image printed correctly Complete Go to step 12 12 Replace the Laser Unit page 8 98 Is the image printed correctly Complete Replace the MCU Board page 8 ...

Page 362: ...t PL4 1 21 Transfer Belt PL6 1 7 IP Board PL10 6 6 MCU Board PL10 7 7 Troubleshooting Procedure Table Step Actions and Questions Yes No 1 Check the paper condition Is the paper dry and approved for use Go to step 3 Replace with dry approved paper then go to step 2 2 Is the image printed correctly Complete Go to step 3 3 Inspect the paper path between the Transfer Belt and Fuser Is there any debris...

Page 363: ...omplete Go to step 11 11 Reseat all MCU Board connectors Is the image printed correctly Complete Go to step 12 12 Reseat all IP Board connectors Is the image printed correctly Complete Go to step 13 13 Open and close the Front Cover to reseat the Transfer Belt Is the image printed correctly Complete Go to step 14 14 Replace the Imaging Unit page 8 8 Is the image printed correctly Complete Go to st...

Page 364: ...idge C PL5 1 22 Toner Cartridge M PL5 1 23 Toner Cartridge Y PL5 1 24 Transfer Belt PL6 1 7 IP Board PL10 6 6 MCU Board PL10 7 7 Troubleshooting Procedure Table Step Actions and Questions Yes No 1 Run the Contamination Check test print Service Mode Test Print Contamination Chk Compare any defects with the Pitch Chart page 5 51 Do any of the horizontal bands match the chart Replace the correspondin...

Page 365: ...to step 11 11 Reseat all IP Board connectors Is the image printed correctly Complete Go to step 12 12 Open and close the Front Cover to reseat the Transfer Belt Is the image printed correctly Complete Go to step 13 13 Replace the Toner Cartridge s page 8 13 Is the image printed correctly Complete Go to step 14 14 Replace the Imaging Unit page 8 8 Is the image printed correctly Complete Go to step ...

Page 366: ...10 6 6 MCU Board PL10 7 7 Troubleshooting Procedure Table Step Actions and Questions Yes No 1 Check the Transfer Belt high voltage connections Are the contacts on the Transfer Belt and springs damaged or dirty Clean or replace the Transfer Belt contacts or spring s Go to step 2 2 Check the Imaging Unit high voltage connections Are the contacts on the Imaging Unit and springs damaged or dirty Clean...

Page 367: ... Board Are P J40 P J 41 P J411 and P J 412 connected correctly Go to step 10 Reconnect the connectors securely then go to step 10 10 Is the image printed correctly Complete Go to step 11 11 Replace the Imaging Unit page 8 8 Is the image printed correctly Complete Go to step 12 12 Replace the Fuser page 8 11 Is the image printed correctly Complete Go to step 13 13 Replace the IP Board page 8 41 Is ...

Page 368: ...ridge K PL5 1 21 Toner Cartridge C PL5 1 22 Toner Cartridge M PL5 1 23 Toner Cartridge Y PL5 1 24 Fuser PL6 1 1 Transfer Belt PL6 1 7 IP Board PL10 6 6 MCU Board PL10 7 7 Troubleshooting Procedure Table Step Actions and Questions Yes No 1 Run the Contamination Check test print Service Mode Test Print Contamination Chk Compare any horizontal dropout bands with the Pitch Chart page 5 51 Do any of th...

Page 369: ...at all IP Board connectors Is the image printed correctly Complete Go to step 10 10 Open and close the Front Cover to reseat the Transfer Belt Is the image printed correctly Complete Go to step 11 11 Check the connections between the Laser Unit and MCU Board Are P J40 P J 41 P J411 and P J 412 connected correctly Go to step 14 Reconnect the connectors securely then go to step 12 12 Is the image pr...

Page 370: ...shooting Procedure Table Step Actions and Questions Yes No 1 1 Run the Contamination Check test print Service Mode Test Print Contamination Chk 2 Compare any blank areas with the Pitch Chart page 5 51 Do any of the blank areas appear at regular intervals and do the intervals match the chart Replace the corresponding parts Go to step 2 2 Check the paper condition Is the paper dry and approved for u...

Page 371: ... Reseat all IP Board connectors Is the image printed correctly Complete Go to step 11 11 Open and close the Front Cover to reseat the Transfer Belt Is the image printed correctly Complete Go to step 12 12 Reseat HVPS Board connections Is the image printed correctly Complete Go to step 13 13 Check the connections between the Laser Unit and MCU Board Are P J40 P J 41 P J411 and P J 412 connected cor...

Page 372: ...t PL6 1 7 IP Board PL10 6 6 MCU Board PL10 7 7 Troubleshooting Procedure Table Step Actions and Questions Yes No 1 Inspect the paper transfer path Is there any contamination on the paper transfer path Clean the paper path refer to Cleaning on page 7 2 then go to step 2 Go to step 3 2 Is the image printed correctly Complete Go to step 3 3 1 Run the Contamination Check test print Service Mode Test P...

Page 373: ...er Cartridges Is the image printed correctly Complete Go to step 11 11 Reseat the Fuser Is the image printed correctly Complete Go to step 12 12 Reseat all MCU Board connectors Is the image printed correctly Complete Go to step 13 13 Reseat all IP Board connectors Is the image printed correctly Complete Go to step 14 14 Open and close the Front Cover to reseat the Transfer Belt Is the image printe...

Page 374: ... Allow the Fuser to cool before starting the procedure Troubleshooting Reference Table Applicable Notes Example Print Transfer Belt PL6 1 7 Print Cartridge PL5 1 18 21 Fuser PL6 1 10 Laser Unit PL5 1 2 Troubleshooting Procedure Table Step Actions and Questions Yes No 1 Check for spot s regular intervals Do spots lines or marks that might appear on the page occur at regular intervals Refer to Pitch...

Page 375: ...fer Belt PL6 1 7 IP Board PL10 6 6 MCU Board PL10 7 7 LVPS Harness Assy PL10 8 14 Troubleshooting Procedure Table Step Actions and Questions Yes No 1 Did the client print a large number of the same image Go to step 2 Go to step 3 2 Run the Contamination Check test print Service Mode Test Print Contamination Chk Is the image printed correctly Complete Go to step 3 3 1 Open the Front Cover and remov...

Page 376: ...nnections Are the contacts on the Transfer Belt and springs damaged or dirty Clean or replace the Transfer Belt contacts or spring s Go to step 9 9 Reseat all MCU Board connectors Is the image printed correctly Complete Go to step 10 10 Reseat all IP Board connectors Is the image printed correctly Complete Go to step 11 11 Open and close the Front Cover to reseat the Transfer Belt Is the image pri...

Page 377: ...arness Assy PL10 8 14 Troubleshooting Procedure Table Step Actions and Questions Yes No 1 Inspect the media path Are there obstructions in the media path Clean the paper path refer to Cleaning on page 7 2 then go to step 2 Go to step 3 2 Is the image printed correctly Complete Go to step 3 3 Print the Windows test page after printing the Demo page Menu Information Pages Demo Page or running Servic...

Page 378: ... Go to step 9 9 Reseat all IP Board connectors Is the image printed correctly Complete Go to step 10 10 Reseat and lock the Toner Cartridges Is the image printed correctly Complete Go to step 11 11 Check the connections between the Laser Unit and MCU Board Are P J40 P J 41 P J411 and P J 412 connected correctly Go to step 13 Reconnect the connectors securely then go to step 12 12 Is the image prin...

Page 379: ...rint Separator Roller Assembly PL2 1 5 Feed Roller Assembly PL3 2 4 Registration Roller Assembly PL3 2 9 Metal Registration Roller PL3 2 10 Troubleshooting Procedure Table Step Actions and Questions Yes No 1 Inspect the paper being used Is it approved paper Go to step 3 Use paper that is on the list of papers approved for the printer then go to step 2 2 Is the image printed correctly Complete Go t...

Page 380: ...ep 12 Go to step 13 12 Is the image printed correctly Complete Go to step 13 13 Reseat the Paper Tray Is the image printed correctly Complete Go to step 14 14 Reseat the paper in the Paper Tray Is the image printed correctly Complete Go to step 15 15 Reset the Paper Tray side guides Is the image printed correctly Complete Go to step 16 16 Reseat the Separator Roller Is the image printed correctly ...

Page 381: ... Example Print Separator Roller Assembly PL2 1 5 Feed Roller Assembly PL3 2 4 Registration Roller Assembly PL3 2 9 Metal Registration Roller PL3 2 10 Troubleshooting Procedure Table Step Actions and Questions Yes No 1 Check the paper condition Is the paper dry and approved for use Go to step 3 Replace with dry approved paper then go to step 2 2 Is the image printed correctly Complete Go to step 3 ...

Page 382: ...nted correctly Complete Go to step 12 12 Reseat the Paper Tray Is the image printed correctly Complete Go to step 13 13 Reset the Paper Tray side guides Is the image printed correctly Complete Go to step 14 14 Replace the media in the Paper Tray Is the image printed correctly Complete Go to step 15 15 Inspect the media path Is there any contamination Clean the paper path refer to Cleaning on page ...

Page 383: ...ain Motor FULL2 test Service Mode Engine Diag Motor Test Main Motor FULL2 2 While it is running start the Regi Clutch test Service Mode Engine Diag Motor Test Regi Clutch Do the Regi Roller Assy and Metal Regi Roller rotate Complete Replace the Feeder Assembly page 8 75 Troubleshooting Procedure Table continued Step Actions and Questions Yes No ...

Page 384: ...oting Procedure Table Step Actions and Questions Yes No 1 Check the media being used and its condition Is the media dry and recommended Go to step 3 Replace with dry approved media then go to step 2 2 Is the image printed correctly Complete Go to step 3 3 Check the Toner type Is non Xerox Toner in use Replace with Xerox toner then go to step 4 Go to step 5 4 Is the image printed correctly Complete...

Page 385: ...ure Table Step Actions and Questions Yes No 1 Cycle the printer power Does the mis registration color shift appear on the print Go to step 2 Complete 2 Print a test page Is the image printed correctly Check the printing data for errors Go to step 3 3 Check the paper being used and its condition Is the paper dry and recommended paper Go to step 5 Replace with dry approved paper then go to step 4 4 ...

Page 386: ...ntenance Mode Automatic Registration Adjust Does the mis registration color shift appear on the print Go to step 9 Complete 9 Adjust the color registration manually Menus Admin Menu Maintenance Mode Adjust Color Registration Does the mis registration color shift appear on the print Go to step 10 Complete 10 Replace the Imaging Unit page 8 8 Is the image printed correctly Go to step 11 Complete 11 ...

Page 387: ...ubleshooting Reference Table Applicable Parts Example Print ADF Scanner Assembly PL11 1 1 Troubleshooting Procedure Table Step Actions and Questions Yes No 1 1 Check the media condition 2 Is the media the recommended type loaded in the correct position and meet specifications Go to step 2 Replace the paper or use the document glass mode 2 Is the ADF closed against the document glass completely Rep...

Page 388: ...sembly PL11 1 1 Troubleshooting Procedure Table Step Actions and Questions Yes No 1 1 Check the paper condition 2 Is the paper dry recommended loaded in the correct position and meet the ADF specifications Go to step 2 Replace the paper or use the platen mode 2 Is the ADF closed against the document glass completely Go to step 3 Close the ADF 3 1 Perform Scanner Calibration procedure Scanner Calib...

Page 389: ...e Print ADF Scanner Assembly PL11 1 1 Troubleshooting Procedure Table Step Actions and Questions Yes No 1 1 Check the output document 2 Are there lines or streaks on the document Replace the original document Go to step 2 2 Are there debris on the document glass Clean the documentglass using a lint free cloth Go to step 3 3 Does the image quality improve Complete Go to step 4 4 Are there scratches...

Page 390: ... Scanner Assembly PL11 1 1 Troubleshooting Procedure Table Step Actions and Questions Yes No 1 1 Check the original document 2 Are there spots on the original document Replace the original document Go to step 2 2 1 Check for any debris on the document glass and the CVT window 2 Are there any debris Remove the debris and clean the documentglass using a lint free cloth Go to step 3 3 Does the image ...

Page 391: ...th the printer function Fail Check the printer function Pass Check the network connection cable PC etc Pattern IOT Test Print This test print provides the printer s built in test pattern This test is used to identify problems with the printer function or the Image Processor Board The colors should be aligned vertically and horizontally Compare the print with this example to determine the problem F...

Page 392: ...ple to determine the problem Fail Check the printer function and the Image Processor Board Pass Check the network connection cable PC etc Cyan 20 ESS Test Print This test print provides 20 cyan density on the whole page This test is used to identify problems with cyan toner or another color toner Compare the print with this example to determine the problem Fail Check the cyan Toner Cartridge Pass ...

Page 393: ...print with this example to determine the problem Fail Check the magenta Toner Cartridge Pass Check another Toner Cartridge Yellow 20 ESS Test Print This test print provides 20 yellow density on the whole page This test is used to identify problems with yellow toner or another color toner Compare the print with this example to determine the problem Fail Check the yellow Toner Cartridge Pass Check a...

Page 394: ...ine the problem Fail Check the black Toner Cartridge Pass Check another Toner Cartridge CMY 20 ESS Test Print This test print provides 20 density for combination of cyan magenta and black on the whole page This test is used to identify problems with balance of three color toners or another toner Compare the print with this example to determine the problem Fail Check the cyan magenta or yellow Tone...

Page 395: ...ith this example to determine the problem Fail Check the printer function Pass Check the Image Processor Board Toner Pallet Check Test Print This test print provides 100 density for cyan magenta yellow and black on the whole page This test is used to identify problems with the toner when printing pictures or photos Compare the print with this example to determine the problem Fail Check the toner c...

Page 396: ...terval By measuring the size of the interval it is possible to determine which printer component is causing the problem Pages 1 through 4 Vertical and horizontal scale patterns on a 20 density background of one color for evaluating regularity and intervals Page 5 A Pitch Chart that lists repeating defect intervals and their associated components s6128mfp 104 13 s6128mfp 105 13 s6128mfp 106 13 s612...

Page 397: ...als on the test print with the gauges on the Pitch Chart that can be printed from the diagnostics in Service Mode The problem may be solved easily by the check To print the Pitch Chart print the Contamination Check test prints Service Mode Test Print Contamination Check s6128mfp 108 s6128mfp 109 Exit Roller FUSER Heat Roller FUSER Exit Pinch Roller FUSER Fuser Belt FUSER BTR PRINTER PHD Drive Roll...

Page 398: ...aging Unit Refresh Test Print When the result of a Contamination Check corresponds to b 12 PHD of the pitch chart printing this test print may improve image quality This chart is printed the PHD Refresh Configuration Chart of the Diagnosis tab in Tool Box s6128mfp 110 ...

Page 399: ...ality is normal the Y M and C are confined within the frame When the image quality is abnormal the colors run out the frame Compare the pitch of the wave with the pitch chart printed after the MQ Chart No Roll Parts Period mm Replaceable Parts 1 Heat Roll 66 7 Fuser 2 Drum 75 4 Imaging Unit 3 Mag Roll 37 7 Imaging Unit 4 Drive Roll 44 0 Printer 5 Registration Roll 37 6 Printer s6128mfp 108 s6128mf...

Page 400: ...t procedure Pass Lines are parallel to the edges of the shee Ghost Test Print This print allows you to check for image ghosting This print is printed from the Ghost Configuratio Chart of the Diagnosis tab in Tool Box When a ghost occurs the patches with open cross and character K B G R M C appear on the light colored patches K C M in the lower half of the chart and the patches with open cross only...

Page 401: ...int Quality Troubleshooting Print Quality Specifications The following provide specifications for Skew Parallelism Linearity Perpendicularity Magnification Error Registration and Guaranteed and Maximum Print Areas Color Chart s6128mfp 115 ...

Page 402: ...To measure Skew Measure the margin of the paper at the leading edge of each corner and then take the difference between them Parallelism Horizontal 180 mm 1 2 mm Vertical 280 mm 1 2 mm s6128mfp 116 Lead Edge A a T E C C b T E D Skew a b within 1 1 mm 180 mm s6128mfp 117 B A Image Area ...

Page 403: ...tical 234 mm 0 5 mm Slant 269 mm 1 2 mm s6128mfp 118 280 mm 180 mm I K C Parallelism within 1 2 mm s6128mfp 119 B E G J H D 180 mm 280 mm 254 5 mm Linearity of Vertical Line mm within 0 5 mm Linearity of Horizontal Line within 0 5 mm Linearity of Slant within 1 1 mm Assumed Perfect Line Printed Real Line ...

Page 404: ...ror Horizontal Simplex 190 mm 0 5 Horizontal Duplex 190 mm 0 8 Vertical Simplex 234 mm 0 5 Vertical Duplex 234 mm 0 8 s6128mfp 120 Lead Edge Assumed Perfect Line Perpendicularity B b within 1 0 mm A B C 90 140 mm F b s6128mfp 121 B J E G Magnification Measured Length Nominal within 0 5 Nominal 280 mm Nominal 180 mm ...

Page 405: ...dge 10 0 mm 2 0 mm Side Edge 8 5 mm 2 5 mm Guaranteed and Maximum Print Areas Maximum Print Area 210 9 mm x 351 6 mm Guaranteed Print Area 207 9 mm x 347 6 mm s6128mfp 122 Registration Measured Length Nominal Lead Edge Nominal 10 0 mm within 2 mm Nominal 8 5 mm within 2 5 mm Left Edge B F ...

Page 406: ...r feeding direction Slow Scan 600 M Y C Shifts 0 042mm 1count Fast Scan K to M Y or C Shifts 0 042mm 1count 128 to 127 Sets the registration in the scanning direction Color registration adjustment Calculation of adjustment is shown below exp Yellow Value of Fast Scan K to Y Value of Fast Scan 2 K to Y 4 Fast Scan M Feed Tray Shifts 0 17mm 1count 30 to 30 Fast Scan 2 K to M Y or C Shifts 0 01mm 1co...

Page 407: ...eed Tray Shifts the print area in this direction by reducing the value Shifts the print area in this direction by reducing the value Shifts the print area in this direction by increasing the value Shifts the print area in this direction by increasing the value Slow Scan K to P Slow Scan 600 M Y C Image Side Default Value Default Value ...

Page 408: ...5 62 Phaser 6128MFP Service Manual Print Quality Troubleshooting ...

Page 409: ...6 Chapter Adjustments and Calibrations In this chapter Adjustments Calibrations Parameter Settings ...

Page 410: ...performing the Color Registration adjustment procedure print the Color Registration Correction Chart for reference 1 From the Control Panel press the System button 2 Press the Up or Down Arrow button to find Admin Menu Press OK 3 Press the Up or Down Arrow button to find Maintenance Mode Press OK 4 Press the Up or Down Arrow button find Adjust Color Regi Press OK 5 Press the Up or Down Arrow butto...

Page 411: ... to turn automatic color registration On or Off Adjusting Color Registration Color Registration can be automatically or manually adjusted Determining the Values From the lines to the right of the Y yellow M magenta and C cyan pattern find the values of the straightest lines When 0 is the value nearest the straightest line you do not need to adjust the color registration When the value is not 0 ref...

Page 412: ...llow the procedure below to enter values Note The densest colors of the grid can also be used to find the straightest lines The colors printed at the highest density are those next to the straight lines To enter values 1 From the Control Panel press the System button 2 Press the Up Arrow or Down Arrow button to find Admin Menu Press the OK button 3 Press the Up Arrow or Down Arrow button to find M...

Page 413: ...the Up Arrow or Down Arrow button to find Slow Scan Press the OK button 7 Use the Up Arrow or Down Arrow button to enter the values and the Right Arrow button to move from Y to M to C 8 Repeat step 7 to continue adjusting the color registration 9 Press the OK button twice to print the Color Registration Correction Chart with the new values The color registration adjustment is complete when the col...

Page 414: ...M This process initializes the settings stored in the NVRAM except for the network settings The NVRAM is a non volatile memory that stores the printer settings even after the power is turned Off After executing this function and restarting the printer all the menu parameters are reset to their default values 1 From the Control Panel press the System button 2 Press the Up Arrow or Down Arrow button...

Page 415: ...er has its own calibration information 1 Turn the printer power Off 2 Access the Service Diagnostics menu by pressing and holding the Up and Down Arrow buttons simultaneously and turn the printer power On 3 The Service Mode is displayed Select Fax Scanner Diag and press the OK button 4 Press the Up Arrow or Down Arrow button to find Scanner Maintenance Press the OK button 5 Press the Up Arrow or D...

Page 416: ...ress the OK button b The Value is displayed with an which should match the provided value from the table Ensure to confirm that there is an in front of the Value number This represents the value has been updated and saved Examples Index Hex 04 Value Hex 52 c Press the Exit button to return to the Parameter screen Continue to enter the Index and Value information using the provided scanner calibrat...

Page 417: ... Parameter Press the OK button 5 Select the appropriate item to change i e Slow Scan KtoP Press the OK button 6 Enter the appropriate range using the Up Arrow or Down Arrow button Press the OK button 7 The new value is displayed Note data has been saved 8 Press the Stop button to return to the Parameter menu Printer Diag Parameter Settings Item Range Description Slow Scan K to P Shifts 0 17mm 1cou...

Page 418: ... cleaning count Life K Waste Toner Waste Toner cleaning count Life IU Y Time Dispense Time Life IU M Time Dispense Time Life IU C Time Dispense Time Life IU K Time Dispense Time Life IU Xero Round Time s6128mfp 124 Fast Scan K to M Y C Fast Scan 2 K to M Y C Fast Scan M Feed Tray Shifts the print area in this direction by reducing the value Shifts the print area in this direction by reducing the v...

Page 419: ...ax Scanner Diag and press the OK button 5 Press the Up Arrow or Down Arrow button to find Parameter Press the OK button Note Use the Left or Right Arrow button to move the cursor Use the Up or Down Arrow button to change the value 1 Enter the Chain Link number and press the OK button 2 The value of the parameter is displayed with an This is the current value 3 Enter the appropriate value and press...

Page 420: ...6 12 Phaser 6128MFP Service Manual Adjustments and Calibrations ...

Page 421: ...7 Chapter Cleaning and Maintenance In this chapter Service Maintenance Procedure Cleaning Maintenance ...

Page 422: ...eaning steps as indicated by the printer s operating environment Caution Never apply alcohol or other chemicals to any parts of the printer Never use a damp cloth to clean up toner If you remove the Imaging Unit place it in a light protective bag or otherwise protect it as exposure to light can quickly degrade performance and result in early failure 1 Record number of sheets printed 2 Print severa...

Page 423: ...ation and Error History pages diagnose and repair any problems as indicated Check the printer engine and image processor firmware fans if necessary clean dust or vacuum these areas Check cleanliness of the interior and exterior including fans if necessary clean dust or vacuum these areas Review proper printer operation using a customer file if possible Check with the customer regarding any special...

Page 424: ...7 4 Phaser 6128MFP Service Manual Cleaning and Maintenance ...

Page 425: ...8 Chapter Service Parts Disassembly In this chapter Overview Maintenance Items and Consumables Covers Feeder Chassis Xerographics ...

Page 426: ... procedure In some instances additional steps are necessary and are provided for replacement of the parts For specific assemblies and parts refer to the Parts List in Chapter 9 Standard Orientation of the Printer When needed the orientation of the printer is called out in the procedure as an aid for locating the printer parts The following figure identifies the Front Rear Left and Right sides of t...

Page 427: ...t include steps for the removal of the parts listed above Note Names of parts that appear in the removal and replacement procedures may not match the names that appear in the Parts List For example a part called Paper Tray in a removal procedure may appear on the Parts List as CASSETTE ASSY When working on a removal procedure ignore any prerequisite procedure for parts already removed Caution Many...

Page 428: ... 3 ADF Feed Roller Assembly PL10 10 4 ADF Separator Pad Assembly PL6 1 1 Fuser Assembly PL4 1 21 PHD Assembly PL10 3 5 Separator Roller Assembly PL3 2 4 Feed Roller Assembly PL5 1 21 Toner Cartridge K PL5 1 22 Toner Cartridge C PL5 1 23 Toner Cartridge M PL5 1 24 Toner Cartridge Y ...

Page 429: ...isassembly procedure being performed The notation PLX X X indicates that this component is listed in the Parts List Bold arrows in an illustration show direction of movement when removing or replacing a component The notation tap plastic 10 mm or metal 6 mm refer to the type of screw being removed Replacement Note Provides information specific to the replacement of parts or assemblies ...

Page 430: ... tapped threads Always use the correct type and size screw Using the wrong screw can damage tapped holes Do not use excessive force to remove or install either a screw or a printer part Posi Drive Screw Types Used in this Product Type Application Shape Characteristics Self tapping plastic 1 Silver colored 2 Screw thread is coarse compared to metal screw 3 Screw tip is thin Sheet Metal silver 1 Sil...

Page 431: ... Roller in the Paper Tray Imaging Unit and Fuser Consumables consist of the four Toner Cartridges Separator Roller PL10 3 5 1 Hold the tray and pinch the left and right hooks of the Separator Roller Swing the Separator Roller to release the two hooks 2 Pull the Separator Roller up to remove it from the Tray s6128mfp 177 s6128mfp 178 ...

Page 432: ...s Disassembly Imaging Unit PL4 1 21 Caution Cover the Imaging Unit to avoid light exposure 1 Open the Front Cover 2 Place a sheet of paper over the Transfer Belt to protect the belt 3 Rotate the four securing locks counter clockwise s6128mfp 179 4x ...

Page 433: ...28MFP Service Manual 8 9 Service Parts Disassembly 4 Grasp the left and right handles and pull the Imaging Unit straight forward until it is clear then lift as shown Take care to not touch the drums s6128mfp 180 ...

Page 434: ... roller core to the left side 4 Move the Feed Roller to the left so that the grooves in the Feed Roller are clear of the pins on the feed shaft 5 Rotate the Feed Roller 180 on the feed shaft and allow the Feed Roller to drop off the shaft Replacement Note Because there are grooves in only in one side of the Feed Roller it fits over the pins on the feed shaft in only one direction Note the location...

Page 435: ...embly Fuser PL6 1 1 Warning Allow the Fuser to cool before using this procedure 1 Open the Front Cover 2 Pull the lever to release the lock 3 Swing the right side of the Fuser toward you with the lever released to unplug the fuser connector s6128mfp 182 2 1 ...

Page 436: ...y 4 Lift the Fuser up then to the right to remove it Replacement Note If the Fuser being replaced has reached end of life 1 Reset the Fuser counter in the customer menu 2 It is highly recommended that the Feed and Separator Rollers be replaced also s6128mfp 183 ...

Page 437: ... 6128MFP Service Manual 8 13 Service Parts Disassembly Toner Cartridges PL5 1 21 24 1 Open the Right Side Door 2 Push the Toner Cartridge handle toward the rear to release the latch s6128mfp 184 s6128mfp 185 ...

Page 438: ...8 14 Phaser 6128MFP Service Manual Service Parts Disassembly 3 Swing open the Toner Cartridge Holder and slide the Toner Cartridge out of the holder as shown s6128mfp 186 ...

Page 439: ... PL10 2 1 1 Open the Front Cover 2 Remove the Left Side Cover page 8 17 3 Remove the Rear Cover page 8 22 4 Remove the Right Side Cover page 8 23 5 Close the Front Cover 6 Release the Pivot Shaft hook and pull the Left and Right Pivot Shafts out of the Front Cover s6128mfp 308 1 2 ...

Page 440: ... Service Manual Service Parts Disassembly 7 Disconnect P J5301 and release the harness from the chassis 8 Release the Transfer Belt bosses from the guides in the Front Cover and remove the cover s6128mfp 187 1 2 2 P J5301 ...

Page 441: ...ce Manual 8 17 Service Parts Disassembly Left Side Cover PL 10 1 10 1 Open the Front Cover 2 Loosen the captive screw that secures the ESS Cover Gently pull the cover back and swing the cover open s6128mfp 188 s6128mfp 189 ...

Page 442: ...8 18 Phaser 6128MFP Service Manual Service Parts Disassembly 3 Remove the 3 screws silver tap 8mm and release the 3 hooks that secure the Left Side Cover s6128mfp 190 Hooks Hook ...

Page 443: ...m and screw silver tap 8mm that secure the Outer Pole Cover 4 Push the boss of the Top Cover PL10 1 4 using the screwdriver and release the front of the Outer Pole Cover 5 Release the 2 hooks that secure the Outer Pole Cover at the back to remove the cover Replacement Note Engage the 2 hooks on the back side of the Outer Pole Cover first s6128mfp 299 Boss Hooks 6mm 8mm 8mm 8mm ...

Page 444: ...de Cover page 8 17 3 Remove the Outer Pole Cover page 8 19 4 Remove the Rear Cover page 8 22 5 Remove the Right Side Cover page 8 23 6 Remove the Top Cover page 8 25 7 Remove the Lower Scanner Cover page 8 26 8 Remove the ESS Cover page 8 21 9 Release the 3 hooks that secure the Inner Pole Cover to the chassis s6128mfp 300 1 2 1 1 ...

Page 445: ...Front Cover 2 Remove the Left Side Cover page 8 17 3 Remove the Outer Pole Cover page 8 19 4 Remove the 2 screws that secure the brackets to the chassis and remove the ESS Cover Replacement Note Align the bosses of the ESS Cover brackets to the chassis before tightening the screws s6128mfp 309 ...

Page 446: ...r 6128MFP Service Manual Service Parts Disassembly Rear Cover PL10 1 5 1 Open the Front Cover 2 Remove the Left Side Cover page 8 17 3 Remove the two screws silver tap 8mm that secure the Rear Cover s6128mfp 250 ...

Page 447: ...de Cover PL10 14 1 1 Open the Front Cover 2 Remove the Left Side Cover page 8 17 3 Remove the Rear Cover page 8 22 4 Open the Toner Door 5 Remove the 8 screws silver tap 8mm that secure the cover to the chassis 6 Release hooks to remove the cover s6128mfp 251 Hook Hooks ...

Page 448: ...ght Side Door PL10 1 7 1 Open the Front Cover 2 Remove the Left Side Cover page 8 17 3 Remove the Rear Cover page 8 22 4 Remove the Right Side Cover page 8 23 5 Release the bosses that secure to upper and lower Toner Door hinges to the Right Side Cover s6128mfp 252 ...

Page 449: ... Left Side Cover page 8 17 3 Remove the Outer Pole Cover page 8 19 4 Remove the Rear Cover page 8 22 5 Remove the Right Side Cover page 8 23 6 Remove the two screws silver tap 8mm that secure the Top Cover to the chassis 7 Lift the front of the Top Cover to release the cover from the 2 bosses and remove s6128mfp 253 ...

Page 450: ...1 2 1 Open the Front Cover 2 Remove the Left Side Cover page 8 17 3 Remove the Outer Pole Cover page 8 19 4 Release the hook at the center of the cover usig a miniture screwdriver 5 Shift the cover to the right to release the remaining hooks and remove the cover s6128mfp 254 Hooks Hooks ...

Page 451: ...d lift 4 Release 3 hooks that secure the sensor to the bracket Release the harness wires from the restraint on the bracket and set the bracket aside 5 Unplug the sensor from the harness connector P J233 Replacement Note When installing a new sensor 1 Plug the sensor into harness connector 2 Install the sensor into the bracket Tip insert the end hook first then snap the side hooks in place 3 Route ...

Page 452: ...f paper on the Transfer Belt 1 Open the Front Cover 2 Remove the Imaging Unit page 8 8 3 Remove 2 screws silver tap 8mm that secure the sensor bracket and lift the bracket from the printer 4 Remove the actuator and spring PL3 2 15 by removing the right end of the shaft from the hole in the chute Replacement Note Note the orientation of the spring on the acutator s6128mfp 270 s6128mfp 272 ...

Page 453: ... Registration Actuator Out is spring loaded by a small spring located under the actuator 2 Release the hook on the Registration Actuator Out and shift the Registration Roller Actuator to the right side 3 Release the Registration Actuator Out from the hook on the Chute Up PL3 2 26 then open the Registration Actuator Out s6128mfp 273 s6128mfp 274 ...

Page 454: ... 5 Disconnect P J232 from the Registration Sensor Registration Roller PL3 2 9 1 Remove the Upper Frame Assembly page 8 68 Caution The Registration Actuator Out is spring loaded by a small spring located under the actuator 2 Release the hook on the Registration Actuator Out and shift the Registration Roller Actuator to the right side s6128mfp 275 s6128mfp 273 ...

Page 455: ... hook on the Chute Up PL3 2 26 then open the Registration Actuator Out 4 Remove the E rings that secure the Registration Roller at both ends using a miniature screwdriver Push the metal registration roller forward and remove the Gear and bearings from the shaft s6128mfp 274 s6128mfp 311 Bearing Bearing 1 1 2 3 ...

Page 456: ...Actuator Registration Sensor Actuator PL3 2 11 1 Remove the Upper Frame Assembly page 8 68 2 Remove the Registration Roller page 8 30 3 Release the left side of the Registration Sensor Actuator from the hook on the chute up 4 Remove the actuator and spring by removing the right end of the shaft of from the hole of the chute up 5 Remove the spring from the Registration Sensor Actuator s6128mfp 312 ...

Page 457: ... the sensor 3 Disconnect P J234 from the sensor Tray No Paper Sensor Actuator PL3 2 32 1 Remove the Upper Frame Assembly page 8 68 2 Remove the Tray No Paper Sensor page 8 33 3 Release the right end of the actuator shaft from the hole in the chute up using a miniature screwdriver 4 Remove the actuator and spring from the hole in the left side of the chute up 5 Remove the spring from the actuator s...

Page 458: ...page 8 37 9 Release the Feed Gear Return Spring from the hook on the printer frame Leave the spring connected to the arm on the Feed Gear 10 Push down on the Feed Lever and release the Feed Gear retainer hook to slide the Feed Gear off the Feed Shaft 11 Remove the Lever Spring from the printer 12 Release the Feed Lever hook and slide the Feed Lever off the shaft 13 Release the Feed Solenoid harnes...

Page 459: ... remove the solenoid Drive Clutch and Bearing Kit PL10 4 99 1 Remove the Left Side Cover page 8 17 2 Release the Drive Clutch harness from the cable restraint on the Feed Drive Assembly 3 Disconnect the Drive Clutch connector P J262 Allow the relay connector to remain with the printer side of the harness s6128mfp 233 P J231 P J262 s6128mfp 279 ...

Page 460: ...sembly 4 Remove the E ring that secures the Drive Clutch on the shaft using a miniature screwdriver and remove the Drive Clutch 5 Release the two hooks of the Registration Bearing and remove the Registration Bearing from the shaft s6128mfp 280 s6128mfp 281 ...

Page 461: ...ver page 8 19 4 Remove the Rear Cover page 8 22 5 Remove the Right Side Cover page 8 23 6 Remove the Top Cover page 8 25 7 Remove the Drive Clutch and Bearing Kit page 8 35 8 Remove the LVPS Card Cage page 8 66 9 Disconnect P J211 of the Main Drive Assembly PL7 1 2 and release all the harnesses from the hooks on the Feed Drive Assembly 6mm M4 Tap 8mm 6mm M3 P J211 s6128mfp 282 ...

Page 462: ...rness out from the hole in the chassis 12 Remove the three screws one silver M4 6mm one silver M3 6mm one silver tap 8mm that attach the Feed Drive Assembly to the printer Note When performing the next step make sure the coupling gear remains on the shaft of the Feed Drive Assembly Take care not to drop the gear s6128mfp 316 P J26 P J24 s6128mfp 154 6mm M4 Tap 8mm 6mm M3 ...

Page 463: ...ect the color mode sensor P J261 from the Feed Drive Assembly and release the Color Mode Sensor Harness from the hook on the Feed Drive Assembly Replacement Note The screw holes in the assembly are marked with M and T to indicate where machine M or tapping T screws are used s6128mfp 200 s6128mfp 201 P J261 ...

Page 464: ...ar P2 PL 7 1 3 1 Open the Front Cover 2 Remove the Left Side Cover page 8 17 3 Remove the Drive Clutch and Bearing Kit page 8 35 4 Remove but do not disconnect the Feed Drive Assembly page 8 37 5 Remove Gear P2 from the shaft of the Sub Drive Assembly s6128mfp 202 ...

Page 465: ...the Front Cover 2 Remove the Left Side Cover page 8 17 3 Remove the Outer Pole Cover page 8 19 4 Remove the Rear Cover page 8 22 5 Remove the ESS Shield page 8 46 6 Remove the FAX Board page 8 47 7 Disconnect all connections from the Image Processor Board s6128mfp 203 P403 P802 J1001 J801 P1003 P1002 P902 P901 ...

Page 466: ...Manual Service Parts Disassembly 8 Remove the 8 screws silver with flange 6mm that secure the board to the chassis 9 Remove the one screw silver 6mm that secures the USB connector to the Card Cage and remove the board s6128mfp 204 ...

Page 467: ...trol Panel PL10 2 2 1 Open the Front Cover 2 Release the boss on the Inner Front Cover PL10 2 4 using a small screwdriver then shift the Inner Front Cover to right 3 Release the five hooks of the Inner Front Cover and remove the cover s6128mfp 206 s6128mfp 207 Hooks ...

Page 468: ...28MFP Service Manual Service Parts Disassembly 4 Disconnect P J2020 remove the five screws silver tap 8mm and release the hook that secures the Control Panel to the Front Cover s6128mfp 208 P J2020 s6128mfp 209 Hooks ...

Page 469: ...Service Parts Disassembly Humidity Sensor PL10 4 20 1 Remove the Left Side Cover page 8 17 2 Remove the screw silver tap 8mm that secures the Humidity Sensor to the chassis 3 Unplug the connector P J201 and remove the sensor s6128mfp 210 ...

Page 470: ...Open the Front Cover 2 Remove the Left Side Cover page 8 17 3 Remove the Outer Pole Cover page 8 19 4 Remove the Rear Cover page 8 22 5 Remove the 14 screws that secure the ESS Shield to the chassis 6 Lift the shield to release the 2 tabs at the bottom and remove the shield s6128mfp 211 ...

Page 471: ...r Pole Cover page 8 19 4 Remove the Rear Cover page 8 22 5 Remove the ESS Shield page 8 46 6 Remove 2 screws silver with flange 6mm that secure the board to the chassis 7 Release the board from the connector on the Image Processor Board LVPS PL10 6 16 1 Open the Front Cover 2 Remove the Left Side Cover page 8 17 3 Remove the Rear Cover page 8 22 s6128mfp 212 ...

Page 472: ...6128MFP Service Manual Service Parts Disassembly 4 Disconnect all connections from the LVPS 5 Remove the 6 screws silver with flange 6mm P J47 P J40 P J48 P J503 P J44 P J502 P J501 P J504 s6128mfp 191 s6128mfp 192 ...

Page 473: ...Phaser 6128MFP Service Manual 8 49 Service Parts Disassembly 6 Release the plastic retainer and remove the LVPS from the chassis s6128mfp 193 ...

Page 474: ... 6 17 1 Open the Front Cover 2 Remove the Left Side Cover page 8 17 3 Remove the Rear Cover page 8 22 4 Disconnect P J503 from the LVPS and release the Fan harness from the clamp 5 Release the 4 hooks of the fan duct to remove the FAN from the chassis s6128mfp 194 P J503 ...

Page 475: ...17 3 Remove the Outer Pole Cover page 8 19 4 Remove the Rear Cover page 8 22 5 Remove the Right Side Cover page 8 23 6 Remove the Top Cover page 8 25 7 Using a miniature screwdriver release the hooks that latch the switch in the frame and remove the switch from the printer 8 Unplug the switch from the harness connector P J291 P J291 s6128mfp 195 1 2 3 ...

Page 476: ...move the Outer Pole Cover page 8 19 4 Remove the Rear Cover page 8 22 5 Remove the Right Side Cover page 8 23 6 Remove the Top Cover page 8 25 7 Disconnect P J44 on the LVPS and release the harness from the clamp 8 Remove the 3 clamps on the Duct Plate PL10 6 1 that secure the harness then pull the harness through the hole P J44 s6128mfp 196 s6128mfp 197 ...

Page 477: ...8MFP Service Manual 8 53 Service Parts Disassembly 9 Release the harness from the 2 clamps on the chassis 10 Remove the screw sliver tap 6mm that attaches the Interlock Harness to remove the harness s6128mfp 198 ...

Page 478: ...th flange 6mm that secure the HVPS to remove the HVPS Power Switch Harness PL10 7 8 1 Open the Front Cover 2 Remove the Left Side Cover page 8 17 3 Remove the Outer Pole Cover page 8 19 4 Remove the Rear Cover page 8 22 5 Remove the Right Side Cover page 8 23 6 Remove the Top Cover page 8 25 7 Remove the LVPS Card Cage page 8 66 8 Release the clamp that secures the Power Switch Harness s6128mfp 25...

Page 479: ...mbly 9 Disconnect P J482 on the GFI Breaker PL10 7 10 10 Release 1 screw that secures the Power Switch Bracket to the Breaker Assembly 11 Release the Power Switch hooks from the bracket to remove the Power Switch Harness from the chassis s6128mfp 213 P J482 ...

Page 480: ...the Outer Pole Cover page 8 19 4 Remove the Rear Cover page 8 22 5 Remove the Right Side Cover page 8 23 6 Remove the Top Cover page 8 25 7 Remove the LVPS Card Cage page 8 66 8 Disconnect P J482 and the FASTON terminal FS484 on the GFI breaker 9 Remove 2 screws silver tap 12mm that secure the GFI Breaker in the chassis to remove the breaker s6128mfp 214 ...

Page 481: ...Remove the Left Side Cover page 8 17 6 Remove the Outer Pole Cover page 8 19 7 Remove the Rear Cover page 8 22 8 Remove the Right Side Cover page 8 23 9 Remove the Top Cover page 8 25 10 Remove the LVPS Card Cage page 8 66 11 Disconnect all connectors on the MCU Board 12 Remove the 6 screws silver with flange 6mm that secure the MCU Board to the chassis and remove the board s6128mfp 215 P J11 P J1...

Page 482: ...r 2 Remove the Left Side Cover page 8 17 3 Remove the Drive Clutch Kit page 8 35 4 Remove the Feed Drive Assembly page 8 37 5 Remove Gear P2 from the Sub Drive shaft 6 Rotate the Stopper Pivot PL6 1 3 counter clockwise to align the tabs with openings in the Main Drive Assembly and remove the stopper s6128mfp 216 ...

Page 483: ...emove the one screw silver M4 6mm and the five screws silver tap 8mm that secure the Main Drive Assembly and remove the drive Replacement Note Secure the wiring harness connecting the sub motor through the back of the hook on the Main Drive Assembly s6128mfp 217 6mm ...

Page 484: ...e Rear Cover page 8 22 5 Remove the Right Side Cover page 8 23 6 Remove the Top Cover page 8 25 7 Remove the Drive Clutch Kit page 8 35 8 Remove the Feed Drive Assembly page 8 37 9 Remove Gear P2 page 8 40 10 Remove the Main Drive Assembly page 8 58 11 Remove the Interlock Harness page 8 52 12 Remove the 1 screw silver 6mm that secures the Ground Harness PL7 1 5 to the Sub Drive Assembly s6128mfp ...

Page 485: ...vice Parts Disassembly 13 Disconnect P J221 from the Sub Drive Assembly 14 Remove the one screw silver M4 6mm and the four screws silver tap 8mm that secure the Sub Drive Assembly to remove the drive P J221 s6128mfp 231 6mm 8mm 8mm 8mm 8mm ...

Page 486: ...er page 8 19 4 Remove the Rear Cover page 8 22 5 Remove the Right Side Cover page 8 23 6 Remove the Top Cover page 8 25 7 Remove the Lower Scanner Cover page 8 26 8 Remove the ESS Shield page 8 46 9 Remove the Inner Pole Cover page 8 20 10 Remove the LVPS Card Cage page 8 66 11 Release 7 harness clamps that secure the Fuser and Interlock harnesses to the Duct Plate s6128mfp 234 ...

Page 487: ...rvice Parts Disassembly 12 Disconnect P J10 and P J11 on the MCU Board then pull the connectors through the hole in the Duct Plate 13 Remove 7 screws silver tap 8mm on the upper side of the Duct Plate s6128mfp 235 P J11 P J10 s6128mfp 236 ...

Page 488: ...uct Plate near the MCU Board and remove the Duct Plate Breaker Chassis PL 10 5 8 1 Open the Front Cover 2 Remove the Left Side Cover page 8 17 3 Remove the Outer Pole Cover page 8 19 4 Remove the Rear Cover page 8 22 5 Remove the Right Side Cover page 8 23 6 Remove the Top Cover page 8 25 7 Remove the Lower Scanner Cover page 8 26 8 Remove the ESS Shield page 8 46 9 Remove the Inner Pole Cover pag...

Page 489: ...sis to the frame 13 Remove 1 screw silver with lock washer 6mm that secures the grounding terminal of the GFI Ground Harness to the chassis 14 Release the ground harness from the clamp 15 Release the 2 hooks that secure the Breaker Chassis to the frame to remove the Breaker Chassis GFI Breaker and Power Switch s6128mfp 238 ...

Page 490: ...a necessary prerequisite for other procedures 1 Open the Front Cover 2 Remove the Left Side Cover page 8 17 3 Remove the Outer Pole Cover page 8 19 4 Remove the Rear Cover page 8 22 5 Remove the Right Side Cover page 8 23 6 Remove the Top Cover page 8 25 7 Disconnect 8 connectors on the LVPS and release the harnesses from the clamps P J47 P J40 P J48 P J503 P J44 P J502 P J501 P J504 s6128mfp 191 ...

Page 491: ...lver tap 8mm that secure the LVPS card cage to the chassis 9 Lift the card cage slightly and pull it from the chassis while feeding the cables through the holes provided Replacement Note Lift the card cage over the screw located at the lower right corner of the chassis s6128mfp 199 8mm 6mm 6mm 6mm 6mm 6mm 6mm 6mm 8mm ...

Page 492: ...ide Cover page 8 23 6 Remove the Top Cover page 8 25 7 Remove the Lower Scanner Cover page 8 26 8 Remove the ESS Shield page 8 46 9 Remove the Inner Pole Cover page 8 20 10 Remove the LVPS Card Cage page 8 66 11 Remove the Duct Plate page 8 62 12 Remove the Breaker Chassis page 8 64 13 Remove the Drive Clutch and Bearing Kit page 8 35 14 Remove the Front Cover page 8 15 15 Remove the Transfer Belt...

Page 493: ... 8 69 Service Parts Disassembly 18 Remove the 3 screws that secure the MCU chassis to the chassis 19 Lift the MCU chassis to release the 3 hooks ro remove the MCU chassis containing the MCU and EEPROM Boards Hook Hooks s6128mfp 244 ...

Page 494: ... Service Manual Service Parts Disassembly 20 Remove the 1 screw silver 6mm that secures the Ground Harness to the Sub Drive Assembly 21 Release all the harnesses from the Locking Clamp PL10 5 10 s6128mfp 245 s6128mfp 246 ...

Page 495: ...Phaser 6128MFP Service Manual 8 71 Service Parts Disassembly 22 Remove 2 screws silver tap 8mm that secure the front of the frame s6128mfp 247 ...

Page 496: ... 72 Phaser 6128MFP Service Manual Service Parts Disassembly 23 Remove 2 screws silver tap 8mm that secure the bottom and 1 screw silver M4 6mm that secures the rear of the Dispense Assembly s6128mfp 248 ...

Page 497: ...Phaser 6128MFP Service Manual 8 73 Service Parts Disassembly 24 Open the Toner Cartridge Holders and remove 1 screw silver tap 8mm that secures the right side of the frame s6128mfp 249 ...

Page 498: ...ove 1 screw silver tap 8mm that fixes the left side of the upper frame 26 Lift the upper frame from the chassis Replacement Note Removal of the Laser Unit from the Upper Frame Assembly simplifys the task of lacing the harnesses around the Dispense Assembly s6128mfp 256 ...

Page 499: ... Manual 8 75 Service Parts Disassembly Feeder Assembly PL10 4 3 1 Remove the Upper Frame Assembly page 8 68 2 Remove the HVPS page 8 54 3 Remove the 11 screws theat secure the HVPS chassis to the Feeder Assembly s6128mfp 329 ...

Page 500: ...Parts Disassembly 4 Remove 3 screws that secure the scanner frame assembly then lift the assembly from the Feeder Assembly Note While replacing the Feeder Assembly transfer components mounted to the old assembly to the new assembly s6128mfp 328 ...

Page 501: ...Service Parts Disassembly IIT Procedures ADF Feed Roll Assembly PL 10 10 3 1 Open the ADF Jam Cover 2 Raise the release lever 90 degrees 3 Lift the Roll Assembly by the lever and remove the back end of the shaft from the ADF s6128mfp 258 ...

Page 502: ...0 4 1 Open the ADF Jam Cover 2 Remove the ADF Feed Roll Assembly page 8 77 3 Squeeze the tabs inward to release the ADF Seperator Pad from the chassis ADF Input Tray PL 10 10 11 1 Open the ADF Jam Cover 2 Release the tray hinges from the bosses in the ADF cover s6128mfp 259 s6128mfp 260 ...

Page 503: ... ADF Input Tray page 8 78 2 Remove 1 screw silver tap 8mm that secures the Rear ADF Cover 3 Slightly raise the right side of the Rear ADF Cover then move the cover to the left until 2 hooks release 4 Remove 1 screw silver 4mm that secures the ADF Harness grounding terminal s6128mfp 261 s6128mfp 262 ...

Page 504: ...8 80 Phaser 6128MFP Service Manual Service Parts Disassembly 5 Disconnect P JADF1 and release the grommet from the frame 6 Feed the harness through the hole in the ADF s6128mfp 263 Opening ...

Page 505: ...miniature screwdriver then remove the Right Counter Balance from the IIT Sub Assembly 8 Tilt the ADF Assembly to the right and release the tab of the Left Counter Balance 9 Lift the ADF Assembly and remove the ADF Harness from the hole of the ADF Assembly to remove the ADF Assembly from the IIT Sub Assembly s6128mfp 264 ...

Page 506: ... Cover 2 Remove the Left Side Cover page 8 17 3 Remove the Outer Pole Cover page 8 19 4 Remove the Rear Cover page 8 22 5 Remove the Right Side Cover page 8 23 6 Remove the Top Cover page 8 25 7 Remove the Lower Scanner Cover page 8 26 8 Remove the ESS Shield page 8 46 9 Remove the Inner Pole Cover page 8 20 10 Release 2 hooks that secure of the FFC Cover to the chassis and remove the cover s6128m...

Page 507: ...ly 11 Remove the clamp that secures the ADF Assembly harness to the chassis 12 Disconnect the ribbon cable from P J1001 on the Image Processor Board 13 Release 2 hooks of the FFC Holder to remove the Ferrite Core from the ribbon cable s6128mfp 266 s6128mfp 267 ...

Page 508: ...the ground wire Caution The Ferrite Core is extremely fragile Use care when removing the core from the ribbon cable 15 Disconnect P J1003 on the Image Processor Board and release the ADF Assembly harness from the three hooks on the Ferrite Core holder pull it through the hole in the chassis s6128mfp 268 Hook s6128mfp 269 ...

Page 509: ...elease the IIT Sub Assembly harness from the clamp Pull the harness through the hole 17 Remove 2 screws silver 6mm that secure the IIT Sub Assembly to the chassis Shift the IIT Sub Assembly to left to release the holes of the assembly from the four studs to remove the IIT from the chassis Clamp s6128mfp 283 s6128mfp 284 ...

Page 510: ...2 Remove the Left Side Cover page 8 17 3 Remove the Rear Cover page 8 22 4 Remove the Right Side Cover page 8 23 5 Remove the two screws silver tap 8mm that secure the Erase LED Assembly to the chassis 6 Remove the Erase LED Assembly from the printer 7 Unplug the connector P J141 of the Erase LED Assembly s6128mfp 285 P J141 ...

Page 511: ...Right Imaging Unit Restraint Blocks 1 Open the Front Cover 2 Remove the Left Side Cover page 8 17 3 Remove the Rear Cover page 8 22 4 Remove the Right Side Cover page 8 23 5 Remove the Erase LED Assembly page 8 86 6 Use a miniature screwdriver to release the hook on the Imaging Unit Restraint Block 7 Remove the Imaging Unit Restraint Block from the printer s6128mfp 286 ...

Page 512: ...printer 9 Rotate the Imaging Unit Lever slightly and remove it from the printer Left Imaging Unit Restraint Block PL 4 1 98 1 Remove the Left Side Cover page 8 17 2 Remove the Main Drive Assembly page 8 58 3 Use a miniature screwdriver to release the hook on the Imaging Unit Restraint Block s6128mfp 287 ...

Page 513: ...9 Service Parts Disassembly 4 Remove the Imaging Unit Restraint Block from the printer 5 Remove the Imaging Unit Spring from the printer 6 Rotate the Imaging Unit Lever slightly and remove it from the printer s6128mfp 288 s6128mfp 289 ...

Page 514: ... Right Side Cover page 8 23 6 Remove the Top Cover page 8 25 7 Remove the Lower Scanner Cover page 8 26 8 Remove the ESS Shield page 8 46 9 Remove the Inner Pole Cover page 8 20 10 Remove the LVPS Card Cage page 8 66 11 Remove the Duct Plate page 8 62 12 Remove the Breaker Chassis page 8 64 13 Remove the Toner Cartridges page 8 13 14 Squeeze the center of the Toner Cartridge Holder to release the ...

Page 515: ...ar Cover page 8 22 5 Remove the Right Side Cover page 8 23 6 Remove the Top Cover page 8 25 7 Remove the Lower Scanner Cover page 8 26 8 Remove the ESS Shield page 8 46 9 Remove the Inner Pole Cover page 8 20 10 Remove the LVPS Card Cage page 8 66 11 Remove the Duct Plate page 8 62 12 Remove the Breaker Chassis page 8 64 13 Remove the Toner Cartridge Holders page 8 90 14 Release the hooks of the L...

Page 516: ...vice Parts Disassembly 15 Disconnect 7 connectors P J14 15 17 18 19 29 31 on the MCU Board then release the Fuser and LVPS main harnesses from the hooks on the Dispense Assembly s6128mfp 292 s6128mfp 293 P J15 P J14 P J17 P J31 P J18 P J29 ...

Page 517: ...silver tap 8mm that secure the Dispense Assembly to the chassis 17 Remove 1 screw silver M4 6mm at the rear side of the Dispense Assembly 18 Release the hole of the Dispense Assembly from the boss then move the Dispense Assembly backward to remove it s6128mfp 294 Boss s6128mfp 295 ...

Page 518: ...8 23 6 Remove the Top Cover page 8 25 7 Remove the Lower Scanner Cover page 8 26 8 Remove the ESS Shield page 8 46 9 Remove the Inner Pole Cover page 8 20 10 Remove the LVPS Card Cage page 8 66 11 Remove the Duct Plate page 8 62 12 Remove the Breaker Chassis page 8 64 13 Remove the Toner Cartridge Holders page 8 90 14 Remove the Dispense Assembly page 8 91 15 Disconnect all the Toner Motor connect...

Page 519: ...Phaser 6128MFP Service Manual 8 95 Service Parts Disassembly 16 Remove 2 screws silver tap 8mm that secure the Toner Motor Frame Assembly to the Dispense Assembly at the side s6128mfp 296 ...

Page 520: ...8 96 Phaser 6128MFP Service Manual Service Parts Disassembly 17 Remove 3 screws silver tap 8mm that secure the Toner Motor Frame Assembly to the Dispense Assembly at the back s6128mfp 313 ...

Page 521: ... 18 Release the Toner Motor Conductor from the hook of the Dispense Assembly Note The Auger drve gears are not captive to the toner motor frame assembly 19 Seperate the toner motor frame assembly from the Dispense Assembly s6128mfp 323 Toner Motor Conductor Hook ...

Page 522: ...r Cover page 8 22 5 Remove the Right Side Cover page 8 23 6 Remove the Top Cover page 8 25 7 Remove the Lower Scanner Cover page 8 26 8 Remove the ESS Shield page 8 46 9 Remove the Inner Pole Cover page 8 20 10 Remove the LVPS Card Cage page 8 66 11 Remove the Duct Plate page 8 62 12 Disconnect P J40 and P J41 from the MCU Board and release the harnesses from the Edging Saddle s6128 297 P J41 P J4...

Page 523: ...Parts Disassembly 13 Remove 4 screws silver tap 8mm that secure the left and right Springs and remove the Springs 14 Lift the Laser Unit from the chassis 15 Disconnect the 2 Laser Unit harnesses from the Laser Unit P J411 and P J412 s6128mfp 298 ...

Page 524: ...Remove the Left Side Cover page 8 17 3 Remove the Outer Pole Cover page 8 19 4 Remove the Rear Cover page 8 22 5 Remove the Right Side Cover page 8 23 6 Remove the Top Cover page 8 25 7 Remove the Front Cover page 8 15 8 Rotate the Pivot Stopper to align the tabs of the Pivot Stopper with the notches of the Main Drive Assembly 9 Remove the Pivot Stopper from the printer s6128mfp 239 ...

Page 525: ...ervice Manual 8 101 Service Parts Disassembly Note When performing the following procedure take care not to drop Gear T4 10 Pull out the Left Transfer Pivot and remove the Gear T4 from the printer s6128mfp 240 Gear T4 ...

Page 526: ...ter Note When performing the next step keep the Transfer Belt slightly lifted to ease removal of the Pivot Shaft If you are performing this procedure as part of the Transfer Belt removal the only step remaining after removing the Right Pivot Shaft is to lift the Transfer Belt out of the printer 12 Pull the Pivot Shaft out of the printer s6128mfp 241 ...

Page 527: ...bber bands to hold it upright Caution When performing the next step take care not to scratch the surface of the Transfer Belt 7 Use a miniature screwdriver to release the Harness 2 Cover hook then remove the Harness 2 Cover Note When performing the next step leave the relay connector on the Transfer Belt harness side 8 Release the harness from the pegs of the Transfer Belt then unplug the Transfer...

Page 528: ...ransfer Belt slowly 11 Remove the Pivot Kit page 8 100 12 Remove the Front Cover Pivot Shaft holding the Transfer Belt in the chassis and remove the Transfer Belt Replacement Note Reset the Transfer Belt life counter in after installing a new Transfer Belt s6128mfp 242 P J281 ...

Page 529: ...9 Chapter Parts List In this chapter Serial Number Format Using the Parts List Parts Lists Xerox Supplies and Accessories Service Kits ...

Page 530: ...digit alphanumeric product code R Single digit numeric revision digit 0 9 To be rolled when the ending serial number is reached or when a major product change occurs SSSSS Five digit numeric serial number based on the following table The serial numbers are reset only when the ending number is reached or when the revision number is rolled Example RCX253072 Xerox Serial Number RCX Product Code for t...

Page 531: ...ses The notation with X Y following a part name indicates an assembly that is made up of components X through Y For example 1 with 2 4 means part 1 consists of part 2 part 3 and part 4 An asterisk following a part name indicates the page contains a note about this part The notation NS next to a part indicates that particular part is not spared but contained in a kit or major assembly The notation ...

Page 532: ...sts Parts List 3 2 Feeder s6128mfp 135 3 2 4 3 5 1 with 2 16 20 33 6 7 8 9 10 11 12 13 31 13 13 21 14 15 16 17 18 19 22 23 33 24 26 27 28 25 20 29 30 P232 P233 P234 Tray 1 MPT No Paper Sensor Tray 2 No Paper Sensor Registration Sensor 32 with 17 19 Front ...

Page 533: ... Regi 10 Roll Regi Metal 11 Actuator Regi In 120E27820 12 Spring Act Regi 13 Sensor Photo 130E87090 14 Actuator SSI Manual Feed 120E27850 15 Spring Act SSI 16 Spring Stp 17 Stopper Act 18 Spring Act Np 19 Actuator No Paper 20 Bearing M Earth 21 Bearing Earth Regi 22 Gear Regi R 23 Gear Regi M 24 Spring Regi R M 25 Plate Earth Regi 26 Chute Up 27 Chute Low 28 Bracket SNS 29 Spring Regi L M 30 Beari...

Page 534: ...9 6 Phaser 6128MFP Service Manual Parts List Parts List 4 1 Xerographics s6128mfp 136 2 1 3 4 2 5 6 98 7 4 7 8 5 6 9 9 9 9 10 11 12 13 14 15 16 17 18 21 22 23 J40 J41 J411 J412 P141 Front 99 97 ...

Page 535: ... Stopper PHD D 7 Block Stopper PHD AD 8 Led Assy Erase 122K94041 9 Spring Tracking 10 Spring Cf 11 Spring Tr4 12 Spring Tr3 13 Spring Tr2 14 Spring Tr1 15 Spring D4 16 Spring D3 17 Spring D2 18 Spring D1 19 20 21 PHD Assy Imaging Unit 675K69240 22 Harn Assy ROS Re J40 j411 23 Harn Assy ROS Video J41 j412 97 Kit Block PHD Right With 4 5 7 2pcs 675K54241 98 Kit Block PHD Left With 4 5 6 2pcs 675K542...

Page 536: ...1 22 23 24 25 26 27 29 16 16 16 16 15 12 9 14 15 15 15 13 13 13 13 13 13 13 13 10 10 10 10 11 with 12 13 2 with 3 8 1 with 2 9 11 14 16 25 27 3 4 3 3 3 5 6 7 8 7 8 7 8 7 8 6 6 6 14 14 14 J191 P192 P191 P182 P181 J192 J182 J181 J311 J29 J31 J19 J18 J312 J313 J314 P311 P291 J291 P312 P313 P314 Front ...

Page 537: ...15 Spring Disp 16 Joint Assy Disp 17 Holder TCRU K 604K44920 18 Holder TCRU C 604K44930 19 Holder TCRU M 604K44940 20 Holder TCRU Y 604K44950 21B Toner Cartridge US EU 2 5k K 675K59231 21C Toner Cartridge DMO 2 5k K 675K59311 22B Toner Cartridge US EU 2k C 675K59241 22C Toner Cartridge DMO 2k C 675K59321 23B Toner Cartridge US EU 2k M 675K59251 23C Toner Cartridge DMO 2k M 675K59331 24B Toner Cart...

Page 538: ...9 10 Phaser 6128MFP Service Manual Parts List Parts List 6 1 Transfer Fuser s6128mfp 138 5 6 7 8 4 3 99 99 P281 1 2 P171 J171 J17 J47 Front ...

Page 539: ...sfer Fuser ID No Name Description Part Number 1A 1B Fuser 115V Fuser 220V 675K65653 675K65663 2 Harn Assy Fuser J17 J47 P171 3 Stopper Pivot 4 Pivot Trans L 5 Gear T4 6 Shaft Assy Pivot 7 Transfer Unit Belt 848K03270 8 Cover Harness 2 99 Kit Pivot with 3 6 675K54121 ...

Page 540: ...9 12 Phaser 6128MFP Service Manual Parts List Parts List 7 1 Drive s6128mfp 139 1 2 3 4 5 J24 P261 P221 P211 Color Mode Switching Sensor Front ...

Page 541: ...s List Parts List 7 1 Drive ID No Name Description Part Number 1 Drive Assy Sub Sub Drive Assembly 007K94692 2 Drive Assy Main Main Drive Assembly 007K94686 3 Gear P2 807E15100 4 Drive Assy PH Feed Drive Assembly 007K94706 5 Harness Assy Gnd ...

Page 542: ...9 14 Phaser 6128MFP Service Manual Parts List Parts List 10 1 Covers s6128mfp 140 Front 1 2 3 4 5 7 10 12 13 11 6 14 with 6 7 ...

Page 543: ...r Pole Out 848E31790 2 Cover Scanner Low 848E31780 3 Cover Pole In 848E31770 4 Cover Top 848E31850 5 Cover Rear 848E31840 6 Cover Side R 7 Cover Window Tnr 8 9 10 Cover Side L 848K31831 11 Cover Assy ESS 848K33010 12 Pivot Assy 029K92730 13 Housing Pivot 848E30320 14 Cover Assy Side R With 6 7 848K27343 ...

Page 544: ...9 16 Phaser 6128MFP Service Manual Parts List Parts List 10 2 Front Cover s6128mfp 141 14 14 99 5 5 7 8 9 6 2 3 4 10 J202 J5301 11 12 11 12 13 1 with 2 3 5 13 Front ...

Page 545: ...Front With 2 3 5 13 848K27329 2 Console Assy Panel Control Panel 848K26097 3 Cover Front 4 Cover Inner Front 5 Latch Front 6 Plate Latch 7 Spring Latch Out 8 Button Latch 9 Cover Harness 10 Guide Belt R 11 Damper Front L Aio 12 Damper Front S 13 Harness A op opp J202 J5301 14 Shaft Pivot 99 Kit Shaft Pivot 675K54051 ...

Page 546: ...9 18 Phaser 6128MFP Service Manual Parts List Parts List 10 3 Media Tray s6128mfp 142 Front 2 3 4 6 7 7 9 11 12 13 16 17 18 8 19 15 16 14 10 1 with 2 19 5 ...

Page 547: ... 2 Plate Assy Bottom 3 Spring N f L 4 Spring N f R 5 Separator Roller Assembly 675K81220 6 Guide Side L 7 Gear Pinion 8 Guide Side Assy R 9 Cover Ssi 10 Guide Side Ssi L 11 Rack Guide Side Ssi L 12 Rack Guide Side Ssi R 13 Guide Side Ssi R 14 Latch Bottom L 15 Latch Bottom R 16 Spring Latch B 17 Tray Assy Extension 18 Housing Cst 250 19 Handle Cst AIO ...

Page 548: ...Manual Parts List Parts List 10 4 Feeder s6128mfp 143 1 4 8 11 12 13 14 9 17 18 16 15 20 21 10 5 5 2 19 with 16 17 97 with 4 6 8 15 18 24 PL3 2 1 Ref PL3 2 1 J231 P231 J23 J234 J232 J233 J28 J281 J262 P201 J201 J20 24 22 23 Front ...

Page 549: ...3 Lever Feed 14 Spring Feed In 15 Spring Feed Out 16 Gear Feed Out 17 Gear Feed In 18 Harn Assy L Side J23 J28 P231 J232 J233 J234 J281 962K57541 19 Gear Assy Feed With 15 16 Gear Kit With 16 17 20 Sensor Temp Humidity 21 Harn Assy Temp Humidity 22 Plate Earth FDR 23 Arrester ENE 112d 10a 24 Plate Earth CST 97 Feeder Assy V AIO with 4 6 8 15 18 24 PL3 2 1 059K56390 98 Kit Solenoid Feed With 9 14 6...

Page 550: ...9 22 Phaser 6128MFP Service Manual Parts List Parts List 10 5 Frame s6128mfp 144 Ref PL10 4 97 1 2 3 5 3 10 3 5 6 7 8 4 9 3 3 3 Front ...

Page 551: ...al 9 23 Parts List Parts List 10 5 Frame Item Parts name Part Number 1 Frame Assy Aio 2 Shield IIT 3 Clamp Mst 10v0 4 Holder FFC 5 Clamp Rlwc 1sv0 6 Edging Saddle 7 Chassis Assy HVPS 8 Chassis Breaker 9 Cover FFC 10 Clamp Locking ...

Page 552: ... Parts List 10 6 Electrical 1 2 s6128mfp 145 1 2 3 4 7 7 8 9 6 with 7 10 11 12 13 15 16 17 with 18 14 14 2 2 18 J44 J503 19 with 10 12 P502 P504 P501 P47 P48 P40 P44 P503 P403 P802 J1001 J801 P801 P1003 P1002 P902 P901 Ref PL10 6 6 20 21 22 Front ...

Page 553: ...62K65360 5 6 Pwba Cont Aio I P Board With 7 960K45742 7 NVM Rom 8 Memory Card 133K25920 9 Pwba Fax 960K38811 10 Shield Ess 11 Cover Inner Upr 12 Cover Inner Btm 13 Chassis LVPS 14 Clamp 15 Support Pwb 16a 16b LVPS 110v LVPS 220v 105K23210 105K23470 17 Duct Fan Assy With 18 054K40530 18 Duct Fan 19 Shield Assy Ess With 10 12 20 Plate Earth Drum 21 Plate Earth Fsr 22 Arrester ENE 112d 10a ...

Page 554: ...MFP Service Manual Parts List Parts List 10 7 Electrical 2 2 s6128mfp 146 J482 J484 P161 T484 J48 P144 1 2 7 8 9 10 11 12 3 4 6 5 3 P11 P42 P22 P21 P24 P26 P10 P23 P28 P15 P14 P17 P31 P19 P18 P29 P16 P20 P41 P40 Front ...

Page 555: ... 2 Item Parts name Part Number 1 HVPS 105K22661 2 Chassis MCU 3 Edging Saddle 4 Clamp Mst 10v0 5 Support Pwb Rcbt 11s 6 Pwba EEPROM Xpro 7 Pwba MCU 960K47041 8 Harn Assy Sw Pwr Aio SW J48 J482 9 Harn Assy GFI Gnd J484 t484 10 Breaker GFI 908W01201 11 Power Cord 12 Bracket SW ...

Page 556: ... 8 9 10 11 12 14 7 5 J10 J901 J21 J211 J40 J42 J403 J14 J141 J15 J501 J502 J504 J802 P5301 P5041 P422 J22 J26 J221 J261 P262 J144 J11 J902 J16 J161 Ref PL10 7 7 Ref PL10 6 16 P11 P42 P22 P21 P24 P26 P502 P504 P501 P10 P23 P28 P15 P14 P17 P31 P19 P18 P29 P16 P20 P47 P48 P40 P44 P503 P41 P40 ...

Page 557: ... Harn Assy Ess Video Aio J11 J902 3 4 5 Harn Assy HVPS Aio J16 J161 6 7 Harn Assy Main Mot J21 J211 8 Harn Assy Sub Mot Aio J22 J221 9 Harn Assy KSNR Regcl J26 J261 P262 10 Harn Assy IIT Power J40 J802 11 Harn Assy PHD Xpro J42 J144 P422 12 Harness A op ess J403 P5301 13 14 Harness Assy Lvps Main J14 J15 P5041 J141 J501 J502 J504 ...

Page 558: ...9 30 Phaser 6128MFP Service Manual Parts List Parts List 10 9 Scanner s6128mfp 148 J1003 P1001 J1002 3 1 with 2 PL10 10 1 2 with 3 Ref PL10 10 1 4 Front ...

Page 559: ...ser 6128MFP Service Manual 9 31 Parts List Parts List 10 9 Scanner Item Parts name Part Number 1 Scanner Assy With 2 pl10 10 1 2 IIT Assy Sub With 3 604K52480 3 Glass Assy Platen 4 Core Ferr Ffc 121E22020 ...

Page 560: ...9 32 Phaser 6128MFP Service Manual Parts List Parts List 10 10 ADF 3 4 6 with 3 4 7 8 with 9 9 14 13 13 14 15 12 98 16 16 J1003 JADF1 11 17 18 20 21 22 23 19 1 with 2 6 8 11 23 s6128mfp 149 2 Front ...

Page 561: ...DF With 3 4 7 Harn Assy ADF J1003 jadf1 8 Cover ADF Rear With 9 9 Arm Interlock 10 11 Tray Assy ADF Input 050K63720 12 Cover Roll Exit 13 Roll Fin Exit 14 Roll Pinch Exit 15 Shaft Roll Exit 16 Spring Roll Exit 17 Cover ADF Base 18 Output Tray Extension 19 Cover Tray Extension 20 Cover ADF Front 21 Cushion ADF Platen 22 Counter Balance L 23 Counter Balance R 98 Kit Feed roll and Pad with 3 4 and in...

Page 562: ...675K59321 PL5 1 23B Toner Cartridge US EU 2 5K M 675K59251 PL5 1 23C Toner Cartridge DMO 2 5K M 675K59331 PL5 1 24B Toner Cartridge US EU 2 5K Y 675K59261 PL5 1 24C Toner Cartridge DMO 2 5K Y 675K59341 Customer replaceable Service Items Parts List Reference Description Part Number PL6 1 1A PL6 1 1B Fuser 115V Fuser 220V 675K65653 675K65663 PL4 1 21 Imaging Unit 675K59860 PL3 2 4 Feed Roller Assemb...

Page 563: ...10 Chapter Wiring In this chapter Plug Jack Designations and Locator Diagrams Plug Jack Locators Notations Used in the Wiring Diagrams Wiring Diagrams ...

Page 564: ...J Map Coordiates Description 10 1 J 157 Connects MCU Board and HARNESS ASSY ESS 11 1 J 157 Connects MCU Board and HARNESS ASSY ESS VIDEO 14 1 I 157 Connects MCU Board and HARNESS ASSY LVPS MAIN 15 1 I 157 Connects MCU Board and HARNESS ASSY LVPS MAIN 16 1 I 159 Connects MCU Board and HARNESS ASSY HVPS 17 1 I 157 Connects MCU Board and HARNESS ASSY FUSER 18 1 I 158 Connects MCU Board and HARNESS AS...

Page 565: ...r moto and HARNESS ASSY TNR MOT 192 1 D 151 Connects Dispense Assy K toner moto and HARNESS ASSY TNR MOT 201 3 H 139 Connects FEEDER ASSY NV AIO HUM Sensor and HARNESS ASSY HUM 202 2 E 123 Connects CONSOLE ASSY PANEL and HARNESS ASSY A OP OPP 211 3 J 137 Connects DRIVE ASSY MAIN Main Motor and HARNESS ASSY MAIN MOT 221 3 I 137 Connects DRIVE ASSY SUB Sub Motor and HARNESS ASSY SUB MOT 231 2 D 127 ...

Page 566: ...S ASSY SW PWR 484 3 B 138 Connects BREAKER GFI and HARNESS ASSY GFI GND 501 3 E 143 Connects LVPS and HARNESS ASSY LVPS MAIN 502 3 E 143 Connects LVPS and HARNESS ASSY LVPS MAIN 503 3 E 143 Connects LVPS and Fan 504 3 E 143 Connects LVPS and HARNESS ASSY LVPS MAIN 801 3 G 138 Connects I P Board and Fax Board 802 3 G 136 Connects I P Board and HARNESS ASSY IIT POWER 901 3 G 136 Connects I P Board a...

Page 567: ...spense Motor Y Dispense Motor M Dispense Motor C Dispense Motor K PL5 1 3 P J181 P J18 PL5 1 3 P J182 PL5 1 3 P J191 PL5 1 3 P J192 P J19 Tray 1 MPT Feed Solenoid PL10 4 11 P J23 P J231 Registration Sensor PL3 2 13 P J232 8 4 6 5 2 s6128mfp 150 7 3 9 1 P J17 P J171 11 10 P J47 PL10 6 16 P J40 IP Board PL10 6 6 Control Panel PL10 2 2 P J901 P J902 P J802 P J403 P J10 P J11 P J202 P J5301 ADF Sub II...

Page 568: ...are referenced by their P J designation 1 System Connections 2 Map 1 MCU Board 3 Map 2 Feed and Laser Unit 4 Map 3 Electrical and Drive 5 Map 4 Imaging Map 1 MCU Board A 147 148 149 150 151 152 153 154 155 156 157 158 159 160 146 B C D E F G H I J K L s6128mfp 151 192 422 161 191 182 181 144 11 42 22 21 24 26 15 14 17 31 19 40 41 10 29 18 16 20 23 28 ...

Page 569: ...Phaser 6128MFP Service Manual 10 7 Wiring Map 2 Feed and Laser Unit A 117 118 119 120 121 122 123 124 125 126 127 128 129 130 116 B C D E F G H I J K L s6128mfp 152 411 412 231 5301 234 233 232 202 ...

Page 570: ... Manual Wiring Map 3 Electrical and Drive A 132 133 134 135 136 137 138 139 140 141 142 143 144 145 131 B C D E F G H I J K L s6128mfp 153 482 484 1002 1003 221 211 403 902 901 802 201 801 261 262 40 503 44 502 48 47 504 501 1001 ...

Page 571: ...Phaser 6128MFP Service Manual 10 9 Wiring Map 4 Imaging A 102 103 104 105 106 107 108 109 110 111 112 113 114 115 101 B C D E F G H I J K L s6128mfp 155 2811 281 291 5041 171 141 314 313 312 311 ...

Page 572: ...a Jack Denotes Pin yy and Jack yy of the connector Pxx and Jxx Denotes a Jumper Point JPxxx xxx Each end of the Jumper connection has a numeric designation Denotes the parts PL X Y Z implies the item Z of plate PL X Y in Parts List Denotes functional parts attached with functional parts name s6128mfp 156 s6128mfp 157 P Jxx YY s6128mfp 158 JPxxx s6128mfp 159 Fuser PL X Y Z s6128mfp 160 Heater s6128...

Page 573: ...for signal in high status The arrow indicates the direction of signal Denotes the function and logic value of the signal when the function operated Low L High H The given voltage is for signal in high status The arrow indicates the direction of signal Denotes a connection between wires Denotes a Clutch or Solenoid Denotes a Motor Symbol Description Control s6128mfp 162 DEVE_A s6128mfp 163 CLUTCH O...

Page 574: ...switch Denotes an On Off Switch Temperature normally close Denotes an NPN Photo transistor I L 24 VDC Denotes DC voltage when the Interlock Switch in MCU Board turns On 5 VDC 3 3 VDC Denotes DC voltage SG Denotes signal ground AG Denotes analog ground RTN Denotes return Symbol Description s6128mfp 169 s6128mfp 170 s6128mfp 171 s6128mfp 172 s6128mfp 173 s6128mfp 174 ...

Page 575: ... Board Xerographics Connections of EEPROM Board with MCU Board Connections of Imaging Unit PHD with MCU Board Connections of Hum Temp Sensor with MCU Board Connections of Erase LEDs and MCU Board Connections of Transfer Belt with MCU Board HVPS Connections of HVPS with MCU Board Toner Dispense Connections of Dispenser Motor Y with MCU Board Connections of Dispenser Motor M with MCU Board Connectio...

Page 576: ...7 8 6 5 4 3 2 4 2 1 2 3 Interlock Harness Assembly PL10 6 4 SG 5VDC R H COVER OPEN SG 3 3VDC SG 1 2 2 1 P J29 P J291 Switch PL5 1 9 LV TYPE DEEP SLEEP SLEEP 24V ON FAN ON FAN LOW FAN ALARM 14 1 I L OPEN Power Switch Harness Assembly PL10 7 8 P J484 P J48 T484 s6128mfp 219 LVPS PL10 6 16 GFI Breaker PL10 7 10 GFI Ground Harness Assembly PL10 7 9 LVPS Main Harness Assembly PL10 8 14 LVPS Main Harnes...

Page 577: ... 24VDC 2 1 1 2 1 2 MPT Feed Solenoid PL10 4 11 P J231 P J23 3 3VDC 6 7 8 K Sensor Registration Clutch Harness Assembly PL10 8 9 PAPER EMPTY SENSED H 3 3VDC SG P J233 3 2 1 PULL UP 3 3VDC Tray 1 MPT No Paper Sensor PL3 2 13 3 4 5 REGI SENSED L 3 3VDC SG 3 2 1 PULL UP 3 3VDC Registration Sensor PL3 2 13 P J232 P J26 4 5 I L 24VDC REGI CL ON L 24VDC 2 1 1 2 P J262 Drive Clutch Assembly PL10 4 1 s6128...

Page 578: ...E M SG 1 2 4 5 6 3 8 9 10 7 P J21 P J211 10 11 9 8 7 6 5 4 3 2 I L 24VDC SG I L 24VDC SG MAIN MOT ON MAIN MOT ALARM MAIN MOT CLK MAIN MOT LOW MAIN MOT CW CCW M s6128mfp 221 Interlock 24VDC Interlock 24VDC 1 2 Main Motor Harness Assembly PL10 8 7 K Sensor Registration Clutch Harness Assembly PL10 8 9 Sub Motor Harness Assembly PL10 8 8 I L 24VDC K MODE SOL ON L 24VDC Interlock 24VDC 1 2 3 K MODE SE...

Page 579: ...F Y ROS MOT ON Laser Harness Assembly PL4 1 22 LOCK ROS MOT ON SG 24VDC 5VDC SOS SG CLK Laser Unit PL4 1 1 Laser Motor SOS Board s6128mfp 222 13 14 ENB 15 15 14 13 12 11 1 2 3 4 5 10 9 8 7 6 5 1 2 3 5 4 3 2 1 3 2 1 4 3 2 1 SG 3 3V LD Interlock 24VDC P J41 P J412 1 2 3 4 5 6 DATA K SG DATA C SG 7 8 DATA M SG DATA Y SG Laser Video Harness Assembly PL4 1 23 8 7 6 5 4 3 2 1 from Xerography ...

Page 580: ...EEPROM P J144 4 3 2 1 SG 5VDC HUMI TEMP P J20 1 2 3 4 P J201 4 3 2 1 EEPROM Board PL10 7 6 Humidity Sensor PL10 4 20 Main LVPS Harness Assembly PL10 8 14 ERASE Y M C ON L 3 3VDC ERASE K ON L 3 3VDC 3 3VDC P J14 15 16 17 P J141 3 2 1 Erase LED Assembly PL4 1 8 1 2 3 4 Left Side Harness Assembly PL10 4 18 Transfer Assembly PL6 1 7 5 4 3 2 1 5VDC ADC SENSOR LED REM ADC V MONI 5 1 2 3 4 5 SG P J2811 P...

Page 581: ...rness Assembly PL10 8 5 P J16 1 2 3 4 5 6 7 8 HVPS PL10 7 1 P J161 A E I H G F BCR BTR BTR Bias Transfer Roll BCR Bias Charge Roll Developer D C B 10 9 8 7 6 5 4 3 TR MON CF MON HV DO HV LD HV CLK 3 0V REF SG 9 10 2 1 MAIN CLK SG I L 24V s6128mfp 224 K C M Y 3 0V REF 3 0V REF ...

Page 582: ... 10 11 9 P182 5 4 3 2 1 J182 1 2 3 4 5 Dispense Motor M PL5 1 3 1 2 4 5 6 3 P191 P J19 5 4 3 2 1 J191 1 2 3 4 5 Dispense Motor C PL5 1 3 P192 5 4 3 2 1 J192 1 2 3 4 5 Dispense Motor K PL5 1 3 Toner Motor Harness Assembly PL5 1 25 Toner CRUM Harness Assembly PL5 1 26 1 2 P J311 CRUM Y Connector PL5 1 14 P J31 DATA Y IN CLK Y OUT 3 3VDC SG DATA M IN CLK M OUT 3 3VDC SG DATA C IN CLK C OUT 3 3VDC SG ...

Page 583: ...VPS Harness Assembly PL10 8 14 SG PULL UP 3 3VDC Fuser Assembly PL6 1 1 LVPS Board PL10 6 16 Lamp Control s6128mfp 226 Thermostat Heater NC SNS 1 2 3 P J175 P J176 P J172 P1711 P J171 P J47 P J14 P J501 P1712 P1713 P J173 2 3 1 STS 1 2 2 1 1 2 3 Exit Sensor 1 2 3 3 2 1 230V Spec 3 1 N HEAT1 1 2 3 1 2 3 LINE P J171 P J47 5 6 10 9 xHEAT1 FUSER ON 3 3VDC Used in production process only P J504 J5041 1...

Page 584: ...G HSYNC SG 16 15 14 13 12 11 10 9 8 7 6 5 4 3 2 1 17 18 18 17 P J40 1 2 3 4 P J202 1 2 3 4 5 6 7 PL10 7 7 LVPS PL10 6 16 Control Panel PL10 2 2 P J902 1 2 3 4 5 6 7 8 P J 11 SG DATA K DATA C DATA M DATA Y SG SG SG 5VDC SG 3 3VDC SG SG DATA CLK 5VDC LED ON WAKE U P 3 3VDC 6 5 4 3 2 1 8 7 3 3VDC 3 3VDC 5VDC 3 3VDC 5VDC 5VDC 5VDC 3 3VDC 1 2 3 4 5 6 7 7 6 5 4 3 2 1 P J5301 Control Panel Harness Assemb...

Page 585: ...8 9 DOC SEN FEED SEN COVER SEN SG ADF MOT A ADF Assembly PL10 10 1 Connector Board s6128mfp 228 1 2 3 4 5 6 7 8 9 3 3VDC 1 2 3 JDFM1 JCV1 1 2 3 4 ADF Motor ADF Cover Sensor M 1 2 3 JDES1 ADF Document Sensor 1 2 3 JDS1 ADF Feed Sensor A A B B 3 3VDC 3 3V P J1003 ADF Harness Assembly PL10 10 7 Image Processor Board ...

Page 586: ...y PL10 9 2 s6128mfp 332 13 14 AFE_SDIO 15 1 2 3 4 5 6 7 8 9 10 11 12 13 14 15 AFE_SCLK AFE_SEN 16 17 18 19 20 21 RXIN0 SG RXIN1 RXIN1 22 23 24 25 26 27 DGND RXIN2 RXIN2 SG RXINCLK RXINCLK DGND RXIN0 28 29 LVDSCLK 30 16 17 18 19 20 21 22 23 24 25 26 27 28 29 30 LVDSCLK SG P J1002 1 2 3 4 SCAN MOTB SCAN MOT A SCAN MOTA SCAN MOT B Scanner Motor Lamp Inverter Lamp Scanner Control Board CCD Board ...

Page 587: ...A Appendix Reference In this chapter Phaser 6128MFP Menu Map Firmware Update Acronyms and Abbreviations ...

Page 588: ...efix Dial Number Discard Size ECM Extel Hook Threshhold Modem Speed Country Ethernet TCP IP Protocol Host Access List Initialize NVM Information Pages Menu Map Configuration PCL Fonts List PCLMacro List Job History Error History Protocol Monitor Demo Page Tray Settings Tray Defaults Settings Copy Defaults Scan Defaults Fax Defaults www xerox com office 6128MFPdocs Nederlands Svenska Dansk Česky Po...

Page 589: ...ive Interlock Harness Sub Drive Right Side Cover Right Side Door Right Side Cover Rear Cover Top Cover Imaging Unit Fuser Left Side Cover Front Cover Toner Cartridge K C M Y Imaging Unit Front Cover Control Panel Right Side Door Fuser Erase LED Assembly Imaging Unit Springs Levers Restraint Blocks LVPS Fan Drive Clutch Registration Bearing Drive Clutch Registration Bearing Humidity Sensor Lower Sc...

Page 590: ...nt Cover Stopper Pivot Pivot Trans L Gear T4 Pivot Shaft Transfer Unit Belt LVPS Card Cage Front Cover 250 Sheet Tray Registration Sensor Tray No Paper Sensor Tray No Paper Sensor Actuator HVPS Registration Roller Registration Sensor Actuator Duct Plate Breaker Chassis Toner Cartridge K C M Y Toner Cartridge Holders K C M Y Dispense Assembly Toner Motor Frame Assembly Drive Clutch Registration Bea...

Page 591: ...or Rear Cover Outer Pole Cover Right Side Cover Cover Top Lower Scanner Cover ESS Shield LVPS Card Cage Inner Pole Cover Duct Plate Toner Cartridge K C M Y Breaker Chassis Toner Cartridge Holders K C M Y Dispense Assembly Toner Motor Frame Assembly Pivot Shaft Front Cover Stopper Pivot Pivot Trans L Gear T4 Pivot Shaft Transfer Belt Drive Clutch Registration Bearing Laser Unit Stopper Pivot Pivot ...

Page 592: ...er Imaging Unit Fuser Left Side Cover Front Cover Toner Cartridge K C M Y Imaging Unit Front Cover Control Panel Right Side Door Fuser Erase LED Assembly Imaging Unit Springs Levers Restraint Blocks LVPS Fan Drive Clutch Registration Bearing Drive Clutch Registration Bearing Humidity Sensor Lower Scanner Cover Switch Interlock Harness Feed Solenoid RAM DIMM Drive Assy Ph Gear P2 Main Drive Imaging...

Page 593: ... Control ASSY Assembly ATM Adobe Type Manager BCR Bias Charge Roller BOOTP Boot Parameter Protocol BTR Bias Transfer Roller CCD Charge Coupled Device Photoelectric Converter CCW Counter Clock Wise CMYK Toner colors for the printer Y yellow C cyan M magenta K black CRU Customer Replaceable Unit CRUM Customer Replaceable Unit Meter Memory CST Cassette dB Decibel DC Direct Current DDNS Dynamic Domain...

Page 594: ... Voltage HVPS High Voltage Power Supply Hz Hertz cycles per second IDT Intermediate Drum Transfer IEC International Electrotechnical Commission I F Interface IIT Image Input Teminal ADF Scanner IOT Image Output Terminal the printer IP Image Processor KB Kilo Byte LAN Local Area Network LCD Liquid Crystal Display LD Laser Diode LED Light Emitting Diode LEF Long Edge Feed LPD Line Printer Daemon LPR...

Page 595: ...s PJL Printer Job Language PL Parts List POP3 Post Office Protocol version 3 PPD PostScript Printer Description PPM Pages Per Minute PWBA Printed Wiring Board Assembly RAM Random Access Memory RH Relative Humidity RMS Root Mean Square Voltage ROM Read Only Memory ROS Raster Output Scanner Laser Unit SEF Short Edge Feed SMB Server Message Block SNMP Simple Network Management Protocol SNR Sensor SOL...

Page 596: ...r of the printer is displayed Then the DownLoad Mode Send F W Data is displayed 11 On your computer locate the downloaded file Open the Boot directory Double click the Xeroxfwup exe file 12 Select USB Click the Next button 13 The xeroxfwup window with the module number is displayed Click the Next button 14 On the printer Control Panel the Erasing Flash Diagnosing message is displayed The the print...

Page 597: ...button Select the box with your printer IP address Click the Next button On the printer Control Panel messages are displayed from Receiving data Port 9100 Writing Port 9100 as the printer starts updating the firmware b For USB connection The xeroxfwup window with the module number is displayed Click the Next button On the printer Control Panel messages are displayed from Receiving data USB Writing...

Page 598: ...printer IP address Click the Next button On the printer Control Panel messages are displayed from Receiving data Port 9100 Checking Port 9100 Writing Port 9100 as the printer starts updating the firmware b For USB connection The xeroxfwup window with the module number is displayed Click the Next button On the printer Control Panel messages are displayed from Receiving data USB Checking USB Writing...

Page 599: ...ent 6 3 disabling 6 3 enabling 6 3 manual adjustment 6 4 configuration page 1 27 consumables Print Cartridge troubleshooting 3 66 Toner Cartridge part number 9 34 Control Panel buttons 1 7 LED states 1 9 shortcuts 1 9 troubleshooting 4 52 controller functions 1 23 information pages 1 27 job control 1 23 maintenance function 1 26 non genuine mode 1 25 copy specifications 1 13 counters billing print...

Page 600: ...oubleshooting 4 33 F Fan location 2 29 Main Fan Motor error 3 103 operation 2 29 fasteners precautions 8 6 screws 8 6 Fax color fax troubleshooting 4 60 operation 2 58 Protocol Monitor 2 61 specifications 1 14 standards 2 65 Feed Drive Assembly removal 8 37 Feed Roller operation 2 17 removal 8 10 Feed Solenoid operation 2 17 removal 8 34 Feeder Assembly removal 8 75 firmware update 1 26 boot contr...

Page 601: ...ion 4 64 troubleshooting 4 64 M Macintosh operating system 1 11 troubleshooting 4 76 maintenance preventive 7 2 RIP 7 3 tools 7 2 maintenance items imaging unit removal 8 8 removal 8 7 separator roller removal 8 7 toner cartridge removal 8 13 Manual Feed No Paper Sensor operation 2 18 No Paper Sensor removal 8 27 Registration Sensor operation 2 18 MCU Board communication error 3 95 location 2 29 N...

Page 602: ...ty defect definitions 5 7 mode 1 11 repeating defect 5 51 specifications 5 55 guaranteed and maximum print areas 5 59 linearity 5 57 magnification error 5 58 parallelism 5 56 perpendicularity 5 58 registration 5 59 skew 5 56 troubleshooting 5 7 troubleshooting checklist 5 4 process control parameters 2 34 admix mode 2 35 high area coverage mode 2 35 potential 2 34 toner density 2 34 process flow c...

Page 603: ...g 1 12 Start of Scan SOS 2 24 startup sequence 4 2 Sub Drive removal 8 60 T technical support 1 2 Temperature Sensor location 2 29 operation 2 31 troubleshooting 3 113 test print Black 20 ESS 5 48 CMY 20 ESS 5 48 Contamination Check 5 50 Cyan 20 ESS 5 46 Gradation ESS 5 49 Grid 2 ESS 5 46 Magenta 20 ESS 5 47 no image IOT 5 45 Pattern IOT 5 45 Toner Pallet Check 5 49 Yellow 20 ESS 5 47 test print e...

Page 604: ...I 6 Phaser 6128MFP Service Manual ...

Page 605: ......

Page 606: ...Copyright 2009 Xerox Corporation All rights reserved Unpublished rights reserved under the copyright laws of the United States Part 701P49279 ...

Reviews: