INSTALLATION INSTRUCTIONS
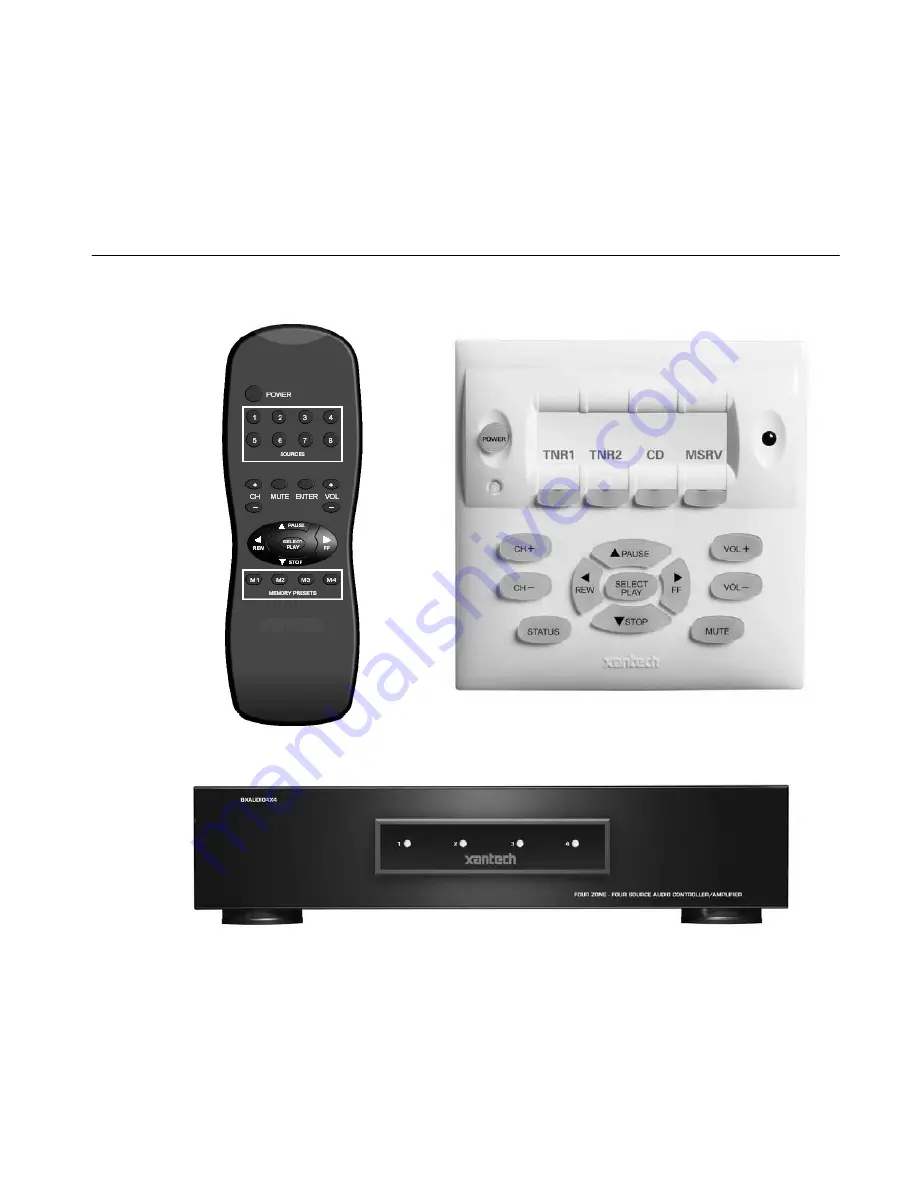
MODEL BXAUDIO4X4
FOUR ZONE – FOUR SOURCE
COMPLETE AUDIO CONTROLLER/AMPLIFIER SYSTEM
Page 1: ...INSTALLATION INSTRUCTIONS MODEL BXAUDIO4X4 FOUR ZONE FOUR SOURCE COMPLETE AUDIO CONTROLLER AMPLIFIER SYSTEM...
Page 2: ...the manufacturer 8 Ventilation The appliance should be situated so that its location or position does not interfere with its proper ventilation For example the appliance should not be situated on a b...
Page 3: ...SECTION 5 0 PROGRAMMING USING XPS Point and Shoot IR Learning 21 Planning the System 21 Enable Disable Program Mode 21 Programming Keypad Buttons Single Commands 22 Programming Keypad Button with a Se...
Page 4: ...and expansion to 8 Zones with the ease of direct front panel IR Learning through Xantech s EZProgramming Technology The BXAUDIO4X4 system includes the following components One BXAUDIO4X4 Controller A...
Page 5: ...zone has 1 RJ45 connector for BXAUDIO4X4 keypad 1 speaker pair terminal and a 12VDC status output Party Mode Multiple zones can be linked to behave as one zone 25 Watts per channel rated at 8 Ohm 4 Oh...
Page 6: ...in Program Keypad Mode press once to program a Sources POWER ON Macro Power Management LED Item 12 turns GREEN and twice to program a Sources POWER OFF Macro Power Management LED turns RED 4 Expansion...
Page 7: ...t is in Expanded Mode and is designated as the SLAVE Unit c OFF Indicates Unit is NOT in Expanded Mode 4 Zone System 14 STATUS LED Illuminates GREEN when unit is ready to receive a Macro IR command du...
Page 8: ...h for 1 Primary 1 Secondary Keypad per Zone RS 422 Data I O and IR Input 21 Control Out Provides a Control Output that goes high 12 volts DC when any zone is first turned on and goes low 0 volts when...
Page 9: ...Intelligent Power Management feature Tip 12VDC Out Ring Control Sense Input Sleeve GND 27 Com Port DB9 Connector This Serial Port is used to program the BXAUDIO4X4 Controller and Keypads using the in...
Page 10: ...D Will indicate zone system status and will flash as IR is received at the IR Sensor These indicators one for each Keypad provide the following Information a Off Zone OFF b Steady Green Zone ON c Flas...
Page 11: ...source activity linked zones audio setup etc non programmable 45 Select Play Stop Pause Rew FF Each send IR commands programmed to these buttons to the selected source and common emitter outputs 53 47...
Page 12: ...r background light level to prevent false triggering of the IR circuits Slowly turn counter clockwise to reduce sensitivity 52 LCD Backlight Adjustment Adjusts brightness of LCD backlight This adjustm...
Page 13: ...t is it depends on the natural free flow of air up through the slot perforations in the bottom plate over the internal heat dissipating fins then out the top cover for adequate cooling 2 If mounted in...
Page 14: ...rint out the desired Source Labels using the perforated Source Template sheet 2 Place Source Template over the Source Window area of the LCKP Keypad 3 Insert the top tabs of the Window Cover Plate int...
Page 15: ...for a TV or monitor from each zone to the BXAUDIO4X4 Controller Amplifier location Speaker Connections 1 Using good quality speaker wire connect the individual speaker leads to the 4 terminal SPEAKER...
Page 16: ...C12 to raise a TV lift or drop a projection screen automatically when a zone is turned ON Tip 12VDC Control Out Sleeve GND Control Out A single Common Control Output is provided When the Common Contro...
Page 17: ...ne Sub Zone OFF OFF OFF ON ON OFF Table 1 LC4KP Keypad Jumper Configurations Multiple Keypad Connections 1 For a second keypad in the same zone terminate the CAT5 cable in the same way as shown in Fig...
Page 18: ...OWER CH CH STATUS SELECT PLAY STOP PAUSE FF REW VOL VOL MUTE 200 feet max 61 m IR Receiver A B C D 400 feet max 122 m Figure 8 BXAUDIO4X4 LC4KP Keypad CAT5 Cable Lengths The maximum cable length for C...
Page 19: ...peaker and the negative speaker connector on the rear of the BXAUDIO4X4 Controller Amplifier connected to the negative connector on the speaker then the system will be in phase No further action is re...
Page 20: ...ER CH CH STATUS SELECT PLAY STOP PAUSE FF REW VOL VOL MUTE ZONE 4 Primary Keypad AUDIO OUT ZONE 1 AUDIO OUT ZONE 2 AUDIO OUT ZONE 3 AUDIO OUT ZONE 4 SAT Receiver XMUSIC CD Changer AM FM Tuner To IR OU...
Page 21: ...tion regarding code compatibility before finalizing the system as there may be some IR code incompatibilities 2 Determine the components to be used in each zone Some sources may not be available in al...
Page 22: ...o use a short quick press of the devices remote when learning commands 8 If the code was learned correctly the STATUS LED will turn OFF and the PROGRAM KEYPAD LED will remain GREEN To program a Sequen...
Page 23: ...ss the button on the LC4KP KEYPAD to be programmed a Confirm the STATUS LED 14 is illuminated GREEN 5 Aim the Manufactures Source Remote at the IR Learning eye on the front of the BXAUDIO4X4 5 6 Press...
Page 24: ...AD button 2 on the front of the BXAUDIO4X4 a Confirm the PROGRAM KEYPAD LED 11 is illuminated GREEN 3 Press the POWER MANAGEMENT button once on the front of the BXAUDIO4X4 Controller 3 a The POWER MAN...
Page 25: ...RED indicating POWER OFF macro deletion 5 Press the Source Button on the LC4KP Keypad corresponding to the SOURCE to be deleted 6 The PROGRAM KEYPAD LED will turn OFF when the macro is deleted 7 Repea...
Page 26: ...1 through 4 7 Repeat steps 3 and 4 until all desired Zones are Linked To Un Link Zones 1 Make sure the BXAUDIO System is in RUN Mode Button 10 in the down position 2 Press and Hold the STATUS button 4...
Page 27: ...pplication Diagram Figure 24 shows two BXAUDIO4X4 Controllers being used in a four source eight zone system Each of the source components XDT Dual Tuner SAT CD have their A V outputs running through a...
Page 28: ...UDIO VIDEO DISTRIBUTION AMPLIFIER AM FM Tuner SAT Receiver XMUSIC CD Changer 283TPEmitter AV61 or Y Cable AV61 or Y Cable AV61 or Y Cable A V61orY Cable CONTROLLER1 CONTROLLER2 283TPEmitter 283TPEmitt...
Page 29: ...PAD button on the front of the BXAUDIO4X4 a Confirm the PROGRAM KEYPAD LED is illuminated GREEN 3 Continuously press the EXPANSION button located on the front of the BXAUDIO4X4 until the Expansion LED...
Page 30: ...boot both units 12 If simply copying one unit to another remove the EXPANSION cable and disable EXPANDED mode on both units SECTION 7 0 INITIALIZING THE SYSTEM CLEARING ALL MACRO S Note Initializing t...
Page 31: ...tons on the remote to trigger the Macro stored under the BXAUDIO s LC4KP Keypad Button Note Source buttons labeled 5 thru 8 Memory Preset buttons M1 thru M4 and the ENTER button are non active when us...
Page 32: ...utton 6 simultaneously on the Zones Keypad a The keypad STATUS LED 13 will begin to flash RED b Note The Keypad Source buttons 1 thru 4 now represent ZONES 1 thru 4 3 Press the ZONE Keypad Source butt...
Page 33: ...ation Frequency Bandwidth 30 Hz to 100 kHz Nominal Reception Range 30 feet Nominal Reception Angle 40 degrees off axis General RC68 Code Group Number A8 Control Output 12 V 50 mA Status Output 12 V 50...
Page 34: ...itation of incidental or consequential damages so the above limitation or exclusion may not apply to you This warranty gives you specific legal rights You may have additional rights which vary from st...
Page 35: ...Model BXAUDIO4X4 Page 35 2005 Xantech Corporation NOTES...
Page 36: ...Page 36 Model BXAUDIO4X4 2005 Xantech Corporation XANTECH CORPORATION 13100 Telfair Avenue Sylmar CA 91342 phone 818 362 0353 fax 818 362 9506 www xantech com Part No 08901665 Rev X1 05 25 2005...