background image


U

SER 

M

ANUAL


X

ORAYA

S

UITE


39 

5.4.3


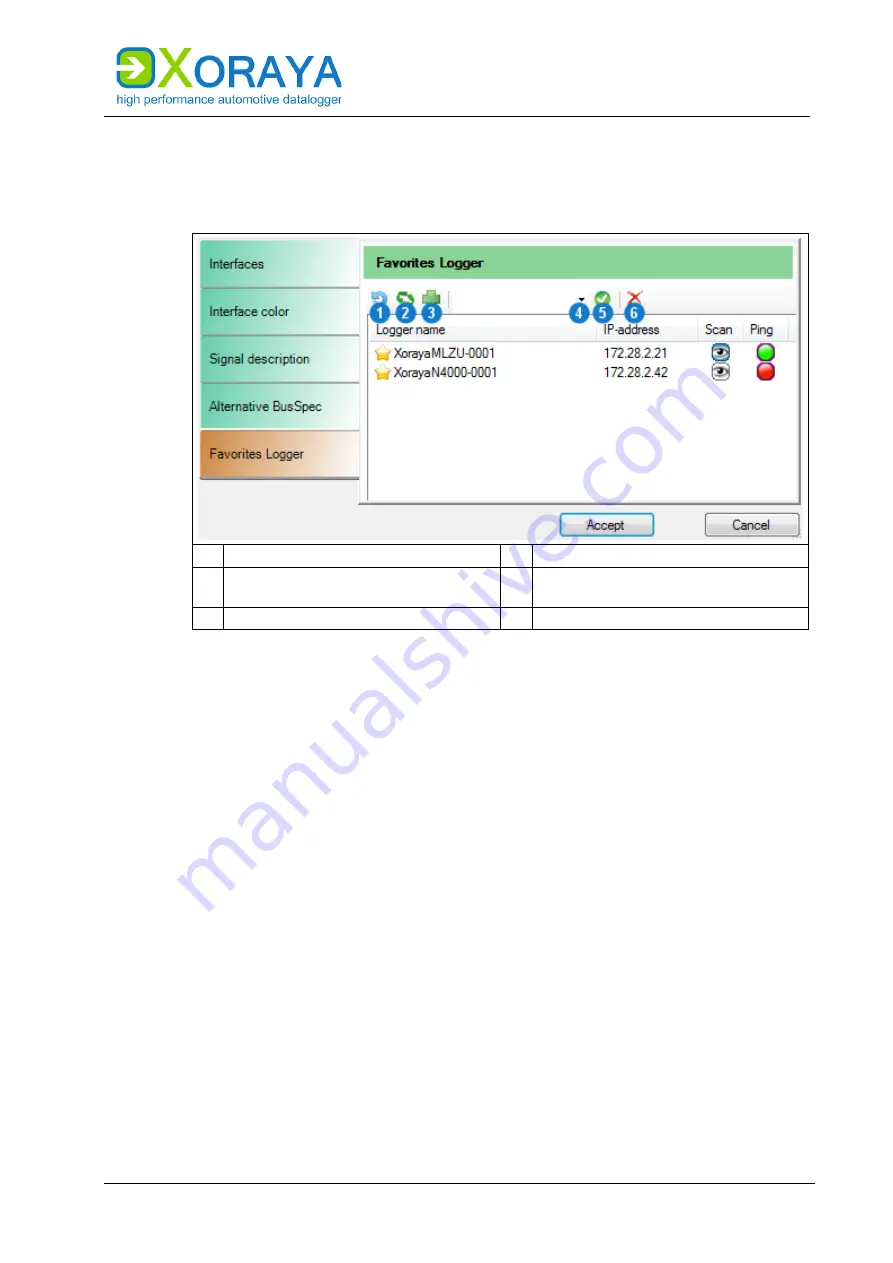
Favourites 

You access the favourites list via 

Display settings

 button in the 

Configuration

Online-Logging

 or 

Hdd-Download

 tools. 


1  Refresh the device list 

4  Devices in the network 

2  Add currently connected device to 

favourites 

5  Add selected device to favourites 

3  Add a device to favourites manually  6  Remove device from favourite list 

Save frequently used dataloggers in the favourites list. Favourites are 
displayed first in the list of available dataloggers and are marked with the 
star symbol. 

Add ML-N4000 manually: 


Click 

Add a device to favourites manually


(3)


Specify 

Logger name

 and 

IP-address


Click 

OK

Add ML-N4000 automatically: 


Click 

Devices in the network


(4)

 to start scanning for dataloggers. 


Select the desired ML-N4000. 


Click 

Add selected device to favourites


(5)

Additionally, you can add the currently connected ML-N4000 directly via 
button 

(2)

.


Summary of Contents for XORAYA ML-N4000

Page 1: ...User Manual XORAYA ML N4000 Edition 1 1 3 May 2022...

Page 2: ...th permission of X2E GmbH Offenders shall be liable to pay compensation and may be subject to prosecution All product names and trademarks used in this manual are the property of their respective owne...

Page 3: ...nections and controls 18 4 Commissioning 25 4 1 Unpacking 25 4 2 Selecting an installation location 25 4 3 Installing the ML N4000 25 4 4 Installing the XORAYASuite 26 4 5 Connecting the ML N4000 to t...

Page 4: ...73 6 1 Safety measures 173 6 2 Cleaning 174 6 3 Repair 175 7 Storage transport and disposal 176 7 1 Storage 176 7 2 Transport 176 7 3 Disposal 176 8 Appendix 177 8 1 Technical data 177 8 2 ML N4000 pi...

Page 5: ...r safe proper and efficient operation of the ML N4000 Following this user manual strictly helps in avoiding dangers reduces repair costs and downtime while increasing the reliability and service life...

Page 6: ...ain properties and functions via the included software so that the ML N4000 behaves differently than described herein Users may revert to factory defaults at any time by pressing the default button on...

Page 7: ...ndicates licence information Licence information contains either general information about licences for the ML N4000 or indicates whether a licence is required for a particular function 1 4 1 Meaning...

Page 8: ...arated from the surrounding text by lines set above and below SIGNAL WORD Danger types and sources Explanation and consequence of danger Actions to prevent danger 1 5 X2E Wiki The X2E Wiki at http wik...

Page 9: ...e The ML N4000 is intended for use only by trained personnel The ML N4000 must not be used in residential or living areas Its use is strictly limited to industrial environments The ML N4000 must also...

Page 10: ...heck the connecting cable regularly for defects to prevent damage to the power source Always install the ML N4000 in de energised status WARNING Defects influencing the environment The incorrect ML N4...

Page 11: ...ure range Never operate the ML N4000 near heat sources Please ensure adequate air circulation for operation Do not cover the ML N4000 with other objects CAUTION Device damage due to shocks Excessive v...

Page 12: ...000 Never disconnect the ML N4000 from the power supply while in operation Ensure proper connector seating and tighten the screws if possible Only shut down the ML N4000 through the XORAYASuite or the...

Page 13: ...anty The warranty period is 12 months Device batteries whether internal or external are excluded from the warranty The warranty also excludes damages arising from improper handling X2E GmbH guarantees...

Page 14: ...residential installation This equipment generates uses and can radiate radio frequency energy and if not installed and used in accordance with the instructions may cause harmful interference to radio...

Page 15: ...CAN and CAN FD FlexRay LIN RS 232 PSI5 Analog BroadR Reach MOST25 and MOST150 Ethernet 100Base T and 1000Base T GNLog and DLT via Ethernet and RS 232 CCP and XCP GPS The ML N4000 based on the Xilinx...

Page 16: ...tion First block Product ID 0200 XORAYA Datalogger Second block Product variant 0600 XORAYA ML N4000 Third block Hardware revision Input Maximum current consumption at given standard input voltage DMF...

Page 17: ...ding on the interface configuration The following accessories are optionally available Power supply cable with AC adapter recommended XORAYA External Storage Unit Additional cables Mounting material D...

Page 18: ...the ML N4000 contains depending on the hardware configuration up to five log interfaces Front side From Rev 3 0 on A Power button G 10 Gbit Ethernet interface B Trigger wake button H LAN host interfac...

Page 19: ...00 state The following table describes these functions as delivered Users can configure this behaviour via the XORAYASuite in the settings of the button interface Button State of the ML N4000 Function...

Page 20: ...ed USB flash drive USB D Currently not used Aux Lights up constantly when one of the additional interfaces without hardware slot for example GNLog Button is activated Flashes when messages are receive...

Page 21: ...cording Label the USB flash drive XORAYALOG and create the folder usb_queue there Check Record on USB stick in the Hard Disk category of the system settings Hard Disk Start data recording in HDD mode...

Page 22: ...rate with power supplies in a certain specified range Technical data Trigger input and trigger button offer an analogous operation A 12 V signal level at the trigger input is equivalent to pressing th...

Page 23: ...s can be variably equipped with up to five interfaces Slot and channel number of each hardware interface are also displayed in multiple locations of the XORAYASuite tool Configuration Interface config...

Page 24: ...switch assignments in the chapter Commissioning Configuring switches and the pin assignments in the Appendix ML N4000 pin assignments Base T1 add on N This interface is not part of the log interface s...

Page 25: ...tion Keep original packaging Keep the original packaging and packing materials for later storage or further transport 4 2 Selecting an installation location The ML N4000 installation location must mee...

Page 26: ...Microsoft Windows 8 32 Bit or 64 Bit Microsoft Windows 10 32 Bit or 64 Bit Hardware requirements Processor speed at least 1 GHz RAM at least 2 GB Storage space approx 120 MB available Software require...

Page 27: ...pin assignments Please note the port pin assignments when connecting the ML N4000 with the measuring environment Wrong pin assignments lead to measurement errors Please note the following sequence Con...

Page 28: ...supply Using an incorrect power supply can lead to abnormal behaviour or destruction of the ML N4000 Use only the supplied power cable Please ensure correct polarity upon connection Make sure that th...

Page 29: ...supply The ML N4000 is securely connected to the measuring environment Once the supply voltage is established the ML N4000 turns on and displays its operational status via the power button LED A CAUTI...

Page 30: ...d using the main setting Automatically Switch Off Main Settings Users can wake up the ML N4000 from sleep mode as follows Pressing the power button A Switching the power supply off and on Signal chang...

Page 31: ...4 have the value Open and therefore are not terminated 4 7 2 2x FlexRay Position Resistance 0 Open 1 2 6 k 2 90 4 7 3 7x LIN Position Power supply Vi Internal Ve External Use the internal power suppl...

Page 32: ...uration Customise the ML N4000 behaviour Online Logging Start and stop logging Hdd Download Download measurements from the ML N4000 storage medium Viewer Evaluate measurements Statistic Evaluate bus s...

Page 33: ...ent interface configuration under a different name The subitem System settings and signals saves everything except the interface configuration Open Opens an info file DLI and the associated log data A...

Page 34: ...Customer default configuration Create Stores the current permanent configuration profile active in the customer default profile Customer default configuration Load Loads the customer default configura...

Page 35: ...Adjusts the width of the columns in the Hdd Download tool to ensure all are visible simultaneously 1 Comment 22 Type spread Determines which tabs are shown in the Hdd Download tool Legend Determines w...

Page 36: ...ir descriptions can be found in the corresponding sections of this user manual 5 3 Status bar The status bar on the bottom of the window provides information about the connected ML N4000 for example t...

Page 37: ...arting Click Display available loggers 1 to start scanning for dataloggers Select the desired ML N4000 alternative name MLZU using the assigned name Click Establish connection to logger 2 or In the Lo...

Page 38: ...the Configuration tool 5 4 2 Disconnecting the ML N4000 2 Release connection to logger 5 Display settings 3 Start Hdd logging Click Release connection to logger 2 or In the Logger menu click Disconnec...

Page 39: ...e device from favourite list Save frequently used dataloggers in the favourites list Favourites are displayed first in the list of available dataloggers and are marked with the star symbol Add ML N400...

Page 40: ...the desired ML N4000 Connecting the ML N4000 The configuration can be performed WARNING Defects influencing the environment The incorrect ML N4000 configuration can lead to the temporary delayed or pe...

Page 41: ...sub items The current configuration of the selected sub item is displayed on the right side of the window This is where you can perform any changes required and optionally save them as a configuration...

Page 42: ...figuration permanently The configuration is saved permanently Delayed change update For certain settings such as Name and IP Address changes are not applied immediately but only after a ML N4000 resta...

Page 43: ...L N4000 These properties fall under various categories Main Settings Network Hard Disk Snapshot Versions Profile Select the category Click the root element of System Settings to display the main setti...

Page 44: ...the system time Automatically Switch Off Time period after which the ML N4000 shuts down provided there is no connection to the XORAYASuite there is no activity on any interface for which Prevent Sle...

Page 45: ...tegories are assigned to the following interfaces Connections and controls LAN Host eth0 LAN host interfaces H LAN Host eth1 10 Gbit Ethernet interface G 1 Overall view 4 Connection matrix 2 Separate...

Page 46: ...ed IP Address ML N4000 with static IP address Off max transmit unit mtu maximum packet size on the network layer in Bytes 1500 Provided the check box is selected the ML N4000 is only DHCP server if it...

Page 47: ...sses Type them in manually or double click in a row of the table that contains the addresses of the PCs in the network Red exclamation marks flag PCs outside the IP range Special care in network setti...

Page 48: ...torage medium 4 Remove ESU safely Only with connected XORAYA ESU These settings and displays refer to the currently active storage medium represented by the blue background colour If a XORAYA ESU is c...

Page 49: ...al or external storage medium Off Disabled Loop Circular buffer which contains the most recent minutes of the recording Linear Ongoing Off Compression Compression reduces the data volume and as a resu...

Page 50: ...easurement Measurement data are processed as queues on the log interfaces In addition to the default queue for packet data the ML N4000 is able to use the faster stream queue where Ethernet data are s...

Page 51: ...rigger Post time Stream queue Trailing time of the snapshot for the stream queue in ms 0 Log mode Stream queue Snapshot recording mode for the stream queue Linear Ongoing Loop In a loop that is overwr...

Page 52: ...on customer default a customer default configuration 1 Activate password protection Create customer default profile Enter customer default in the text box and click Create or In the Logger menu click...

Page 53: ...ord protection you can still temporarily save settings and create profiles without needing to enter the password 1 Unlock password protection Unlock password protection for active profile Click Unlock...

Page 54: ...ading later 1 Upload client settings onto the logger 2 Delete client settings from the logger Save settings on the ML N4000 Specify the export settings Export settings Specify the output formats Outpu...

Page 55: ...ANUAL XORAYASUITE 55 System Settings DLN Set up a Distributed Logging Network consisting of data sink master and one or multiple probes For further information see the quick manual for the XORAYA T Z7...

Page 56: ...E 56 System Settings Versions All properties in this category are immutable and purely informative Among other things this displays version numbers for various ML N4000 components as well as additiona...

Page 57: ...Routing Other Advanced Interface or channel selection Click the root element Interfaces to display the main settings of all interfaces or Click an interface to display the main settings for all chann...

Page 58: ...faces Double click a row in the table to jump directly to the corresponding interface or to the corresponding channel Reducing power consumption of the ML N4000 To reduce the ML N4000 power consumptio...

Page 59: ...e By default the FD specific settings are missing on CAN channels belonging to other slots CANFD_4PLUS_ For each of these licences the number of CAN FD capable channels is increased by 4 Check in cate...

Page 60: ...not go into sleep mode as long as there is activity on this channel On Wake ML N4000 wakes up from sleep mode as soon as there is activity on this channel On Acknowledge Send Acknowledgment and trans...

Page 61: ...USER MANUAL XORAYASUITE 61 CAN Trigger 1 Number of bytes for the trigger 3 Number of bytes for the response 2 8 byte blocks of the trigger 4 Byte values of the response...

Page 62: ...r Id specify the ID of the CAN message that raises a trigger Changing the numbering system Select the check boxes Extended Frame Can FD and Bit Rate Switch as desired Specify the Number of bytes for t...

Page 63: ...e check boxes Extended Frame Can FD and Bit Rate Switch as desired Specify the Number of bytes for the response 3 Specify the Byte values of the response 4 Repeat as necessary to configure a second tr...

Page 64: ...routing 1 Under Source interface choose the receiving CAN channel Under Source msg ID specify the ID of the source message Changing the numbering system Select the check box Ext ID for a 29 bit ID in...

Page 65: ...contain signals which hold the specific values General system statistics are for example RAM queue fill level CPU load Storage medium usage Interface statistics Transfer speed in kB s Messages per se...

Page 66: ...ID in orange is reserved and is automatically adjusted for each interface channel by the software Click the DBC button to open the generated messages and signals as a DBC file in a text editor and to...

Page 67: ...ad configuration template provided by the vehicle manufacturer Off Prevent Sleep Mode ML N4000 will not go into sleep mode as long as there is activity on this channel On Wake ML N4000 wakes up from s...

Page 68: ...ID for subsequent evaluation Baudrate Transfer rate in bit s Values 20000 19200 9600 4800 2400 19200 Use Busspec Load configuration template provided by the vehicle manufacturer Off Prevent Sleep Mod...

Page 69: ...er Id specify the ID of the LIN message that raises a trigger Changing the numbering system Specify the payload bytes from 1 to 8 Set bits Repeat as necessary for up to a total of five triggers No tri...

Page 70: ...USER MANUAL XORAYASUITE 70 RS 232...

Page 71: ...data bits of a data block Values 5 bit 6 bit 7 bit 8 bit 8 bit Parity Parity check for error detection Values None Odd Even None Stopbits Number of stop bits that mark the end of a data block Values...

Page 72: ...s Setting Description Default Enable Turn on logging for this channel On Alias Freely selectable channel name ethernet Bus ID Additional ID for subsequent evaluation Use Busspec Load configuration tem...

Page 73: ...Data Sink switch operation mode the data are only recorded In Pass Through mode the BroadR Reach ports are combined as pairs to allow a bus connection between ECU and BroadR Reach component for examp...

Page 74: ...the VLAN ID for each port separately via the property brr_vlan_outer_vid in the category other Setting Description Default Master Slave Mode of the BroadR Reach port Slave Switch operation mode Operat...

Page 75: ...Queue dispatching filter EtherType and VLAN Configure pre filters Click Add pre filter 1 Choose the Filter type only MAC is available at the current development stage Under Direction choose if the fi...

Page 76: ...the Ethernet frame contains no or only one VLAN tag the filter conditions for the non existing fields are ignored Via Load presets you can configure filter conditions in such way that either all fram...

Page 77: ...MANUAL XORAYASUITE 77 Ethernet protocols In this configuration section you can add update and delete GNLog and DLT channels Both protocols are recorded via the LAN host ports or the BroadR Reach inter...

Page 78: ...revent Sleep Mode ML N4000 will not go into sleep mode as long as there is activity on this channel On Debug level Detail level of the debug information GNLog 0 to 3 max DLT 0 None to 6 Verbose GNLog...

Page 79: ...LAN host port H to the PC Control video recordings Create one or multiple signal based triggers of the VIDEO interface or Activate one or multiple trigger actions of the button interface that effect t...

Page 80: ...configuration of a Basler camera Prevent Sleep Mode ML N4000 will not go into sleep mode as long as there is activity on this channel On VIDEO Trigger 1 Add trigger 4 Delete trigger 2 Trigger type 5...

Page 81: ...igger 1 Select the desired Trigger type 2 Create a single condition or multiple combined conditions for this trigger Create trigger conditions If required repeat the above steps for further triggers N...

Page 82: ...AL XORAYASUITE 82 DiagCCP DiagCCP Settings 1 Clear all settings 5 Open selection file 2 Edit CAN interface channel 6 Settings 3 Open A2L file 7 Traffic light for the bus load 4 Traffic light for the E...

Page 83: ...long as there is activity on this channel Off Source Physical CAN channel to be used Can_1 can1 A2L file Description file which is suitable for the ECU and is loaded to configure the CCP connection Se...

Page 84: ...ls of the Traffic light for the EPK check 4 green check successful yellow check not possible red check not successful Signal configuration Click Open selection file 5 and select a suitable XML CFG or...

Page 85: ...vent channel column or Highlight one or multiple rows and right click to activate these signals simultaneously for one event channel Select signals for the polling measurement mode Click Add polling c...

Page 86: ...optionally encrypted on the ML N4000 Other Status of the signal definition file 10 displays the current state of the file and changes its state by clicking not generated saved on ML N4000 saved encryp...

Page 87: ...ions the CCP recording provided it is activated starts and stops automatically at the beginning or ending of the data recording in online mode or HDD mode Configure triggers On the header of the desir...

Page 88: ...a reduced A2L file and save it optionally encrypted on the ML N4000 Create and encrypt the signal definition file by selecting the check boxes under MDF Export of signals Add additional signals 4 to t...

Page 89: ...on of a seed and key function for the encrypted communication with the ECU Create and test the seed and key function Click Add basic structure of the function 1 Insert the algorithm that corresponds w...

Page 90: ...DiagXCP Settings 1 Clear all settings 5 Open selection file 2 Edit interface channel 6 Settings 3 Open A2L file 7 Traffic light for the bus load 4 Traffic light for the EPK check 8 Engine RPM Only fo...

Page 91: ...eely selectable channel name xcp Bus ID Additional ID for subsequent evaluation Prevent Sleep Mode ML N4000 will not go into sleep mode as long as there is activity on this channel Off Source Physical...

Page 92: ...6 is activated Alias is also changed If the A2L contains multiple transport layer descriptions select the layer from the appearing window You can change this selection afterwards via the drop down lis...

Page 93: ...on is displayed via the Traffic light for the bus load 7 If angle synchronous RPM dependent event channels are used select the Engine RPM 8 which influences the bus load calculation Configure the leve...

Page 94: ...ow for the event channel column or Highlight one or multiple rows and right click to activate these signals simultaneously for one event channel Select signals for the polling measurement mode Click A...

Page 95: ...er Status of the signal definition file 10 displays the current state of the file and changes its state by clicking not generated saved on ML N4000 saved encrypted on ML N4000 not saved on ML N4000 If...

Page 96: ...ions the XCP recording provided it is activated starts and stops automatically at the beginning or ending of the data recording in online mode or HDD mode Configure triggers On the header of the desir...

Page 97: ...a reduced A2L file and save it optionally encrypted on the ML N4000 Create and encrypt the signal definition file by selecting the check boxes under MDF Export of signals Add additional signals 4 to t...

Page 98: ...a This category consists of the following elements Overview of the configured event channels Timeout values changeable FlexRay buffer configuration partly changeable Mapping of the FlexRay buffers to...

Page 99: ...basic structure of the function 1 Insert the algorithm that corresponds with the ECU Define the Input data 2 to test the function Click Execute function 3 The XORAYASuite calculates the output data k...

Page 100: ...apshots Button interface Event Settings Setting Description Default Enable Turn on logging for this channel On Alias Freely selectable channel name event Bus ID Additional ID for subsequent evaluation...

Page 101: ...gger conditions that write custom event messages Configure triggers Click Add trigger 1 Select the desired Trigger type 2 Create a single condition or multiple combined conditions for this trigger Cre...

Page 102: ...gered by the following trigger types Each trigger type is assigned a channel of the button interface as follows Connections and controls trigger_button Pressing the trigger button B wake_line Signal a...

Page 103: ...Rising edge Wake ML N4000 wakes up from sleep mode as soon as there is activity on this channel On Debounce time Bridging time in s to prevent undesired multiple events when a trigger is raised 1000 A...

Page 104: ...mes for easier handling Settings 1 Add signal manually 4 Refresh signals 2 Edit signal 5 Configured signals 3 Delete signal 6 Signal selection Select the desired signals from 6 to add them to the list...

Page 105: ...of system settings to verify which licences are activated for your ML N4000 Versions Add signal processing Click Add signal processing 2 Select the desired signal processing type The following signal...

Page 106: ...cify the Interval Click Save signal processing 1 The log signal processing is stored on the ML N4000 Interval of the log signal processing If you specify an interval the last measured value of the sig...

Page 107: ...e text boxes i e Number of classes Begin End Width and Span width you would like to specify or Select Automatic to create classes of constant width uniformly over the entire value range Complete all a...

Page 108: ...signal processing 4 Signal 2 The compound signal processing corresponds to a combined count signal processing for two signals and is processed by the XORAYASuite as a two dimensional matrix Therefore...

Page 109: ...ocessing 2 Delete signal processing Edit signal processing Select the signal processing in the list 1 Click Edit signal processing 3 or Right click the signal processing and then click Edit signal pro...

Page 110: ...down Logger Shut down logger without wake up Create Snapshot Snapshot Add trigger On the header of the desired trigger action click Add trigger 1 Select the desired Trigger type 2 Create a single cond...

Page 111: ...figuration or one or all interfaces to their factory defaults or Press the default button D for at least 3 seconds to reset all ML N4000 settings Connections and controls The ML N4000 goes into idle s...

Page 112: ...as the ML N4000 is fully autonomous in this mode HDD logging may still be started and stopped from the PC Simultaneous recording modes Both modes can be operated in parallel but separately controlled...

Page 113: ...mats Acoustic warning or executing a script if a bus error is detected Buses to be recorded Colour assignments for the interfaces Signal description Signal description settings Load configuration temp...

Page 114: ...line logging 10 Trigger acoustic signal to identify ML N4000 3 Start Hdd logging 5 Set Trigger for later evaluation Online logging information is distributed over several tabs The following table desc...

Page 115: ...ignals Monitoring of defined signals Signal selection Context menu Show or hide columns Hide selected signals Save load and delete signal lists Send Send user defined CAN RS 232 or Ethernet UDP messag...

Page 116: ...column Timediff is displayed when you set the Timemasters on a particular record This column contains the time difference of each record to the Timemaster Represent data in graphical form Click Displa...

Page 117: ...K Connections and controls Optionally Connect a XORAYA ESU to the corresponding interface I Turn on the ML N4000 Start the HDD recording by pressing the trigger button B on the ML N4000 Data received...

Page 118: ...Disk The session size exceeds the maximum size specified In this case the current session is closed and a new session for the current measurement starts Sessions are closed under the following condit...

Page 119: ...link This file contains information about the included log interfaces and references to the corresponding binary files File Format Meaning name dli ASCII Master file Contains information about log in...

Page 120: ...nload tool of the XORAYASuite Starting Connect to the desired ML N4000 Connecting the ML N4000 or Connect to a USB flash drive that contains recorded measurements or Connect to a directory on your PC...

Page 121: ...enable disable time groups or eject the USB flash drive automatically after disconnecting Colour assignments for the interfaces Manage logger favourites Favourites Change temporary download folder Whe...

Page 122: ...t menu Select all or Select none Sessions and Measurements tabs Calendar tab Time range tab Sessions Measurements You can show and hide the Sessions tab in the settings Select the check boxes in the S...

Page 123: ...ick the single arrows d to jump one day or one week forward or backward Click the double arrows e to jump three days or three weeks forward or backward Click the graphical representation of a measurem...

Page 124: ...c Use the arrows d optionally to apply the start date or to jump one day forward or backward Specify the end time e Click Apply f Limit the time range further by clicking and dragging inside the graph...

Page 125: ...log data Click Start download 3 or In the Download menu click Start The selected sessions or measurements are transmitted to the PC 3 Stop download from logger 7 Show download statistics 6 Open last u...

Page 126: ...and analysis of records No ML N4000 connection is necessary to do this Start the Viewer tool of the XORAYASuite Starting The subsequent view is divided into four panels which can be resized at will Da...

Page 127: ...nu click Open and select the DLI file or Drag and drop the DLI file from the Windows Explorer into the Data panel Display recently opened measurements Click the arrow behind Open measurement 1 or In t...

Page 128: ...with date 100 nanoseconds or standard Show or hide columns Draw record signal in the Graphic tab of the Graphical output panel Graphic Timemaster An additional column Timediff is displayed when you s...

Page 129: ...her scrolling is by row numbers or time Right click 1 to specify how many rows or how much time is scrolled per click on the double arrow buttons 2 Left click the single arrow buttons 3 to move only o...

Page 130: ...displays information about active measurement and search results Tabs Info Detail Search Trace Signals Comment Info This tab displays general information about all records for the open measurement 1 S...

Page 131: ...Raw data 4 Raw data values Right click anywhere on the white or green background part of the user interface to select whether the underlying raw data 2 is also displayed alongside the data 1 Right cl...

Page 132: ...in the following panels and tabs Information panel Signals tab Search filter and export panel Browse tab Search filter and export panel Find tab 1 Search condition 4 Go to next search result 2 Go to s...

Page 133: ...ious 12 Manage signal lists 5 Search box 13 Show signal details 6 Find next 14 Signals overview 7 Draw selected signals 15 Signal details 8 Previous Add signals to signals overview 14 Click Signal des...

Page 134: ...ing the Shift key or the Ctrl key Click Draw selected signals 7 to display the graphical representation in the Graphic tab Graphic Search message in open log data In the signals overview 14 select the...

Page 135: ...Add new signal list 16 Add signal to signal list Select the signal list 15 Select the signal in the signals overview 14 Click Add signal to list 17 Delete signal from signal list Select the signal in...

Page 136: ...ponding records in the Data panel In addition you can manage the bookmarks list 1 Previous 11 Search message by payload 2 Next 12 Search message by Interface ID and payload 3 All since cursor 4 Paste...

Page 137: ...the next record that meets the desired search condition Select search criteria from the tabs 7 to 12 or Select the corresponding criterion from the drop down list 6 Specify the search condition or Cl...

Page 138: ...it in the Data panel and select the appropriate option Use the Browse tab to navigate between bookmarks or to delete them Event This tab displays all events generated by the user or by the ML N4000 it...

Page 139: ...lect the Field 1 that you would like to add to your search Select the Relation 2 between field and value Specify the Value 3 Depending on the field this is either presented as a text box or as a drop...

Page 140: ...Cancel search Click Cancel 9 Interface Use this tab to filter the displayed records in the Data panel 1 Start 5 Select FlexRay IDs 2 Cancel 6 Interfaces 3 Filter region 7 Interface channels 4 Select C...

Page 141: ...he desired filter Click Start 1 Records in the Data panel are filtered Cancel filter Click Cancel 2 Export Use this tab to export the records to various output formats 1 Export settings 3 Source regio...

Page 142: ...Period before and after raised triggers Pre post triggers If this option is selected you can double click to change the time period before and after a trigger is raised Default values are configured...

Page 143: ...Overview This tab displays the timeline of the opened measurement Icons represent events bookmarks and search results You can also specify a Fine zone to filter the records to display and export Set...

Page 144: ...a record of the interface channel that you would like to see in graphical format Data Point to Draw signal Select the desired value The time curve of the value is displayed graphically Graph View Repe...

Page 145: ...4000 to the PC Turn on the ML N4000 Start the Statistic tool of the XORAYASuite Starting Connect to the desired ML N4000 Connecting the ML N4000 1 Release connection to logger 4 Minimise view 2 Freeze...

Page 146: ...he current state of the statistic display Freeze statistic Continue statistic Display remote statistic counter Statistic since the start of the tool and connection to the ML N4000 Display local statis...

Page 147: ...o this Start the Convert tool of the XORAYASuite Starting 1 Add DLI file to list 6 Open selection in Viewer 2 Remove selected DLI files from list 7 Export settings 3 Move selection up 8 Output formats...

Page 148: ...og files in the Viewer tool Select one or multiple rows in the list by using the Shift and Ctrl key Click Open selection in Viewer 6 Select or deselect log files in the list Select the relevant check...

Page 149: ...og files are converted 9 Cancel convert 10 Open result DLI file Cancel conversion Click Cancel convert 9 or In the Convert menu click Cancel Open converted files After the successful conversion click...

Page 150: ...are Update tool of the XORAYASuite Starting Connect to the desired ML N4000 Connecting the ML N4000 1 Release connection to logger 3 Open SWU XSWU file 2 Start Hdd logging 4 Launch firmware update Per...

Page 151: ...he last ML N4000 configuration 5 Reset software Repeat the firmware update If the update fails click button 5 to reset the user interface to the initial state Activate licences Activating and updating...

Page 152: ...e XORAYAToolkit a collection of commands optimised for script oriented application Connect the ML N4000 to the PC Connecting the ML N4000 to the PC Turn on the ML N4000 Start the TK Commandline tool o...

Page 153: ...ddErase Deletes sessions from ML N4000 or formats the storage medium XHddLog Starts stops data recording in HDD mode or sets a snapshot XConfig Reads overwrites the ML N4000 configuration or compares...

Page 154: ...required 5 14 1 Changing the numbering system For numerical values in text boxes you can switch the display between three numbering systems Already entered values are converted accordingly if possibl...

Page 155: ...in the bottom row of a byte 1 once or twice to set the desired bit to 0 or 1 Highlight an X in the top row of a byte 2 and enter one hexadecimal digit to specify the half byte Highlight XX in the top...

Page 156: ...ick Browse for folder 3 to select the Path Path is not available in the Configuration tool because the settings are saved on the ML N4000 itself Enter the desired Filename Special attributes You can a...

Page 157: ...eck the settings of the selected output format 3 Filter the exported interface channels 4 Special attributes You can also separately change the original filename for each export filter by means of spe...

Page 158: ...ter a name in the text box Export settings 8 Click Save this export setting 9 Load export setting Select the desired export setting in Export settings 8 Delete export setting Select the desired export...

Page 159: ...ge signal lists 3 Sort by ID 9 Show signal details 4 Find previous 10 Signals overview 5 Search box 11 Signal details 6 Find next Add signals to signals overview 10 Click Signal description settings 1...

Page 160: ...lick Add this signal 7 Manage signal lists 8 is activated 8 Manage signal lists 13 Add signal to list 10 Signals overview 14 Delete signal from list 11 Signal lists 15 Find signal 12 Add new signal li...

Page 161: ...list 11 in the signals overview 10 Select the signal in the signal list 11 Click Find signal 15 Storage location for signals signals overview and signal lists Added signals are stored on the connected...

Page 162: ...line Logging and Viewer Here load description files and assign them to signal groups Supported description file types DBC LDF FIBEX XML A2L AUTOSAR ARXML 1 Add new signal group 6 Interface alias 2 Clo...

Page 163: ...onditions are met Signal list Raise trigger if the ML N4000 detects one of these signals on the data buses Value compare 1 Apply trigger 7 Parenthesise selection 2 Cancel trigger configuration 8 Clear...

Page 164: ...e rules of Boolean algebra the AND operator precedes the OR operator You can influence precedence by parentheses Add parentheses Click the desired conditions and operators to mark them blue Click Pare...

Page 165: ...lick Apply trigger 1 The value compare trigger is stored on the ML N4000 Signal list 1 Apply trigger 2 Cancel trigger configuration Add signal list trigger Select the check boxes of the desired signal...

Page 166: ...er an area to zoom in Double click to jump to the corresponding period in the Data panel of the Viewer tool Click the timeline 2 to display arrows which allow you to move in small steps to the left 3...

Page 167: ...nts the left clicked position Change the visibility of the green time pointer which represents the right clicked position Connect the graph points as lines curves stairs or do not connect Draw the gra...

Page 168: ...g XAA GNLog RS 232 Event System DLT Autosar V4 0 DLT DLT Event System System Events TXT Event System Raw for RS232 RawSocket RAW RS 232 RawSocket Event CSV for Analog CCP PSI5 CSV DiagCCP DiagXCP CSV...

Page 169: ...Write debug information Off ShowSystem Write messages of the system interface Off ShowMediaConfig Write entire configuration of the interface channels On ShowFormatDescription Show basic message stru...

Page 170: ...ocessing by CARMEN Off UseEcosCompatMode Do not write falling edges of button triggers possibly desired for compatibility reasons Off WriteOneFilePerInterface Write one file for each interface channel...

Page 171: ...100 Extension x File extension raw TimestampPrefix Write timestamp prefix for each message Off AllowMarker Write events as markers Requirements TimestampPrefix must be On Event interface must be enabl...

Page 172: ...efault DoJPEG Write images in JPEG format On DoMPEG Write videos in MPEG 2 format On DoH264 Write videos in MPEG 4 H 264 format Off 5 15 14 MDF Export Setting Description Default a2l_file_alternative_...

Page 173: ...onnector pins pose a short circuit risk This can lead to abnormal behaviour or destruction of the ML N4000 Likewise devices connected to the measurement setup may be also compromised Make sure that co...

Page 174: ...Do not operate the ML N4000 outdoors Do not operate the ML N4000 outside the specified temperature range Turn off the ML N4000 and disconnect it from the power supply before you start cleaning Observe...

Page 175: ...enance and repairs be required Upon malfunction or defect return the ML N4000 without any accessories to X2E GmbH You can find the address on page 2 of this manual Before submission please take the fo...

Page 176: ...2 Transport Transport the ML N4000 only in the original packaging 7 3 Disposal Please observe local legal requirements should you need to dispose of the ML N4000 Within the European Union the disposa...

Page 177: ...m 6 to 32 V Current consumption 12 V standard configuration everything connected PCAPs are charged max 1 A PCAPs are not charged max 3 3 A until about 10 s after power on Standby current consumption M...

Page 178: ...w the external view of the ML N4000 contacts 8 2 1 4x CAN D SUB9 M Pin Function 1 CAN 3 Low 2 CAN 1 Low 3 CAN 4 Low 4 CAN 2 Low 5 CAN 3 High 6 CAN 4 High 7 CAN 1 High 8 CAN 2 High 8 2 2 2x FlexRay D S...

Page 179: ...APPENDIX 179 8 2 4 8x RS 232 3M 10220 5212 PL 2x spacer bolt 3M 3341 31 Pin Function 1 RX 8 2 TX 8 3 RX 7 4 TX 7 5 RX 6 6 TX 6 7 RX 5 8 TX 5 9 RX 4 10 TX 4 11 GND 12 TX 1 14 RX 1 16 TX 2 18 RX 2 19 R...

Page 180: ...tion 1 CH 2 P 2 CH 2 N 3 GND 4 CH 4 P 5 CH 4 N 6 CH 1 P 7 CH 1 N 8 GND 9 CH 3 P 10 CH 3 N 11 CH 6 P 12 CH 6 N 13 GND 14 CH 8 P 15 CH 8 N 16 CH 5 P 17 CH 5 N 18 GND 19 CH 7 P 20 CH 7 N 21 CH 10 P 22 CH...

Page 181: ...USER MANUAL APPENDIX 181 8 2 6 Power trigger wake Pin Function A1 GND A2 VIN 2 Wake 3 Trigger Wake GND 4 Trigger...

Page 182: ...the right one or more connectors in the measurement environment or to the power supply Figures always show the external view of the contacts The sign is a placeholder for the number of the respective...

Page 183: ...x2 Pin Function 2 FR BM A 3 GND 4 FR BM B 7 FR BP A 8 FR BP B Pin Function 2 FR BM A B 7 FR BP A B 8 3 3 7x LIN x9 Pin Function 1 LIN 1 2 LIN 2 3 LIN 3 4 LIN 4 5 GND 6 LIN 5 7 LIN 6 8 LIN 7 9 VBAT Col...

Page 184: ...RS 232 x8 Pin Function 1 RX 8 2 TX 8 3 RX 7 4 TX 7 5 RX 6 6 TX 6 7 RX 5 8 TX 5 9 RX 4 10 TX 4 11 GND 12 TX 1 13 GND 14 RX 1 16 TX 2 18 RX 2 19 RX 3 20 TX 3 Pin 11 connected to pin 13 within the cable...

Page 185: ...USER MANUAL APPENDIX 185 8 3 5 Power trigger wake x5 Pin Function A1 GND A2 VIN 2 Wake 3 Trigger Wake GND 4 Trigger Colour Function Black GND Red VIN Yellow Wake Black Trigger Wake GND Green Trigger...

Page 186: ......

Page 187: ......

Page 188: ......

Page 189: ......

Page 190: ...X2E GmbH Grosse Ahlm hle 19 76865 Rohrbach GERMANY Phone 49 6349 99599 200 E mail xoraya x2e de Internet www x2e de Wiki wiki x2e de...

Reviews: