WHS200
Cloud IP Camera
Quick Start Manual
Package Contents
In a the package, there are
two poly form containers,
you will find:
WHS200 camera (qty. 1)
power adapter (qty. 1)
antenna (qty. 1)
brackets (qty. 2)
bolts (qty. 2)
nut (qty. 1)
wall anchors with screws
(qty. 2).
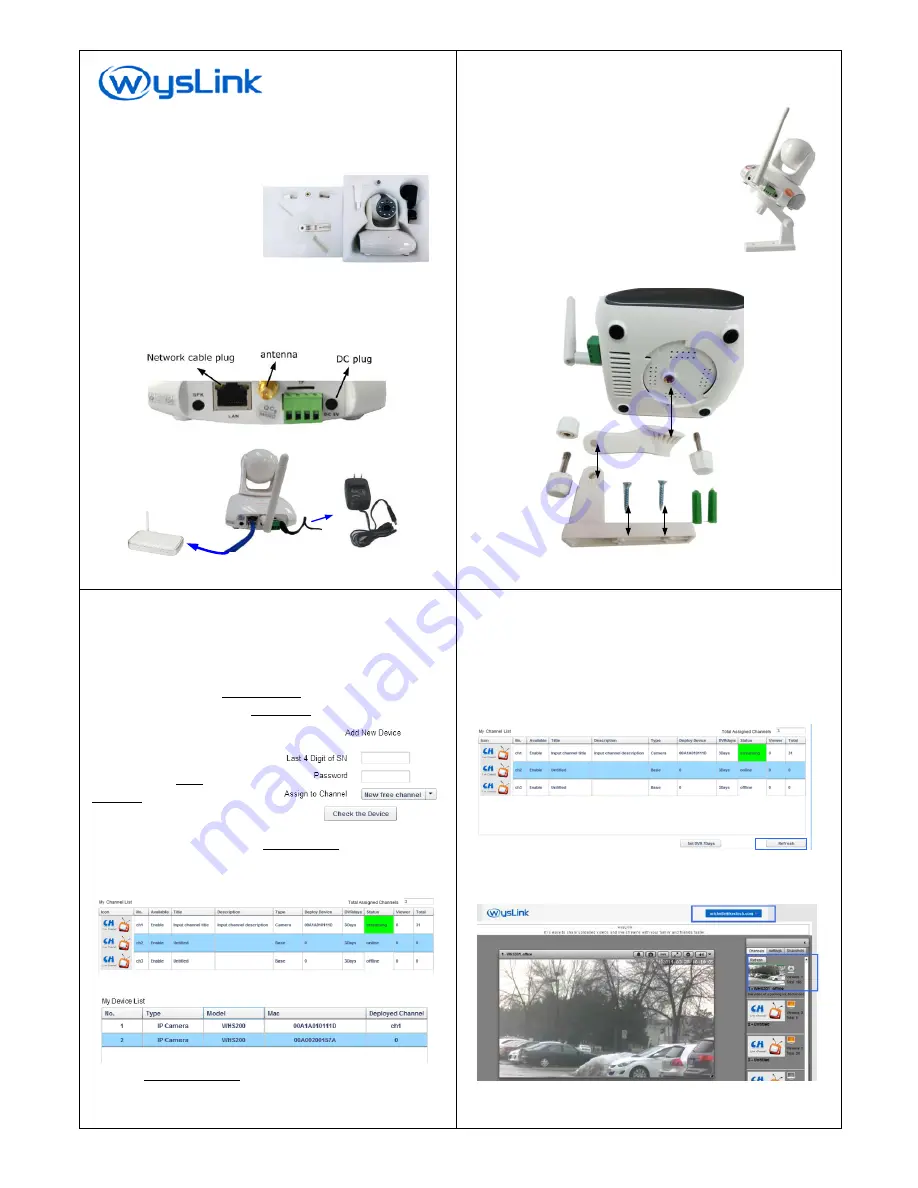
Camera Connection
1.
Install the antenna on the camera.
2.
Plug one side of a network cable into the LAN port on rear panel
and the other side into your router.
3.
Connect the provided 5VDC power adapter to the camera.
Power Adapter
Router
1/8
Camera Mounting
WHS200 is able to be mounted on the wall.
Mounting steps are:
1.
Mount bracket 1 on the wall using two wall
anchors with screws;
2.
Set WHS200 on bracket 2 using blot 2;
3.
Fix bracket 2 on bracket 1 using blot 1 and
nut;
4.
Adjust the angle of bracket 1 and bracket
2 to find a proper direction.
blot 1 & nut
bracket 1
blot 2
bracket 2
wall anchors with
screws
2/8
Camera Registration on wysLink.com
Please register your IP camera on wyslink.com following the next
steps.
1.
Create an account
on www.wysLink.com and activate it. If
you already have a wysLink account, please ignore this step.
Then log in and enter Channel Editor.
2.
In Channel Editor, click the Edit Device button.
Add Your Device
:
Input the last 4 digit of S/N and
Password to find your camera.
S/N: HS201311E023
Password is printed on the label.
3.
Now, your camera is listed in My Device List.
Assign Your Device to a Channel
:
(omit this step if it is directly assigned to a
channel already at step 2 )
Click an available channel that is not assigned to other devices.
Click your camera row to select it.
Then click Assign to Channel button to put this camera into your
selected channel.
3/8
Watch Live Video
After registration, please connect your camera with network, then
power on.
1.
After power on your camera, please wait about 30 seconds.
2.
Click
Refresh
button below My Channel List.
3.
When the channel status displays “
streaming
”, your camera
streams live video to your channel,.
4.
Click your account dropdown list at the top-right corner of the
webpage and then click
My Stage
. Now you enter your stage.
5.
Click your channel icon. You can watch your video on stage.
4/8


