WolfPack8x8
8x8 HDMI 2.0 Matrix with Audio Matrix
All Rights Reserved
Version:
_2019V1.0
User Manual
Page 1: ...WolfPack8x8 8x8 HDMI 2 0 Matrix with Audio Matrix All Rights Reserved Version WolfPack8x8_2019V1 0 User Manual...
Page 2: ...FCC Statement This equipment generates uses and can radiate radio frequency energy and if not installed and used in accordance with the instructions may cause harmful interference to radio communicati...
Page 3: ...ure or install this product near water Do not put any heavy items on the extension cable in case of extrusion Do not remove the housing of the device as opening or removing housing may expose you to d...
Page 4: ...7 6 Panel Button Control 8 6 1 I O connection switching 8 6 2 I O connection Inquiry 8 6 3 LOCK Function 8 6 4 PRESET RECALL Function 8 6 5 CLEAR Button 9 7 IR Remote Control 10 8 GUI Control 11 8 1...
Page 5: ...mands 23 9 3 2 Control Management 23 9 3 3 Query Commands 25 9 3 4 Lock unlock Commands 29 9 3 5 Audio Commands 29 9 3 6 HDCP Compliance 30 9 3 7 EDID Management 31 9 3 8 CEC Control 34 10 Firmware Up...
Page 6: ...wide range of video sources The matrix switcher not only supports bi directional IR RS232 extension but also has IR RS232 and TCP IP control options 1 1 Features 8x8 HDMI 2 0 Matrix Switcher Supports...
Page 7: ...x level SNR 90dB 20Hz 20KHz bandwidth Crosstalk Isolation 70 dB 10 kHz sine at 0 dBFS level or max level before clipping Noise 90dB Analog Audio Output Output 8 Analog L R Audio Output Connector 8 L R...
Page 8: ...5 General Transmission Distance 4K 60Hz 444 5m 4K 60Hz 420 10m 1080P 15m Bandwidth 18Gbps Operation Temperature 5 55 Storage Temperature 25 70 Relative Humidity 10 90 External Power Supply Input AC 10...
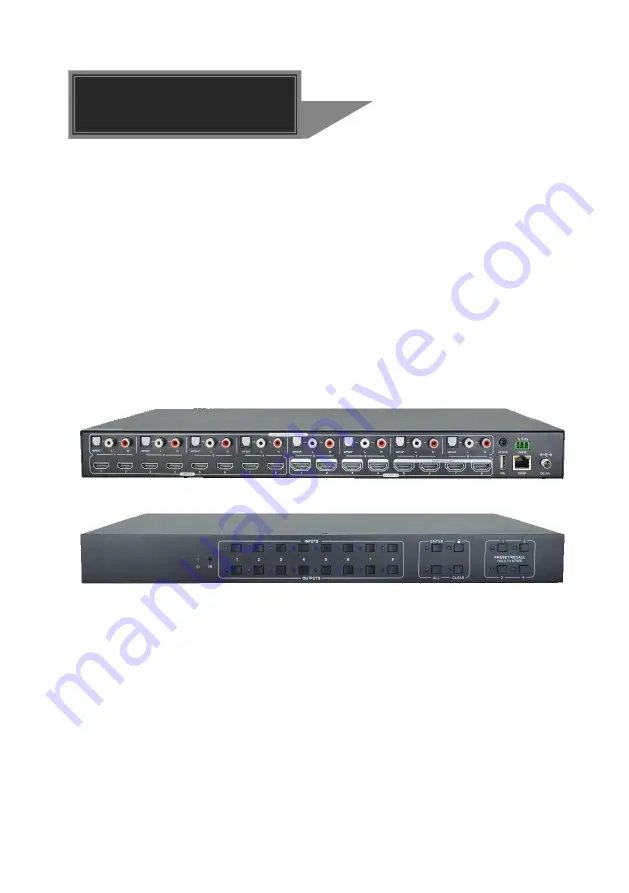
Page 9: ...ss one of buttons to switch input source Total 8 output selector buttons press the buttons to select output channel ENTER button Confirm operation LOCK button Press this button for 3 seconds to lock u...
Page 10: ...e embedded HDMI audio 8 in total L R RCA audio output ports for de embedded HDMI audio 8 pairs in total IR IN IR IN Connects with external IR receiver for using the IR remote to control the Matrix Swi...
Page 11: ...e 1080p Specs 1 3840x2160 60 4 4 4 Support 1080p 60Hz 4 4 4 2 3840x2160 30 4 4 4 Support 1080p 30Hz 4 4 4 3 3840x2160 24 4 4 4 Support 1080p 24Hz 4 4 4 4 3840x2160 60 4 2 0 Support 1080p 60Hz 4 4 4 5...
Page 12: ...components and accessories included before installation System should be installed in a clean environment with proper temperature and humidity All of the power switches plugs sockets and power cords s...
Page 13: ...on is done then it will be off If the conversion failed they will be off immediately 6 2 I O connection Inquiry Press OUTPUTS button 1 2 3 4 5 6 7 or 8 to inquiry its corresponding input and then the...
Page 14: ...2 0 Matrix with Audio Matrix 9 6 5 CLEAR Button Please press the CLEAR button if want to withdraw an operation before the ENTER button comes into effect meanwhile the matrix will return to the previou...
Page 15: ...channel selection buttons same with the corresponding front panel buttons Menu buttons ALL Select all inputs outputs To convert an input to all outputs Example Input 1 to all Outputs Press INPUTS 1 AL...
Page 16: ...a TCP IP The default IP settings are IP Address 192 168 0 178 Subnet Mask 255 255 255 0 Type 192 168 0 178 in the internet browser it will enter the below log in webpage Username admin Password admin...
Page 17: ...clicking the button on the Input 1 row and Output 1 column directs input 1 to output 1 Use the 6 numbered buttons under scene area to save and load layout presets To save a given layout first click on...
Page 18: ...PDIF 1 Analog 1 Audio on Input 1 Audio on Input 2 Audio on Input 3 Audio on Input 4 Audio on Input 5 Audio on Input 6 Audio on Input 7 Audio on Input 8 Audio on Output 1 Audio on Output 2 Audio on Out...
Page 19: ...trix with Audio Matrix 14 2 Audio Volume Eight pairs analog L R audio to control their outputs volume 8 3 Configuration Tab 1 EDID Copy Copy the EDID of the selected output device to one or more input...
Page 20: ...e selected input source Upload user defined EDID by the below steps 1 Prepare the EDID file bin on the control PC 2 Select the User defined 3 Click the box and then select the EDID file bin according...
Page 21: ...ces output display devices support CEC they can be controlled via the following CEC interface 1 Input Source Device Control Select one input source device to be controlled and then press function butt...
Page 22: ...MI2 0 Matrix with Audio Matrix 17 2 Output Display Device Control Select one output device to be controlled and then press function buttons Note It can not control two or more output devices simultane...
Page 23: ...command format can be selected Baud Rate Supports 2400 4800 9600 19200 38400 57600 or 115200 Command Ending NULL CR LF or CR LF can be chosen Command Type the command in this box to control the third...
Page 24: ...8x8 HDMI2 0 Matrix with Audio Matrix 19 8 6 Interface Tab Modify the title bar label Modify the button labels...
Page 25: ...th Audio Matrix 20 8 7 Network Tab Static IP or Dynamic Host Configuration Protocol DHCP Modify the static IP Address Subnet Mask and Gateway 8 8 Access Tab Modify the login password Lock or unlock th...
Page 26: ...the username and password the same as the GUI log in setting modified password will be available only after rebooting to login the configuration interface After that click Administration in the source...
Page 27: ...nding file path 9 2 Basic Settings Firstly connect WolfPack8x8 with necessary input devices and output devices Then connect it with a PC installed RS232 control software Double click the software icon...
Page 28: ...ata bit 8 Stop bit 1 Parity bit none 9 3 1 System Commands Command Function Feedback Example PowerON Power on Power ON Front Panel Unlock PowerOFF Power off Power OFF Name Query the name of matrix MUH...
Page 29: ...o Video Out 01 Analog Out 02 Switch To Video Out 01 Output 02 Switch To In 01 Output 03 Switch To In 01 Output 04 Switch To In 01 Output 05 Switch To In 01 Output 06 Switch To In 01 Output 07 Switch T...
Page 30: ...rate Is 115200 GUI_IP 192 168 0 150 Output 01 Switch To In 01 Output 02 Switch To In 01 Output 03 Switch To In 01 Output 04 Switch To In 01 Output 05 Switch To In 01 Output 06 Switch To In 01 Output 0...
Page 31: ...Switch To Video Out 05 Analog Out 07 Volume Mute Analog Out 07 Volume 46 Audio Out 08 Switch To Video Out 05 Analog Out 08 Volume Mute Analog Out 08 Volume 75 IN 1 2 3 4 5 6 7 8 LINK Y Y Y Y Y Y Y Y...
Page 32: ...n 03 Output 06 Switch To In 06 Output 07 Switch To In 04 Output 08 Switch To In 07 STA_HDCP Query current using HDCP model of all output ports 01 08 represents output port 1 8 OUT 01 HDCP PASSIVE OUT...
Page 33: ...Out 01 In 01 Out 02 In 04 Out 03 In 05 Out 04 In 04 Out 05 In 06 Out 06 In 03 Out 07 In 06 Out 08 In 08 PresetRecall xx Scene recall Preset 09 Recall Output 01 Switch To In 02 Output 02 Switch To In...
Page 34: ...8 input if the yy 09 16 it means de embedded audio from HDMI1 8 output Audio Out 01 Switch To Video Out 05 Audio Out 02 Switch To Video Out 05 Audio Out 03 Switch To Video Out 05 Audio Out 04 Switch...
Page 35: ...means all output ports OUT 01 HDCP MAT Display OUT 02 HDCP MAT Display OUT 03 HDCP MAT Display OUT 04 HDCP MAT Display OUT 05 HDCP MAT Display OUT 06 HDCP MAT Display OUT 07 HDCP MAT Display OUT 08 H...
Page 36: ...ll ports able EDID user defined for all HDMI inputs Note EDID user defined can be used once if switch to another EDID or exit it will not be saved xx U xx U means user defined for built in EDID It can...
Page 37: ...defined EDID Input All EDID Upgrade OK By 09 Internal EDID EDIDGOUT XX Read and print EDID of HDMI output XX 01 08 is the number of the output port EDIDOUT04 EDIDM xx B yy Input port yy follows the E...
Page 38: ...defined when querying it the input port will use the user defined EDID For example send EDID 03 09 EDIDSTA03 and the result is Input 03 EDID From User Define EDID If directly user define the port EDI...
Page 39: ...e CC represents the CEC function type e g 44 Remote control The DD represents the specific command from the table below Control the input source Command Description Command Example and Response CECI A...
Page 40: ...trol the output display device Command Description Command Example and Response CECO AA BB CC 41 Volume up CECO05404441 CEC Output 05 Send Success CECO AA BB CC 42 Volume down CECO05404442 CEC Output...
Page 41: ...eopen the U disk to check the filename READY TXT whether automatically becomes SUCCESS TXT if yes the firmware was updated successfully otherwise the firmware updating is fail the name of upgrade file...
Page 42: ...he input Cannot control the device via front panel buttons Front panel buttons are locked Send command Unlock or select unlock in GUI interface to unlock Cannot control the device via IR remote The ba...
Page 43: ...nection between the control device and the unit Wrong RS232 communication parameters Type in correct RS232 communication parameters Baud rate 9600 Data bit 8 Stop bit 1 Parity bit none Broken RS232 po...
Page 44: ...and tear Use of supplies or parts not meeting our specifications No certificate or invoice as the proof of warranty The product model showed on the warranty card does not match with the model of the...