


DV-07-WIFI
User Guide
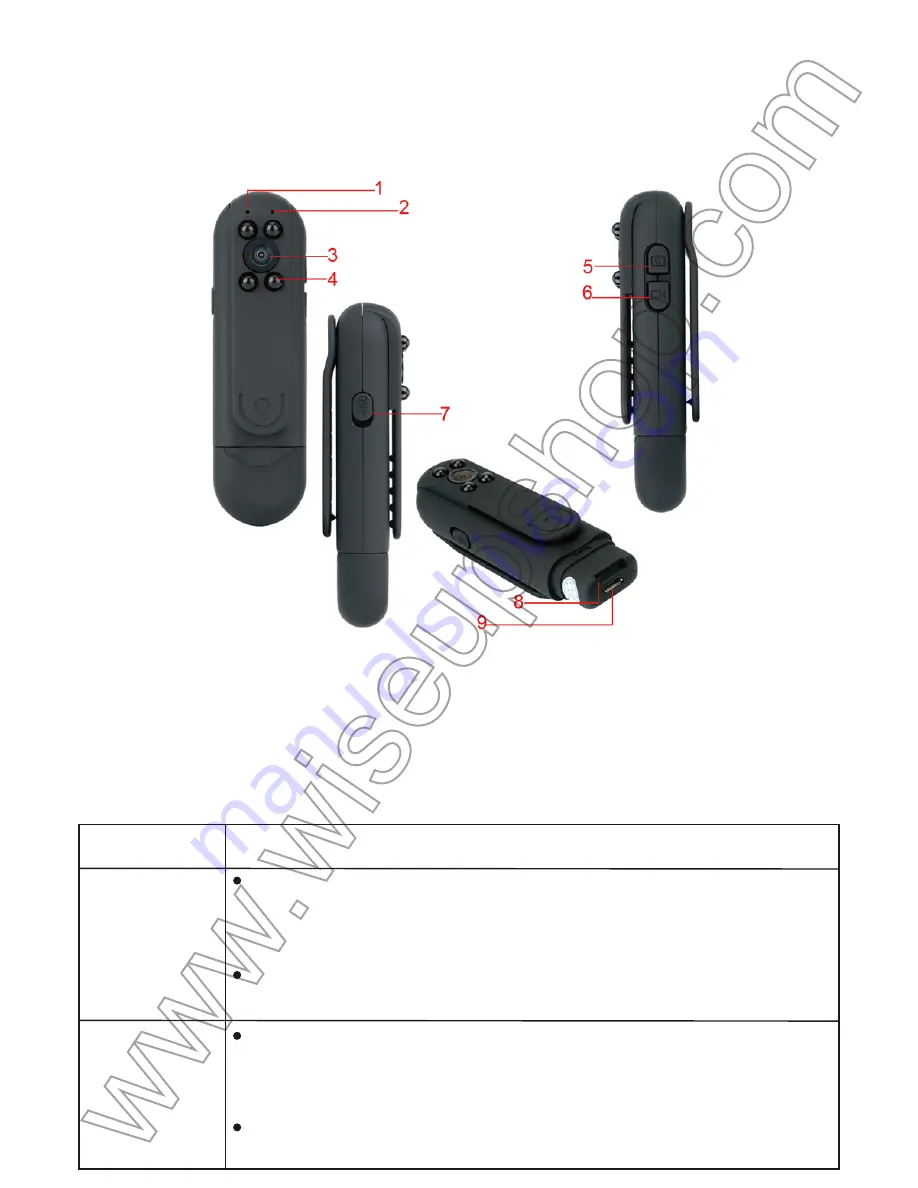
I. Product Overview
1. Red/Blue Indicator Light
2. Microphone
3. Camera Lens
4. IR LEDs
5. Camera Button
II. What’s in the Box
-1×Wifi Network Meeting Camcorder
-1× Card Reader
-1× 3m USB Cable
-1× AC110-230V to DC 5V Charging Adapter
-1× Mini Disc
-1 ×8GB Micro SD Card (fitted into the Micro SD card slot already)
III. Charging
3.1. Connect the camera to an outlet AC power socket by using the charging adapter
and USB cable provided.
3.2. It will take about 4 hours to obtain a full charge. The camera can work 3 hours
on a full charge. The indicator lights will NOT change when the camera battery is
charging or fully charged.
3.3. If you want this camera to work 24/7 days, keep it plugged onto an outlet AC
power socket.
[Note]:
It is normal that the camera becomes hot while it is working or charging.
IV. Network Setup
4.1. Install the “
BVCAM
” APP on your smartphone or tablet PC
4.1.1. Search for “
BVCAM
” in App Store or Google Play and install it on your smart-
phone or tablet PC.
4.2. LAN or P2P Mode Setup
4.2.1. Power on the camera by sliding the power switch to the
ON
position. The blue
and red indicator lights will illuminate for 3 seconds and then off. Waiting for 15 sec-
onds,the blue and red indicator lights will start illuminating for 3 seconds again; the
red indicator light will be off again. Waiting for 8 seconds, the blue indicator light will
stay illuminated while the red one will start flashing, indicating the camera’s WIFI
signal is ready.
4.2.2. Go to the WIFI or WLAN settings on your smartphone or tablet PCand con-
nect to the camera’s WIFI signal. The camera’s WIFI network SSID starts with
“
KD******
” and will appear on your WIFI or WLAN settings page as below.Both red
and blue indicator lights will keep flashing, indicating the camera’s P2P connection
is done.
[Note]:
If the camera’s WIFI signal cannot be found for a long time, press the Reset Button for 5 sec-
onds to reset all settings to factory default. The red and blue indicator lights will be turned off and the
camera will restart automatically in 5 seconds.
4.2.3. Launch the “
BVCAM
” APP.
4.2.4. Add the camera to the application.
For Android: Tap + > Search(Lan) >Tap the camera icon > Tap OK or √.
For IOS: Tap + >Tap Add new online Camera >Tap Search (LAN) >Tap the camera
icon >Tap OK.
4.2.5. If the camera shows “
Online
” on the “
Live video
” page, it means the P2P
(LAN) connection is successful and you can view a live video feed from the camera
in the P2P (LAN) mode.
[Note]:
See the table below for an explanation of the different functions available:
4.3. WAN Mode or Remote View Setup
>>Before the WAN configuration, please confirm that the camera is successfully
added to your smartphone or tablet PC in the P2P (LAN) mode, and the P2P (LAN)
connection works well.
4.3.1. Launch the “
BVCAM
” APP.
4.3.2. Set up the WAN mode or remote view.
Step 1: Tap the setting icon on the “
Live video
” page and select “
Advance Config
”
(IOS: Device Settings).
Step 2:Tap “
WIFI Config
” and select a desired WIFI network to enroll the camera in.
Step 3: Tap “
OK
”to confirm the WIFI configuration.
4.3.3. The camera will reboot automatically.
Check if the WAN mode or remote view setting works!
1. Exit the “
BVCAM
” APP.
2. Go to the WIFI or WLAN setting page on your smartphone or tablet PC and join
to another WIFI network which must be different from the one that the camera is en-
rolled in, or you can use your mobilenetwork.
3. Launch the “
BVCAM
” APP again.If you see the camera is “
Online
” on the“
Live
video
” page, it indicates the WAN mode or remote view setting is successful.Now
you can watch the live video from the camera on your smartphone or tablet PC
remotely as long as you have access to the Internet.
[Note]:
If the WAN mode setup fails, please reset the camera (See VIII) and re-configure it.
V. Motion Detection Setup
>>Make sure that the camera is added successfully to the APP in LAN or WAN
mode.
>>Please make sure theMicro SD card (4GB-64GB) has been formatted already
and is securely fitted into the SD card slot on your camera. A SDHC Class 10 Micro
SD card is recommended.
5.1. Motion Detection Photograph Setup
5.1.1. Launch the “
BVCAM
” APP.
5.1.2. Enable the motion detection function.
Step1: Tap the setting icon on the
“Live video
” page and then choose “
Advance
Config
” (IOS:
Device Settings
)
Step 2:Tap “
Alarm Config
” , choose a desired sensitivity level.
Step 3: Tap “
OK
” to confirm the setting.
5.1.3. The camera will take a screenshot of the live video automatically when a
movement is detected. Go back to the “
Live video
” page and tap “
Alarm
” at the
bottom of the screen to check out the screenshots.
5.2. Motion Detection Video Recording Setup
5.2.1. Tap the setting icon on the “
Live video
” page and choose“
Advance Config
”
(IOS:
Device Settings
).
5.2.2. Tap “
SDCard Record Config
” and select “
Record when Alarms
” (IOS: On
alarm).
5.2.3. Tap “
OK
” to confirm the Motion Detection Video Recording setting.
5.2.4. The camera will start recording video automatically when a movement is de-
tected.Go back to the “
Live video
” page, tap “
Record
” at the bottom of the screen
and then choose “
Remote SD card
”(IOS: ) to check out the video files.
[Note]:
Video Resolution: 1280×720P Video Format: ASF
VI. Recording Video to Smartphone or Tablet PC
>> Before recording, make sure that the camera is added successfully to the APP in
LAN or WAN mode.
6.1. Launch the “
BVCAM
” APP. Tap the camera icon to view the live video.
6.2.Tap the remote video recording button to start or stop recording video.
The video files will be saved in your smartphone or tablet PC flash memory if you are
usingan Android device. However, the video files can only be found in the APP
“
BVCAM
” if you are an IOS device.
6.3. Go back to the “
Live video
” page, tap “
Record
” at the bottom of the screen and
then choose “
Local
” (IOS: ) to check out the video files.
[Note]:
Video Resolution: 1280×720P Video Format: ASF
VII. Recording Video to the Local Micro SD Card
>>Make sure that the camera is added successfully to the APP in LAN or WAN
mode.
>>Make sure theMicro SD card (4GB-64GB) has been formatted already and is
securely fitted into the SD card slot on your camera. A SDHC Class 10 Micro SD
card is recommended.
7.1. Launch the “
BVCAM
” APP.
7.2. Tap the setting icon on the“Live video” page and choose “
Advance Con-
fig
”(IOS:
Device Settings
)
7.3. Select “
SD Card Record Config
” and choose a desired recording mode.
7.4. Tap “
OK
” to confirm the SD card recording setting.
6. Video Recording/Reset Button
7. Power Switch
8. Micro SD Card Slot
9. USB Port
Button Name
FunctionDescription
Camera Button
Video Record-
ing/Reset Button
Taka a Photo: Press the Camera Button once to take a picture and the blue indi-
cator light will flash once. The pictures will be saved in the Micro SD card on the
camera.
Turn On/Off the Indicator Light: Press the Camera Button for 4 seconds to turn
on or off the indicator lights.
Record Video: Press the Video Recording Button once to start recording video
and the blue indicator light will flash slowly. The video files will be saved in Micro
SD card on the camera.
Reset the Camera: Press the Reset Button for 5 seconds to reset all settings to
factory default.
7.5. Check out the video files. (See 5.2.2)
VIII. Resetting
If for any reason the camera stops working or isn’t working properly, a reset will
restore it back to normal operation.
Operation:
When the camera is powered on, press the Reset Button for 5 seconds
to reset all settings to factory default. The camera will reboot automatically with de-
fault settings in 5 seconds.
IX. Change the Camera’s Password
>>Please confirm that the camera is successfully added to the APP in the P2P (LAN)
mode, and the P2P (LAN) connection works well.
9.1. Launch the APP “
BVCAM
”.
9.2. Tap the settings icon on the “Live video” page,choose “
Advance Config
” (IOS:
Device Settings
), and then click “
Change P2P access password
” (IOS:
Change
password
).
9.3. Enterthe user default password “
8888
”. Input a new password and confirm it,
then tap “
OK
” to save the change.
Check if the new password works!
1. Go back to the “
Live video
” page, tap the setting icon and delete the current
camera.
2. Follow 3.2.3 to add the camera again. Don’t forget to type the new password
before tapping “
OK
” or “√” to add the camera.
3. If the camera shows “
Online
”, it means the password has been changed success-
fully. If the camera shows “
password mistake
”, it means you input a wrong pass-
word.
Frequently Asked Questions
Q: What kind of memory card can I use in this camera?
A:You are recommended to use a SDHC Class 10 Micro SD card (4GB-64GB). If a
memory card does not work, remove and format it on a PC computer before trying it
in thecamera again.
Q: Why can’t I find the camera’s WIFI signal on my smartphone or tablet PC?
A: Recharge the camera. Or reset the camera to factory default (See VIII).
Q: Why can’t I play back video files or it shows the video files are corrupted?
A: It is mainly because the camera is powered off inappropriately.
Q: What media player software should I use to play back the video files on my
computer?
A: Click the link: http://www.videolan.org/vlc/index.html to download and install VLC
player to play back video files on your computer.
Q: How do I reset my camera back to the way I got it?
A:Reset the camera to factory default. (See VIII)
Summary of Contents for DV-07-WIFI
Page 81: ...DV 07 WIFI I 1 2 3 4 LED 6 7 8 SD 9 USB SD 4 SD 5...
Page 84: ...IOS IP LAN OK 4 2 5 P2P LAN P2P LAN...
Page 85: ......
Page 88: ...2 3 OK 5 1 3...
Page 89: ...5 2 5 2 1 IOS 5 2 2 SD IOS 5 2 3 OK 5 2 4 SD IOS...
Page 90: ...1280 720P ASF VI PC LAN WAN APP 6 1 BVCAM APP 6 2 Android PC IOS BVCAM APP...
Page 91: ...6 3 IOS...
Page 93: ...7 5 5 2 2 VIII 5 5 IX P2P LAN APP P2P LAN 9 1 BVCAM APP 9 2 IOS P2P IOS 9 3 8888 OK...
Page 94: ...1...
Page 95: ...2 3 2 3 OK...