background image

English _

9

INST
ALLA

TION & CONNECTION

installation & connection

INSTALLATION


J


`

This camera is waterproof and in compliance with the IP66 spec, but the jack connected to the external cable is not. You are 

recommended to install this product below the edge of eaves to prevent the cable from being externally exposed.

Precautions before installation

Ensure you read out the following instructions before installing the camera:


It must be installed on the area (ceiling) that can withstand 5 times the weight of the camera including the 

installation bracket.


Stuck-in or peeled-off cables can cause damage to the product or a fire.


For safety purposes, keep anyone else away from the installation site. 

And put aside personal belongings from the site, just in case.


If excessive force is used while installing the product, the camera may be damaged due to malfunction. 

Forcing assembly using non-compliant tools may damage the product.  

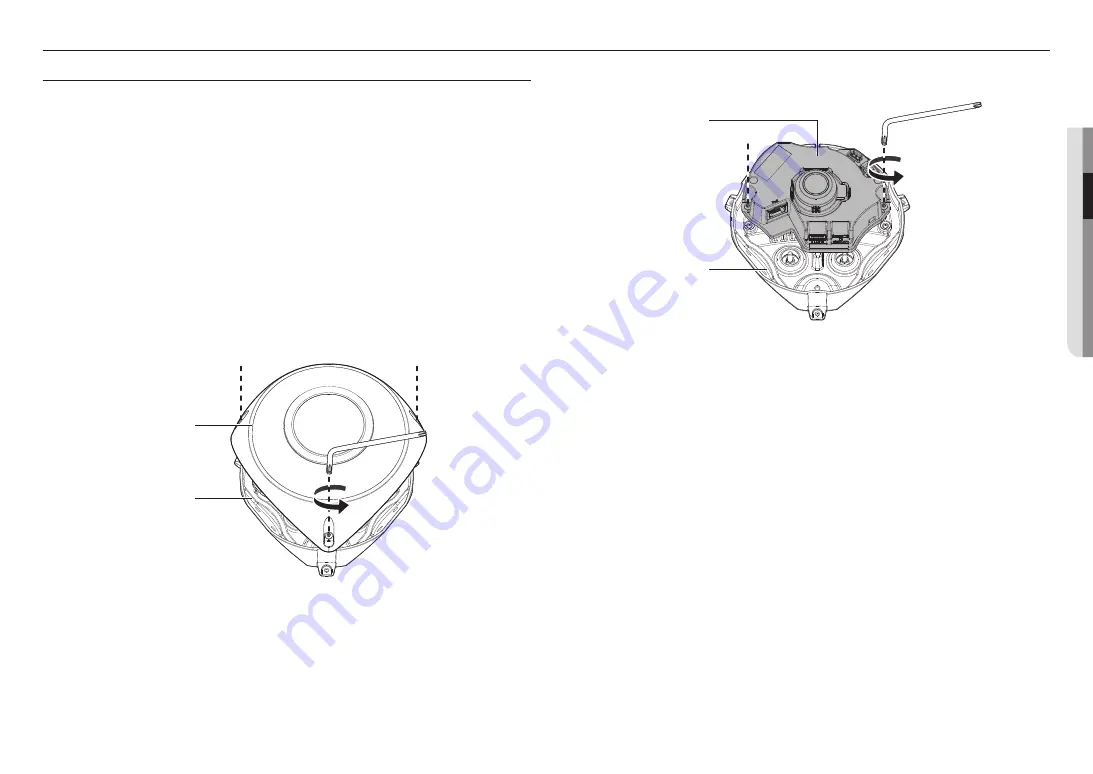
Disassembling

1. 

Using the provided Torx L wrench, turn the 3 screws counterclockwise to release the top cover.

Top Cover

Camera case

2. 

Using the provided Torx L wrench, turn the 2 screws that secure the camera module counterclockwise to 

release the camera module.

Camera case

Camera module

Summary of Contents for TNV-8010C

Page 1: ...NETWORK CAMERA User Manual TNV 8010C...

Page 2: ...correctness of the contents in this document but no formal guarantee shall be provided Use of this document and the subsequent results shall be entirely on the user s own responsibility Hanwha Techwin...

Page 3: ...roduct the camera may be damaged and malfunction If you forcibly install the product using non compliant tools the product may be damaged 18 Do not install the product in a place where chemical substa...

Page 4: ...e outside plant The wired LAN hub providing power over the Ethernet PoE in accordance with IEEE 802 3af shall be a UL Listed device with the output evaluated as a Limited Power Source as defined in UL...

Page 5: ...P 17 17 Connecting the Camera Directly to Local Area Networking 17 Connecting the Camera Directly to a DHCP Based DSL Cable Modem 18 Using Device Manager 18 Automatically searching camera 18 Configuri...

Page 6: ...Safari version 11 0 1 or later The video play performance of the web viewer depends on the performance of the user s CPU and GPU RECOMMENDED MICRO SD SDHC SDXC MEMORY CARD SPECIFICATIONS Recommended c...

Page 7: ...ion to a portable display device CAUTION Be ware of the Rated Voltage and Polarity of the power connection Torx L wrench 1 Used to assemble disassemble the top cover and camera module Audio alarm cabl...

Page 8: ...o c Reset Button The button restores all camera settings to the factory default Press and hold for about 5 seconds to reboot the system J If you reset the camera the network settings will be adjusted...

Page 9: ...the camera including the installation bracket Stuck in or peeled off cables can cause damage to the product or a fire For safety purposes keep anyone else away from the installation site And put aside...

Page 10: ...n or ejection of a Micro SD card is not recommended Disassembly of the product cover should be finished within 5 minutes or there will be the risk of internal dew condensation Removing the Micro SD ca...

Page 11: ...ideration of the direction to monitor 90mm 3 5 inch 110mm 4 3 inch Installing the network cable 2 Pull off the extruded parts of the cable bushing to be used 3 Use the cap installer to route the netwo...

Page 12: ...udio alarm cable to the camera case 6 Secure the camera case using 5 mounting screws When mounting the camera case tidy up the cables to avoid them from being damaged or pinched Mounting screws separa...

Page 13: ...ed Camera Camera Camera System System System A A J J If the cable jacket is not waterproofed properly then it can directly cause leakage Make sure to protect the cable with a dense layer of taping Wat...

Page 14: ...Methods of adjustment To change the direction of the camera grab the lens and move it up down CONNECTING WITH OTHER DEVICE SOFTAP J J The Test Monitor Out port of the product is provided for easier in...

Page 15: ...t is compliant with the IEEE802 3af protocols Network Cable Specification Item Contents Remark Connector RJ45 Ethernet 10 100BASE T Cable Category 5e Max Distance 100M DC resistance 0 125 m PoE Suppor...

Page 16: ...GND port Alarm In Wiring Diagram Sensor GND RESISTOR ALARM IN 5mA SINK RESISTOR RESISTOR VCC_3 3V DIODE GND MLCC TRANSISTOR External connection Inside of the camera To connect the alarm out If device...

Page 17: ...utomatically If there is no DHCP server available the IP address will be set to 192 168 1 100 To change the IP address use the Device Manager For further details on Device Manager use refer to Using D...

Page 18: ...inistrator HTTP Port Used to access the camera using the Internet browser defaulted to 80 RTSP Port A port that controls real time streaming The initial value is 554 If using a Broadband Router IP Add...

Page 19: ...OK MANUALLY REGISTERING CAMERA If the camera cannot be found using search function the camera can be registered remotely by manually inserting IP information if the camera is connected to external ne...

Page 20: ...rwarding setting is an example of setting CISCO IP router The settings may differ depending on the connected Broadband Router model For more information refer to the user manual of the applicable rout...

Page 21: ...remote computer that is not in the Broadband Router s network cluster is not allowed users can access cameras within a Broadband Router s network by using the camera s DDNS URL 1 Before you can acces...

Page 22: ...ystem in support of the UPnP protocol 2 Click the camera name for search In the Windows operating system click the camera name searched from the network menu The login window is displayed Connecting v...

Page 23: ...OGIN Whenever you access the camera the login window appears Enter the User ID and password to access the camera 1 Enter admin in the User name input box The administrator ID admin is fixed and can no...

Page 24: ...s y y If the transmission method is set to multicast check whether there is a router that supports multicast in the LAN the camera is connected to Voice is not recorded even though audio input setting...

Page 25: ...rms and conditions of the purchase contract This product and its electronic accessories should not be mixed with other commercial wastes for disposal Hanwha Techwin cares for the environment at all pr...

Page 26: ......

Reviews: