


26
a
l e x i a
V i
n s Ta l l aT i o n
a n d
C
a r e
g
u i d e
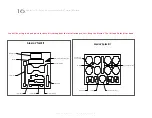
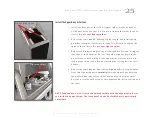
Section 3.4—Tweeter Module Propagation Delay
Refer to Table labeled “Tweeter Detent Position.” Loosen the oval tether
bolt on the rear of the tweeter module enough so that it can freely move front-
to-back.
Note: When you loosen the oval tether bolt securing the Tweeter Module,
support the front of the module to ensure it does not slide forward.
1. Locate the number on the tweeter alignment plate, on the up-
per plane of the tweeter, that corresponds to the detent indi-
cated in the table.
2. Slide the tweeter such that the downward pointing spike of the
Array bridge aligns with the appropriate numbered detent.
3. Re-tighten the oval tether bolt, ensuring the cross member
spike rests in the correct detent location.
A u t h e n t i c E x c e l l e n c e
Oval Tether Bolt
Summary of Contents for Alexia V
Page 4: ......
Page 5: ...Section 1 WASP Setup W i l s o n A u d i o S p e c i a l t i e s...
Page 11: ...Sect i o n 1 1 WASP 11 W i l s o n A u d i o S p e c i a l t i e s...
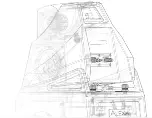
Page 12: ...Upper Array Woofer...
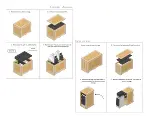
Page 13: ...Section 2 Uncrating Alexia V W i l s o n A u d i o S p e c i a l t i e s...
Page 18: ......
Page 19: ...Section 3 Assembling Alexia V W i l s o n A u d i o S p e c i a l t i e s...
Page 28: ......
Page 29: ...Section 4 Final Setup W i l s o n A u d i o S p e c i a l t i e s...
Page 36: ......
Page 37: ...Section 5 Specifications W i l s o n A u d i o S p e c i a l t i e s...
Page 42: ......
Page 43: ...Section 6 Time Alignment Charts W i l s o n A u d i o S p e c i a l t i e s...
Page 46: ......
Page 47: ...Section 7 Warranty W i l s o n A u d i o S p e c i a l t i e s...


