Whalen WF24FVB Assembly Instructions Manual Download Page 1

2

Maximum load 200 lb. (90.71 kg)

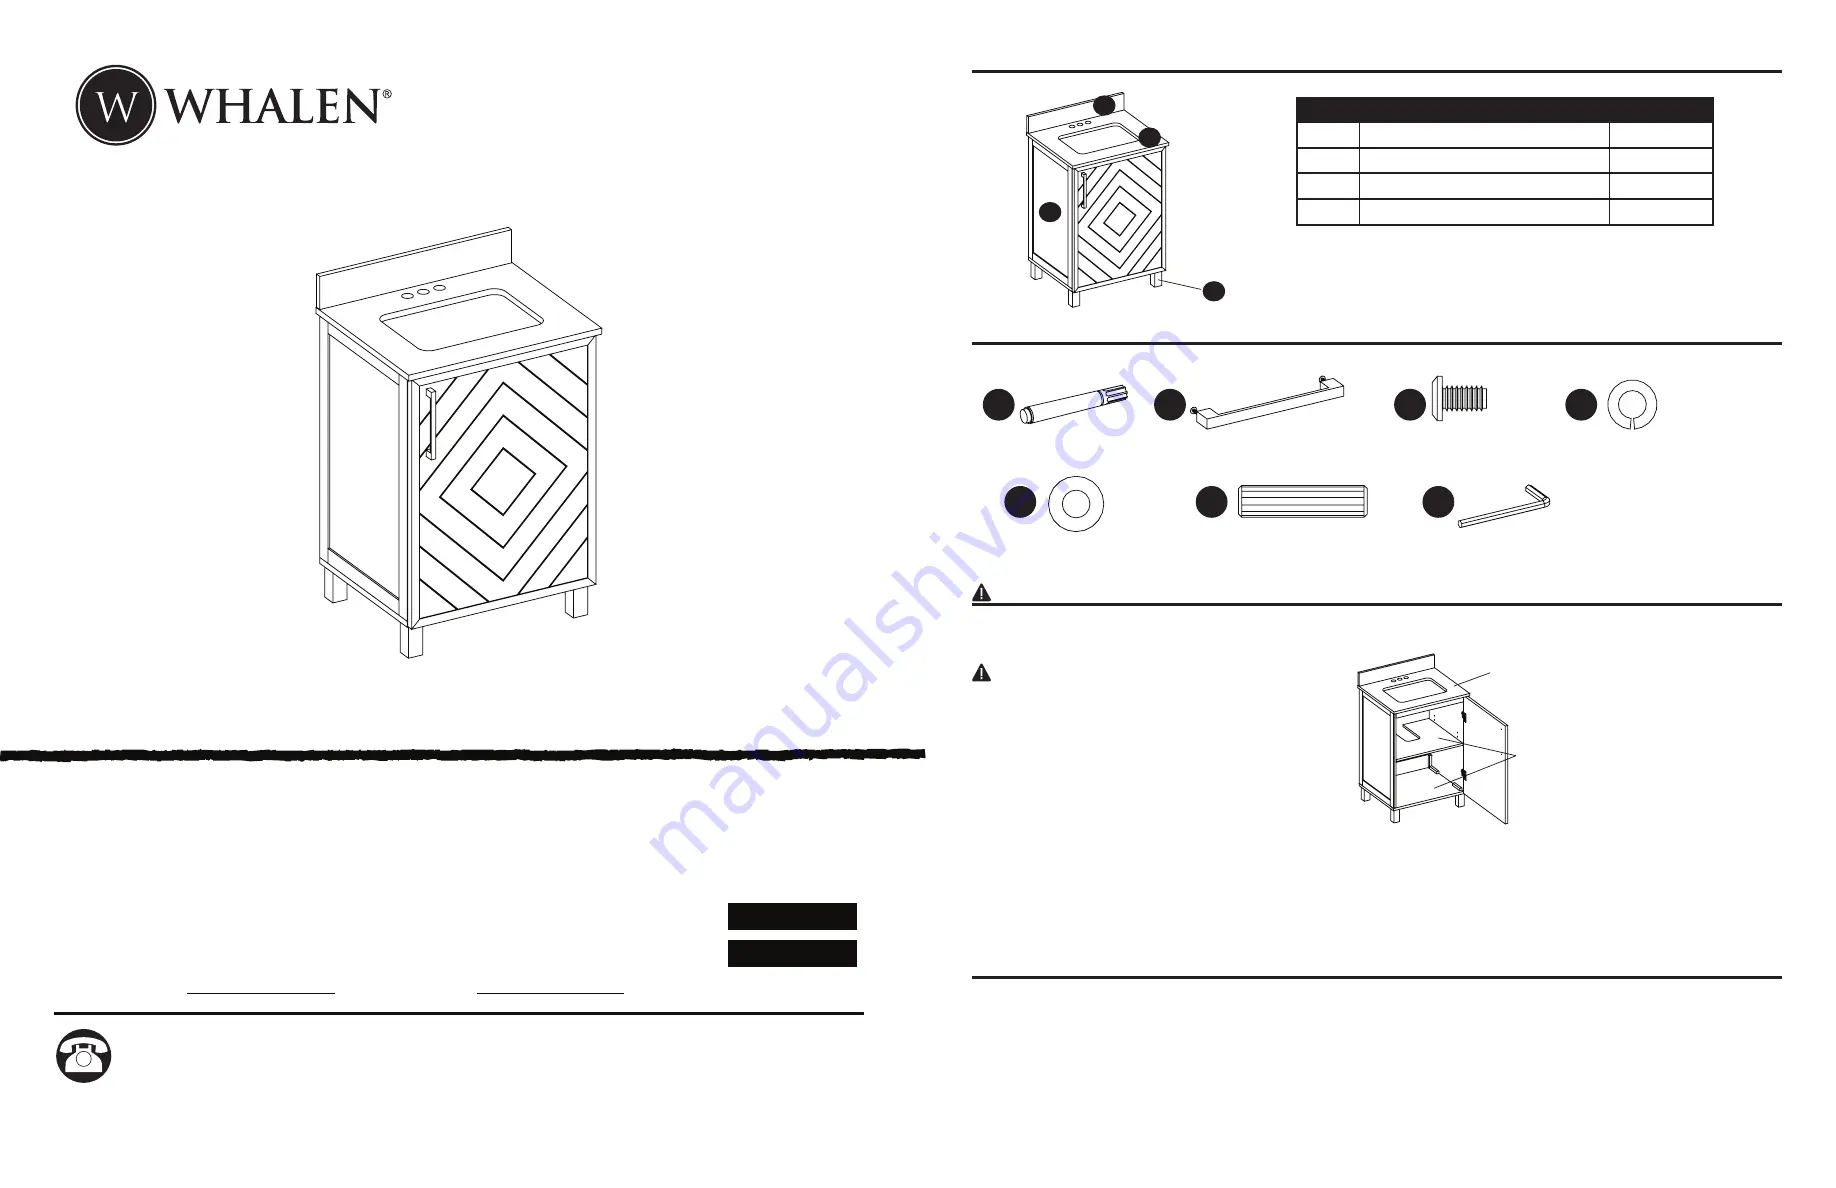
Maximum load 30 lb. (13.6 kg)

Serial Number

Purchase Date

ATTACH YOUR RECEIPT HERE

MODEL #WF24FVB

VANITY WITH TOP

1

Please call for replacement parts or assistance:  1-866-942-5362

Pacific Standard Time: 8:30 am – 4:30 pm PST Monday to Friday

Or visit our web site: www.whalenfurniture.com

SAFETY INFORMATION

Please read and understand this entire manual before attempting to assemble or install the product.

WARNING

CAUTION

Do not stand on vanity. Use vanity on level ground. Base 

vanity supports a maximum weight of 200 lbs. Exceeding 

maximum weight limit will compromise the integrity of the 

vanity structure and could cause the vanity to fail.

Failure to follow cautions could result in serious injury.

Do not hang from the vanity.

Do not taking off the vanity top to avoid damaging the vanity.

Clean all fluids from the stone surface to prevent stains. Wipe off the soap or toothpaste immediately to prevent 

permanent damage to the stone surface.

PREPARATION

Before beginning assembly of product, make sure all parts are present. Compare parts with package contents list and 

hardware contents list. If any part is missing or damaged, do not attempt to assemble the product.

Estimated Assembly Time:

 25 minutes

Tools Required (not included): Silicone compound, Phillips screwdriver, Level, Stud Finder, Pencil, Variable Speed Drill.

PACKAGE CONTENTS

PART

DESCRIPTION

QUANTITY

A

Vanity Top (preassembled)

1

B

Vanity Base

1

C

Backsplash

1

D

Vanity Feet

4

Français p. 8

Español p. 15

HARDWARE CONTENTS

Note

: Hardware shown not actual size.

x 1  Touch-up Pen

x 1  Door Handle

x 8+1 extra  Bolt

x 8+1 extra  Lock Washer

x 4+1 extra  Wood Dowel

x 8+1 extra  Flat Washer

x1  Hex Wrench

AA

BB

CC

DD

EE

GG

FF

C

A

D

B

Summary of Contents for WF24FVB

Page 1: ...ty Do not taking off the vanity top to avoid damaging the vanity Clean all fluids from the stone surface to prevent stains Wipe off the soap or toothpaste immediately to prevent permanent damage to th...

Page 2: ...LY INSTRUCTIONS v 4 v6 v 5 Step 4 Install faucet drain and supply lines none included to vanity top A according to the instructions supplied with those items A Step 5 Remove preassembled bolts from do...

Page 3: ...warranted to the original purchaser If there is a failure in this unit due to defects in materials or workmanship the manufacturer will repair or replace this item at our discretion without charge War...

Page 4: ...02 BB Door Handle 00WFFVB 03 CC Bolt 00WFFVB 04 DD Lock Washer 00WFFVB 05 EE Flat Washer 00WFFVB 06 FF Wood Dowel 00WFFVB 07 GG Hex Wrench 00WFFVB 08 HH Hinge with Screws 00WFFVB 09 II Shelf Support w...

Page 5: ...ez pas le comptoir de meuble lavabo afin d viter d endommager le meuble lavabo Nettoyer tous les liquides de la surface de la pierre pour viter les t ches Essuyer imm diatement le savon et le dentifri...

Page 6: ...vous installerez le meuble lavabo et notez l emplacement des conduites d alimentation en eau et du drain sur le panneau arri re du meuble lavabo tape 3 Placez le meuble lavabo B contre le mur l endroi...

Page 7: ...pouvez nettoyer le meuble lavabo l aide d un nettoyant doux et non abrasif Essuyez imm diatement le bois l aide d un linge doux ou d une serviette Le plateau en pierre reconstitu e peut tre nettoy l a...

Page 8: ...BB Poign e de porte 00WFFVB 03 CC Boulon 00WFFVB 04 DD Rondelle de blocage 00WFFVB 05 EE Rondelle plate 00WFFVB 06 FF Goujons en bois 00WFFVB 07 GG Cl hexagonale 00WFFVB 08 HH Charni re de porte avec...

Page 9: ...ra evitar da os permanentes a la superficie de piedra PIEZA DESCRIPCI N CANTIDAD A Cubierta para tocador preensamblada 1 B Base para tocador 1 C Protector contra salpicaduras 1 D Patas de tocador 4 CO...

Page 10: ...AMBLE Paso 2 Marque la pared con la ubicaci n del tocador y tenga en cuenta la ubicaci n de las tuber as de suministro de agua y el desag e en el panel posterior del tocador Paso 3 Mueva el tocador B...

Page 11: ...manchar La garant a de este producto es v lida para el comprador original Si esta unidad presenta alguna falla debido a defectos en los materiales o la mano de obra el fabricante reemplazar o reparar...

Page 12: ...02 BB Manija de la puerta 00WFFVB 03 CC Perno 00WFFVB 04 DD Arandela de seguridad 00WFFVB 05 EE Arandela plana 00WFFVB 06 FF Espigas de madera 00WFFVB 07 GG Llave hexagonal 00WFFVB 08 HH Bisagra de la...

Reviews: