background image

- 10 -

Getting Started

2.1 Getting to Know the Computer

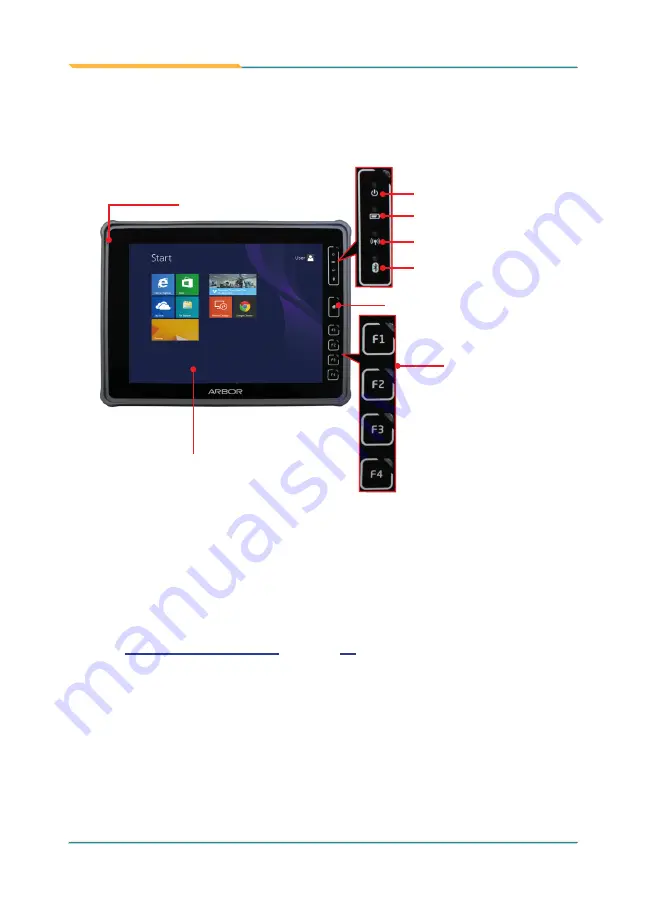
2.1.1 Front Side

Power status LED

Touch screen

Microphone

Wi-Fi LED

Battery status LED

Home Key

Bluetooth LED

Function keys


Microphone
The built-in microphone captures sound and voice when used with a 

program capable of recording audio.


Touch Screen

The computer comes with a 10-point projected capacitive touch screen 

allowing users to interact with the computer without a mouse or keyboard. 

See 

3.1 Using Touch Screen

 on page 

22

 to know how to do the touch 

control and text input on a touch screen.

Summary of Contents for TIG97

Page 1: ...TIG97 9 7 Intel Celeron N2930 Rugged Tablet PC User s Manual Version 1 0 2014 09...

Page 2: ...II This page is intentionally left blank...

Page 3: ...i Revision History Version Date Descriptions 1 0 2014 09 Initial release...

Page 4: ...the manufacturer be liable for any direct indirect special incidental or consequential damages arising from the use or inability to use the product or documentation even if advised of the possibility...

Page 5: ...Introduction 1 1 1 Product Highlights 2 1 2 Package Contents 3 1 2 1 Order Information 3 1 2 2 Configure to Order Service 3 1 3 Specifications 4 1 4 Dimensions 7 Chapter 2 Getting Started 9 2 1 Gettin...

Page 6: ...er 30 3 5 Using the Camera 32 3 5 1 Launching the Camera 32 3 5 2 Taking a Picture 33 3 5 3 Shooting a Video 33 3 5 4 Configuring Video Shooting 33 Chapter 4 Utilities 35 4 1 System Suite 36 4 1 2 Acc...

Page 7: ...ressly approved by the guarantee of this device could void the user s authority to operate the equipment This equipment has been tested and found to comply with the limits for a Class B digital device...

Page 8: ...oducts Member states of the EU are to enforce by 7 1 2006 The listed products do not contain unintentional additions of lead mercury hex chrome PBB or PBDB that exceed a maximum concentration value of...

Page 9: ...ings on the equipment 2 Place this equipment on a reliable surface when installing Dropping it or letting it fall may cause damage 3 Make sure the correct voltage is connected to the equipment 4 For p...

Page 10: ...y transient overvoltage 14 Never pour any liquid into openings This may cause fire or electrical shock 15 Never open the equipment For safety reasons the equipment should be opened only by qualified s...

Page 11: ...d render it incapable of holding any charge Be sure to store the equipment and battery at the proper temperature Battery Lifespan The removable batteries for the equipment are designed to retain up to...

Page 12: ...re Use the appropriate container to store the battery such as a paper box Do not allow a metal object to touch the terminal of the battery The battery consists of precise electrical components and cel...

Page 13: ...ecommend you to rub it with a piece of cloth Water or rubbing alcohol You may moisten a piece of cloth a bit with some water or rubbing alcohol and rub it on the device Unknown solvents may be harmful...

Page 14: ...power cords When you need to dispose of your display products please follow the guidance of your local authority or ask the shop where you purchased the product or if applicable follow any agreements...

Page 15: ...lp For the most frequently asked questions you can easily find answers in the computer s documentation These answers are normally a lot more detailed than the ones we can give over the phone So please...

Page 16: ...or inability to use this product Vendor will not be liable for any claim made by any other related party Vendors disclaim all other warranties either expressed or implied including but not limited to...

Page 17: ...1 1 Chapter 1 Introduction Chapter 1 Introduction...

Page 18: ...umpers on each of its four corners for enhanced protection Featuring slim design high portability and long battery life the TIG97 Series is ideal for mobile POS and logistics application 9 7 XGA IPS L...

Page 19: ...Pack 1 2 1 Order Information TIG97 9 7 Intel Celeron N2930 rugged tablet PC with XGA LCD projected capacitive touch battery pack WLAN Bluetooth and Rear Camera 9 7 Intel Celeron N2930 rugged tablet PC...

Page 20: ...WLAN 802 11 a b g n Bluetooth Integrated Bluetooth 4 0 BLE class 2 Camera 5 0 MP rear CMOS camera with Auto Focus and light supplement Sensor Accelerometer Magnetometer Gyroscope Light Sensor I O Inte...

Page 21: ...acity 1 x 2270mAh 4 cell external battery pack 1 x 2270mAh 2 cell internal battery pack Optional Battery Life Up to 8 hours depends on configuration and use Mechanical Environmental Operating Temp 20...

Page 22: ...1 Embedded Standard Windows 8 1 Embedded Industry Windows 8 1 Embedded Professional Ordering Information TIG97 9 7 Intel Celeron N2930 rugged tablet PC with XGA LCD projected capacitive touch battery...

Page 23: ...7 Introduction 1 4 Dimensions 258 260 21 200 26 22 5 24 30 6 197 95 A A Unit mm...

Page 24: ...8 This page is intentionally left blank...

Page 25: ...9 2 Chapter 2 Getting Started Chapter 2 Getting Started...

Page 26: ...s Microphone The built in microphone captures sound and voice when used with a program capable of recording audio Touch Screen The computer comes with a 10 point projected capacitive touch screen allo...

Page 27: ...rocess Current battery level 0 15 N A Off No battery is present Wi Fi Green On The Wi Fi is enabled Off The Wi Fi is disabled Bluetooth Blue On The Bluetooth is enabled Off The Bluetooth is disabled T...

Page 28: ...ck to Windows home screen 2 1 2 Left and Right Sides Power button DC In power jack microSD card slot Micro USB 2 0 Type A port USB 2 0 3 0 Type A port Audio out jack mini HDMI port RST I O Ports and C...

Page 29: ...3 0 driver on the provided CD DC In power jack To connect to the power adapter to provide power to the computer or to charge the battery Power Button Use the Power Button to power on off the computer...

Page 30: ...ocus Camera Speaker Speaker Battery Chamber Auto Focus Camera A 5 0 MP CMOS auto focus camera with LED flash For more information see 3 5 Using the Camera on page 32 Speaker Piezoelectric speakers for...

Page 31: ...ng the Extenal Battery Pack The computer comes with an internal and an external battery pack The internal battery pack is a configue to order service and is not allowed for installing or replacing by...

Page 32: ...as illustrated above To remove an existing external battery disconnect the battery s power cable first and then remove the battery To install a new external battery plug the battery s power cable to...

Page 33: ...that is not made for your computer Supplying the computer with inappropriate voltage may cause harm to the battery or even worse burn the computer The lithium ion battery is currently one of the most...

Page 34: ...Intel Dynamic Platform and Thermal Framework component MBI Required Install the driver for Intel Sideband Fabric Device Driver Intel MBI Wi Fi Required Install the Wi Fi driver and application Bluetoo...

Page 35: ...river CD 3 Tap Win7 Driver Install or Win8 Driver Install according to your operating system If you want to browse the CD contents tap Browse CD instead 4 The drivers menu then opens Tap Chipset to in...

Page 36: ...the chipset drivers proceed to install the remaining drivers including TXE Graphic DPTF MBI Wi Fi Bluetooth and Audio When installing the remaining drivers there is no need to follow any specific ord...

Page 37: ...21 3 Chapter 3 Using the Computer Chapter 3 Using the Computer...

Page 38: ...d capacitive touch screen And no calibration is needed If the computer runs Windows 7 8 the projected capacitive touch screen is ready to function when the computer is delivered No driver is needed 3...

Page 39: ...Recognition is an input method that interprets and converts handwriting to text The Windows features a writing pad to get the job done To launch the Windows handwriting panel 1 Tap the keyboard icon o...

Page 40: ...s of these keys are defined by Windows system For example F1 is used to launch Help and F2 is to rename a seleted file or folder Once you installed the System Suite by default the keys will be associa...

Page 41: ...tem Suite then opens on screen For the key that you want to reassign a function simply tap the intended function Assigned function will be highlighted in blue Function key assignment panel Status bar...

Page 42: ...guide below to connect the computer to a Wi Fi hotspot 1 Launch the Wi Fi module by hitting the function key F1 by default The system shows the Wi Fi status in the bottom right corner of the screen H...

Page 43: ...ss coverage of the computer 4 Tap the desired network to connect it If the network to connect is a secured network a dialog will open and request for the password Enter the password to access the Wi F...

Page 44: ...following descriptions assume that you have installed the System Suite to use the function key Follow the guide below to proceed 3 4 1 Launching the Bluetooth Feature To be able to use Bluetooth launc...

Page 45: ...es it has to pair with them To pair connect with other Bluetooth devices 1 Launch the Bluetooth module as described in 3 4 1 Launching the Bluetooth Feature on page 28 2 From the notification area tap...

Page 46: ...able at Control Panel System and Security System 3 4 4 Hiding Exposing the Computer By default the computer is NOT discoverable by other Bluetooth devices To hide or expose the computer 1 Launch the B...

Page 47: ...The Bluetooth Settings dialog box then opens Tap the Options tab and find the Discovery section To make your computer discoverable to Bluetooth enabled devices select the check box of Allow Bluetooth...

Page 48: ...dule by hitting the function key The system shows the camera status in the bottom right corner of the screen Hitting the function key will toggle on off the camera function When camera is launched the...

Page 49: ...eo To shoot a video 1 Launch the camera also the camcorder as described in 3 5 1 Launching the Camera on page 32 The camera program automatically launches 2 From the camera application program s tool...

Page 50: ...ogram s tool bar tap the configuration icon The Properties dialog box opens 3 Make the configuration as needed 4 Tap the Apply button to apply the changes Tap the OK button to save the changes and exi...

Page 51: ...35 4 Chapter 4 Utilities Chapter 4 Utilities...

Page 52: ...System Suite installed on your computer tap the System Suite shortcut in the notification area to launch and use System Suite The System Suite then opens on screen Function key assignment panel Status...

Page 53: ...ates a function key to turn on off Wi Fi Associates a function key to trigger barcode scanning Associates a function key to turn on off Bluetooth Associates a function key to turn on off the camera As...

Page 54: ...sociates a function key to open close on screen keyboard Associates a function key to open close a program installed in the system When tapping the icon you will be prompted to select a program to ass...

Page 55: ...39 5 Chapter 5 BIOS Chapter 5 BIOS...

Page 56: ...S Incorrect settings can cause system boot failure or malfunction NOTE For system stability and performance this BIOS utility is constantly improved The screenshots demonstrated and descriptions herei...

Page 57: ...setup screen It reports basic system information and also allows you to configure the System Date and System Time settings InsydeH20 Setup Utility Rev 5 0 BIOS Version TIG97 1 00 System Date System Ti...

Page 58: ...annel A N A SODIMM 0 Displays the RAM of SODIMM 0 System Time Sets system time Valid range is from 0 to 23 0 to 59 and 0 to 59 System Date Sets system date Valid range is from 1 to 12 1 to 31 and 2000...

Page 59: ...ge Values F5 F6 Select SubMenu Enter Select Item Select Menu F1 Exit ESC Help Setup Defaults F9 Save and Exit F10 5 3 1 Boot Configuration The Boot Configuration screen provides the following setting...

Page 60: ...state 5 3 3 Miscellaneous Configuration The Miscellaneous screen provides the following setting options Settings Description Available Options Restore AC Power Loss Specify what state to go to when p...

Page 61: ...rip point When this point is reached the OS will shut down the system Passive Set the value of temperature of the thermal sensor passive trip point When this point is reached the system will throttle...

Page 62: ...the length of password must be greater than one character The Security screen provides the following setting options Settings Descriptions Set Supervisor Password To set up a supervisor password After...

Page 63: ...Select SubMenu Enter Select Item Select Menu F1 Exit ESC Help Setup Defaults F9 Save and Exit F10 These items control various CPU parameters The Advance CPU control screen provides the following setti...

Page 64: ...F1 Exit ESC Help Setup Defaults F9 Save and Exit F10 Allows InsydeH20 to skip certain tests while booting This will decrease the time needed to boot the system The Boot screen provides the following...

Page 65: ...vance is selected the hard disk drive info will be displayed 5 7 Exit Options The Exit screen provides the options regarding saving changes quitting the utility and recovering defaults InsydeH20 Setup...

Page 66: ...Exit Saving Changes Save the changes and exit the BIOS Setup Utility Exit Discard Changes Exit the BIOS Setup Utility without saving the change s Load Optimal Defaults Restores all settings to defaul...

Reviews: