background image

        8

DTI10 - DTI14 (CD 220-350)

Summary of Contents for DTI10

Page 1: ...D 22391 Hamburg Tel 49 40 60009468 0 Fax 49 40 536 75 01 Equipment Imp Exp GmbH Zitterpappelweg 9 E Mail info wesco navy com www wesco navy com Manual Handbuch Spare parts list Ersatzteilliste ...

Page 2: ......

Page 3: ......

Page 4: ......

Page 5: ...s to the machine until the drier has cooled down sufficiently and close off all supply conducts Current gas and steam During and after use of the machine the back panel can heat up be careful for burns When repairing the machine only use original spare parts To avoid fire and explosion Keep the surrounding areas free of flammable and combustible products Regularly clean the drier the ventilator an...

Page 6: ...dry textile that was washed in water Only insert spin dried linen in the drier Do not use the appliance to dry materials with a low melting temperature PVC rubber Do not dry products that still contain solvents oils or other inflammable products Do not dry curtains or other fibreglass textiles except when the label indicates that this is allowed The drier drum will not work when the front door or ...

Page 7: ... In order to ensure a good conduction of the vapours this pipe should be kept as short as possible with a minimum of bends If the exhaust pipe comes into a main pipe then the angle may be maximum 45 After the coupling of both pipes the diameter of the main duct should be adapted The diameter of this duct should at least be the sum of the 2 coupled ducts The radius of the bends should preferably me...

Page 8: ...e swivel H on the side of It is necessary to ground the dryer for your personal safety and to ensure a good operation 220 240V 3AC The 3 mains wires L1 L2 and L3 should be connected to the 3 left clamps and the yellow green grounding wire PE should be connected to the grounding clamp It is necessary to provide in the connection circuit fuses which are easy to reach Value of the fuses DTI10 220 240...

Page 9: ... Remove the lower front panel and the lint filter see fig 1 Check the direction of rotation of the ventilator see fig 2 direction of the arrow In case of a wrong direction of rotation switch L1 and L2 see fig 3 THE MANUFACTURER IS NOT RESPONSIBLE FOR DAMAGES CAUSED BY NON EXECUTION OF THESE INSTRUCTIONS VERY IMPORTANT 3 ...

Page 10: ...he type of gas and the gas pressure indicated on the machine identification plate The use of too small gas lines can lead to insufficient gas supply resulting in a bad heating up and bad drying results Test all couplings and connections for leakages according to the instal lation standards in force in the country where the machine is installed and never use a flame It is important to always work w...

Page 11: ... back of the printboard By means of the left switch the manufacturer can adjust if the dryer needs to be executed with a coin operated dryer or not If it concerns a coin operated dryer the switch is put downwards COIN In case of an OPLdryer the switch is put upwards OPL The right switch is put upwards RUN By putting this switch downwards PRG you can enter into the setting menu The following button...

Page 12: ...9 4 ...

Page 13: ...s value default 30 by means of the or button between 1 and 120 minutes Confirm the adjustment by means of the middle button For dryers without reversing the program goes immediately to TE2 St 1 Stop time between left right movement of the drum Press the middle button to continue XX Change if necessary this value default 5 seconds by means of or button between 0 and 10 seconds Confirm the adjustmen...

Page 14: ...11 4 ...

Page 15: ...o TE3 Because of this the program will be executed without reversing Ar 2 Action time of the drum right movement Press the middle button to continue XX Change if necessary this value default 30 seconds by means of the or button between 5 and 120 seconds Confirm the adjustment by means of the middle button AL 2 Action time of the drum left movement Press the middle button to continue XX Change if n...

Page 16: ...13 4 ...

Page 17: ...conds Confirm the adjustment by means of the middle button Cd Cool down This is the cool down cycle which needs to be executed after the dry cycle Press the middle button to continue XX If necessary change this value default 5 minutes by means of the or button between 1 and 30 minutes Confirm the adjustment by means of the middle button FLS Flash alternate description of the remaining dry time and...

Page 18: ...15 ...

Page 19: ...ress the middle button to continue Hereafter you automatically return to the beginning The right DIP switch needs to be put into the position RUN again in Here the inlets are being checked When the door is closed LED 3 lights up The dryer is equipped with a sensor measuring the rpm of the drum the dash next to in will blink if the drum is turned by hand Press the middle button to continue 9 dashes...

Page 20: ...17 ...

Page 21: ...dle button Remark If the dryer is connected to a system on which it is possible to determine a different rate according to the period of time e g Sigma explorer 3 rates happy hour can be programmed Low Medium High In this case the time value of the lowest rate is put in Press the middle button Then give in the values for C1M coin meter 1 middle rate C1H coin meter 1 highest rate C2L coin meter 2 l...

Page 22: ...19 4 ...

Page 23: ...s the middle button to continue XX Change if necessary this value default 5 seconds by means of or button between 0 and 10 seconds Confirm the adjustment by means of the middle button When O is filled in the program goes immediately to TE2 Because of this the program will be executed without reversing Ar 1 Action time of the drum right movement Press the middle button to continue XX Change if nece...

Page 24: ...21 4 ...

Page 25: ...Press the middle button to continue XX If necessary change this value default 70 C 158 F by means of the or button between 25 F 77 F and 90 C 194 F Confirm the adjustment by means of the middle button For dryers without reversing the program goes immediately to Cd St 3 Stop time between left right movement of the drum Press the middle button to continue XX Change if necessary this value default 5 ...

Page 26: ...23 4 ...

Page 27: ...e middle button rtP Flash indication of the programmed or real drying temperature Press the middle button to continue YES or no Select by means of the button no only the programmed drying temperature will be displayed during the cycle YES only the real drying temperature will be displayed during the cycle Confirm the adjustment by means of the middle button rEM REMOTE START central coinsystem Pres...

Page 28: ...25 ...

Page 29: ... closed LED 1 lights up When coin meter 2 is closed LED 2 lights up When the door is closed LED 3 lights up The dryer is equipped with a sensor measuring the rpm of the drum the dash next to in will blink if the drum is turned by hand Press the middle button to continue 9 dashes appear temporarily on the display This is the end of the setting menu Then you automatically return to the beginning The...

Page 30: ...27 ...

Page 31: ...cs which can t resist the dry temperature Linen which has been treated with inflammable products needs to be aired first before being put into the drum Change the prepro grammed cool down time The preprogrammed cool down time can be changed once only before starting a program Keep the left or the right button pressed After 5 seconds the preprogrammed cool down time will be displayed This time can ...

Page 32: ...is indicated with degrees C then the symbol is displayed When the temperature is indicated for values less than 100 F then this symbol F is displayed When the heating is activated then the decimal point lights up Change the remaining drying time The remaining drying time can be reduced or extended by means of the left or the right button If the drying time is reduced to O then the cool down time s...

Page 33: ...ome to an end here 30 minutes the cool down time is automatically started here 5 minute This cool down time is completely separated from the drying time The remaining cool down time is displayed alternately with Cd Safety cooldown If the cooldown time here 5 minutes has lapsed and the temperature in the drum is higher than 40 C then the cooldown time will be automatically extended The cycle ends w...

Page 34: ...31 ...

Page 35: ...um Coin insertion For each coin insertion in the coinmeter the time value see setting menu Co 1 and Co 2 is added on the display As long as the value of parameter Add see setting menu isn t obtained Add is displayed and needs to be extra When sufficient coins have been inserted the cycle time and STA are displayed alternately The 3 leds next to the push buttons are blinking Select and start the dr...

Page 36: ...king on the display and all leds next to the push buttons are blinking as well However the drying time keeps on counting down Assoonasthedoorisclosed STA andtheremainingcycletimearedisplayedalter nately Now the cycle or if necessary another cycle needs to be started again End of the drying time change to cool down time When the drying time has come to an end here 25 minutes the cool down time is a...

Page 37: ... end of the cycle During non operation tMP is blinking on the display and the cycle can t be started anymore Because of these protections the dryer can t be used at a temperature of less than 5 C Underpressure switch In case the drum no longer rotates due to failure for instance breakdown of a V belt rot will appear blinking on the display if the machine is equipped with a rotation sensor option a...

Page 38: ... risk Open the dust filter door and remove all the piled up dust at the underside of the filter and inside the filter chamber Daily Monthly Remove all the dust out of the heating compartment and the burner Dust which enters into the burner can combust Gas or steam heated dryers need to cleaned 2 times a month Remove all the dust of the temperature sensor and the security thermostat Every 3 months ...

Page 39: ...tate to contact the technical service of your distributor Name Adres Tel Data dryer Type Date of installation Installed by Serial number Operation voltage and frequency Remarks Data distributor The manufacturer reserves the right to change the contents of this in struction manual at all times and without previous notice ...

Page 40: ...please give full description and state both position and code numbers Thank you Bei Bestellung von Ersazteilen bitte deutlich die Positions und Kodenummer angeben Danke Pour vos commandes de piéces détachées veuillez indiquer clairement les numéros de code et de position 26 08 2008 249 00273 00 Code Date ...

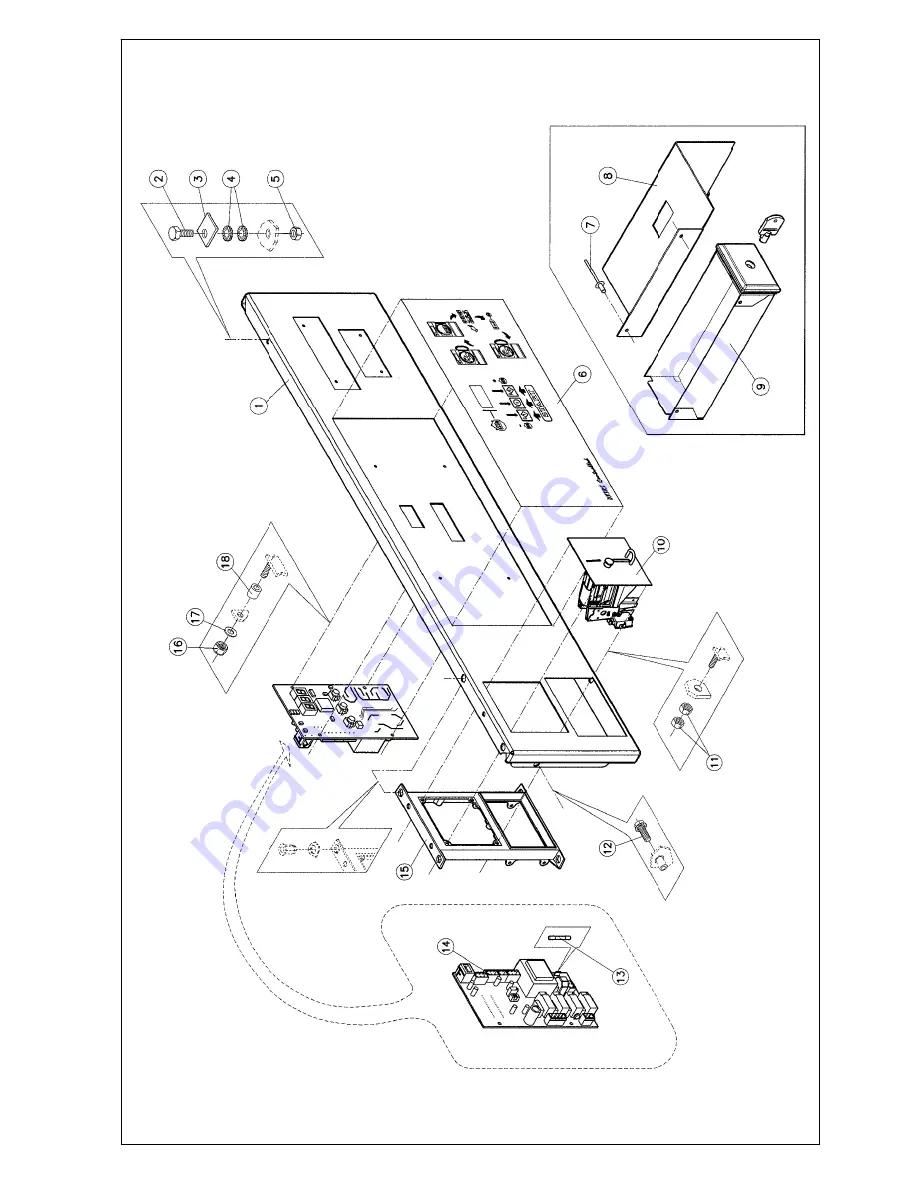
Page 41: ...llagers 5 Trommel as riemschijf 6 Voorpaneel boven kadran DX3RS 7 Voorpaneel boven kadran munt 8 Voorpaneel boven kadran PRO HC 9 Voorpaneel PVC deur 10 Stoffilter voorpaneel onder 11 Motor HANNING riemschijf 12 Omhulsel achterkant ventilator 13 Huis gas brander 14 Gas verwarming 15 Elektrisch verwarmingssysteem 16 Stoom verwarming 17 ...

Page 42: ...ngs 5 Cylinder axle belt pulley 6 Front panel above facia panel DX3RS 7 Front panel above facia panel coin 8 Front panel above facia panel PRO HC 9 Frontpanel PVC door 10 Dust filter Front panel lower 11 Motor HANNING belt pulley 12 Cabinet back Fan 13 Housing gas burner 14 Gas heating 15 Electric heating system 16 Steam heating 17 ...

Page 43: ...xe poulie 6 Panneau avant dessus kadran DX3RS 7 Panneau avant dessus cadran monnayeur 8 Panneau avant dessus kadran PRO HC 9 Panneau avant PVC porte 10 Filtre de poussière Panneau avant inférieur 11 Moteur HANNING poulie 12 Carrosserie arrière Ventilateur 13 Boîtier brûleur à gaz 14 Chauffage à gaz 15 Système de chauffage électrique 16 Chauffage à vapeur 17 ...

Page 44: ... Keilriemenscheibe 6 Frontblende oben Armaturenbrett DX3RS 7 Frontblende oben Armaturenbrett Münzprüfer 8 Frontblende oben Armaturenbrett PRO HC 9 Frontblende PVC Tür 10 Staubfilter Frondblende Unter 11 Motor HANNING Keilriemenscheibe 12 Gehäuse Hinterseite Lüfter 13 Haus Gasbrenner 14 Gas Heizung 15 Elektrischer beheizungssystem 16 Dampf Heizung 17 ...

Page 45: ...1 DTI10 DTI14 CD220 350 ...

Page 46: ...D350 Pont arrière CD165 CD350 Brücke Hinterseite CD165 CD350 1 12 206 00099 00 Flensschroef met vertanding M6x16 Bolt with integrated lockwasher M6 X 16 Boulon avec rondelle étoile intégrée M6 X 16 Schraube mit Fächerscheibe M6 X 16 1 13 160 00044 00 Afdekplaat oven CD165 Cover panel oven CD165 Couvercle four CD165 Abdeckplatte Ofen CD165 1 13 160 00045 00 Afdekplaat oven CD220 Cover panel oven CD...

Page 47: ...1 DTI10 DTI14 CD 220 350 ...

Page 48: ...N Code Omschrijving Description Description Bezeichnung 25 223 00163 00 Rubber tige diam 7mm Duct tige 7mm Tuyau tige 7mm Rohr tige 7mm 1 ...

Page 49: ...2 DTI10 DTI14 CD 220 350 ...

Page 50: ...Schraube mit Fächerscheibe M6 X 16 2 13 206 00099 00 Flensschroef met vertanding M6x16 Bolt with integrated lockwasher M6 X 16 Boulon avec rondelle étoile intégrée M6 X 16 Schraube mit Fächerscheibe M6 X 16 2 14 206 00099 00 Flensschroef met vertanding M6x16 Bolt with integrated lockwasher M6 X 16 Boulon avec rondelle étoile intégrée M6 X 16 Schraube mit Fächerscheibe M6 X 16 2 15 206 00099 00 Fle...

Page 51: ...3 DTI10 DTI14 CD 220 350 ...

Page 52: ...B Contacteur inversion VB6A 30 10 24Volt ABB Schütz Reversierung VB6A 30 10 24Volt 3 08 260 00024 01 ABB reversing verbindingsklem BMS6 30 ABB reversing connecting link BMS6 30 ABB inversion pièce de jonction BMS6 30 ABB Reversierung Verbindungs Klemme BMS6 30 3 09 260 00016 00 Transformator STS 63 23 24 Transformer STS 63 23 24 Transformateur STS 63 23 24 Trafo STS 63 23 24 3 10 260 00035 01 ABB ...

Page 53: ...4 DTI10 DTI14 CD 220 350 ...

Page 54: ...0006 00 Sterrondel gefosfateerd M4 AZ DIN 6798 Castle washer M4 AZ DIN 6798 Rondelle étoile M4 AZ DIN 6798 Fächerscheibe M4 AZ DIN 6798 4 08 206 00027 00 Persvijs staal verzinkt M4x10 DIN 933 Hexagon bolt zincked M4x10 DIN 933 Boulon galvanisé M4x10 DIN 933 Sechskantschraube verzinkt M4x10 DIN 933 4 09 254 00063 00 Afscherming thermostaat vochtmeeting Protection thermostat hygrometer Protecteur th...

Page 55: ...5 DTI10 DTI14 CD 220 350 ...

Page 56: ...ondelle étoile M6 AZ DIN 6798 Fächerscheibe M6 AZ DIN 6798 5 08 260 00003 00 Lagerhuis CD165 CD350 Bearing housing CD165 CD350 Palier CD165 CD350 Lagergehäuse CD165 CD350 5 09 212 00028 00 Veer cerclips J80 DIN472 Spring cerclips J80 DIN472 Cerclips J80 DIN472 Feder Nietstift J80 DIN472 5 10 215 00001 03 Kogellager 6307 2z Ball bearing 6307 2z Roulement à billes 6307 2z Kugellager 6307 2z 5 11 160...

Page 57: ...6 DTI10 DTI14 CD 220 350 ...

Page 58: ...sfateerd M12 AZ DIN 6798 Castle washer M12 AZ DIN 6798 Rondelle étoile M12 AZ DIN 6798 Fächerscheibe M12 AZ DIN 6798 6 06 206 00004 00 Persvijs staal verzinkt M12x25 DIN 933 Hexagon bolt M12x25 DIN 933 Boulon galvanisé M12x25 DIN 933 Sechskantschraube verzinkt M12x25 DIN 933 6 07 207 00031 00 Metaalschroef verzinkt M4x20 cilindrisch DIN84 Screw zincked M4x20 cyl DIN84 Vis galvanisée M4x20 cyl DIN8...

Page 59: ...7 DTI10 DTI14 CD 220 350 ...

Page 60: ... 00520 00 Telem etiket ZONDER TEKST ZB2BY9101 Telem sticker WITHOUT TEXT ZB2BY9101 Telem étiquette SANS TEXTE ZB2BY9101 Telem Aufkleber Ohne Text ZB2BY9101 7 10 209 00099 20 Drukknop rood noodstop ZB4 BS Press button emergency stop ZB4 BS Bouton poussoir arrêt d urgence ZB4 BS Druckknopf Notstop ZB4 BS 7 11 209 00506 00 Glaszekering 200mA Flink 5x20 Fuse 200mA fast 5x20 Fusible 200mA rapide 5x20 G...

Page 61: ...8 DTI10 DTI14 CD 220 350 ...

Page 62: ...8 10 209 00600 00 Muntschakelaar 1 0 50 Euro Coin meter 1 0 50 Euro Monnayeur 1 0 50 Euro Münzprüfer 1 0 50 Euro 8 10 209 00601 00 Muntschakelaar 1 2 Zwitserse FR Coin meter 1 2 Swiss francs Monnayeur 1 2 Franc suisse Münzprüfer 1 2 franc Suisse 8 10 209 00610 00 Muntschakelaar jeton GETTONE vierkant coin meter token GETTONE square Monnayeur jeton GETTONE Carré Münzprüfer Münze GETTONE Quadrat 8 1...

Page 63: ...9 DTI10 DTI14 CD 220 350 ...

Page 64: ...elem sticker WITHOUT TEXT ZB2BY9101 Telem étiquette SANS TEXTE ZB2BY9101 Telem Aufkleber Ohne Text ZB2BY9101 9 10 209 00099 20 Drukknop rood noodstop ZB4 BS Press button emergency stop ZB4 BS Bouton poussoir arrêt d urgence ZB4 BS Druckknopf Notstop ZB4 BS 9 11 206 00099 00 Flensschroef met vertanding M6x16 Bolt with integrated lockwasher M6 X 16 Boulon avec rondelle étoile intégrée M6 X 16 Schrau...

Page 65: ...10 DTI10 DTI14 CD 220 350 ...

Page 66: ... inox M6x12 A2 DIN 933 Sechskantschraube Nirosta M6x12 A2 DIN 933 10 09 202 00101 00 Rondel RVS 6 4x12x1 6 A2 DIN 125 Washer st st 6 4x12 5x1 6 A2 DIN 125 Rondelle inox 6 4x12 5x1 6 A2 DIN 125 Unterlegscheibe Nirosta 6 4x12 5x1 6 A2 DIN 125 10 10 254 00013 00 Scharnier patrijspoort Door hinge Charnière porte Türscharnier 10 11 254 00010 00 CIS patrijspoort CIS door PVC CIS porte PVC CIS Tür PVC 10...

Page 67: ...11 DTI10 DTI14 CD 220 350 ...

Page 68: ... 933 Sechskantschraube verzinkt M4x10 DIN 933 11 04 204 00007 00 Moer staal verzinkt M4 DIN 934 Nut M4 DIN 934 Ecrou galvanisé M4 DIN 934 Mutter verzinkt M4 DIN 934 11 05 zie blz 11 positie 2 see page 11 position 2 ref page 11 position 2 ref Pagina 11 Position 2 11 06 160 00021 03 Voorpaneel onder CD165 CD350 Lower front panel CD165 CD350 Panneau avant inférieur CD165 CD350 Untere Frontblende CD16...

Page 69: ...12 DTI10 DTI14 CD 220 350 ...

Page 70: ...Motor Hanning A111ZA18D 180 Motor Hanning A111ZA18D 180 Moteur Hanning A111ZA18D 180 Motor Hanning A111ZA18D 180 12 09 206 00101 00 Moer M6 met geïntegreerde sterrondel Nut with integrated castle washer M6 Ecrou avec rondelle étoile intégrée M6 Mutter mit integrierte Fächerscheibe M6 12 10 206 00099 00 Flensschroef met vertanding M6x16 Bolt with integrated lockwasher M6 X 16 Boulon avec rondelle é...

Page 71: ...13 DTI10 DTI14 CD 220 350 ...

Page 72: ...Ventilator G4D200 DM 12 09 Fan G4D200 DM 12 09 Ventilateur G4D200 DM 12 09 Lüfter G4D200 DM 12 09 13 03 160 00093 00 Ventilatorplaat CD165 350 Ventilator plate CD165 350 Plaque pour ventilateur CD165 350 Lüfter platte CD165 350 13 03 160 00106 00 Ventilatorplaat CD220 Ventilator plate CD220 Plaque pour ventilateur CD220 Lüfter platte CD220 13 04 208 00101 00 Parkerschroef RVS 6x1 2 DIN 7971 Parker...

Page 73: ...14 DTI10 DTI14 CD 220 350 ...

Page 74: ...165 Couvercle pour chambre brûleur à gaz CD165 Deckel für Gasbrenner CD165 14 02 160 00128 00 Huis gas brander CD220 350 Housing gas burner CD220 350 Chambre brûleur à gaz CD220 350 Gehâuse Gasbrenner CD220 350 14 02 160 00129 00 Huis gas brander CD165 Housing gas burner CD165 Chambre brûleur à gaz CD165 Gehâuse Gasbrenner CD165 14 03 206 00099 00 Flensschroef met vertanding M6x16 Bolt with integr...

Page 75: ...15 DTI10 DTI14 CD 220 350 ...

Page 76: ... gaz Propaan 2 375MM CD165 Düse für gas Propaan 2 375MM CD165 15 15 260 10003 650 Gas inspuitstuk G20 3 650MM CD220 Gas orifice G20 3 650MM CD350 Gicleur pour gaz G20 25 3 650MM CD220 Düse für gas G20 25 3 65MM A5 15 15 260 10003 975 Gas inspuitstuk G25 3 975MM CD220 Gas orifice G25 3 975MM CD220 Gicleur pour gaz G25 3 975MM CD220 Düse für gas G25 3 975MM CD220 15 15 260 10002 775 Gas inspuitstuk ...

Page 77: ...15 DTI10 DTI14 CD 220 350 ...

Page 78: ... 00 Support 1 gasklep VK4105A2009B Support 1 gas valve VK4105A2009B Support 1 vanne de gaz VK4105A2009B Support 1 gasventil VK4105A2009B 15 30 160 00107 00 Support 2 gasklep VK4105A2009B Support 2 gas valve VK4105A2009B Support 2 vanne de gaz VK4105A2009B Support 2 gasventil VK4105A2009B 15 31 207 00036 00 Metaalschroef verzinkt M4x25 VK DIN965 Screw zincked M4x25 VK DIN965 Vis galvanisée M4x25 VK...

Page 79: ...16 DTI10 DTI14 CD 220 350 ...

Page 80: ...ächerscheibe M6 X 16 16 08 160 00048 01 Onderdeel oven voorzijde CD165 CD350 Part oven front CD165 CD350 Pièce détachée four devant CD165 CD350 Ersatzteil Ofen Vorderseite CD165 CD350 16 09 260 00013 00 Verwarmingselement 6KW HR ART 110569 Heating element 6KW HR ART 110569 Résistance 6KW HR ART 110569 Heizelement 6KW HR ART 110569 16 09 260 00034 00 Verwarmingselement 4 5KW Heating element 4 5KW R...

Page 81: ...17 DTI10 DTI14 CD 220 350 ...

Page 82: ...lle étoile intégrée M6 X 16 Schraube mit Fächerscheibe M6 X 16 17 03 160 00068 00 Montageplaat stoombatterij CD165 Mounting plate steam battery CD165 Plaque de montage batterie vapeur CD165 Montageplatte Dampfregister CD165 17 03 160 00069 00 Montageplaat stoombatterij CD220 Mounting plate steam battery CD220 Plaque de montage batterie vapeur CD220 Montageplatte Dampfregister CD220 17 03 160 00070...

Page 83: ......

Page 84: ......

Page 85: ......

Page 86: ......

Reviews: