


17
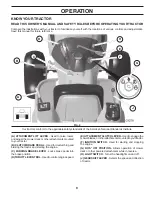
MAINTENANCE
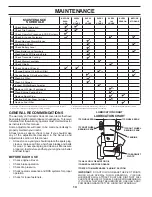
AIR FILTER
Your engine will not run properly using a dirty air filter.
Service air cleaner more often under dusty conditions. See
Engine Manual.
MUFFLER
Inspect and replace corroded muffler and spark arrester (if
equipped) as it could create a fire hazard and/or damage.
SPARK PLUGS
Replace spark plugs at the beginning of each mowing sea-
son or after every 100 hours of use, whichever comes first.
Spark plug type and gap setting is shown in "PROD UCT
SPECIFICATIONS" section of this manual.
CLEAN AIR SCREEN
Air screen must be kept free of dirt and chaff to prevent
engine dam age from overheating. Clean with a wire brush or
com pressed air to re move dirt and stubborn dried gum fibers.
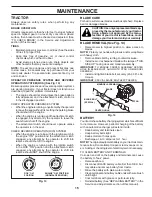
IN-LINE FUEL FILTER (See Fig. 17)
The fuel filter should be replaced once each season. If fuel
filter becomes clogged, ob struct ing fuel flow to car bu re tor,
re place ment is re quired.
• With engine cool, remove filter and plug fuel line sec-
tions.
• Place new fuel filter in position in fuel line with arrow
pointing towards carburetor.
• Be sure there are no fuel line leaks and clamps are
properly positioned.
• Immediately wipe up any spilled gasoline.
Fig. 17
FUEL
FILTER
CLAMP
CLAMP
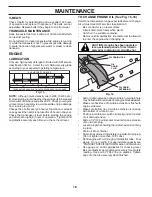
ENGINE COOLING SYSTEM (See Fig. 18)
Debris may clog the engine's air cooling system. Remove
blower housing and clean the area shown to prevent over-
heating and engine damage.
CLEAN OUT CHAFF AND DEBRIS
02744
AIR SCREEN
Fig. 18
Fig. 19
•
Keep finished surfaces and wheels free of all gasoline,
oil, etc.
• Protect painted surfaces with automotive type wax.
We do not recommend using a garden hose or pressure
washer to clean your tractor unless the engine and trans-
mission are covered to keep water out. Water in engine or
transmission will shorten the useful life of your tractor. Use
compressed air or a leaf blower to remove grass, leaves
and trash from tractor and mower.
CLEANING
• Clean engine, battery, seat, finish, etc. of all foreign
matter.
• Clean debris from steering plate. Debris can restrict
clutch/brake pedal shaft movement, causing belt slip
and loss of drive.
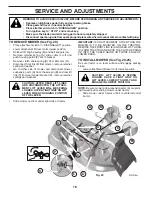
CAUTION:
Avoid all pinch points and
movable parts (See Fig. 19)
CLUTCH/BRAKE PEDAL
STEERING
PLATE
STEERING SYSTEM,
DASH, FENDER AND
MOWER NOT SHOWN
CLEAN TOP SIDE
CAUTION:
PINCH
POINTS