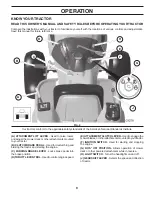
Weed Eater W14538 Operator'S Manual Download Page 10

10

OPERATION


The operation of any tractor can  result in foreign objects thrown into the eyes, which can result 

in severe eye dam age.  Always wear safety glass es or eye shields while operating your tractor 

or per form ing any adjustments or repairs.  We rec om mend a wide vision safety mask over spec-

tacles or stan dard safety glasses.

STOPPING (See Fig. 6)

MOWER BLADES -
• 

To stop mower blades, place attachment clutch control 

in the “DIS EN GAGED” position (

).

GROUND DRIVE -
•  To stop ground drive, depress clutch/brake pedal into 

full “BRAKE” po si tion.

•  Move gearshift lever (J) to neutral po si tion.
ENGINE - 
•  Move throttle control (D) between half and full speed 

(fast) position.

NOTE:

 Failure to move throttle control between half and full 

speed (fast) position, before stop ping may cause engine 

to “back fire”.

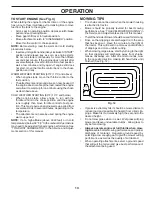
HOW TO USE YOUR TRACTOR

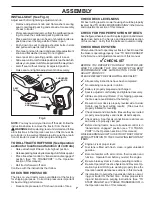
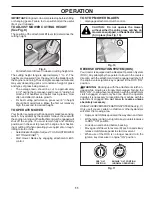
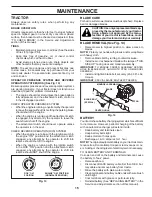
TO SET PARKING BRAKE (See Fig. 5)

Your tractor is equipped with an operator presence sens-

 ing  switch.  When engine is running, any attempt by the 

op er a tor to leave the seat without first setting the parking 

brake will shut off the engine.
•  Depress clutch/brake pedal (B) all the way down and 

hold.

• 

Pull parking brake lever (C) up and hold, re lease pres-

 sure from clutch/brake pedal (B), then release parking 

brake lever.  Pedal should re main in brake position.  

Make sure parking brake will hold tractor secure.

B

C

Fig. 5

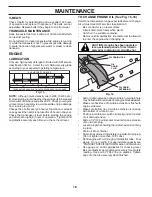
TO USE THROTTLE CONTROL (D) (See Fig. 7)

Always operate engine at full speed (fast).
• 

Operating engine at less than full speed (fast) reduces 

the engine's operating efficiency.

•  Full speed (fast) of fers the best mower per for mance.

Fig. 7

Fig. 8

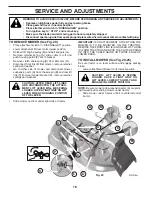
TO MOVE FORWARD AND BACKWARD 

(See Fig. 8)

The direction and speed of movement is controlled by the 

gearshift lever (J). 
1.  Start tractor with clutch/brake pedal depressed and 

gearshift lever in neutral position.

2.  Move gearshift lever to desired po si tion. 
3.  Slowly release clutch/brake pedal to start movement.

( ) 

ATTACHMENT 

CLUTCH LEVER  

“ENGAGED”

(


) ATTACHMENT 

CLUTCH LEVER 

“DIS EN GAGED”

Fig. 6

•  Turn ignition key (F) to “STOP” position and remove 

key. Always remove key when leaving tractor to prevent 

un au tho rized use.

•  Never use the choke to stop the engine.

IMPORTANT: 

LEAVING THE IGNITION SWITCH IN ANY 

POSITION OTHER THAN "STOP" WILL CAUSE THE BATTERY 

TO BE DIS CHARGED, (DEAD).

NOTE:

 Under certain conditions when tractor is standing 

idle with the engine running, hot engine exhaust gases may 

cause “browning” of grass. To eliminate this possibility, al-

ways stop engine when stopping tractor on grass areas.

CAUTION: Always stop tractor com-

 plete ly, as described above, and set 

parking brake before leav ing the op er a-

 tor's position.

D

F

J

Summary of Contents for W14538

Page 1: ...AWAY OPERATOR S MANUAL MODEL W14538 LAWN TRACTOR ALWAYS WEAR EYE PROTECTION DURING OPERATION WARNING Read this Manual and follow all Warnings and Safety Instructions Failure to do so can result in ser...

Page 2: ...p engine and remove keys before dismounting Disengage blades when not mowing Shut off engine and wait for all parts to come to a complete stop before cleaning the machine removing the grass catcher or...

Page 3: ...h towed equipment except at the hitch point Follow the manufacturer s recommendation for weight limits for towed equipment and towing on slopes Never allow children or others in or on towed equipment...

Page 4: ...ions under Maintenace and Stor age sections of this owner s manual WARNING This tractor is equipped with an internal combustion engine and should not be used on or near any unimproved forest covered b...

Page 5: ...Wheel Steering Wheel 1 Washer Seat 1 Seat Steering Boot Steering Extension Shaft Steering Wheel Adapter Key s Slope Sheet 1 Oil Drain Tube For Future Use 1 Hex Bolt 1 Lock Washer 1 Large Flat Washer...

Page 6: ...ES IN SKID THAT MAY PUNCTURE TIRES WHERE TRACTOR IS TO ROLL OFF SKID TOOLS REQUIRED FOR ASSEMBLY A socket wrench set will make assembly easier Standard wrench sizes are listed 1 5 16 wrench Utility kn...

Page 7: ...HE BEST PERFORMANCE AND SATISFACTION FROM THIS QUALITY PRODUCT PLEASE REVIEW THE FOLLOWING CHECKLIST All assembly instructions have been completed No remaining loose parts in carton Battery is properl...

Page 8: ...ty alert symbol is used to identify safety inform ation about hazards which can result in death serious injury and or property damage DANGER indicates a hazard which if not avoided will result in deat...

Page 9: ...mower deck or other attachments mounted to your tractor B CLUTCH BRAKE PEDAL Used for declutching and braking the tractor and starting the engine C PARKING BRAKE LEVER Locks brake pedal into the brake...

Page 10: ...pedal B then release parking brake lever Pedal should remain in brake position Make sure parking brake will hold tractor secure B C Fig 5 TO USE THROTTLE CONTROL D See Fig 7 Always operate engine at f...

Page 11: ...average lawn should be cut to approximately 2 1 2 during the cool season and to over 3 during hot months For healthier and better looking lawns mow often and after moderate growth For best cutting per...

Page 12: ...asolinewithaminimum of 87 octane Use of leaded gasoline will increase carbon and lead oxide deposits and reduce valve life Donotmixoilwithgasoline Purchasefuelinquantities thatcanbeusedwithin30daystoa...

Page 13: ...engine has run out of fuel it will take extra cranking time to move fuel from the tank to the engine Sit on seat in operating position depress clutch brake pedal and set parking brake Place gear shift...

Page 14: ...Fasteners Check Replace Mower Blades Che Clean Debris Off Steering Plate ck Transaxle Cooling Che Check Operator Presence ROS Systems ck V Belts Check Mower Levelness LUBRICATION CHART GENERAL RECOMM...

Page 15: ...gnition switch in the ROS ON position and the attachment clutch engaged any attempt by the operator to shift into reverse should NOT shut off the engine BLADE CARE Forbestresultsmowerbladesmustbekepts...

Page 16: ...ace belts if they begin to slip from wear TO CHANGE ENGINE OIL See Fig 15 16 Determine temperature range expected before oil change All oil must meet API service classification C Be sure tractor is on...

Page 17: ...carburetor Be sure there are no fuel line leaks and clamps are properly positioned Immediately wipe up any spilled gasoline Fig 17 FUEL FILTER CLAMP CLAMP ENGINE COOLING SYSTEM See Fig 18 Debris may c...

Page 18: ...f mower and disconnect mower suspension arm A from chassis pin B and rear lift link C from rear mower bracket D remove retainer springs and washers CAUTION AFTER REAR LIFT LINKS ARE DISCONNECTED THE A...

Page 19: ...Repeat on opposite side of tractor ATTACH REAR LIFT LINKS C Lift rear corner of mower and position slot in link assembly over pin D on rear mower bracket and secure with washer and retainer spring Ins...

Page 20: ...nut will change mower height about 3 16 Test your adjustment by mowing some uncut grass and visually checking the appearance Readjust if necessary until you are satisfied with the results PRECISION SI...

Page 21: ...rward If the rear wheels rotate then the brakeneedstobeserviced Contactaqualifiedservicecenter TRANSAXLE GEAR SHIFT LEVER NEUTRAL ADJUSTMENT See Fig 31 Thetransaxleshouldbeinneutralwhenthegearshiftlev...

Page 22: ...OTHER VEHICLES TO ATTACH JUMPER CABLES Connect one end of the RED cable to the POSITIVE terminal of each battery A B taking care not to short against tractor chassis ConnectoneendoftheBLACKcabletothe...

Page 23: ...ASSEMBLY See Fig 35 Raise hood Unsnap headlight wire connector Stand in front of tractor Grasp hood at sides tilt toward engine and lift off of tractor To replace reverse above procedure ENGINE TO ADJ...

Page 24: ...UELSYSTEMPARTSSUCH AS CARBURETOR FUEL FILTER FUEL HOSE OR TANK DURING STORAGE ALSO EXPERIENCE INDICATES THAT ALCOHOL BLENDED FUELS CALLED GASOHOL OR USING ETHANOLORMETHANOL CANATTRACTMOISTUREWHICH LEA...

Page 25: ...aulty ignition switch 7 Check replace ignition switch 8 Faulty solenoid or starter 8 Check replace solenoid or starter 9 Faulty operator presence switch es 9 Contact an authorized service center depar...

Page 26: ...l speed too fast 2 Shift to slower speed 3 Wet grass 3 Allow grass to dry before mowing 4 Mower deck not level 4 Level mower deck 5 Low uneven tire air pressure 5 Check tires for proper air pressure 6...

Page 27: ...never across the face Do not mow slopes greater than 15 degrees Make turns gradually to prevent tipping or loss of control Exercise extreme caution when changing direction on slopes 1 Fold this page a...

Page 28: ...12 17 09 BAD Printed in the U S A...

Reviews: