


9.1.1.1 Cleaning
•
All dismantled components must be cleaned and then dried.
•
Existing seal residues on the components must be completely and carefully removed.
9.1.1.2 Visual inspection
•
Inspect all components for damage (cracks, deformation, wear, etc.) and replace if necessary.
•
Inspect the plugs and cables for corrosion, loose contacts, crimping faults, etc. and repair them if necessary.
•
Check plug strips for signs of corrosion and contacts to ensure they are secure. Repair them if necessary.
9.1.2 Carrying out modifications
The constant development of our heaters is aimed at optimizing them so as to prevent failures and malfunctions.
Generally it is possible to modify heaters that are already in use. Corresponding modification kits are available for
this purpose. The following describes modifications that can be carried out without any great effort during
standard repair work:
•
Installation of an external room temperature sensor for better temperature control (see Section 9.1.2.1).
9.1.2.1 Installation of an external room temperature sensor
General information
The Air Top Evo 40 / Air Top Evo 55 heater optimally regulates the desired temperature when its temperature
sensor is loaded with the air temperature of the main occupied area. In certain circumstances, this is not always
possible using the room temperature sensor integrated in the control unit due to the installation circumstances. In
this case, optimum temperature control can be ensured using an external room temperature sensor fitted in the
appropriate area.
Method
1.
Select a suitable position for an external room temperature sensor.
NOTE:
•
The external room temperature sensor should not be in the direct line of hot air and not close to heat
sources (for example the vehicle’s own heating system).
•
The external room temperature sensor is to be installed at medium height in the vehicle cabin on
surfaces that are as vertical as possible.
•
The installation site should not be exposed to direct sunlight.
•
Do not install the external room temperature sensor behind curtains or the like.
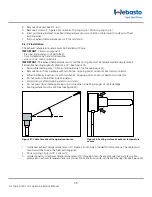
2. Remove the cover and pull blind plug off control unit (connector X5).
3. Install the external room temperature sensor and route the cable to the heater.
4. Connect the plug on the external room temperature sensor to socket X5 on the control unit and fit the
cover.
5. Conduct a trial and check the control properties.
54
Air Top Evo 40 / Air Top Evo 55 Service Manual
Summary of Contents for Air Top Evo 40
Page 63: ...4 2015...


