


Granudos 45/100-CPR Touch XL + Touch + S5
Dosing unit
Index: 02
Date modified: 06/06/2019
OI No.: BA SW 003-02 Granudos 45-100 CPR Touch+Touch+S5-Dosiereinheit EN.docx Page 47 of 58
7.1.4
Maintaining and setting the rinsing tray inlet floater control valve
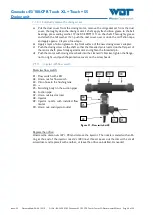
Figure 32, Float control valve, complete and tappet for float valve
Overview float valve, complete
101.
Hose connector for flushing water hose 6x1mm with
O-ring
102.
3/8” nut with gasket (not illustrated)
103.
Union nut for float assembly
104.
Adjustment screw for water level
105.
Float 250ml
106.
Float valve body
Overview Tappet for float valve
108.
Membrane piston
109.
Sealing membrane
110.
Valve cone with O-ring gasket
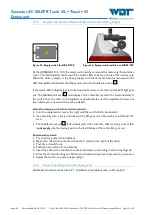
Replace the sealing membrane
a)
Unscrew the union nut (103) and remove the upper part of the float valve.
b)
Remove the inner membrane valve assembly (108-110), pull the valve cone from the
membrane piston (108) and install a new sealing membrane (109) on the valve cone.
c)
Replace the O-ring on the valve cone (109) as well.
d)
Reinstall in the reverse sequence.
e)
Reset the water lever in the flushing tank. See
Section 5.2.6.
108
109
110
104
101
102
103
106
105


