background image

© 2018

www.teamWavelength.com

19

LDTC2/2 LASER DIODE DRIVER AND TEMPERATURE CONTROLLER

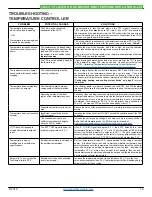
TROUBLESHOOTING – 
TEMPERATURE CONTROLLER

PROBLEM

POTENTIAL CAUSES

SOLUTIONS

Temperature is decreasing 

when it should be increasing.

–OR–

Temperature is increasing when 

it should be decreasing.

The TEC may be connected 

backwards to the LDTC.

The convention is that the 

red

 wire on the TEC module connects to 

TEC+ (pin 6) and the 

black

 wire to TEC- (pin 5). If your TEC is connected in 

this manner and the problem persists, the TEC module itself may be wired in 

reverse. Switch off power to the system, reverse the connections to the LDTC, 

and then try again to operate the system.
TEC wiring polarity is dependent on temperature sensor type (NTC vs. PTC). 

Verify that the polarity is correct for the sensor type you are using (

Table 4

).

Temperature increases beyond 

the setpoint and will not come 

down.

The heatsink may be inadequately 

sized to dissipate the heat from the 

load and TEC module, and now 

the system is in a condition called 

thermal runaway

.

Increase the size of the heatsink, add a fan to blow air over the heatsink,  

and/or reduce the ambient air temperature around the heatsink.

Apply a thin layer of thermal paste or use thermal washers between the load, 

the TEC surfaces, and the heatsink.

The TEC is not adequately sized for 

the thermal load.

The heat being generated by the load may be too great for the TEC to pump 

to the heatsink; a larger TEC may be needed.  Consult our technical note  

TN-TC01: Optimizing Thermoelectric Temperature Control Systems

 at 

www.teamwavelength.com/download/applicationtechnotes/tn-tc01.pdf

The temperature of my heater-

based system increases without 

stopping.

The current limits might not be 

correctly configured.

When using a heater the current limit trimpots LIM A and LIM B must be 

set according to the temperature sensor type you are using. If the load 

temperature increases past the setpoint and continues to increase, one of 

the current limit trimpots may have been improperly set. Refer to 

Table 3

 and 

“Configuring  heating  and  cooling  current  limits”  on  page  9 

for more 

information.

Temperature does not stabilize 

very well at the setpoint.

Poor thermal contact between 

components of the thermal load.

Use thermal paste or washers between the load/TEC and TEC/heatsink 

interfaces. Make sure the temperature sensor is in good thermal contact with 

the load.

Operating outside of the ideal 

region of the temperature sensor.

The sensor type and bias current should be selected to maximize sensitivity at 

the target temperature. Thermistors provide the best performance, particularly 

for applications where a single setpoint temperature must be accurately 

maintained.  For  example,  at  25°C  a  10  kΩ  thermistor  has  a  sensitivity  of 

43 mV/°C, whereas an RTD sensor has a sensitivity of 4 mV/°C.

Proportional control term is set too 

high.

Reduce the value of the proportional term. For more information, contact the 

factory.

Temperature does not reach the 

setpoint.

Insufficient current driven to the 

TEC or Heater.

Increase the current limit - but DO NOT exceed the specifications of the TEC 

or heater.

The controller does not have 

sufficient compliance voltage to 

drive the TEC or heater.

Increase the power supply voltage; be certain to verify that the controller is 

within the Safe Operating Area; the SOA calculator is found at:

www.teamwavelength.com/support/design-tools/soa-tc-calculator/

LDTC does not respond to 

external temperature setpoint 

input.

The EXT T SET signal is below the 

minimum signal value of 0.3 V.

If the R TC SET signal falls below 0.3 V, the LDTC defaults to a “safe 

temperature” setpoint voltage of 1 V (for a 10 kΩ thermistor at 100 µA bias 

current,  the  default  temperature  setpoint  is  25°C).  The  safe  temperature 

setpoint voltage can be changed at the factory if your application requires it. 

To reset the safety circuit, the R TC SET signal must be greater than 0.4 V.

Temperature is slow to 

stabilize and is not within the 

specifications.

Setpoint temperature is set close to 

the ambient temperature.

Set  the  temperature  at  least  10°C  above  ambient  when  using  a  resistive 

heater.  A resistive heater is unable to precisely maintain temperature near 

ambient because once the temperature overshoots the setpoint, the controller 

turns off and relies on ambient temperature to cool the load.  If setting the 

temperature  10°C  or  more  above  ambient  is  not  possible,  then  choose  a 

thermoelectric cooler, which can alternately heat and cool the load to maintain 

a more precise setpoint temperature.

Setpoint is 1 V even when the 

Tset trimpot is fully OFF.

Failsafe circuit has been activated 

due to low setpoint.

Increase the temperature setpoint to a value above 0.3 V. Once the Tset 

value becomes greater than 0.3 V, the failsafe circuit will be disabled and the 

setpoint will be at the set value.

Summary of Contents for LDTC2/2E

Page 1: ...o system components Adjustable trimpots configure heat and cool current limits The WLD3343 Laser Driver maintains precision laser diode curent Constant Current Mode or stable photodiode current Consta...

Page 2: ...A Laser Diode Type B Laser Diode Type C Laser Diode Common Cathode Laser Diode Anode Photodiode Cathode Common Isolated Photodiode Short the Laser Diode Anode to Photodiode Cathode Common Anode Laser...

Page 3: ...t set T SET to 0 85 V NOTE To stay within the Safe Operating Area while using the test load VS must not exceed 5 V RECOMMENDED LASER DRIVER TEST LOAD For the laser diode driver recommended simulated l...

Page 4: ...ge proportional to the current flowing through the laser diode See Table 2 for the transfer function 9 ACT T MON Actual Temperature Monitor Green Monitor the actual voltage produced by the temperature...

Page 5: ...s voltage output of Photodiode Monitor Pin 2 Connector J2 to forward current through Photodiode 2 RPD 499 for 2 0 mA range RPD 4 99 k for 200 A range NOTE Available on Rev B and later Actual Temperatu...

Page 6: ...BIENT 25 C Long Term Stability 24 hours 0 05 TAMBIENT 25 C OUTPUT Peak Current IMAX 1 8 2 0 2 2 A With heat sink and fan Compliance Voltage Laser Diode Load 3 0 V Full Temp Range ILD 2 0A 5V Rise Time...

Page 7: ...Sensor Compatibility Thermistor RTD IC Sensors Sensor Input Voltage Range 4 GND to VDD 2 0 V Sensor Input Damage Threshold 0 7 VDD 7 V VSET Input Impedance 500 k VSET Damage Threshold 0 7 VDD 7 V BIA...

Page 8: ...Constant Power operation is available where the driver adjusts the laser forward current in order to maintain a constant photodiode current Available remote LD TC setpoint control Separate heating an...

Page 9: ...CW WIRE OUTPUT CONNECTION Use Table 4 to determine the connection from the LDTC2 2 to your thermoelectric or resistive heater Table 4 Wiring vs Sensor Load Type SENSOR LOAD TEC PIN J3 6 TEC PIN J3 7...

Page 10: ...e Operating Calculators available on our website TEMPERATURE SETPOINT Wavelength introduces a special setpoint circuit with the LDTC2 2 An onboard trimpot TSET will adjust the voltage from 0 3 to 2 5...

Page 11: ...only when power is not applied to VDD Setting for 2 0 mA range Setting for 200 A range CC CP CC CP ExtTset Vset PDset Vset PDset ExtTset Figure 8 Select the photodiode range with the PDset jumper The...

Page 12: ...use proper operator grounding and anti static procedures MONITOR LASER DIODE OR PHOTODIODE CURRENT Equation 1 provides a transfer function for converting the voltage output of LD I M Laser Diode Curre...

Page 13: ...ow in Figure 10 and do not connect an external voltage source to the R LD SET input The ISET trimpot provides a setpoint adjustment of between zero to 2 5 V Use On board trimpot OR Sum ExtTset with tr...

Page 14: ...onto the corner posts and press PCB into seated position Install the eight screws in the WLD and WTC 4 Install the cover and cables PROPORTIONAL GAIN INTEGRATOR TIME CONSTANT PI TERMS The LDTC2 2 is...

Page 15: ...r RSENSE vs Maximum Laser Diode Current ILDMAX MAXIMUM OUTPUT CURRENT ILDMAX CONSTANT POWER RSENSE CONSTANT CURRENT RSENSE 50 mA 25 00 20 00 125 mA 10 00 8 00 250 mA 5 00 4 00 500 mA 2 50 2 00 1 25 Am...

Page 16: ...CC LDC PDA PDC LDA VDD VDD Ext Vset LIM S2 EG2211 R17 1 00K 1 R7 1 00K R19 1 00K R18 150 R16 10K 2 3 1 4 11 U6A 5 6 7 4 11 U6B 9 10 8 4 11 U6C 13 12 14 4 11 U6D R11 1 00K R10 1 00K R12 1 00K R9 1 00K...

Page 17: ...T T SET T GND ACT T SET T Common Common TEC TEC Sensor R33 10 0K R32 100K 1 2 3 J1 CON3 VDD PMON IMON Ext Vset Remote Enable PMON IMON Ext Vset Rem En Common PD MON Common NO 6 COM 5 NC 4 IN 1 V 2 GND...

Page 18: ...nd current IMAX specifications Calculate the voltage drop across the controller VDROP VDD VMAX Mark VDROP on the X axis and extend a line upward Mark IMAX on the Y axis and extend a line to the right...

Page 19: ...sure the temperature sensor is in good thermal contact with the load Operating outside of the ideal region of the temperature sensor The sensor type and bias current should be selected to maximize se...

Page 20: ...ge 12 for instructions on setting the laser driver current limit Laser driver is compliance limited Check the laser diode specifications to determine the forward voltage VF Make sure that the LDTC2 2...

Page 21: ...ACK GREEN BLACK DESCRIPTION LASER DIODE CATHODE PHOTODIODE ANODE PHOTODIODE CATHODE LASER DIODE ANODE LOW CURRENT GROUND TEC CONNECTION TEC CONNECTION SENSOR POSITIVE CONNECTION SENSOR NEGATIVE CONNEC...

Page 22: ...NSIONS LDTC2 2E WITH ENCLOSURE 2 70 68 6 mm 0 15 3 8 mm 2 40 61 0 mm 4 80 121 9 mm 4 20 106 7 mm 0 15 3 8 mm 4 50 114 3 mm 0 13 3 2 mm 4 PLACES 0 30 7 6 mm 1 14 29 0 mm 500 1 27 875 2 22 125 0 32 3 70...

Page 23: ...5 3 8 mm 2 20 55 9 mm 0 15 3 8 mm 3 70 94 0 mm 0 062 1 6 mm 0 50 12 6 mm 0 50 12 7 mm 4 00 101 6 mm 2 50 63 5 mm 4 20 106 7 mm 0 250 6 3 mm 0 156 4 0 mm 0 750 2 000 3 700 4 000 0 150 2 200 2 500 0 150...

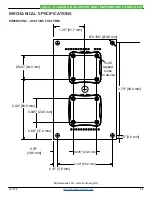
Page 24: ...LLER MECHANICAL SPECIFICATIONS DIMENSIONS HEATSINK FOOTPRINT 0 78 19 8 mm 0 945 24 0 mm 0 68 17 2 mm 0 945 24 0 mm 2 40 60 9 mm 0 945 24 0 mm 1 25 31 7 mm 0 156 4 0 mm 4 40 tapped holes in device 0 15...

Page 25: ...E The information contained in this document is subject to change without notice Wavelength will not be liable for errors contained herein or for incidental or consequential damages in connection with...

Reviews: