Field Testing Procedure
FEBCO recommends the use of the appropriate test method
presented in the ASSE Series 5000 manual that is consistent with
the local codes.
Before starting the procedure, remove the freeze sensor mounting
clip from the test cock and set it aside to avoid damage. After the
procedure is finished, reattach the clip on either test cock.
Equipment Required
Sight Tube Test Kit (1" clear plastic Sight Tube about 40" long with
appropriate fittings to attach to test cocks of vacuum breaker)
Purpose of Test
To test the air inlet and the check valves for proper performance.
Test Air Inlet
The air inlet must be tested to verify opening above 1 psi.
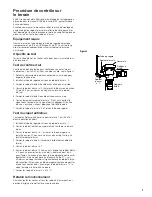
(For visual aid information, see Figure 3.)
1. Remove the canopy from the top of the vacuum breaker to
expose the air inlet.
2. Install the sight tube at test cock No. 2.
3. Close ball valve B on the discharge side of the vacuum breaker.
4. Open test cock No. 2, fill the tube to about 30" above the poppet,
then close the test cock.
5. Close ball valve A on the inlet side of the vacuum breaker.
6. Slowly open test cock No. 2 while watching the poppet in the air
inlet. The poppet must unseat. If the air inlet does not open, it is
sticking and must be repaired.
7. Close test cock No. 2 and remove the sight tube.
Test Check Valve
The check valve must be tested to hold against 1 psi in the direction
of flow.
1. Install the sight tube at test cock No. 1.
2. Open ball valve A to allow the unit to refill with water.
3. Open test cock No. 1 and allow the sight tube to fill about 30"
above the top of the unit, then close the test cock.
4. Close ball valve A. (Ball valve B should already be closed.)
5. Open test cock No. 1.
6. Open test cock No. 2. Water may run from test cock No. 2 initially,
but should stop after a short time. The level of water in the sight
tube may drop a little, but should not drop below 28" above the
check valve. (Centerline of the discharge ball valve.) If the level in
the sight tube continues to drop and water continues to run out of
test cock No. 2, the check valve is leaking and must be repaired.
7. Close test cocks No. 1 and No. 2.
Restore Operation
Restore all valves and test cocks to the original positions and replace
the canopy.
Figure 3
Canopy
Sight Tube
Test Cock
No. 1
Test Cock No. 2
Ball Valve A
Ball Valve B
3


