10
9. Concrete Pour
9.1 Check the entire trench system for proper anchoring, alignment, and leveling,
and connections prior to pouring concrete. (Although the Dead Level frame-
anchored design dramatically reduces the risk of floating, a poorly anchored
system can shift during the pour).
9.2 Check the excavation to be sure a minimum of 4" of concrete can be poured
under, and on all sides of the channels.
9.3 Begin the concrete pour, vibrating the concrete adequately as it is placed, to
ensure complete filling of all potential voids around the trench.
9.4 The edge of the trench frame should be approx. 1/16" BELOW the top of the
concrete after finish troweling in order to keep the frame at or below grade
after the concrete is fully cured.
10. Final Inspection
10.1 After the concrete is dry, remove the construction covers, and retighten the
grate lockdowns. (If construction covers will not pry out easily, cut the cover,
and loosen the grate lockdown to free the sides of the cover).
10.2 Replace the covers to protect the installation during the rest of construction if
appropriate.
11. Alternative Installations: Retro-Fit or Suspended
11.1 Cut the existing slab or form a cavity which will enable a 4" concrete pour
below and around the Dead Level system.
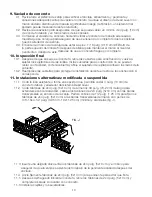
11.2 Cut 2x4's at least 30" in length to span the cavity, and align 2x4's with the
cross bars in the trench frame. Drill 1/2" holes to secure the 2x4's to the
frame cross bars, using 3/8"-16x4-1/2" (minimum) bolts and washers
(Fig. J).
11.3 Insert a thin shim between 2x4's and the frame to ensure the trench
will sit slightly below finished grade after the pour.
11.4 Securely anchor the 2x4's to grade to prevent floating.
11.5 Once the concrete is initially set, remove 2x4's and complete unfinished
areas with concrete.
11.6 Install the grates & lockdowns.
FIG. J
Summary of Contents for Dead Level Series
Page 11: ...Notes...
Page 23: ...Notas...


