Watt Stopper PW-203 Installation Instructions Manual Download Page 9

TROUBLESHOOTING

Lights do not turn ON with motion (LED does flash)

1.  Press and release each button to make sure that the correct lights 

come ON for each relay. 

If the lights do NOT turn ON

, check wire connections, especially the 

Load connection. 

If the lights turn ON

:

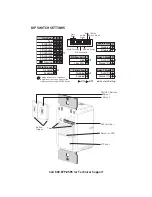
Verify the correct On Mode is selected in DIP switches 8 and 9.


Check to see if light level control is enabled: cover the sensor 
lens with your hand. If the lights come ON, adjust the light level 
setting. 

2.  If lights still do not turn ON, call 800.879.8585 for technical support.

Lights do not turn ON with motion (LED does not flash)

1.  Press and release each button to make sure that the correct lights 

come ON for each relay. If the lights turn ON, verify that Sensitivity is 
on High.

2.  Check the wire connections. 


-  Verify the ground connection.
-  Make sure line and load are not reversed.
-  Confirm that connections are tightly secured. 

3.  If lights still do not turn ON, call 800.879.8585 for technical support.

Lights do not turn OFF

1.  There can be up to a 30 minute time delay after the last motion is 

detected. To verify proper operation, set DIP switch 1 to ON, then reset 
switches 1, 2, and 3 to OFF to start Test Mode. Move out of view of the 
sensor. The lights should turn OFF in approximately 5 seconds.

2.  Verify that the sensor is mounted at least six feet (2 meters) away from 

any heating/ventilating/air conditioning device that may cause false 
detection. Verify that there is no significant heat source (e.g., high 
wattage light bulb) mounted near the sensor.

3.  If the lights still do not turn OFF, call 800.879.8585 for technical support.

Sensing motion outside desired areas

1.  Select PIR Sensitivity      – Low (DIP switch 5 = ON) if necessary.
2.  Mask the PIR sensor’s lens to eliminate unwanted coverage area. 

Red LED is lit all the time and the sensor features don’t work.

1.  Check DIP switches 1,2,3. If they are all ON the unit is in Service Mode. 

Set the DIP switches to a valid Time Delay setting.

2.  If re-setting the Time Delay switches does not clear the LED call 

technical support.

Summary of Contents for PW-203

Page 1: ...c or electronic ballast Horsepower Rating each relay 1 6 HP 120VAC Time Delay Adjustment 5 to 30 minutes Walk Through Mode 3 minutes if no activity after 30 sec Test Mode 5 sec for 10 min with DIP switch setting PIR Adjustment High or Low DIP switch Light Level Adjustment 8fc to 180 fc Alerts Selectable Audible Visual Cover plate not included US Patents 5640113 6617560 PW 203 Passive Infrared Mult...

Page 2: ...ccupancy turns ON all the lights that are connected to the same circuit The occupant can turn OFF the load at any time by pressing the ON OFF button of any sensor that is connected to the circuit If the occupant forgets to turn OFF the lights the last sensor to detect occupancy turns them all OFF after the time delay expires A walk through mode can turn lights OFF after only 3 minutes if no activi...

Page 3: ...egree field of view The red LED on the sensor flashes when the PIR detects motion Masking the lens Opaque adhesive tape is supplied so that sections of the PIR sensor s view can be masked This allows you to eliminate coverage in unwanted areas Since masking removes bands of coverage remember to take this into account when troubleshooting coverage problems PIR Coverage 7 5 2 2m 15 4 5m 20 6 1m 35 10 ...

Page 4: ...e first 30 seconds If motion continues beyond the first 30 seconds the set time delay applies High DIP 5 OFF Default setting Suitable for most applications PIR Sensitivity Adjustment The PW sensor constantly monitors the controlled environment and automatically adjusts the PIR to avoid common ambient conditions that can cause false detections while providing maximum coverage Reduces sensitivity by...

Page 5: ...ings provided No Audible Alerts DIP 7 OFF With an ON Mode DIP switch in the OFF position the load turns ON and OFF automatically based on occupancy If the load is turned OFF manually Presentation Mode operation applies This prevents the load from turning ON automatically after it was deliberately turned OFF Pressing the button to turn lights ON returns the sensor to Auto ON mode Switch 9 default i...

Page 6: ...ll box and tighten 4 Turn the circuit breaker ON Wait one minute then push the Auto ON OFF switch for each load and the lights will turn ON There is a delay due to initial power up of the sensor that only occurs during installation 5 Test and adjust the sensor if necessary 6 Attach the cover plate 12 14 AWG Cu Wire Only Strip Gage 1 2 12 7mm Visit our website for FAQs www wattstopper com WARNING T...

Page 7: ...e aid of artificial light In order to set this as the threshold level of brightness so that the artificial lights remain OFF perform the following steps 1 Make sure the room is lit appropriately 2 Put the sensor into TEST mode using the Time Delay DIP switches 3 Press and hold the ON OFF button Relay 1 button on the PW 203 for 3 seconds until you hear a beep 4 Step away from the sensor After 25 se...

Page 8: ... 7 Disabled Enabled Audible Alert 4 Disabled Enabled Walk Through 9 1 2 3 4 5 6 7 8 Time Delay Walk Through ON Relay 1 Mode Relay 2 Mode Audible Alerts PIR Sensitivity Visible Alerts Test 10 minutes 15 minutes 20 minutes 25 minutes 30 minutes Service 5 minutes 1 2 3 Time Delay Service bypasses occupancy light level functions Control the load manually using ON OFF button 6 Disabled Enabled Visible ...

Page 9: ...t turn ON call 800 879 8585 for technical support Lights do not turn OFF 1 There can be up to a 30 minute time delay after the last motion is detected To verify proper operation set DIP switch 1 to ON then reset switches 1 2 and 3 to OFF to start Test Mode Move out of view of the sensor The lights should turn OFF in approximately 5 seconds 2 Verify that the sensor is mounted at least six feet 2 me...

Page 10: ...t damages with respect to loss of property revenue or profit or cost of removal installation or reinstallation 2800 De La Cruz Boulevard Santa Clara CA 95050 Technical Support 800 879 8585 www wattstopper com 10188r2 9 2010 Please Recycle COVER PLATES WattStopper PW series wall switches fit behind industry standard decorator style switch cover plates Units come in the following colors which are in...

Reviews: