background image


RS1  


PLEASE NOTE THESE SPECIFICATIONS BEFORE PROCEEDING

OPERATING PRESSURE RANGE : 20 - 125 PSI

OPERATING TEMPERATURE RANGE : 33º F - 120º F

INLET / OUTLET PIPE SIZE : 3/4: FNPT

PLEASE COMPLY WITH ALL APPLICABLE PLUMBING CODES

PROTECT THE SOFTENER AND PIPING FROM FREEZING TEMPERATURES

Please read the entire Owner’s Manual and Instruction before installation.

This Owner’s Manual must stay with the unit.

-How A Water Softener Works-

Water hardness is derived from Calcium and Magnesium minerals that have been dissolved into the water under 
the earth’s surface. These minerals are found in limestone deposits and are the source of hard water. The amount 
of hardness in a given water supply is dependent upon the quantity of Calcium and Magnesium present and the 
length of time water has been in contact with them. This can vary dramatically from well-to-well and, for this reason, 
a water analysis is imperative in order to determine the proper treatment method. The degree of hardness increas-
es as the concentration of Calcium and Magnesium “ions” increase and is measured in 

Grains Per Gallon (gpg).

The problem of hard water in the home / business comes to light in many facets of daily use. Water spots and scum 
left behind on bathtubs, fixtures and showers; wear and tear on appliances; calcium build-up in hot water heaters 
and piping; and, greater amounts of soap and detergents being used are just a few examples.

The modern water softener is designed to reduce hardness ions and their unpleasant side effects. Special resin 
beads in the softener mineral tank are used to change hard water into soft water. The surfaces of these beads are 
covered with sodium ions. As hard water enters the mineral tank and comes into contact with the resin, an ex-
change of ions takes place as dissolved Calcium and Magnesium ions cling to the resin surface and sodium ions 
take their place, thus softening the water. This process is called 

Ion Exchange

. Over time, the sodium ions used 

for the exchange process become depleted and must be replenished.

The water softener provides a 

Regeneration 

process whereby brine solution enters the mineral tank, driving-off 

the collected hardness ions and replenishes the surface of the resin beads with more sodium ions. This process is 
automatically initiated by the control valve on the mineral tank. The regeneration process has five basic cycles as 
follows:

1.  

Backwash

 - The control valve directs the water flow in a reverse direction through the mineral tank, separating  

     the resin beads and flushing any accumulated particles to a waste drain.

2.  

Brine & Rinse

 - In the first part of this cycle, the control valve directs brine solution downward through the 

     mineral tank, driving-off collected hardness ions and replenishing the resin beads with sodium ions. The second  
     part of the cycle rinses hardness ions and excess brine from the mineral tank to the waste drain.

3.  

Rapid Rinse 

- The control valve directs the water flow downward, settling and recompacting the resin bed.

4.  

Brine Refill 

- The control valve directs fresh water into the salt compartment to create new brine solution for the  

     next scheduled regeneration.

5. 

 Service

 - This is the normal “operating” cycle where hard water enters the mineral tank, comes into contact with     

     the resin beads and exchanges hardness ions for sodium ions - the water then becomes “soft” and ready for        
     use.

Softener Specifications

              4

Summary of Contents for rs1

Page 1: ...RS1 RS1 Softener Manual Installation Operation Manual CABINET Water Softener...

Page 2: ...ation Page 5 Master Programming Page 12 Utilizing Bluetooth Page 14 Powerhead Assembly Page 15 Valve Body Assembly Page 16 Cabinet Body Assembly Page 17 Bypass Assembly Page 18 Additional Information...

Page 3: ...that attacks some plastic materials It is recommended that Teflon tape be used to seal plastic Noryl threaded fittings Softener Specifications 3 General Specifications CD24 CD24X CD32 CD32X Grains Cap...

Page 4: ...oft water The surfaces of these beads are covered with sodium ions As hard water enters the mineral tank and comes into contact with the resin an ex change of ions takes place as dissolved Calcium and...

Page 5: ...lumbing connections A level floor position ahead of piping into water heater Unit must be installed at least 10 ahead of the inlet to a water heater to prevent damage due to back up of hot water DO NO...

Page 6: ...assumed by the manufacturer of the softener should this occur Caution If sweat soldering copper pipe remember to always use lead free solder and flux cover bypass valve with wet rags to prevent heat...

Page 7: ...low during regeneration Elbows or other fittings must be kept at a bare minimum Note Where the drain line is elevated above the control valve or exceeds 20 in length 3 4 I D drain line tubing should b...

Page 8: ...ss the Menu Enter button Time of Day will flash 2 To set the Time of Day press the Set Change button First digit will flash Example 12 00 To change digit value press the Set Change button To accept th...

Page 9: ...run to drain for 3 to 4 minutes Warning Close valve on bypass prior to selecting the backwash position After backwash position has been established slightly open bypass to evacuate air from the media...

Page 10: ...d Final Check 1 Be certain the bypass valve is in the SERVICE position 2 Make sure the power supply is connected to an uninterrupted 115 volt outlet 3 Check that the time of day is set 4 Double check...

Page 11: ...Time of Day and Gallons left until the next regeneration The meter will count down to zero 0000 and then regenerate at the scheduled time set Starting Extra Regeneration Cycle 1 To Start Delayed Extr...

Page 12: ...is used to set the maximum amount of time in days the unit can be in service without regeneration This setting is identified by the letter A in the left digit Regeneration will begin at the scheduled...

Page 13: ...1 ON BE 0 OFF 7 Bluetooth Password BBPP is displayed for one second then password is displayed 8 To Exit the Master Programming Mode press the Menu Enter button until time of day returns Note If no bu...

Page 14: ...this device must accept any interference received including interference that may cause undesired operation Changes or modifications not expressly approved by the party responsible for compliance coul...

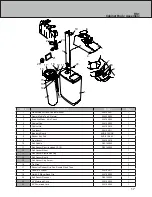
Page 15: ...Number Qty 1 Secondary Plate 20016X002 1 2 Encoder Wheel 20001X007 1 3 Encoder Board 20016X200 1 4 Main Plate 20016X001 1 5 Motor 20016X200 1 6 Brine Cam 20001X122 1 7 Main Gear 20001X120 1 6 1 2 7 4...

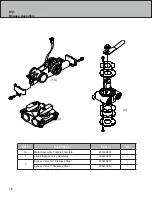
Page 16: ...Ferrule 20251X305 2 12 Injector Cap Screw 20001X226 1 13 Injector Cap 20001X223 1 Ref Description Part Qty 14 Injector Seal 20001X224 1 15 Injector White 20001X219 1 16 Screen 20001X222 1 17 Plug 2000...

Page 17: ...6X011 1 7 Bluetooth Board EVB 019 CAB 1 8 Rubber Key Pad EVA 019 KEY 1 9 Front Insert 20016X012 1 10 Salt Paddle R2014X002 1 11 Salt Sensor Pivot includes 12 15 R2014X005 1 12 Salt Sensor Mount 1 13 S...

Page 18: ...y Ref Description Part Qty 1A Meter Assembly Turbine Complete 20003X200 1 1 Plastic Bypass Valve Assembly 20561X292 1 2 Bypass Valve 3 4 Stainless Steel 20561X270 1 Bypass Valve 1 Stainless Steel 2056...

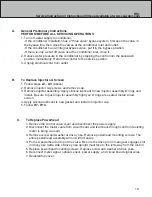
Page 19: ...s and remove cap 3 Remove injector assembly Apply silicone lubricant to new injector assembly O rings and install Be sure to push injector assembly tightly so O rings are seated Install a new screen 4...

Page 20: ...to assure proper function Make sure control valve is returned to the service position 13 Make sure there is enough salt in the brine tank 14 Start regeneration cycle manually if water is hard 15 Repla...

Page 21: ...body Install new seals and spacers individually pressing around the outer edge of each seal to make sure it is seated When all seals and spacers are seated properly you will have a 1 4 of space betwe...

Page 22: ...ver it Resin fouling Call dealer Find out how to confirm it Clean the resin and prevent future fouling Poor distribution channeling uneven bed surface Call dealer Check backwash flow Regenerate more f...

Page 23: ...tionsfor air leaks Internal control leak Call dealer Check piston seals and spacers for scratches and dents 9 Continuous Flow to Drain Foreign material in control piston and seals Call dealer Clean va...

Page 24: ...RS1 WATERSOFT 710 Orange St Ashland OH 44805 l PH 419 281 6829 l FAX 419 281 2375 www WATERSOFT com...

Reviews: