background image

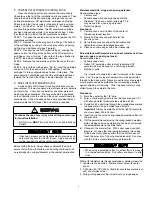
H.  INSTALL THE DRAIN CONNECTION

IMPORTANT NOTES

•  Before starting this procedure, inspect the condition of the 

drain  piping,  especially  in  older  homes  where  the  traps 
and tailpieces can be deceptively thin and frail.  If they are 
in poor condition, it is wise to inform the customer that the 
condition should be remedied.

•  Some local plumbing codes may prohibit the use of sad-

dle-type  valves  and/or  drain  connections.    The  use  of 
saddle-type  valves  are  prohibited  in  Alaska,  Delaware, 
Idaho,  Kentucky,  Massachusetts,  Michigan,  Minnesota, 
New Hampshire, North Dakota, Ohio, and South Dakota.  
Check your local plumbing codes for any restrictions that 
apply.  Massachusetts CMR 248 strictly prohibits the use 
of saddle-type valves.  The feed water connection must 
conform to applicable plumbing codes.

Undercounter Installation:
 

The drain saddle assembly is designed to fit around a 

standard 1-1/2” OD drain pipe.  For smaller (lavatory type) or 
larger (ABS pipe) drains, consult your dealer for special drain 
saddles.
 
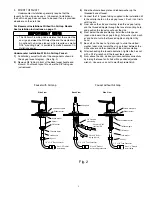
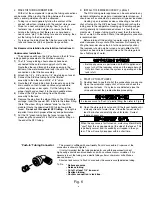
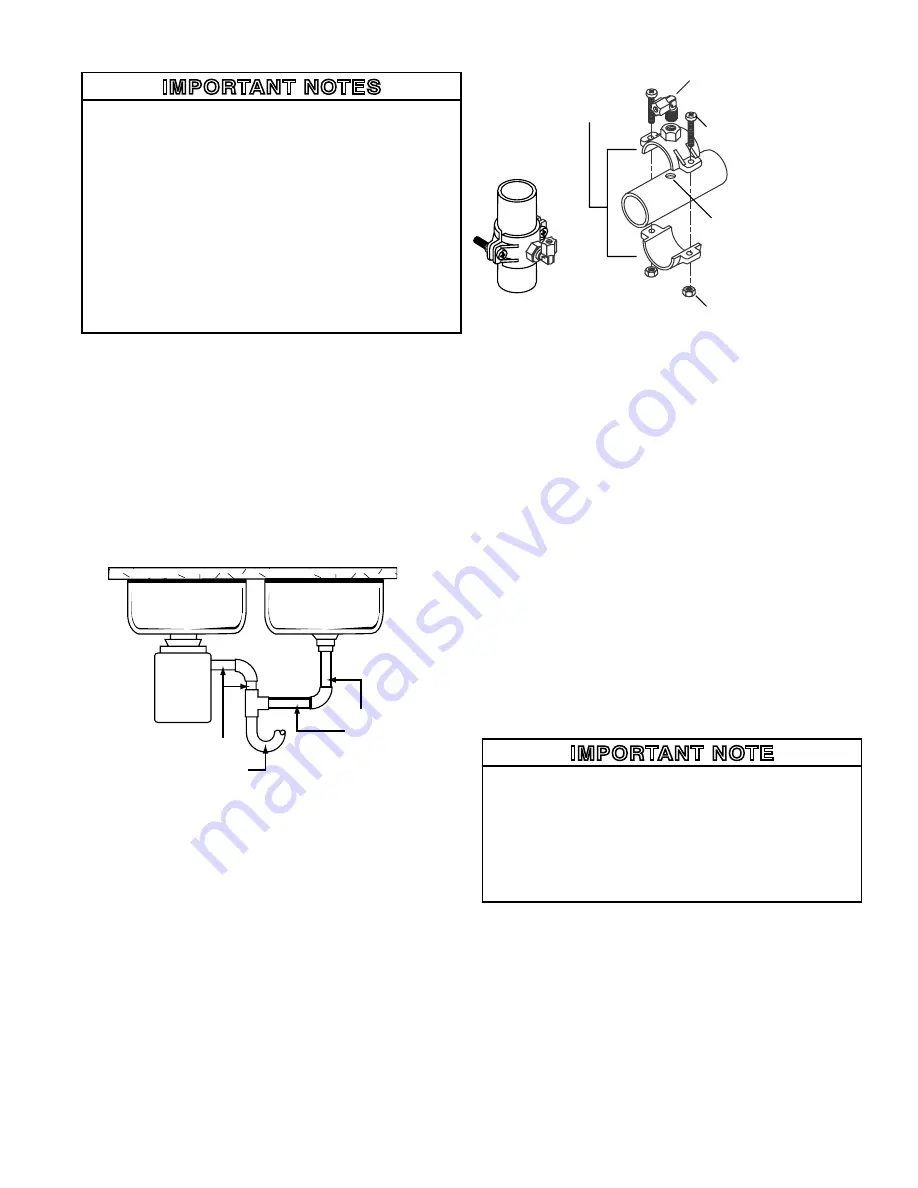
The drain saddle should always be installed above (before) the 
trap and on the vertical or horizontal tailpiece.  Never install the 
drain saddle close to the outlet of a garbage disposal because 
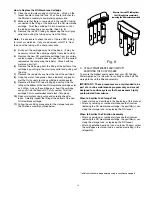
plugging of the RO drain line may occur.  (See Fig. 4)

1)  Remove backing on foam seal and place over hole on  
      threaded half of the drain saddle. Place drain saddle at 
      the selected location and mark the pipe through the thread
      ed opening. 
2)  Drill a 1/4” hole at the marked location through one side of 
 

the drain tailpiece.

3)  Position both halves of the drain saddle on the drain pipe 
 

so that the threaded opening is lined up with the hole in 


the drain pipe.

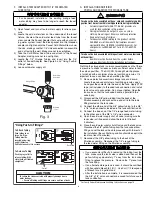
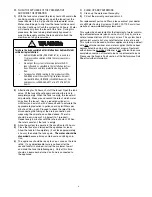
4)  Use the screws and nuts to clamp the drain saddle onto 
 

the drain pipe.  Make sure that there is equal space 


between saddle halves on each side.  Do not overtighten.  


(See Fig. 5)

5)  Orient the elbow in the direction of the RO faucet location.

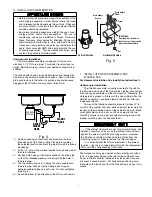
I.  INSTALL THE FILTRATION ASSEMBLY AND 


STORAGE TANK

For Basement Installation See Installation Instructions O.

Undercounter Installation:
 

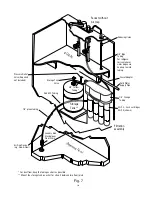
The filtration assembly is usually mounted to the right or 

the left side wall inside of the sink cabinet, taking into consider-
ation the space available and the tank location.  Generally, the 
storage tank is placed in the rear of the sink cabinet while the 
filtration assembly is positioned toward the front for filter car-
tridge accessibility.
 

To mount the filtration assembly, elevate it at least 2” (5 

cm) off of the cabinet floor and, while keeping it level, mark the 
location of the mounting holes on the cabinet side wall.  Make 
small pilot holes with an awl or a drill and screw in the two 
mounting screws; leaving just enough protruding to allow the 
bracket mounting slots to slide over them.

IMPORTANT NOTE

   •  If the cabinet side walls are not of solid construction, the 
filtration assembly can be set on the cabinet floor and held 
against the side wall with the mounting screws.  However, 
the filtration assembly will then need to be lifted from the 
mounting screws in order to remove the filter cartridges.
  

 •   

It is essential that the filters be installed in the correct 

location.  Use the icon coded label to match the replacement 
filters with their corresponding filter heads.

The storage tank may be oriented either vertically or horizon-
tally.  It is generally placed to the rear of the cabinet but can 
be set in the front center (between the sink basins) for ease 
of access if space permits.  For horizontal positioning, care-
fully detach the tank base from the tank bottom and use it as a 
cradle.

7

MOUNT

HERE

NEVER

MOUNT

HERE

Fig. 4

Vertical Position

Horizontal Position

Nut

Screw

Drain Saddle

Elbow

IMPORTANT:

Hole should be located on

top of the pipe if drain saddle

is positioned horizontally.

Drain Saddle

Halves

Fig. 5

GARBAGE

DISPOSAL

Summary of Contents for SQC3 Series

Page 1: ...ries Owner s Manual This Manual is for the Installation Operation and Maintenance of the WATER FACTORY SYSTEMS SQC3 and SQC4 Series Reverse Osmosis RO Drinking Water Appliance Installer Leave with hom...

Page 2: ......

Page 3: ...Number 070595 CT 001 An approved air gap must exist between the RO System reject drain line and the drain line opening to meet plumbing codes To reduce the risk associated with irritation from Sodium...

Page 4: ...urs Do not install in direct sunlight or outdoors All hydro pneumatic tanks must have an appropriate pressure relief valve installed Do not install near water pipes which will be in path of a drilling...

Page 5: ...mber Failure to install the system as instructed will VOID the warranty TABLE OF CONTENTS I Installation Instructions A Determine the appliance location 3 B Prepare the area for installation 3 C Prepa...

Page 6: ...s fittings and tubing that may be required B PREPARE THE AREA FOR INSTALLATION Re move supplies from under the sink and stack them neatly away from the working area Ar range a light for the work area...

Page 7: ...e faucet such as reinforcing ribs support brackets or the cabinet construction Stainless steel sink air gap or non air gap faucet Recommended tools Center punch Variable speed drill and high speed dri...

Page 8: ...ir gap tubing and the threaded nipple through the faucet mounting hole and position the faucet spout over the sink 6 From below the sink countertop install the white spacer open side toward the air ga...

Page 9: ...ntainer of sanitizing granules open it and pour the contents into the end of the tank Apply PTFE tape not included to threaded tank connection and install tank valve onto connection Do not over tighte...

Page 10: ...h side Do not overtighten See Fig 5 5 Orient the elbow in the direction of the RO faucet location I INSTALL THE FILTRATION ASSEMBLY AND STORAGE TANK For Basement Installation See Installation Instruct...

Page 11: ...dispenser It should never be connected to a commercial type bar icemaker Hooking up an icemaker involves connecting a tee with a shut off valve into the 3 8 blue faucet tubing and routing the tubing...

Page 12: ...the reject flow by disconnecting the tubing at the drain connection and measuring the drip rate as outlined above The ratio should be a minimum of 2 5 reject to 1 product Repeat every 5 minutes until...

Page 13: ...k 1 4 green tubing Air Gap Device e g Gap A Flow Laundry Sink Standpipe or Floor Drain Basement Floor Storage Tank Valve Red SFC Tubing Filtration assembly For best flow keep the tubing as short as po...

Page 14: ...ts To mount the filtration assembly keep the bracket level and mark the location of the mounting holes Install wall anchors and or mount ing screws as required Leave the screw heads protruding to allo...

Page 15: ...Close the icemaker valve and wait until the faucet drips Wait for the air to be purged from the system Problem Water leaks from air gap module opening Possible Causes The drain line tubing is looped...

Page 16: ...move cover and twist the filter cartridge 1 4 turn clockwise so that the ears on the cartridge are able to disengage from the head Firmly pull the cartridge from the head It may be necessary to twist...

Page 17: ...mbrane cartridge as far as it will go Line up the cartridge ears insert the cartridge and push it into the head until it is fully seated Twist the cartridge 1 4 turn counterclockwise to lock it into p...

Page 18: ...e filtration assembly to depressurize 2 Remove all of the filter cartridges Turn the cartridges upside down in the sink to drain out as much water from them as possible 3 Place the cartridges in an ai...

Page 19: ......

Page 20: ...If the Product fails to satisfy this Limited Warranty during the warranty period 3M will replace the Product or refund your Product purchase price This warranty does not cover labor The remedy stated...

Reviews: