101-044-E.1
EXPERTS IN WATER CHEMISTRY SINCE 1903
9033X Sodium Analyzer
User Manual
Page 1: ...101 044 E 1 EXPERTS IN WATER CHEMISTRY SINCE 1903 9033X Sodium Analyzer User Manual...
Page 2: ...ron net Please be ready to provide the following information Date analyzer was purchased Analyzer model and serial number Recent maintenance history Calibration slope values and detailed description o...
Page 3: ...s containers packages and chemicals Only qualified personnel should be involved in the installation operation and servicing of the analyzer Follow safety precautions when operating analyzer in conditi...
Page 4: ...st may be sent out to repair or replace the defective part s on location Traveling time and expenses of the Technical Service Specialist is at the customer s expense Equipment sent to Waltron must be...
Page 5: ...shipping needs Check all items received against those on the packing list Chemicals are usually shipped in a separate package and will be itemized accordingly Verify that the number of packages recei...
Page 6: ...L SYSTEM OPTIONAL 15 2 4 4 PROBE INSTALLATION PROCEDURES 16 2 5 ELECTRICAL CONNECTIONS 17 2 5 1 WET SECTION UNIT 17 2 5 2 PRE AMP UNIT 18 2 5 3 TRANSMITTER UNIT 19 3 OPERATING THE ANALYZER 23 3 1 ANAL...
Page 7: ...101 044 E 1 9033X Sodium Analyzer 5 5 2 MONTHLY 45 5 6 SHUT DOWN PROCEDURE Prolonged Shut Down 1 months 46 5 6 1 STORAGE OF ELECTRODES 47 5 7 pH EFFECTS 47 6 SPARE PARTS 48 7 TROUBLE SHOOTING 50 8 SP...
Page 8: ...compensation o Protection from Hot Sample o Grab sample measurement o Missing sample flow switch 2 Calibration o Single two point calibration o Process calibration o Fully automatic calibration single...
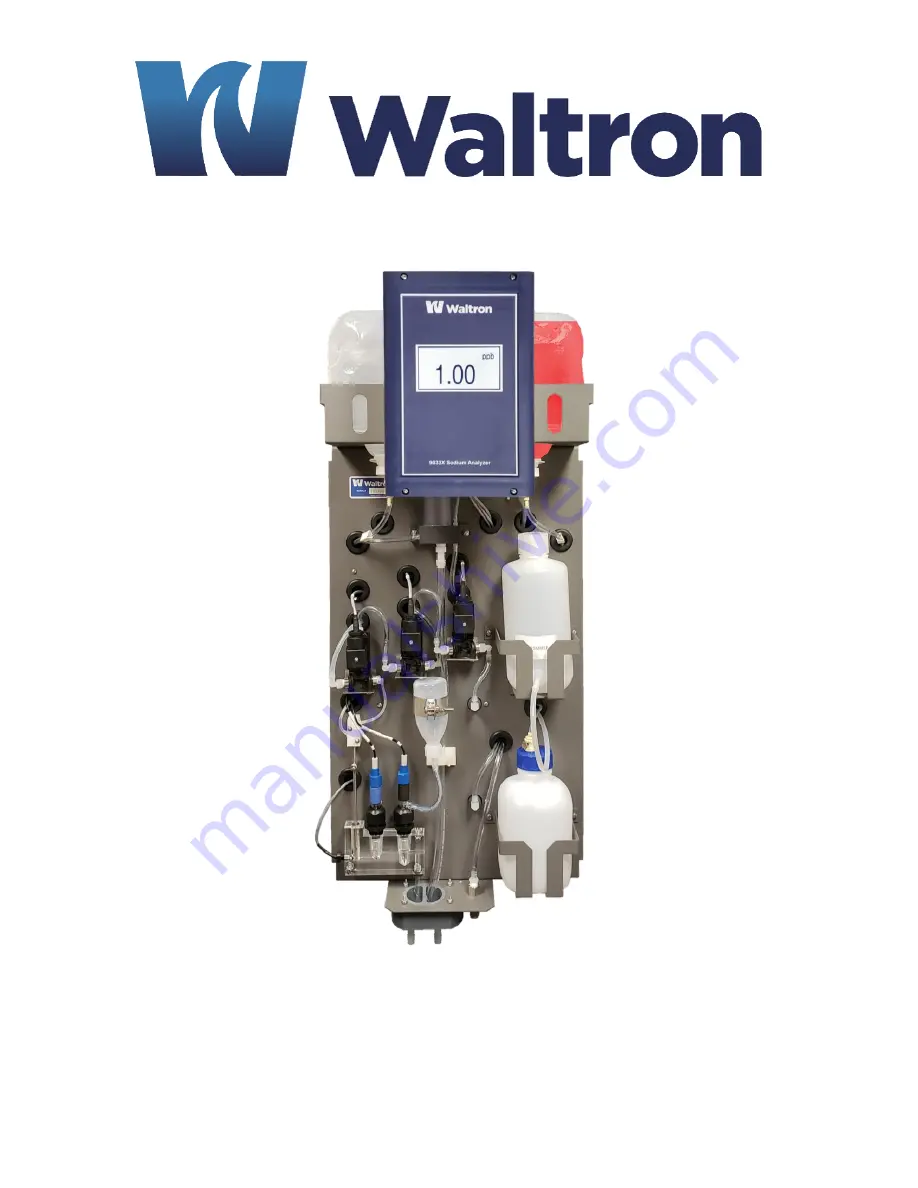
Page 9: ...n containers b Hydraulic panel consisting of constant head flowcell tubing thermistor and 3 solenoid valves c Sodium and reference electrodes d 2 sodium standard solution containers CAL1 and CAL2 e Gr...
Page 10: ...The electrodes transmit a voltage proportional to the sodium content in the feed water This output is then measured by the electrical system and converted into a ppb ppm measurement An internal therm...
Page 11: ...lectrodes The DIN style cables from the pre amplifier allow for quick and easy change out of electrodes 1 3 3 TRANSMITTER UNIT The transmitter unit interprets electrode response and temperature output...
Page 12: ...in the transmitter enclosure Transmitter unit is a NEMA 4X rated enclosure with cable glands for wiring Size and layout of transmitter is shown below Figure 4 Dimensions of the transmitter unit All d...
Page 13: ...shown 2 4 ELECTRODE INSTALLATION 2 4 1 PROBE CONNECTIONS Figure 6 Placement of electrodes in the flowcell Buffered Sample Drain Outlet 3 8 ID Sample Inlet ID Swagelok Sodium Measuring Electrode Refer...
Page 14: ...Gel filled reference electrode has an inner element consisting of a gel solution which does NOT require electrolyte refilling Sodium Measuring Electrode Reference Electrode Flowcell Quick connect ele...
Page 15: ...und it 4 Insert inner tubing through nozzle of bottle and connect outer tubing over the nozzle of bottle Make sure the inner tubing reaches the top of the bottle while the other end remains inside the...
Page 16: ...ully insert the electrode through the clamp and into the flowcell Electrodes may have to be inserted at an angle 4 For reference electrode insert the electrode so that the tip of the electrode is 5mm...
Page 17: ...The wet section layout and connections Constant Head Solenoid 1 CAL 1 Solenoid 2 CAL 2 Solenoid 3 G S Heat Exchanger behind plate Sample Inlet Sample Drain Reference Probe Measuring Probe Thermistor...
Page 18: ...Pin 1 of all the connectors is shown in black The following cables connections are used in pre amp system 1 Multicore cable 8 Core for interfacing the transmitter unit with pre amp at J3 Pin 1 Black...
Page 19: ...gain access when making the necessary connections Remove the six screws securing the top cover of the transmitter unit Pass appropriate cables thru the cable glands for the following connections Powe...
Page 20: ...to the main power supply check that there is correct voltage at the mains Although this instrument has internal fuse protection the operator must use a suitably rated external protection device such...
Page 21: ...not come installed in the analyzer The pin locations from the connector J9 are shown below Pin X0 Red Wire Pin X1 Black Wire Pin GND Shield Connecting the Current Output s to Transmitter Two 4 20mA c...
Page 22: ...rinted on the board as ELECTROVALVE Wiring is as follows Pin 1 EV1 Solenoid Valve 1 Calibration Standard 1 100ppb Red Pin 2 EV1 Solenoid Valve 1 Calibration Standard 1 100ppb Black Pin 3 EV2 Solenoid...
Page 23: ...keep the sample temperature and calibration solutions temperature at equilibrium during calibration Drastic and sudden changes in solution temperature may have a negative effect on electrode performa...
Page 24: ...n The signal from the electrodes is fed to the pre amplifier which converts the voltage into current The output from pre amplifier is then sent to the transmitter unit via the interconnection cable A...
Page 25: ...is below Low Alarm set point CONC HIGH Concentration is above High Alarm set point OVR Concentration is above limits of analyzer 10ppm OUT Sample flowrate to analyzer is not sufficient 3 3 GETTING STA...
Page 26: ...r 3 4 1 SOFTWARE STRUCTURE MAP 3 4 2 MAIN MENU USER MODE The default display when the analyzer is online is the Main Menu in User Mode In User Mode the user is able to access only the COMMANDS window...
Page 27: ...DOW Use the touch screen to open the Commands Window to run grab samples or calibrations 3 4 3 1 GRAB SAMPLE The GRAB SAMPLE cycle is helpful in that it can be used as a bench test or QA QC check The...
Page 28: ...solution flows through the flow cell During a 1 Pt calibration the analyzer calibrates by changing the offset of the slope taken during the last 2 Pt calibration NOTE During single point calibration...
Page 29: ...valve is energized first and CAL1 solution flows through the flow cell Once analyzer finishes measuring the CAL1 solution the first solenoid valve is deactivated and the second solenoid is activated t...
Page 30: ...w concentration solution 100ppb in the container CAL1 3 Place high concentration solution 1ppm in the container CAL2 4 Check the high and low solution concentrations need to be entered in the system u...
Page 31: ...ed concentration of the sample and press ENT You will then see the entered value in the Process cal value window If you wish to make changes to the entered value press the number XX X ppb to edit the...
Page 32: ...the operation From the Commands window press the ABORT OPERATION button 3 4 4 DISPLAY WINDOW The display window will give you access to useful tools for troubleshooting The display window will show y...
Page 33: ...ectrode identification useful for recording date of electrode replacement etc 3 4 4 1 Checks Window The CHECKS function allows you to perform maintenance diagnostics on the three way solenoid valves t...
Page 34: ...Selection Window From the Main Menu press the DISPLAY button Then press the DATALOG button 3 4 4 2 1 Results Datalog Results of your concentration readings by time and date are recorded in the Results...
Page 35: ...ples Datalog The Datalog will show the results of the last 10 grab samples rounded off to the nearest whole ppb 3 4 4 2 3 Alarms Datalog The last 10 alarms are saved under the Alarms Datalog with red...
Page 36: ...l and mV1 and mV2 the readings in mV of the low and high calibration standards 3 4 5 MAIN MENU SERVICE MODE The analyzer will default to operating in User Mode where the user can only access the funct...
Page 37: ...keypad and press ENT After the correct password is entered the CONFIGURATION and SERVICE buttons will become available 3 4 5 1 Configuration Window Service Mode The Configuratin Window will give you...
Page 38: ...tion for every 4 weeks If you wish to turn automatic calibration off set Wee frequency 0 Waltron recommends week frequency 1 for optimal performance of your analyzer Now week this is a counter reflect...
Page 39: ...ion of sodium sample Measure range set the measurement range Temp range enter the upper limit of your temperature range Time date enter the time and date for the analyzer s internal clock To access th...
Page 40: ...Stable time Allows the sensors to adjust to the calibration fluid Cond Time Holds the analyzer output value at the last sensor value before initiating calibration to allow for the sensors to adjust ba...
Page 41: ...L FAIL condition will occur after a 2 Pt calibration if the electrode response does not meet requirements This happens when the electrodes strength slope from a 2 Pt calibration is below 83 or greater...
Page 42: ...ference electrode Check status of reference electrode filling solution and add more if using N3010 174 Check the status of reference electrode and replace if necessary Make sure standard containers CA...
Page 43: ...ry system and skin Wear rubber gloves and eye protection In warm weather pressure increases in the bulk container of ammonia and the cap must be released with care Note Waltron offers Ammonium Hydroxi...
Page 44: ...ration any concentration difference can be used within the constraints of i above and the need to have a significant change in electrode output to achieve an accurate calibration Note High purity wate...
Page 45: ...ions greater than 100ppb a weekly Single Point Calibration is recommended See Section 3 4 3 2 Single Point Calibration 5 5 2 MONTHLY o Replace the bottle of reagent buffer solution If using ammonia th...
Page 46: ...tion for 60 5 seconds then rinse in high purity water Caution It is important not to exceed the etching time or the performance of the electrode may be permanently degraded o Dispose of the etching so...
Page 47: ...th 5M sodium solution Push the bottle over the end of the electrode and tighten the cap For the refillable reference electrodes fill the storage bottle with the refillable solution and push the bottle...
Page 48: ...m Standard 1000ppb 1 ppm Red 1 Gallon Cube 9033X N1234 548 3 5 M KCl Reference Solution Kit 9033X N1234 116 29 Ammonium Hydroxide 2 5 L N1234 579 99 Di Isopropylamine 1 Gallon N1234 543 Sodium Electro...
Page 49: ...6A Entrainment T Assembly P5000 019 Transmitter Assembly Sodium X Series N1142 116B Buffer Bottle Square N1142 117B Vented Cap Buffer Bottle P2000 053 Solenoid Valve Assembly P2000 054 Solenoid Cable...
Page 50: ...oo low 83 Verify condition of reagent solution Replace monthly Calibration Fail Strength is too low 83 Verify electrodes are connected properly Calibration Fail Strength is too low 83 Check that vapor...
Page 51: ...n Fail No standard flow Check for clogs in system Check for air trapped in tubing Gently squeeze standard containers to verify flow during appropriate solenoid test Filter sample if deposits found in...
Page 52: ...nctioning correctly Disconnected wiring at transmitter or along wire path DCS recording system not set up properly Bad DIO board Check alarm set up to make sure values are entered properly Run Diagnos...
Page 53: ...step less than 6 minutes Current Outputs Two isolated 4 20mA current analog outputs Alarms Three voltage free contacts alarm points set from transmitter rated at 2A 250VAC non inductive Power Wide ran...
Page 54: ...ppb 435 27 0 1 ppb 417 47 0 2 ppb 399 66 0 5 ppb 377 11 1 ppb 358 31 2 ppb 340 5 5 ppb 316 95 10 ppb 299 15 20 ppb 281 34 50 ppb 257 79 100 ppb 239 99 200 ppb 222 18 500 ppb 198 63 1 ppm 180 83 2 ppm...