Nemesis T35 / T45 / T60 / T90
TeichpumpePond Pump
10033382 10031918 10033389 10033390
Page 1: ...Nemesis T35 T45 T60 T90 Teichpumpe Pond Pump 10033382 10031918 10033389 10033390...
Page 2: ......
Page 3: ...gsanleitung und weitere Informationen rund um das Produkt zu erhalten INHALTSVERZEICHNIS Sicherheitshinweise 4 Ger te bersicht 5 Inbetriebnahme 6 Pflege und Wartung 7 Fehlerbehebung 8 Hinweise zur Ent...
Page 4: ...derlich wenn das Ger t auf irgendeine Weise besch digt wurde das hei t wenn Gegenst nde darauf gefallen sind wenn es nicht ordnungsgem funktioniert oder fallengelassen wurde Versuchen Sie nicht das Ge...
Page 5: ...rer Filter 8 Endst ckverschluss 2 Fl gelschrauben Abdeckung 9 Gro es Auslassst ck 3 O Ring 1 10 Kleines Auslassst ck 4 Gummilagerung 11 Dichtring 5 Rotor 12 Gro es Verbindungsst ck 6 Motor 13 O Ring 2...
Page 6: ...osition Sch tzen Sie das Stromkabel vor Besch digungen durch Knicken und oder scharfe Kanten wenn Sie es verlegen Schlie en Sie die Pumpe an die Steckdose an Hinweis Betreiben Sie die Pumpe nie ohne d...
Page 7: ...Wasser eintauchen Reinigung der Pumpe Ziehen Sie den Netzstecker Nehmen Sie die Springbrunnengruppe auseinander Zerlegen Sie das Pumpengeh use Reinigen Sie Pumpe und den Filter mit einer weichen B rst...
Page 8: ...gen Impeller besch digt Impeller auswechseln Zu niedrige Spannung An passender Spannung anschlie en HINWEISE ZUR ENTSORGUNG Befindet sich die linke Abbildung durchgestrichene M lltonne auf R dern auf...
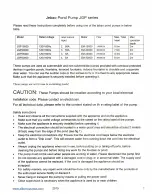
Page 9: ...l and other information about the product CONTENT Safety Instructions 10 Product Overview 11 Operation 12 Care and Maintenance 13 Troubleshooting 14 Hints on Disposal 14 TECHNICAL DATA Item T35 T45 T6...
Page 10: ...erience and knowledge unless they have been given supervision or instruction concerning use of the appliances by a person responsible for their safety Children should be supervised to ensure that they...
Page 11: ...PRODUCT OVERVIEW 1 Front filter 8 Outlet nut 2 Impeller cover 9 Big outlet 3 O ring 1 10 Small outlet 4 Rubber bearing 11 Gasket 5 Rotor 12 Connecting thread 6 Motor 13 O ring 2 7 Suction cup 14 Big f...
Page 12: ...Depth see the information on the model plate Do not place the pump directly in the pond floor mud place the pump on a raised surface Lay the power cord in a protected manner to exclude the possibility...
Page 13: ...tly Never immerse the mains plug in water Cleaning the pump Disconnect the mains plug Disassemble the fountain group Disassemble the pump casing Clean the pump and filter with a soft brush Remove the...
Page 14: ...ges and plug in Low voltage Change to right voltage HINTS ON DISPOSAL According to the European waste regulation 2012 19 EU this symbol on the product or on its packaging indicates that this product m...
Page 15: ...tra informaci n sobre el producto NDICE DE CONTENIDOS Indicaciones de seguridad 16 Vista general del aparato 17 Puesta en funcionamiento 18 Limpieza y cuidado 19 Resoluci n de anomal as 20 Retirada de...
Page 16: ...cabo las reparaciones Ser necesario reparar el aparato cuando se haya visto da ado de alguna manera es decir si ha ca do alg n objeto encima si no funciona correctamente o si se ha dejado caer No int...
Page 17: ...iltro frontal 8 Tuerca final 2 Carcasa del propulsor 9 Pieza de salida grande 3 Junta t rica 1 10 Pieza de salida peque a 4 Cojinete de goma 11 Junta 5 Rotor 12 Pieza de uni n grande 6 Motor 13 Junta...
Page 18: ...de alimentaci n de lugar aseg rese de no doblarlo y o que no cuelgue de cantos afilados para evitar da arlo Conecte la bomba a la toma de corriente Atenci n no utilice la bomba sin el cesto filtrante...
Page 19: ...cable de alimentaci n en agua Limpieza de la bomba Desconecte el aparato Desmonte la parte de la fuente Retire la carcasa de la bomba Limpie la bomba y el filtro con un cepillo suave Retire la sucieda...
Page 20: ...pie el cesto filtrante Propulsor da ado Cambie el propulsor Corriente demasiado baja Conecte al aparato a otra corriente RETIRADA DEL APARATO Si el aparato lleva adherida la ilustraci n de la izquierd...
Page 21: ...du mode d emploi et d autres informations concernant le produit SOMMAIRE Consignes de s curit 22 Aper u de l appareil 23 Mise en marche 24 Entretien et maintenance 25 R solution des probl mes 26 Conse...
Page 22: ...e p riph rique a t endommag de quelque mani re que ce soit c est dire si des objets sont tomb dessus s il n a pas fonctionn correctement ou s il est tomb N essayez pas de r parer l appareil vous m me...
Page 23: ...8 Embout de verrouillage 2 Couverture vis oreilles 9 Grande pi ce de sortie 3 Joint torique 1 10 Petite pi ce de sortie 4 Support en caoutchouc 11 sceau 5 Rotor 12 Excellent connecteur 6 Moteur 13 Jo...
Page 24: ...sus Prot gez le cordon d alimentation des dommages caus s par les plis et ou les ar tes vives lors de la pose Connectez la pompe au secteur Remarque Ne faites jamais fonctionner la pompe sans le panie...
Page 25: ...longez jamais le cordon d alimentation dans l eau Nettoyage de la pompe D branchez le cordon d alimentation D montez le groupe de fontaine D montez le corps de pompe Nettoyez la pompe et le filtre ave...
Page 26: ...rbine endommag e Remplacez la turbine Tension insuffisante Banchez l appareil sur une tension adapt e CONSEILS POUR LE RECYCLAGE Le pictogramme ci contre appos sur le produit signifie que la directive...
Page 27: ...nuale d uso pi attuale e per ricevere informazioni sul prodotto INDICE Avvertenze di sicurezza 28 Descrizione del dispositivo 29 Messa in funzione 30 Pulizia e manutenzione 31 Correzione degli errori...
Page 28: ...aria se il dispositivo stato in qualche modo danneggiato cio se vi sono caduti sopra oggetti se non funziona correttamente o se stato fatto cadere Non cercare di riparare il dispositivo autonomamente...
Page 29: ...e 8 Chiusura estremit 2 Copertura viti ad alette 9 Componente di rilascio grande 3 O Ring 1 10 Componente di rilascio piccolo 4 Cuscinetto in gomma 11 Guarnizione ad anello 5 Rotore 12 Connettore gran...
Page 30: ...l cavo di alimentazione proteggerlo da danni dovuti al piegamento e o da bordi taglienti Collegare la pompa alla presa elettrica Avvertenza non utilizzare mai la pompa senza il cestello del filtro 1 I...
Page 31: ...mai la spina di rete in acqua Pulizia della pompa Scollegare la spina di rete Smontare il gruppo fontana Smontare l alloggiamento della pompa Pulire la pompa e filtrare con una spazzola morbida Rimuo...
Page 32: ...ltro otturato bloccato Pulire il cestello del filtro Girante danneggiato Sostituire il girante Tensione troppo bassa Collegare a una tensione adeguata SMALTIMENTO Se sul prodotto presente la figura a...
Page 33: ......
Page 34: ......
Page 35: ......
Page 36: ......