
a
b
c
d
f
g
e
m
o
h
i
j
k
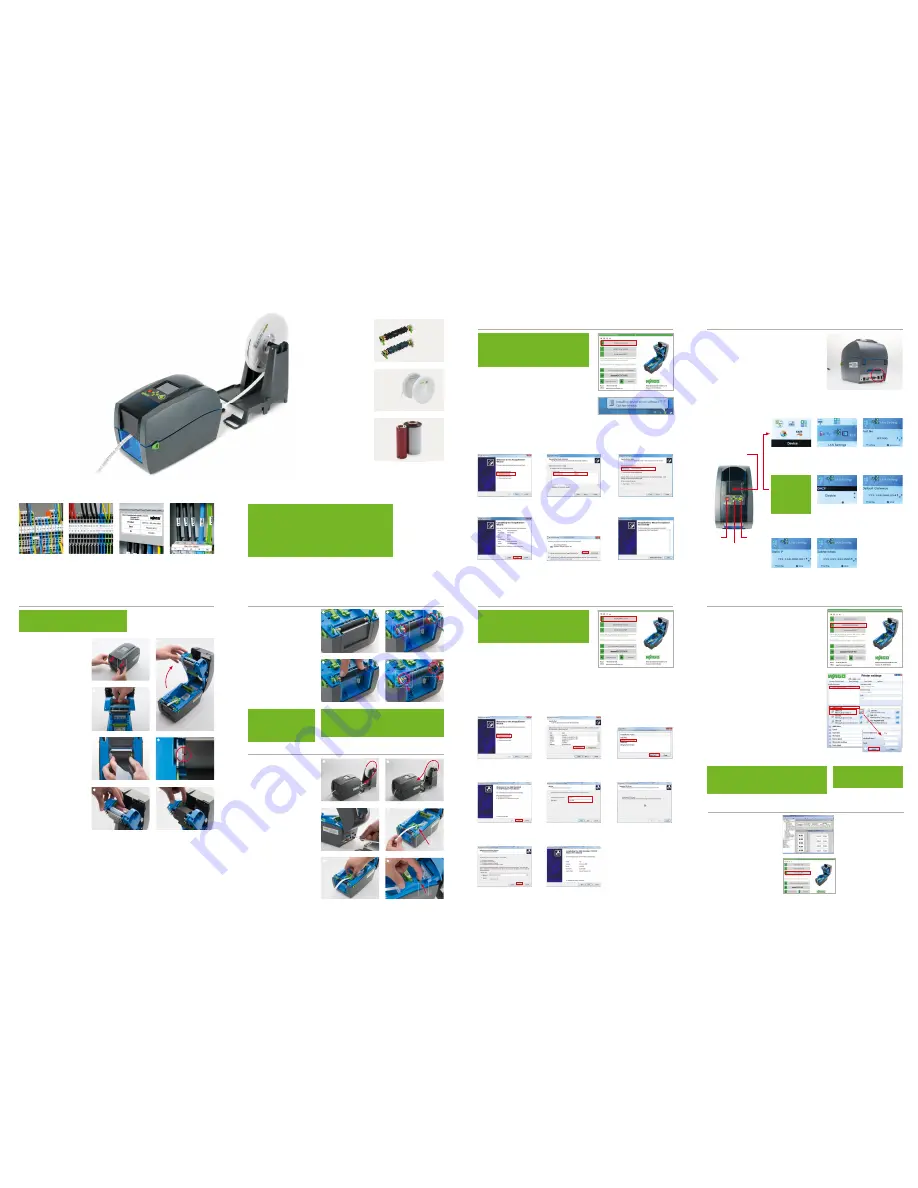
WAGO THERMAL TRANSFER smart
PRINTER
WMB Inline markers
Marking strips
Nameplates, wire/cable markers
and many other label types
Thank you for choosing WAGO’s Thermal Transfer
smart
PRINTER. This printer marks: labels, marking
strips and markers for all WAGO terminal blocks,
as well as wire/cable markers and devices.
The
smart
PRINTER is fast and easy to use, pro-
viding wipe- and scratch-proof markings, while
only requiring a single ink ribbon for all print jobs.
The printer features a USB interface and
connects to any network via ETHERNET.
WAGO’s
smart
PRINTER is portable and
can be used anywhere thanks to its light
weight and compact design.
smart
PRINTER
marks WAGO terminal
blocks, wires/cables and devices.
• Includes:
• 1
smart
PRINTER
• 1 marking strip reel
• 1 WMB Inline reel
• 1 reel holder
• 2 rollers
• 1 ink ribbon
• Power cable
• USB cable
Hardware Installation Instructions
Software Installation Instructions and Printer Settings
Thermal Transfer
smart
PRINTER-
Item No. 258-5000
Place the printer on an even, stable
and dry surface.
a
Open the cover by simultaneously
pulling the two green levers located
on each side toward the front of the
printer.
b
Then lift the cover up as far as
it will go.
c
Insert the red cardboard roll for
the ink ribbon directly under the
cover. To do so, place the cardboard
roll on the right of the spring-loaded
roll holder and push it against the
spring’s pressure to mount. On the
left, the groove locks into the card-
board roll’s notch.
d
The ink ribbon holder is easily
recognizable by its white knob
(below the red cardboard roll).
Insert the ribbon with the matte
black side facing out and slide it
onto the roller holder until it is
centered. Press lightly against
the spring while doing this.
e
The ink ribbon is in place when
the knob locks into the ink ribbon’s
groove. Slight resistance must be
felt when pulling on the ink ribbon.
f
Secure the transparent strip of
the ink ribbon to the red cardboard
roll using the adhesive side of the
strip.
g
Turn the green knob until the trans-
parent section of the ink ribbon is
completely wound around the roll.
Now, the ink ribbon is securely
mounted on the cardboard roll.
A. Printer and Ink Ribbon Installation
Smooth roller
for marking
strips and
labels
Roller with
guide grooves
for WMB Inline
markers
2 Rollers
Item No. 258-5006
Roller for marking strips
and labels
Item No. 258-5007
Roller for WMB Inline
markers
2 Reels
Item No. 2009-110
Marking strips
Item No. 2009-115
WMB Inline markers
1 Ink Ribbon
Item No. 258-5005
incl. 1 cardboard roll
Insert the smooth roller into the printer
to print marking strips and labels.
Insert the roller with guide grooves
when printing WMB Inline markers.
h
Remove the tear-off plate at the
front of the housing.
i
Lift up the green locking levers
on both ends of the roller.
j
Insert the new roller in straight
position.
k
Then push the two green locking
levers back down.
B. Roller Change
First, mount the marking media reel
on its holder. Then, place the reel
holder behind the printer.
l
a) The marking strip is fed to the
printer in a clockwise direction.
l
b) WMB Inline markers are fed to
the printer in a counter-clockwise
direction.
m
Open the printer and feed the
media from the back of the printer
through the opening.
n
Pull the media through the green
guides toward the roller.
o
Move the green guides in to
match the media width. Align the
markers exactly to the roller guide
groove.
p
Press and release the locking
tab. When closing the printer cover,
make sure it locks into place.
l
a) Inserted marking strip
l
b) Inserted WMB
Inline markers
C. Media Installation
n
p
Locking tab
Media guides
MAC address
a) via USB for stand-alone P
Connect the
smart
PRINTER to your PC with the USB cable
and to the mains using the power cable. Press the red button
located on the front panel of the printer to turn on the printer.
Download the installation package from
www.wago.com/
smartprinter.
Then run the “smartPrinter_Installation_Package.exe” fi le.
Select “Install driver“ from the installation menu.
Consult your IT department for the addresses you need
to specify.
D. Printer Driver Installation
D. Printer Driver Installation
2. Step:
Use the control
button to select the
“Accessories” menu and
then press Enter.
5. Step:
DHCP is disabled
as a default setting. If you
are using a static IP ad-
dress, “Disable” the DHCP
setting.
6. Step:
Set the IP address
for the standard gateway
of your network environ-
ment.
8. Step:
Enter the subnet
mask for your own network
topology.
Start:
Press the On/Off button;
“Ready” appears in the display.
1. Step:
Hold the right control
button pressed for three seconds
until the menu symbols appear.
On/Off
Control
buttons
Enter key
Follow the instructions given in the driver installation program (Driver Wizard):
7. Step:
Enter here your
static IP address.
b) for a network (step 1)
INFO: DHCP is disabled in the delivery state of
smart
PRINTER.
When connecting
smart
PRINTER to a PC network instead of
using a USB cable, the printer must be prepared as follows:
Preparation for a network
with
DHCP server: For detailed
installation steps, go to
www.wago.com/smartprinter.
Preparation for a network without DHCP server:
You must use the printer display to enter the required settings.
To do this, switch on the printer and follow the steps below as
shown on the display.
1. Step:
Select “Install printer driver”
4. Step:
Finish
2. Step: smart
PRINTER is displayed
automatically at the USB connection.
(If the USB connection is not displayed,
check the connection to the printer
and restart.)
5. Step:
An additional security prompt
is issued if you are using Windows 7, 8
or 10. Confi rm by selecting “Install.”
3. Step:
Accept the printer name
smart
PRINTER, or specify a diff erent
name.
6. Step:
The printer driver
for
smart
PRINTER has been
successfully installed.
Ignore this Windows message if it appears
at the bottom of the display.
3. Step:
Select the sub-
menu “LAN Setting” and
then press Enter.
4. Step:
Check Port No.
Default value is 09100.
The WAGO “Printer Settings” Software must be used
prior to initial startup and after changing media. This
sets the printer for using WAGO marking media.
For this, select “Install Printer Settings” from the installation
menu. No input is required during installation. Simply click
“Continue” when requested.
The software starts automatically after it has been success-
fully installed. An icon is simultaneously created on your
desktop. Proceed as follows in the input dialog windows as
illustrated below:
a
Select printer.
b
Select the type of media (e.g., marking strip).
c
Select the media item no. After this, the printer slightly
advances the media forward in the printer as part of a
pre-print check until “Ready” appears on the display.
d
Click on the blue gearwheel symbol to make fi ne adjustments
or individual media settings. In a new mask, you can align the
marking either vertically or horizontally, or you can optimize the
printing intensity by adjusting the thermal settings for the media.
e
Settings have been saved when the confi rmation
“Settings successfully imported” is displayed.
E. “Printer Settings” Installation: Settings for Marking Media
Follow the instructions given in the driver installation program (Driver Wizard):
1. Step:
Select “Install printer driver.”
4. Step:
Start network installation.
7. Step:
Click “Continue” for generic
queries of the standard network card.
2. Step:
Create new connection port.
5. Step:
Enter the printer name and
port name.
8. Step:
Complete installation
by clicking “Finish.”
3. Step:
Select the standard TCPI/IP
port as the new connection port.
6. Step:
Address search
(this step may take a few moments )
b) for a network (step 2)
For network installation, connect
smart
PRINTER
to the mains using the power cable and switch the
printer on.
Select “Install driver“ from the installation menu.
D. Printer Driver Installation
smart
SCRIPT provides all necessary
marking templates for all WAGO termi-
nal blocks, as well as labels, wire/cable
markers and push-button/type plates.
Select “Install
smart
SCRIPT” from the
installation menu. No input is required
during installation. Simply click “Conti-
nue” when requested.
After successful installation,
a new symbol is added to your
desktop.
For quick marking using
smart
SCRIPT, we recommend
our Quickstart instructions
located in the download area
at
www.wago.com/printer.
These instructions provide
you with information about the
quickest way to mark marking
strips or labels.
Examples of marking performed using
smart
script: marking strips
(2009-110), WMB Inline markers (2009-115) and labels (210-806)
F.
smart
SCRIPT
Installation: WAGO Marking Software
Note:
Do not use this printer until you have thoroughly read
and completely understood these instructions!
Note:
The following installation steps require administrative
rights and the input of addresses within your network.
Contact your IT department for assistance regarding
the network addresses that will need to be used.
Note:
You can set the
language via the
display.
Go to Settings
> Language
Notice:
Rollers for other Inline variants
are not included in the
standard package and must
be ordered separately!
Note:
The following installation steps require administrative
rights and the input of addresses within your network.
Contact your IT department for assistance regarding
the network addresses that will need to be used.
Fine adjustment of the marking media:
Raise/Lower horizontal value > Shift characters to right/left
Raise/Lower vertical value > Shift characters up/down
Raise/Lower thermal value > Darker/Lighter printing
More information about text/
character alignment is available
at: www.wago.com/smartprinter.
Note:
Clean the roller and the print head regularly (at least once
a month). Roller cleaning guarantees constant high-quality
printing.
Note:
Both printer and marking media information is available
at www.wago.com/printer. For software information,
visit www.wago.com/smartprinter.
Additional customer service is available via email at:
[email protected] or by phone: +49 (0) 571 887 630.
a
b
c
d
e
60291134 - 0888-0453/0101-0101 - SMART PRINTER INSTALL.POSTER DE+US 1.1 - 04/16 - Printed in Germany - Subject to design changes