background image

46  Configuration 


758-919 Wireless Access Point 

Manual 


Version 1.0.0  


5.2.11  Configurations via AT Commands 


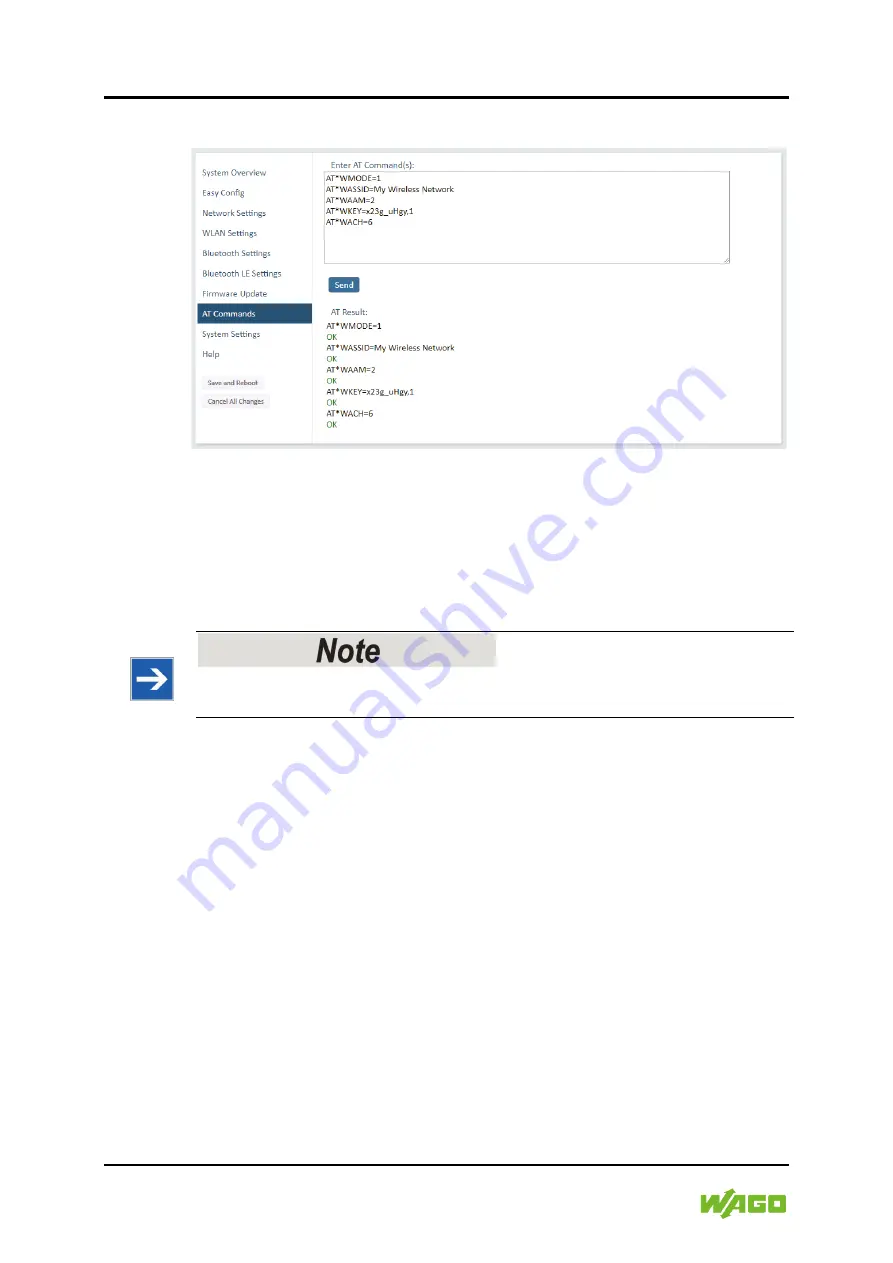
Figure 21: AT Commands 

AT commands can be used for setting advanced parameters that are not 

accessible in the web interface, to read out parameters in text format, and for 

batch configuration using command scripts. 

Enter or paste the commands into the text box, then click on [

Send]

. The result 

codes will be displayed below the text box. 


Overview of AT commands 

A list of all AT commands is available on the “Help” page in the web interface.  


Summary of Contents for 758-919

Page 1: ...Manual 758 919 Wireless Access Point Version 1 0 0...

Page 2: ...upport wago com Every conceivable measure has been taken to ensure the accuracy and completeness of this documentation However as errors can never be fully excluded we always appreciate any informatio...

Page 3: ...tion 16 3 2 View 18 3 3 Labeling 19 3 4 Connectors 20 3 5 RJ45 LED Indicators 21 3 6 RESET Button 22 3 7 Technical Data 23 3 7 1 Hardware Specifications 23 3 7 2 Communication 23 3 8 Approvals 25 3 8...

Page 4: ...luetooth 50 6 1 3 EtherNet IP Networking via Bluetooth 51 6 1 4 Ethernet network to existing WLAN 52 6 1 5 Adding single Ethernet node to WLAN 53 6 1 6 Accessing PLC via WLAN from Handheld Device 54 6...

Page 5: ...to this documentation is included if necessary This documentation applies to the Wireless Access Point 758 919 1 1 Copyright This Manual including all figures and illustrations is copyright protected...

Page 6: ...e risk potentially hazardous situation which if not avoided could result in death or serious injury Personal Injury Indicates a low risk potentially hazardous situation which if not avoided may result...

Page 7: ...s about this Documentation 7 758 919 Wireless Access Point Manual Version 1 0 0 Additional Information Refers to additional information which is not an integral part of this documentation e g the Inte...

Page 8: ...rked in italic type e g C Program Files WAGO Software Menu Menu items are marked in bold letters e g Save A greater than sign between two names means the selection of a menu item from a menu e g File...

Page 9: ...ried out by electrical specialists with sufficient knowledge in installation and handling of electrical equipment The electrical specialists must also be familiar with the current standards and guidel...

Page 10: ...9 Wireless Access Point Manual Version 1 0 0 Further details are given in the contractual agreements Please send your request for modified and new hardware or software configurations directly to WAGO...

Page 11: ...k of cyber attacks and to enhance cyber security Only open ports and services during commissioning and or configuration Limit physical and electronic access to all automation components to authorized...

Page 12: ...are to be stored in their original packaging Likewise the original packaging provides optimal protection during transport When assembling or repacking the components the contacts must not be soiled o...

Page 13: ...ce is only restricted for use in hazardous areas Maintenance Repair only by authorized specialists The device contains no parts that can be serviced by users Always have all service reconfiguration ma...

Page 14: ...and materials are imperative for handling devices modules Cleaning only with permitted materials Clean soiled contacts using oil free compressed air or with ethyl alcohol and leather cloths Avoid elec...

Page 15: ...re replacing or wiring modules Do not disconnect equipment while the circuit is live or unless the area is known to be free of ignitable concentrations Install in an enclosure considered representativ...

Page 16: ...es such as MODBUS TCP EtherNet IP or PROFINET In combination with another function related device e g another WAP or Access Point AP of the same radio technology the WAP can serve as a wireless replac...

Page 17: ...ementation of Bluetooth by various manufacturers 5 GHz WLAN cannot be used with 2 5 GHz WLAN or Bluetooth at the same time WLAN or Bluetooth Choose WLAN if data throughput and wireless roaming are req...

Page 18: ...2 View Figure 2 View Table 3 Legend for Figure View Pos Description Details see Section 1 Antenna for WiFi and Bluetooth Technical Data 2 Power Connector Art Nr 2734 103 107 000 3 ETHERNET Connector...

Page 19: ...vice MAC address is included with other data on the device Figure 3 Marking Type Plate Part 1 Example Figure 4 Marking Type Plate Part 2 Example Table 4 Legend for Figure Label Example No Serial NO De...

Page 20: ...also Chapter Technical Data regarding power supply requirements Table 5 Power Connector 3 pin terminal block Pin Function 1 19 36 VDC 2 3 Functional Earth FE Table 6 Ethernet Connector RJ45 PoE Pin D...

Page 21: ...Function Off No power Blue Connected on all configured wireless interfaces Purple Trying to connect to WLAN Bluetooth access point Blue slow blink Awaiting connections Alternating blue purple Connect...

Page 22: ...Point Manual Version 1 0 0 3 6 RESET Button Figure 7 RESET Button The RESET button is located on the bottom of the unit When the unit is powered on press and hold RESET for 10 seconds and then releas...

Page 23: ...midity EN 600068 2 78 Damp heat 40 C 93 humidity for 4 days Dimensions Height 75 mm 91 mm with PS connector Outside height 41 mm Diameter 68 mm Weight 84 g Protection class Top outside of host IP66 IP...

Page 24: ...11n SISO Security WEP 64 128 WPA WPA PSK and WPA2 TKIP and AES CCMP LEAP PEAP including MS CHAP Table 12 Classic Bluetooth Wireless standards profiles PAN PANU NAP Operation modes Access point or Clie...

Page 25: ...use only 5GHz FCC Federal Communications Commission CFR 47 Part 15 ETS 300328 FCC ID PVH0965 This device complies with Part 15 of the FCC Rules Operation is subject to the following two conditions 1 t...

Page 26: ...ired operation This product contains FCC ID PVH0965 Damage to Property Any changes or modifications not explicitly approved by WAGO Kontakttechnik GmbH Co KG could cause the module to cease to comply...

Page 27: ...e maximum range can only be effective under optimal conditions A lack of line of sight link or mis alignment of the devices will result in reduced range For a line of sight link install the devices su...

Page 28: ...also possible without line of sight but the range is substantially reduced depending on the obstacle e g a wall A fire protection wall or a steel reinforced concrete ceiling is located between the de...

Page 29: ...Area Network may not work with some devices due to different implementations of Bluetooth by different manufacturers WLAN 5 GHz cannot be used at the same time as WLAN 2 4 GHz or Bluetooth Do not ins...

Page 30: ...e using the included sealing ring and nut The top mounting surface in contact with the sealing must be flat with a finish equivalent to Ra 3 2 or finer and cleaned and free from oils and greases Tight...

Page 31: ...oint The default address is 192 168 0 99 The computer accessing the web interface must be in the same IP subnet as the Wireless Access Point Figure 9 Web interface The device is configured as a WiFi a...

Page 32: ...for the wired and wireless interfaces The different parameters are explained in the descriptions of each settings page in this manual The Help page describes AT commands that can be used for advanced...

Page 33: ...ents Apply PROFINET optimization to all units 8 Bluetooth NAP 9 Bluetooth PANU Configure as Bluetooth client and scan for another client PANU PANU Apply PROFINET optimization to both units 10 any Appl...

Page 34: ...this mode the unit must be restored to factory defaults by pressing and holding the RESET button Modes 10 and 11 will be added to the configuration without changing any other settings Modes 1 and 9 wi...

Page 35: ...erfaces Only a single DHCP server can be active for all the connected interfaces If WLAN is used the forwarding mode must be set to Layer 3 IP Forward DHCP Server Enabled Activates an internal DHCP se...

Page 36: ...communicate on one band at a time Scan for Networks Click to scan the selected frequency band s for discoverable WLAN networks Select a network from the dropdown menu to connect to it Connect to SSID...

Page 37: ...an be permanently disabled using AT commands See the Help page in the web interface for more information about how to set up WLAN roaming WLAN Channels and World Mode Client Mode only Which channels a...

Page 38: ...136 140 ETSI 1 11 12 13 36 40 44 48 52 56 60 64 100 104 108 112 116 120 124 128 132 136 140 FCC 1 11 36 40 44 48 52 56 60 64 100 104 108 112 116 132 136 140 Notes The maximum output power will be redu...

Page 39: ...ption mode to use for the access point Open No encryption or authentication WPA2 WPA2 PSK authentication with AES CCMP encryption WPA2 Passkey Enter a string in plain text or hexadecimal format to use...

Page 40: ...on 758 919 Wireless Access Point Manual Version 1 0 0 Example of hexadecimal password 0x000102030405060708080a0b0c0d0e0f101112131415161718191a1b1c1d1e1f Do not use the example passwords above in a liv...

Page 41: ...s the unit to other Bluetooth devices If left blank the unit will use a default name including the last 6 characters of the MAC ID Connectable Enable to make the unit accept connections initiated by o...

Page 42: ...h devices To connect to a device select it from the dropdown menu when the scan has completed Connect To Used when connecting manually to a NAP or PANU device Connection Scheme Choose whether to selec...

Page 43: ...NAP Mode Adjustment Description Bridge Mode Standard Default mode Layer 3 IP forward IP data will be bridged over Bluetooth This mode must be used when connecting to an Android device over Bluetooth...

Page 44: ...25 Bluetooth LE Settings Adjustment Description Operating Mode Disabled Bluetooth LE disabled default Central Bluetooth LE enabled Please select Help in the main menu for more information about using...

Page 45: ...se to select a downloaded firmware file then click on Send to send it to the unit Figure 19 Firmware update in progress Both progress bars will turn green when the firmware update has been completed T...

Page 46: ...nced parameters that are not accessible in the web interface to read out parameters in text format and for batch configuration using command scripts Enter or paste the commands into the text box then...

Page 47: ...ded Table 27 Settings Backup Adjustment Description Create Settings Backup Click on Generate to save the current configuration to a file on your computer Password is not included in backup file Restor...

Page 48: ...leasing it Table 29 Default Network Settings Adjustment Description IP Assignment Static IP Address 192 168 0 99 Subnet Mask 255 255 255 0 Default Gateway 192 168 0 99 Internal DHCP Server Enabled Tab...

Page 49: ...will now be discoverable and open for automatic configuration Figure 24 Easy Config Mode 4 2 In the web interface of unit 2 activate Easy Config Mode 5 for WLAN or 6 for Bluetooth Unit 2 will now disc...

Page 50: ...t settings 2 Connect Wireless Access Point 1 to the IO device and Wireless Access Point 2 to the PLC 3 Set Wireless Access Point 1 to Easy Config Mode 4 This unit will now be discoverable and open for...

Page 51: ...cess Point 1 to the IO device and Wireless Access Point 2 to the PLC 3 Set Wireless Access Point 1 to Easy Config Mode 4 This unit will now be discoverable and open for automatic configuration 4 Set W...

Page 52: ...s PROFINET Configuration 1 Reset the Wireless Access Point to the factory default settings 2 In Network Settings configure the IP settings as required by the wireless network 3 If the network uses DHC...

Page 53: ...required by the wireless network 3 In WLAN Settings click on Scan for Networks 4 When the scan has completed select the wireless network from the dropdown list 5 If required select the authentication...

Page 54: ...lt settings 2 In Network Settings configure the IP settings as required If the wired network uses DHCP select DHCP Relay Enabled The DHCP server on the network will now be able to allocate an IP addre...

Page 55: ...k name for the new wireless network 5 Set Authentication Mode to WPA2 and enter a passkey 6 Select a Channel band and a Channel 7 Click on Save and Reboot You should now be able to connect to the SSID...

Page 56: ...size and shape of the zones depend on the distance between the devices and on the signal wave length As a rule of thumb at least 60 of the first innermost Fresnel zone must be free of obstacles to ma...

Page 57: ...ferent angles around the WAP while maintaining the same distance 6 3 1 Azimuth Horizontal View This diagram shows the horizontal antenna pattern when looking at the WAP from above i e looking at the t...

Page 58: ...58 Appendix 758 919 Wireless Access Point Manual Version 1 0 0 Figure 34 Antenna Pattern Horizontal Please note the information Limited gain for 5 GHz between 105 to 190...

Page 59: ...Appendix 59 758 919 Wireless Access Point Manual Version 1 0 0 6 3 1 1 Front View Vertical 0 Figure 35 Front View Vertical 0...

Page 60: ...iagrams show the antenna pattern when looking at the WAP from the side in two different rotations 0 and 90 The WAP is mounted in a metal cabinet illustrated by the box below Figure 37 Vertical Views D...

Page 61: ...less ETHERNET Gateway in a free field application Figure 38 Throughput Diagram 6 4 Data Security for Radio Transmission It is often assumed that wireless communication systems are less secure than lin...

Page 62: ...gure 8 Bluetooth Settings PANU Mode 42 Figure 9 Bluetooth settings NAP 43 Figure 10 Bluetooth LE settings 44 Figure 11 Firmware update in progress 45 Figure 12 Firmware update completed 45 Figure 13 A...

Page 63: ...Energy 24 Table 1 Selection of Installation Location 28 Table 1 Buttons 32 Table 2 Easy Config Modes 33 Table 3 Network Settings page 35 Table 4 Network Settings page 36 Table 5 Advanced Settings 37 T...

Page 64: ...64 List of Tables 758 919 Wireless Access Point Manual Version 1 0 0...

Page 65: ...List of Tables 65 758 919 Wireless Access Point Manual Version 1 0 0...

Page 66: ...WAGO Kontakttechnik GmbH Co KG Postfach 2880 D 32385 Minden Hansastra e 27 D 32423 Minden Phone 49 571 887 0 Fax 49 571 887 844169 E Mail info wago com Internet www wago com...

Reviews: