background image

Contents

Index

Contents

27

Index

27

CABLE REPLACEMENT

The connection cables (DVI-I to DVI-D Dual-Link, DisplayPort, USB, and power) come pre-installed on your 
Cintiq.  

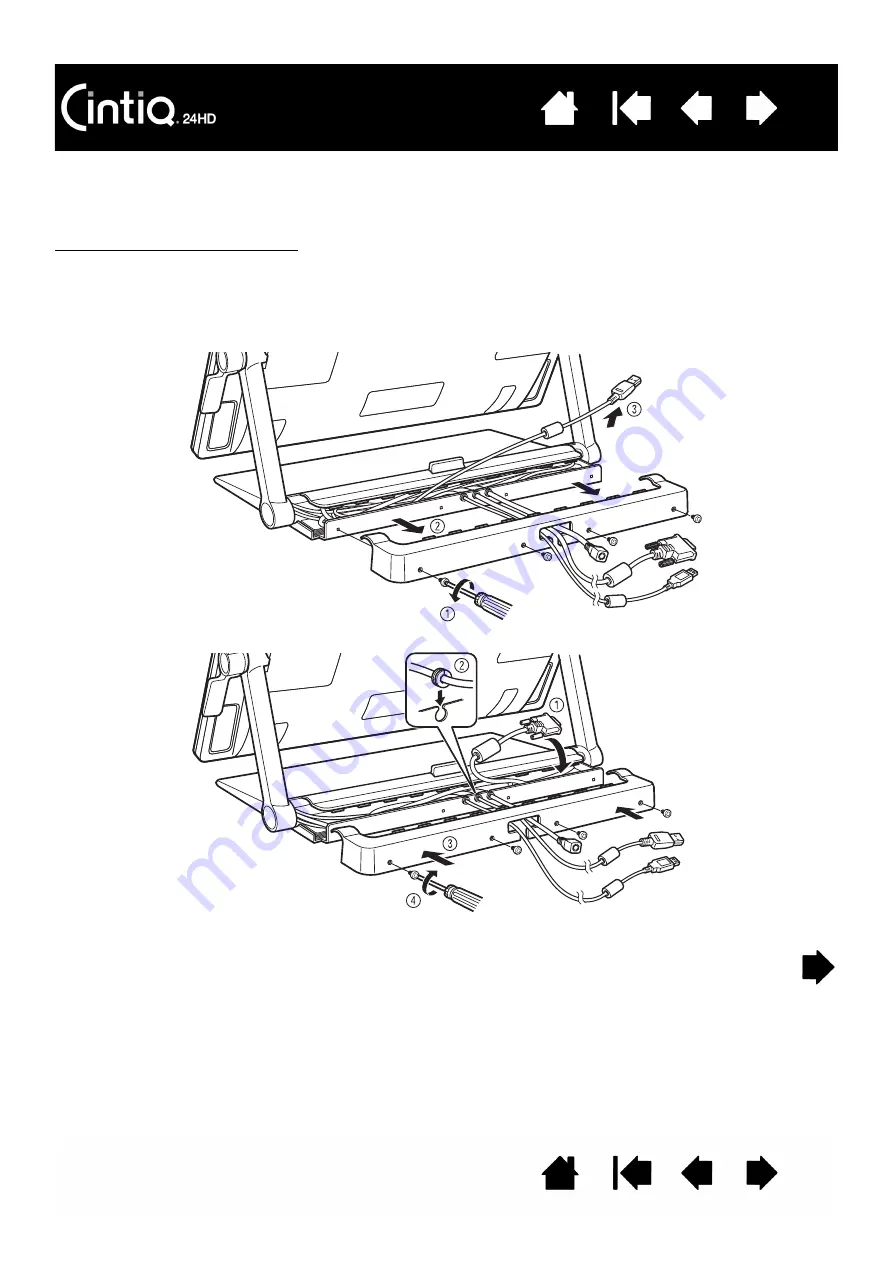
If using a DisplayPort connection, access the DisplayPort cable by removing the back cover from the 
display stand.

1. Remove the screws (qty 4, Phillips) from the back cover of the display stand.  Remove the back cover.

2. Extract the DisplayPort cable and set it within the center cable channel.  Tuck the DVI-I to DVI-D cable 

into the stand for a clean appearance.

3. Replace the back cover and secure using the original screws. 

Screw type: Phillips, flat fillister head, 
M3-6, black

Summary of Contents for DTK-2400

Page 1: ...Contents 1 Index 1 Cintiq DTK 2400 Setting up Using the display stand Using the pen Customizing the pen Using the pen display Customizing the pen display Using the Radial Menu Application specific se...

Page 2: ...duction into the market of the applicable Wacom product Cintiq and Wacom are registered trademarks of Wacom Co Ltd Adobe and Photoshop are either registered trademarks or trademarks of Adobe Systems I...

Page 3: ...n display controls 37 Using the hardware control buttons 38 Using the ExpressKeys 39 Using the Touch Rings 40 Working with multiple monitors 41 Adjusting the display 42 Factory presets auto sync and u...

Page 4: ...ions 85 Obtaining driver downloads 86 FREQUENTLY ASKED QUESTIONS 87 CARE AND MAINTENANCE 89 Caring for Cintiq 89 Replacing the pen nib 90 OTHER USEFUL INFORMATION 91 Removing Cintiq from the display s...

Page 5: ...ions Be sure to see also the Important Product Information guide for Cintiq located on the Installation CD The guide includes product safety precautions specifications and your license agreement The f...

Page 6: ...move any packing materials from around the interactive pen display and stand To better access Cintiq remove the plastic joiners from the lower corners of the product box Then lift away the upper porti...

Page 7: ...s product Physical damage or personal injury may result from a single person attempting to lift or carry this product Use care not to let the pen display fall backward Doing so may cause personal inju...

Page 8: ...ox contents are complete Pen with personalization rings Pen stand AC power adapter and cable Cintiq interactive pen display Cintiq display stand pre assembled DVI I to DVI D Dual Link DisplayPort and...

Page 9: ...k Cintiq in the original containers and protective cushions Before installing take some time to learn about your Cintiq interactive pen display and Cintiq display stand DVI I to VGA cable DVI I to DVI...

Page 10: ...er Available USB port and CD ROM drive Cintiq supports digital DVI or DisplayPort and analog VGA video signals For optimum performance connect Cintiq to a digital video card VGA connection is not reco...

Page 11: ...m 6 Connect the adapter power cable and plug into an AC outlet See D in the connection diagram 7 Turn on the pen display The power LED will light orange For DVI operation use the DVI D video cable con...

Page 12: ...display Use of an improper power adapter may damage the unit For optimum performance the display refresh rate should use a vertical frequency of 60 Hz Make sure the refresh rate does not exceed the m...

Page 13: ...Product Information guide for more information If an image has fine striping such as screen stripes it may appear to flicker or display a moir pattern Do not apply excessive pressure on the display s...

Page 14: ...to drag your pen across the display screen surface 5 Check the Read Me file for updated information Review also the Important Product Information guide located on the Installation CD for cautions and...

Page 15: ...ing Note Not all product models are available in all regions Pen display features Pen features PEN DISPLAY FEATURES Take some time to familiarize yourself with the features and components of your Cint...

Page 16: ...when power has been supplied to Cintiq and a video signal is present Glows orange when no video signal is detected e g The computer is turned off starting up or has entered a power management mode in...

Page 17: ...Security slot Pen tether attachment point One on each side Connection ports DVI I Dual Link and DisplayPort Pre installed cables are routed to enter unit at this point Remove cover if access is requi...

Page 18: ...side switch is in a convenient location where you can toggle it with your thumb or forefinger but not accidentally press it while using the pen You can use the switch whenever the pen tip is within p...

Page 19: ...which you have positioned Cintiq before moving the unit Display stand features Display stand location Adjusting display height and incline Using a keyboard with Cintiq Cable replacement Adjust the di...

Page 20: ...not lift by the incline levers or upper portion of the display support arms Improper operation may lead to physical injury or damage to the stand Avoid catching your finger in the gaps of the movable...

Page 21: ...r to the LCD if it flexes during movement Also the display unit does not have sufficient strength to support the load of the stand hanging freely from it Work together and lift carefully Locate Cintiq...

Page 22: ...ing Check to ensure the display stand base does not extend beyond desktop edge Caution Use care when adjusting the working position Use a smooth horizontal motion when pulling Cintiq toward you Do not...

Page 23: ...when you are not actively working with Cintiq Readjust height and incline Important Push Cintiq fully back onto desktop when done working Caution When using Cintiq in a position where the display over...

Page 24: ...vers or squeeze both upper levers For a flatter incline squeeze the lower levers and gently rotate Cintiq down to the desired position For a more vertical incline squeeze the upper levers and gently r...

Page 25: ...lay with one hand and lift slightly Using your other hand pull the release latch toward you This will unlock and release the support arms for movement 3 Carefully lower the pen display unit until its...

Page 26: ...eath the pen display unit The support legs are located beneath the pen display unit one at each lower corner Flip out and then push up slightly on each leg until it clicks into place Adjust height and...

Page 27: ...ort cable by removing the back cover from the display stand 1 Remove the screws qty 4 Phillips from the back cover of the display stand Remove the back cover 2 Extract the DisplayPort cable and set it...

Page 28: ...and replace it with the provided DVI I to VGA cable When mounting Cintiq on a VESA mounting arm and you wish to use the existing cables that come with Cintiq When replacing a suspected bad cable To re...

Page 29: ...pport arm cover which houses the cable you wish to remove 5 Carefully disconnect the cable and unthread it from the support arm cable track 6 Install or replace a cable by reversing this procedure Scr...

Page 30: ...ice Setting up your work area Configuring Cintiq for handedness Using the Grip Pen Pen display controls Working with multiple monitors Adjusting the display SETTING UP YOUR WORK AREA To minimize fatig...

Page 31: ...o learn more about working with Cintiq Learn about the basics of customizing Cintiq for the way you like to work Tips Do not pull the cabling from their computer connections by accidentally moving the...

Page 32: ...automatically reconfigured when you change the handedness setting To reconfigure for left or right handed users 1 Open the Wacom Tablet control panel and click OPTIONS 2 Choose the appropriate setting...

Page 33: ...n tilt the pen in any way that feels most comfortable Place the pen stand within easy reach When not in use place the pen in the pen stand or lay it flat on your desk The stand allows for vertical or...

Page 34: ...ng Tap the display screen once with the pen tip or touch the pen to the display screen with enough pressure to register a click Tip Configure Windows to select when hovering the pen over an icon and t...

Page 35: ...H PRESSURE SENSITIVITY The pen responds to the nuance and inflection of your hand movements enabling you to create natural looking pen and brush strokes within applications that support this feature T...

Page 36: ...ions that support tilt See product information ERASING In supporting applications the pen eraser works like the eraser on a pencil In text applications use the eraser to select text then lift the eras...

Page 37: ...See using the ExpressKeys A Display Toggle function is available for use on multiple monitor systems This feature enables you to toggle the screen cursor between Cintiq and your other displays For ex...

Page 38: ...n Notes You may notice a slight delay in response time depending on the speed of your computer The control buttons cannot be customized Launches the Wacom Tablet control panel Press to close the contr...

Page 39: ...ble functions See customizing the ExpressKeys for details Important Some applications can override and control the ExpressKey functions For details see using applications integrated for tablet control...

Page 40: ...le increment changes Press a Touch Ring mode button to switch between three customizable states Status LEDs show the active mode As you press each button an overlay appears briefly on your display scr...

Page 41: ...the DISPLAY TOGGLE function You can then press the button to toggle the screen cursor between Cintiq and your other displays For example Cintiq can be used as a pen display where the screen cursor is...

Page 42: ...tically synchronizes to the incoming signal The auto sync function sets the horizontal and vertical screen position as well as pitch and phase Auto sync will function between the supported horizontal...

Page 43: ...also press the MENU button to close the menu All settings are automatically saved when the OSD menu closes and will be used the next time the unit receives a similar video signal This is applicable to...

Page 44: ...olors Any changes you manually make to the color settings will override the color profile settings SCALING options include FULL Resizes the image to fill the whole screen ASPECT Resizes the image to f...

Page 45: ...lly comply with the below power saving parameters When power saving functions are in effect the screen display is darker than usual COMPUTER MODE H SYNC V SYNC VIDEO POWER CONSUMPTION POWER LED Power...

Page 46: ...Renaming the tablet in the tablet list OPENING THE CONTROL PANEL Launch the Wacom tablet control panel by pressing the appropriate Cintiq hardware control button You can also open the Wacom Tablet co...

Page 47: ...t control panel items Position the screen cursor over an item and let it rest there The appropriate Tool Tip will pop up in a few moments Your keyboard tab and arrow keys can also be used to navigate...

Page 48: ...display or tablet is connected to the computer Settings can only be viewed or changed for an attached pen display or tablet A pen display or tablet cannot be deleted from the control panel list unles...

Page 49: ...n display See On Screen Display OSD settings 1 Open the Wacom Tablet control panel If more than one pen display is installed on your system select the unit you are working with from the TABLET list 2...

Page 50: ...n of digital paint These tools are fully supported in the Wacom driver software They will appear in the TOOL list of the Wacom Tablet control panel after you touch the pen display screen with the tip...

Page 51: ...TIP FEEL for a wider range of pressure values in most pressure sensitive applications In some applications a soft pressure setting can make the pen overreact so that slight pressure on the pen will b...

Page 52: ...ure needed to erase Click to further customize the eraser sensitivity With your screen cursor positioned over an empty area of the control panel press down on the pen display screen with your pen eras...

Page 53: ...the pen tip function At least one tool button should be set to the CLICK function The tip must be set to CLICK in order to draw in most graphics applications You can change the SIDE SWITCH MODE to bes...

Page 54: ...the interactive pen display open the Wacom Tablet control panel and select the FUNCTIONS icon in the TOOL list Select a tab to customize and change settings using the available options Drag to increas...

Page 55: ...play Toggle modifier keystroke or other function Important Some applications can override and control the ExpressKey functions For details see using applications integrated for tablet control Choose a...

Page 56: ...cular application see the documentation that came with the application Choose SKIP to set the Touch Ring mode button to skip the function state To zoom images around the current position of the screen...

Page 57: ...click Be sure at least one button performs this function so you can always navigate and click RIGHT CLICK Simulates a right mouse button click which displays a context menu MIDDLE CLICK Simulates a m...

Page 58: ...hey cannot be used to select OK You must use your pen to click on the OK button If prompted enter a name for the keystroke definition The name will be displayed with the respective control or in the R...

Page 59: ...application switching dialog with focus on the next open application On Windows 7 or Vista systems running Aero Flip 3D will be activated with focus on the next open application When you select PAN S...

Page 60: ...when open EXPOS Mac Tiles all open windows To access this option first choose KEYSTROKE and then click on the ADD SPECIAL menu within the dialog box PRESSURE HOLD Locks the pressure at the current pr...

Page 61: ...splay where the screen cursor is positioned at the pen tip location on the pen display screen surface Display Toggle enables you to cycle between pen control for Cintiq and your other displays This is...

Page 62: ...e current functions for each control are shown At the bottom of the diagram click CHANGE SETTINGS to open the Wacom Tablet control panel and adjust settings as needed Dismiss the diagram by again pres...

Page 63: ...oft Journal TABLET PC DEFINED Tablet PCs and Windows systems that support the Tablet PC Input Panel Sets the button function according to settings found in the Windows 7 and Vista TABLET PC SETTINGS a...

Page 64: ...The menu closes after you make a selection To close without making a selection click on the X located at the center of the Radial Menu or on a control slice that has no function assigned to it You ca...

Page 65: ...to each connected display in turn until it returns to the Cintiq from where the initial toggle began Important When using application specific settings with Display Toggle be sure each customized app...

Page 66: ...settings are added the ALL icon changes to ALL OTHER and an application icon is displayed for the newly added application s In the above example application specific settings have been added for the...

Page 67: ...G APPLICATION SPECIFIC SETTINGS To remove an application specific setting 1 In the TOOL list select the tool from which you want to remove the application specific setting Then in the APPLICATION list...

Page 68: ...ol These settings can then be customized for the newly added tool Identical tools will use the same settings To remove a selected tool from the TOOL list click on the TOOL list button In the dialog bo...

Page 69: ...ts Index Contents 69 Index 69 RENAMING THE TABLET IN THE TABLET LIST Within the control panel TABLET list double click on the pen display icon If desired enter a new name to be used for the pen displa...

Page 70: ...display Read Me file and look for any information updates 4 Check the product FAQs Frequently Asked Questions 5 If you are having a compatibility conflict between Cintiq and a new hardware or softwar...

Page 71: ...an connect that display to the card in order to verify that the video card is operating correctly 3 Verify that the pen and the tablet portion of your pen display are working Press the pen tip against...

Page 72: ...rol panel and click on the ABOUT button In the dialog box that appears click on the DIAGNOSE button The DIAGNOSTICS dialog box shows dynamic information about the Cintiq pen display and pen This infor...

Page 73: ...open observe the TABLET INFO column as you test each Touch Ring Be sure to select the Cintiq unit you are testing from the TABLET INFO column 2 Slide your finger around the entire circumference of ea...

Page 74: ...RESSURE should change from approximately 0 with no pressure applied to approximately 100 when full pressure is applied For the optional Airbrush move the fingerwheel forward The WHEEL value should dec...

Page 75: ...is lit orange A no signal go to power save message appears briefly on the display screen Your computer may be in a power management mode Touch the pen tip to the display screen move the mouse or depr...

Page 76: ...display screen Set the refresh rate to a vertical frequency that is compatible with your pen display See the Important Product Information guide for frequency range details For optimum performance set...

Page 77: ...details For optimum performance set the refresh rate to use a vertical frequency of 60 Hz Turn off the pen display then turn it back on Open the OSD menu and select the AUTO ADJUST option If necessary...

Page 78: ...ry plugging it into a USB port directly on your computer 4 If the USB device still does not function properly contact the manufacturer for that particular device The Cintiq power LED is off Make sure...

Page 79: ...creasing the TIP DOUBLE CLICK DISTANCE If that does not work move the TIP DOUBLE CLICK DISTANCE slider to the OFF position in order to turn off double click assist You have to press hard with the pen...

Page 80: ...e LED does not light you may have defective hardware see troubleshooting The screen cursor moves but it does not jump to the pen tip location when placed on the display screen and it does not follow t...

Page 81: ...splay may interfere with screen cursor positioning when using other input devices The screen cursor moves erratically or jumps around on the display screen when another tablet is connected to your com...

Page 82: ...r tablet preferences In the TABLET PREFERENCE FILE UTILITY dialog box click BACKUP and follow the prompts Then use the Tablet Preference File Utility to delete the tablet preferences a follows Single...

Page 83: ...lts Use the Wacom Tablet Utility to work with preferences Close any open applications Open the main APPLICATIONS folder Then open the WACOM TABLET folder and run the WACOM TABLET UTILITy It is a good...

Page 84: ...menu choose your HOME Open the LIBRARY and PREFERENCES folders Remove the following preferences COM APPLE INK FRAMEWORK PLIST COM APPLE INK INKPAD PLIST COM APPLE INK INKPAD SKETCH 3 Go back to SYSTEM...

Page 85: ...pport staff for the area where your product was purchased See the Wacom Read Me file located on the Installation CD for contact information When you call you should be at your computer with the follow...

Page 86: ...ddle East and Africa Japan Asia Pacific English China Hong Kong Korea Taiwan Worldwide Web http www wacom com Software updates Worldwide Web http www wacom eu downloads Software updates Worldwide Web...

Page 87: ...ications Cintiq supports general mouse input functions in all applications Assuming the product driver is installed and functioning properly pressure sensitivity and eraser functions are also supporte...

Page 88: ...l a hardware device The pen and screen cursor do not line up Why The interactive pen display needs to be calibrated This should be done each time you reinstall the tablet driver or delete the Cintiq p...

Page 89: ...roduct will void your warranty Important Take care to never spill liquids onto the pen display or pen Be especially careful of getting the display ExpressKeys Touch Rings or pen buttons and tip wet as...

Page 90: ...the pen Firmly push the nib until it stops For replacement parts see ordering parts and accessories Important When not in use place the pen in the pen stand or lay it flat on your desk When the optio...

Page 91: ...moving Cintiq from the display stand Mounting Cintiq on the display stand Using an alternate mount or stand Uninstalling Cintiq Managing preferences Installing multiple tablets Using applications inte...

Page 92: ...damage or personal injury Request assistance from another person or persons Each person should securely grasp the lower part of a display support arm near the display stand base With the other hand gr...

Page 93: ...ft cloth or other protective surface Carefully adjust the incline levers until the pen display screen lies flat on your work surface This also allows for access to the display support arm brackets Cor...

Page 94: ...the cable connector covers on the back of the pen display Do not operate the incline levers unless the display support arms are roughly located within their mounting brackets and you are placing some...

Page 95: ...unt the pen display on the stand 1 Prepare the display stand Carefully raise both display support arms to their upright locked position 2 Prepare the pen display Place the pen display face down on a s...

Page 96: ...pport arms Carefully move the pen display and stand through their full range of motion See adjusting display height and incline Do not operate the incline levers unless the display support arms are ro...

Page 97: ...the other hand grasp the base of the stand at the front corner Using care lift and carefully move this product while supporting the base of the stand Important The assembly is heavy Do not attempt to...

Page 98: ...e weight of the Cintiq interactive pen display To remove the pen display from the display stand 1 Turn off your computer and power off the pen display 2 See removing Cintiq from the display stand To a...

Page 99: ...w choose WACOM TABLET and click REMOVE 3 Follow the prompts to remove the software driver If prompted enter your administrator log on name and password 4 When the driver has been removed shut down you...

Page 100: ...rrently open tablet aware applications that you may be running To back up your preferences click BACKUP under MY PREFERENCES To restore preferences that you had previously backed up click RESTORE unde...

Page 101: ...pen display unit s or tablet s The eraser function will continue to work correctly using the first pen display or tablet that was added to the control panel To remove one of multiple pen displays or t...

Page 102: ...und When you close the application or select a new application pane to work in your Wacom Tablet control panel settings are returned to their previous state To review ExpressKey Touch Ring or pen func...

Page 103: ...ial Menu or pen button and eraser functions To import expert settings 1 Choose an XML file with settings for use with a particular application Double click on your file selection 2 Carefully read and...

Page 104: ...on the REVIEW tab within applicable applications The Windows 7 or Vista Input Panel enables you to use handwriting or an on screen keyboard to directly enter text with your Wacom pen There are differ...

Page 105: ...are disabled in the Windows 7 PEN AND TOUCH or Windows Vista PEN AND INPUT DEVICES control panel PRODUCT INFORMATION To learn more about your Cintiq visit the Wacom web site for your region You can a...

Page 106: ...reparts wacom eu Or visit http shop wacom eu You can also contact your local dealer distributor or technical support using the appropriate number for your region In Australia Singapore Taiwan and Kore...

Page 107: ...erent ways depending on what makes sense for the application ExpressKeys The customizable control keys located on the pen display See using the ExpressKeys Fingerwheel The control wheel on the optiona...

Page 108: ...applied This is used to create natural looking pen brush and eraser strokes in applications that are pressure sensitive Pressure sensitive application Any application that supports pressure sensitive...

Page 109: ...ings The customizable control rings located on the pen display See using the Touch Rings USB Universal Serial Bus A hardware interface standard for connecting computer peripheral devices USB ports sup...

Page 110: ...ling 99 working with 30 Cleaning display stand 89 pen 89 pen display 89 Clicking with pen 34 Control panel lists 48 opening 46 overview 47 tabs 48 Controls testing 72 Customizing 46 eraser feel 52 Exp...

Page 111: ...tiple tablets installing 101 Multiple tools working with 68 New tool adding 68 On Screen Display OSD 43 Ordering parts and accessories 106 Parts available 106 ordering 106 Pen clicking with 34 customi...

Page 112: ...tons 72 input tools 72 pen 74 Touch Rings 73 Tilt drawing with 36 sensitivity customizing 54 Tip feel adjusting 51 Tip pressure setting advanced 52 Tool buttons customizing 53 Touch Rings 37 customizi...

Page 113: ...KOREA CO LTD 1103 Beijing IFC West Tower 1211 12F KGIT Sangam Center No 8 Jianguomenwai Street 1601 Sangam dong Mapo gu Seoul 121 913 Korea Chaoyang District Beijing 100022 Telephone 82 2 557 3894 Chi...

Reviews: