BA 50Z3/6003 en – Edition 4.3 * 5003b340.fm
3-103
Operation
3.57 Re-equipping attachments
Re-equipping the attachments is described below for a bucket. If you are fitting or remov-
ing attachments with their own hydraulic functions – grab or offset bucket, for example –
you must follow the special information given in the Operator’s Manual of the attachment.
Also refer to the Operator’s Manual of the attachment for the procedure to follow for fitting
an attachment onto a quickhitch.
Specific safety instructions
Danger!
Re-equipping attachments –
Risk of injury.
☞
Avoid accidents and injuries by following the information below:
• Stop the engine.
• Raise the control lever base.
• Re-equip attachments only with suitable tools.
• Do not align components with your fingers or your hands but use suita-
ble tools – danger of crushing.
☞
Once you have re-equipped the attachments, or before starting work,
ensure that the attachment is safely locked with the stick and the tilt rod, or
with the quickhitch (option).
• Driving in pins with a suitable tool (soft-face hammer, for example) can still cause them
to splinter, which can cause severe injury.
☞
Wear protective equipment (safety glasses, protective clothing, for example).
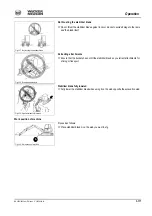
• Do not stand behind the bucket when removing pins.
☞
Do not place your foot underneath the bucket.
• Pay special attention to your fingers when removing and reinserting pins.
• Never insert fingers in the bores of the pins as you align them.
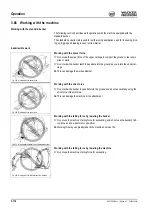
Removing a bucket
• Lower the bucket to the ground with its flat side facing down.
• Stop the engine.
• Raise the control levers.
• Remove the ignition key.
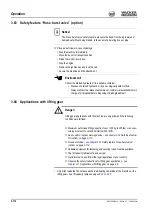
• Remove linch pins
A
.
• First remove pin
B
, and then pin
C
. Carefully expel pins that are stuck with a suitable
tool (soft-face hammer and brass punch, for example).
If pin
C
is stuck:
• Start the engine.
• Slighty raise and lower the boom to take the load off the pin.
• Stop the engine.
• Raise the control lever base.
• Remove the ignition key.
Fig. 208: Removing a bucket
A
B
C
Summary of Contents for 50Z3
Page 35: ...BA 50Z3 6003 en Edition 4 3 5003b110 fm 1 23 Introduction Overview of safety labels ...
Page 56: ...2 16 BA 50Z3 6003 en Edition 4 3 5003b210 fm Safety instructions ...
Page 178: ...3 122 BA 50Z3 6003 en Edition 4 3 5003b340 fm Operation ...
Page 190: ...4 12 BA 50Z3 6003 en Edition 4 3 5003b410 fm Troubleshooting ...
Page 254: ...5 64 BA 50Z3 6003 en Edition 4 3 5003b560 fm ...
Page 265: ...BA 50Z3 6003 en Edition 4 3 5003b610 fm 6 11 Specifications 6 16 Dimensions model 50Z3 ...
Page 267: ...BA 50Z3 6003 en Edition 4 3 5003b610 fm 6 13 Specifications 6 17 Dimensions model 50Z3 VDS ...


