background image

DE

EN

FR

IT

NL

SV

ES

PL

27

85290 - 07.2021 - V5

INSTRUCTION MANUAL VOSS.FARMING EASYCUT PRO

EN

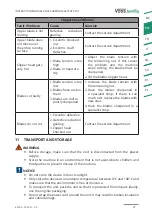
Clippers head/Blades

Fault /Problem

Cause

Solution

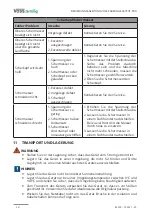
Upper blade is not 

moving

Defective reduction 

gearing

Contact the service department.

Upper blade does 

not move over 

the entire running 

surface

1. 

Eccentric knocked 

out

2. Eccentric shaft 

defective

Contact the service department.

Clipper head gets 

very hot

1. Blade tension is too 

high

2. Blade or head are 

dry

1. 

Adjust  the  blade  tension  with 

the tensioning nut. If this solves 

the problem and the machine 

stops cutting, the blades must be 

sharpened.

2. 

Oil the blades/clipper head.

Blades cut badly

1. Blade tension is too 

low

2. Blades have rust on 

them

3. Blades are dull or 

poorly sharpened

1. 

Increase  the  blade  tension  with 

the tensioning nut.

2. Have the blades sharpened in 

a specialist shop. If there is too 

much rust, replace the blades with 

new ones.

3. Have the blades sharpened in a 

specialist shop.

Blades do not cut

1. Eccentric defective 
2. Defective reduction 

gearing

3. Clipper head 

knocked out

Contact the service department.

11  TRANSPORT AND STORAGE

 WARNING


Before  storage,  make  sure  that  the  unit  is  disconnected  from  the  power 

supply.


Store the machine in an environment that is not accessible to children and 

third parties to prevent misuse of the machine.

 NOTICE


Do not store the device in direct sunlight.


Only store the device at an ambient temperature between 0°C and +40°C and 

make sure that the environment is free of moisture.


To transport the unit, pack the unit so that it is protected from impact. Ideally, 

use the original packaging.


Do not wrap the power cord around the unit. It may result in broken insulation 

and cable damage.

Summary of Contents for 85290

Page 1: ...L SV ES PL VOSS farming easyCUT pro Art 85290 85291 85292 Bedienungsanleitung Instruction Manual Mode d emploi Manuale di Istruzioni Gebruiksaanwijzing Bruksanvisning Instrucciones de operaci n Instru...

Page 2: ......

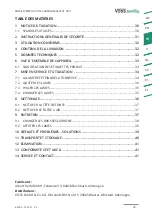
Page 3: ...NDUNG 8 7 1 SCHERMASCHINE EIN UND AUSSCHALTEN 8 7 2 SCHERMESSER EINSTELLEN 8 7 3 SCHERMESSER LEN 9 7 4 SCHERMESSER WECHSELN 9 8 REINIGUNG 10 8 1 SCHERKOPF REINIGEN 11 8 2 LUFTFILTER REINIGEN 11 9 WART...

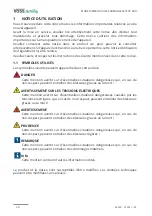
Page 4: ...en GEFAHR DieserHinweisstehtf rm glichesch dlicheSituationen diebeiZuwiderhandlung zu schwersten Verletzungen oder zum Tode f hren WARNUNG VOR ELEKTRISCHEN SPANNUNGEN Dieser Hinweis steht f r m gliche...

Page 5: ...Ger t ausgeschaltet und vom Strom getrennt ist Das Ger t darf nur von Personen bedient werden die Erfahrung im Umgang mit den zu scherenden Tieren haben K rperlich beeintr chtigte Personen m ssen w hr...

Page 6: ...Spezial Schermaschinen l 1x Universal Schraubenschl ssel 1x Schutzkappe f r Schermesser 2x Ersatz Kohleb rsten 1x Reinigungspinsel 1x Transportkoffer 1x Bedienungsanleitung 5 TECHNISCHE DATEN Netzspan...

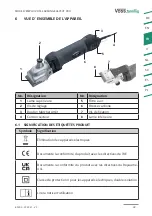
Page 7: ...Schalter 7 Befestigungsschraube 4 Netzkabel 8 Unteres Schermesser 6 1 ERL UTERUNG DER PRODUKTLABEL Symbol Bedeutung Entsorgung von Elektroartikeln Dokumentiert die bereinstimmung des Produktes mit den...

Page 8: ...das Ger t nur mit korrekt eingesetzten und scharfen Schermessern Verwenden Sie das Ger t nicht l nger als f r den maximalen Dauerbetrieb angegeben Lassen Sie das Ger t danach mindestens 10 Minuten ruh...

Page 9: ...bb 2 HINWEIS Achten Sie darauf dass die Schermesser nicht trocken laufen Verwenden Sie zum len ausschlie lich spezielles Schermaschinen l Abb 2 7 4 SCHERMESSER WECHSELN Ein Schermesser Set besteht aus...

Page 10: ...die Befestigungsschrauben 7 mithilfe des beiliegenden Schraubenschl ssels fest Abb 4 Abb 5 8 REINIGUNG WARNUNG VOR ELEKTRISCHEN SPANNUNGEN Halten Sie das Ger t fern von Wasser oder anderen Fl ssigkei...

Page 11: ...ie in Abschnitt 7 4 beschrieben 8 2 LUFTFILTER REINIGEN Reinigen Sie regelm ig den Luftfilter Der Reinigungszyklus ist abh ngig von der H ufigkeit der Verwendung der Schermaschine Reinigen Sie den Luf...

Page 12: ...aktieren Sie den Service Achten Sie beim Wechsel darauf dass das Ger t vom Strom getrennt ist 1 Schalten Sie die Schermaschine aus und trennen Sie die Schermaschine vom Strom 2 Entfernen Sie die Halte...

Page 13: ...nd lassen Sie diese ggf durch geeignetes Fachpersonal pr fen auswechseln 2 Kontaktieren Sie den Service Motor vibriert 1 Rotor l uft unrund 2 Lager sind ausgeschlagen 3 L fterrad gebrochen Kontaktiere...

Page 14: ...sser zu gering 2 Schermesser haben Rostansatz 3 Schermesser sind stumpf oder unsauber geschliffen 1 Erh hen Sie die Spannung der SchermessermitderStellschraube 2 Lassen Sie die Schermesser in einem Fa...

Page 15: ...utzer gesetzlich verpflichtet Sie k nnen Altbatterien die wir als Neubatterien im Sortiment f hren oder gef hrt haben unentgeltlich an unserem Versandlager Versandadresse oder an einem Wertstoffhof Re...

Page 16: ...LADE 21 7 4 CHANGING BLADES 22 7 3 OILING BLADES 22 8 CLEANING 23 8 1 CLEANING THE CLIPPER HEAD 24 8 2 CLEANING THE AIR FILTER 24 9 MAINTENANCE 25 9 1 CHANGING CARBON BRUSHES 25 9 2 SHARPENING BLADES...

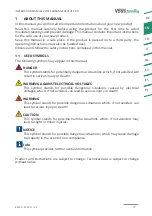
Page 17: ...appear in this manual DANGER This symbol stands for potentially dangerous situations which if not avoided will result in serious injury or death WARNING AGAINST ELECTRICAL VOLTAGES This symbol stands...

Page 18: ...hen the unit is switched off and disconnected from the power supply The unit may only be operated by persons who are experienced in handling the animals to be clipped Persons with physical impairments...

Page 19: ...also use the machine for clipping cattle The use on humans is not permitted The clipper is for private use only and not for commercial use 4 CONTENTS The contents include 1x VOSS farming easyCUTpro ho...

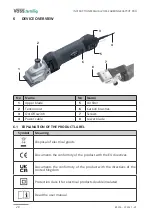
Page 20: ...witch 7 Screws 4 Power cable 8 Lower blade 6 1 EXPLANATION OF THE PRODUCT LABEL Symbol Meaning Disposal of electrical goods Documents the conformity of the product with the EU directives Documents the...

Page 21: ...longer than the specified maximum continuous operation time Afterwards let the machine rest for at least 10 minutes 4 To switch off the machine set the on off switch 3 to O 7 2 ADJUSTING THE BLADE Bef...

Page 22: ...GING BLADES A blade set consists of an upper blade and a larger lower blade the grinding sides of which always rest on each other CAUTION Keep your fingers away from the sharp edges of the blades to a...

Page 23: ...4 Fig 5 8 CLEANING WARNING AGAINST ELECTRICAL VOLTAGES Keep the device away from water or other liquids otherwise an electric shock or short circuit may result CAUTION Keep your fingers away from the...

Page 24: ...oroughly with the cleaning brush 4 After cleaning reinstall and oil the blades as described in section 7 4 8 2 CLEANING THE AIR FILTER Clean the air filter regularly The cleaning cycle depends on the...

Page 25: ...any doubts when changing the carbon brushes contact the service department When changing the carbon brushes make sure that the machine is disconnected from the power supply during the change 1 Switch...

Page 26: ...ble Switch or motor defective 1 Check the socket and fuse used and have them checked replaced by qualified personnel if necessary 2 Contact the service department Motor gets hot 1 Air filter clogged 2...

Page 27: ...he blade tension with the tensioning nut 2 Have the blades sharpened in a specialist shop If there is too much rust replace the blades with new ones 3 Have the blades sharpened in a specialist shop Bl...

Page 28: ...in substances such as mercury cadmium and lead These are poisonous and dangerous to the environment if not disposed of properly Heavy metals can have harmful effects on human animal and plant health a...

Page 29: ...ET UTILISATION 34 7 1 ALLUMER ET TEINDRE LA TONDEUSE 34 7 2 AJUSTER LES LAMES 34 7 3 HUILER LES LAMES 35 7 4 CHANGER LES LAMES 35 8 NETTOYAGE 36 8 1 NETTOYER LA T TE DE TONTE 37 8 2 NETTOYER LE FILTR...

Page 30: ...DANGER Cette mention avertit sur d ventuelles situations dangereuses qui en cas de non respect peuvent entra ner des blessures graves ou la mort AVERTISSEMENT SUR LES TENSIONS LECTRIQUES Cette mentio...

Page 31: ...e L appareil ne doit tre utilis que par des personnes ayant de l exp rience avec les animaux tondre Les personnes physiquement handicap es doivent tre sous surveillance pendant l utilisation de l appa...

Page 32: ...tilisation sur les humains n est pas autoris e Cette tondeuse est destin e exclusivement un usage priv et non commercial 4 CONTENU DE LA LIVRAISON La livraison comprend 1x tondeuse VOSS farming easyCU...

Page 33: ...uton Marche Arr t 7 Vis de fixation 4 Cordon secteur 8 Lame inf rieure 6 1 SIGNIFICATION DES TIQUETTES PRODUIT Symbole Signification limination des appareils lectriques Documente la conformit du produ...

Page 34: ...outon Marche Arr t 3 sur I PRUDENCE N utilisez l appareil qu avec des lames correctement ins r es et aff t es N utilisez pas l appareil plus longtemps que la dur e maximale de fonctionnement continu i...

Page 35: ...et dans l orifice d huile toutes les 10 minutes Fig 2 REMARQUE Veillez ce que les lames ne s ass chent pas Pour huiler les lames n utilisez que de l huile sp ciale pour tondeuse Fig 2 7 4 CHANGER LES...

Page 36: ...s vis de fixation 7 l aide de la cl fournie Fig 4 Fig 5 8 NETTOYAGE AVERTISSEMENT SUR LES TENSIONS LECTRIQUES Tenez l appareil loign de l eau ou d autres liquides pouvant entra ner un choc lectrique o...

Page 37: ...4 8 2 NETTOYER LE FILTRE A AIR Nettoyez r guli rement le filtre air Le cycle de nettoyage d pend de la fr quence d utilisation de la tondeuse Nettoyez le filtre air au plus tard d s que vous remarque...

Page 38: ...queruned charge lectriquependant le fonctionnement Nous vous conseillons donc de changer les brosses carbone avec soin Si vous avez des doutes quant au changement des brosses carbone veuillez contacte...

Page 39: ...1 Pas de courant 2 C ble d alimentation interrupteur ou moteur d fectueux 1 V rifiez la prise de courant utilis e et le fusible et faites les v rifier remplacer par du personnel qualifi si n cessaire...

Page 40: ...mes dans un magasin sp cialis S il y a trop de rouille remplacez les lames par des lames neuves 3 Faites r aff ter les lames dans un magasin sp cialis Les lames ne coupent pas 1 Excentrique d fectueux...

Page 41: ...r l aluminium le lithium et l argent De plus ils peuvent contenir des mat riaux tels que du mercure du cadmium et du plomb qui sont toxiques et mettent en danger l environnement s ils ne sont pas limi...

Page 42: ...RICE 47 7 2 REGOLAZIONE DELLE LAME 47 7 4 CAMBIARE LE LAME 48 7 3 OLEARE LE LAME 48 8 PULIZIA 49 9 MANUTENZIONE 50 8 1 PULIZIA DELLA TESTA DELLA TOSATRICE 50 8 2 PULIRE IL FILTRO DELL ARIA 50 9 1 SOST...

Page 43: ...o manuale potranno apparire i seguenti simboli PERICOLO Questo simbolo indica situazioni di potenziale pericolo che se non evitate causeranno gravi lesioni o morte AVVISO CONTRO LE TENSIONI ELETTRICHE...

Page 44: ...ato dalla rete elettrica Il dispositivo pu essere utilizzato solo da persone esperte nel maneggiare animali da tosare Persone meno abili fisicamente devono essere sorvegliate durante l utilizzo del di...

Page 45: ...o per tosare i bovini Un utilizzo sull uomo non consentito La tosatrice solo per uso privato e non per uso commerciale 4 CONTENUTO Il contenuto include 1x Tosatrice VOSS farming easyCUTpro 2x Set di l...

Page 46: ...Off 7 Viti di fissaggio 4 Cavo di alimentazione 8 Lama inferiore 6 1 SPIEGAZIONE DEI SIMBOLI DEL PRODOTTO Simbolo Significato Smaltimento di materiale elettrico Documentazioni di conformit del prodot...

Page 47: ...ilizzare il dispositivo per un periodo pi lungo rispetto al tempo di funzionamento continuo massimo indicato Lasciare in seguito riposare la tosatrice per almeno 10 minuti 4 Per spegnere l apparecchio...

Page 48: ...lame da taglio 7 4 CAMBIARE LE LAME Un set di lame composto da una lama superiore e da una lama inferiore pi grande i cui lati di affilatura sono sempre appoggiati l uno sull altro PRECAUZIONE Tenere...

Page 49: ...in dotazione Fig 4 Fig 5 8 PULIZIA AVVISO CONTRO LE TENSIONI ELETTRICHE Tenere il dispositivo lontano da acqua o altri liquidi altrimenti si potrebbero verificare scosse o cortocircuiti PRECAUZIONE T...

Page 50: ...a sezione 7 4 8 2 PULIRE IL FILTRO DELL ARIA Pulire il filtro dell aria regolarmente Il ciclo di pulizia dipende dalla frequenza di utilizzo Pulire il filtro dell aria al pi tardi non appena si rileva...

Page 51: ...ONI ELETTRICHE Delle spazzole in carbone montate male possono causare una scossa elettrica durante il funzionamento Si prega di sostituire le spazzole in carbone con cura In caso di dubbi durante la s...

Page 52: ...ore o motore difettoso 1 Controllare la presa e il fusibile utilizzati farli controllare o sostituire se necessario da personale qualificato 2 Contattare l assistenza Il motore si surriscalda 1 Filtro...

Page 53: ...2 Fare affilare le lame solo in negozi specializzati Se c troppa ruggine sostituire le lame con nuove lame 3 Affilare le lame in un negozio specializzato Le lame non tagliano 1 Eccentrico difettoso 2...

Page 54: ...ferro l alluminio il litio e l argento Esse possono inoltre contenere anche sostanze come il mercurio cadmio e piombo che sono tossiche e pericolose per l ambiente se non vengono smaltite correttament...

Page 55: ...ACHINE IN EN UITSCHAKELEN 60 7 2 HET AFSTELLEN VAN DE SCHEERMESSEN 60 7 3 SMEER DE SCHEERMESSEN 61 7 4 VERWISSEL SCHEERMESSEN 61 8 SCHOONMAKEN 62 8 1 REINIGEN VAN DE SCHEERKOP 63 8 2 SCHONE LUCHTFILTE...

Page 56: ...aat voor mogelijke schadelijke situaties die als ze worden geschonden leiden tot ernstig letsel of de dood WAARSCHUWING VOOR ELEKTRISCHE SPANNINGEN Dit symbool staat voor mogelijke schadelijke situati...

Page 57: ...it als het apparaat is uitgeschakeld en van de stroomtoevoer is losgekoppeld Het apparaat mag alleen worden bediend door personen die ervaring hebben met de omgang met het scheren van dieren Fysiek ge...

Page 58: ...t gebruik op mensen is niet toegestaan De scheermachine is uitsluitend bedoeld voor priv gebruik en niet voor commercieel gebruik 4 LEVERINGSOMVANG Inbegrepen in de leveringsomvang 1x VOSS farming eas...

Page 59: ...evestigingsschroeven 4 Stroomkabel 8 Onderste scheermes 6 1 UITLEG VAN DE PRODUCTLABELS Symbool Dat betekent Verwijdering van elektrische goederen Documenten over de conformiteit van het product met d...

Page 60: ...pparaat alleen met correct geplaatste en scherpe scheermessen Gebruik het apparaat niet langer dan gespecificeerd voor een maximale continue werking Laat het apparaat daarna minstens 10 minuten rusten...

Page 61: ...olie op de scheermessen en in de olieopening om de 10 minuten afb 2 NOOT Zorg ervoor dat de scheermessen niet drooglopen Gebruik voor het oli n alleen speciale scheermachine olie Afb 2 7 4 VERWISSEL S...

Page 62: ...de bevestigingsschroeven 7 vast met de meegeleverde sleutel Afb 4 Afb 5 8 SCHOONMAKEN WAARSCHUWING VOOR ELEKTRISCHE SPANNINGEN Houd het apparaat uit de buurt van water of andere vloeistoffen er kan ee...

Page 63: ...e meegeleverde reinigingsborstel 4 Na het reinigen opnieuw monteren en oli n van de scheermessen zoals beschreven in punt 7 4 8 2 SCHONE LUCHTFILTER Maak het luchtfilter regelmatig schoon De reiniging...

Page 64: ...tels kunnen tijdens het gebruik een elektrische schok veroorzaken Vervang de koolborstels met zorg Als u twijfelt bij het vervangen van de koolborstels neem dan contact op met de serviceafdeling Wanne...

Page 65: ...t 2 Stroomkabel schakelaar of motor defect 1 Controleer de gebruikte contactdoos en de gebruikte zekering en laat deze indien nodig door gekwalificeerd personeel controleren vervangen 2 Neem contact o...

Page 66: ...n de scheermessen met de stelschroef 2 Laat de scheermessen opnieuw slijpen in een speciaalzaak Als er te veel roest is vervang dan de messen door nieuwe 3 Laat de scheermessen opnieuw slijpen in een...

Page 67: ...e vinden in batterijen en accu s Bovendien kunnen ze ingredi nten bevatten zoals kwik cadmium en lood Deze zijn giftig en brengen het milieu in gevaar als ze niet op de juiste manier worden afgevoerd...

Page 68: ...NDNING 73 7 1 SL P OCH AV KLIPPMASKINEN 73 7 2 JUSTERA SK REN 73 7 4 BYTA KLIPPSK R 74 7 3 SM RJNING AV SK R 74 8 RENG RING 75 8 1 RENG RING AV KLIPPHUVUDET 76 8 2 RENG R LUFTFILTRET 76 9 UNDERH LL 7...

Page 69: ...t leda till allvarliga personskador eller d dsolyckor VARNING F R ELEKTRISKA SP NNINGAR Denna symbol st r f r eventuella farliga situationer orsakade av elektriska sp nningar som om de inte undviks re...

Page 70: ...ten och underh llsarbeten n r enheten r avst ngd och fr nkopplad fr n str mf rs rjningen Enheten f r endast drivas av personer som har erfarenhet av att hantera de djur som ska klippas Personer med fy...

Page 71: ...en f r klippning av n tkreatur Anv ndning p m nniskor r inte till ten Klippmaskinen r endast avsedd f r privat bruk och inte f r kommersiellt bruk 4 LEVERANSENS INNEH LL Inneh llet inkluderar 1x VOSS...

Page 72: ...7 F stskruv 4 Str mkabel 8 Nedre klippblad 6 1 F RKLARING AV PRODUKTM RKNING OCH SYMBOLER Symbol M rkning Betydelse Avfallshantering av elprodukter Dokumenterar produktens verensst mmelse med EU direk...

Page 73: ...inte maskinen l ngre n den angivna maximala kontinuerliga driftstiden L t sedan maskinen vila i minst 10 minuter 4 F r att st nga av maskinen st ller du P AV brytaren 3 p l ge O 7 2 JUSTERA SK REN F...

Page 74: ...BYTA KLIPPSK R Ett klippsk rset best r av ett vre sk rblad och ett st rre undre sk rblad vars slipningssidor alltid vilar p varandra SE UPP Se till att h lla fingrarna borta fr n sk rens vassa kanter...

Page 75: ...LEKTRISKA SP NNINGAR H ll enheten borta fr n vatten eller andra v tskor annars kan det leda till elektriska st tar eller kortslutning SE UPP H ll fingrarna borta fr n klippsk rens vassa kanter f r att...

Page 76: ...f ljande reng ringsborsten 4 S tt tillbaka och sm rj in sk ren efter reng ring enligt beskrivningen i avsnitt 7 4 8 2 RENG R LUFTFILTRET Reng r luftfiltret regelbundet Reng ringscykeln beror p hur oft...

Page 77: ...KTRISKA SP NNINGAR Felaktigt anv nda och felaktigt isatta kolborstar kan orsaka elektriska st tar under maskinens drift Byt kolborstarna f rsiktigt och med omsorg Om du r os ker p hur du ska g ra n r...

Page 78: ...kt motor eller brytare 1 Kontrollera uttaget och s kringen som anv nds och l t dem vid behov kontrollera byta ut av kvalificerad personal 2 Kontakta kundservice Motor blir varm 1 Tillt ppt luftfilter...

Page 79: ...n med sp nnskruven 2 L t slipa sk ren hos fackhandlare specialist Om det r f r mycket rost byt ut sk ren mot nya 3 L t slipa sk ren i fackhandeln Sk ren klipper inte 1 Excenter defekt 2 Defekt verf ri...

Page 80: ...r det laddningsbara batteriet Batterier och laddningsbara batterier inneh ller ocks tervinningsbara mnen som t ex zink j rn aluminium litium och silver De kan ven inneh lla mnen som kvicksilver kadmiu...

Page 81: ...ENDER Y APAGAR LA CORTADORA 86 7 2 AJUSTE DE LA CUCHILLA 86 7 3 LUBRICACI N DE LAS CUCHILLAS 87 7 4 CAMBIO DE CUCHILLAS 87 8 LIMPIEZA 88 8 1 LIMPIEZA DEL CABEZAL DE LA CORTADORA 89 8 2 LIMPIEZA DEL FI...

Page 82: ...situaciones potencialmente peligrosas que si no se evitan resultar n en lesiones graves o incluso la muerte ADVERTENCIA DE RIESGO EL CTRICO Este s mbolo representa posibles situaciones peligrosas caus...

Page 83: ...est apagado y desconectado de la fuente de alimentaci n S lo pueden utilizar la m quina personas con experiencia en el manejo de los animales que se van a recortar Las personas con limitaciones f sic...

Page 84: ...quilar al ganado El uso en humanos no est permitido La recortadora es s lo para uso privado y no para uso comercial 4 CONTENIDO DEL ENV O El contenido del env o incluye 1x M quina cortapelo easyCUTpro...

Page 85: ...Interruptor On Off 7 Tornillos 4 Cable de alimentaci n 8 Cuchilla inferior 6 1 EXPLICACI N DE LA ETIQUETA DEL PRODUCTO S mbolo Significado Deshacerse de los art culos el ctricos Documenta la conformi...

Page 86: ...a s lo con las cuchillas correctamente insertadas y afiladas No utilice la m quina durante m s tiempo que el tiempo m ximo de funcionamiento continuo especificado Despu s deje que la m quina descanse...

Page 87: ...bertura cada 10 minutos fig 2 AVISO Aseg rese de que las cuchillas de corte no se sequen S lo use aceite especial para cortadoras para engrasar las cuchillas Fig 2 7 4 CAMBIO DE CUCHILLAS Un juego de...

Page 88: ...tornillos de fijaci n 7 con la herramienta Fig 4 Fig 5 8 LIMPIEZA ADVERTENCIA DE RIESGO EL CTRICO Mantenga el dispositivo alejado del agua u otros l quidos de lo contrario podr a producirse una descar...

Page 89: ...e nuevo y engrase las cuchillas como se describe en la secci n 7 4 8 2 LIMPIEZA DEL FILTRO DEL AIRE Limpie el filtro de aire con regularidad La frecuencia de limpieza depender del uso Al menos limpie...

Page 90: ...e el funcionamiento Cambie las escobillas de carbono con cuidado Si tiene alguna duda al cambiar las escobillas de carbono p ngase en contacto con el servicio t cnico Cuando cambie las escobillas de c...

Page 91: ...e y el fusible utilizados y ll velos a revisar sustituir en caso necesario a un especialista 2 P ngase en contacto con el servicio t cnico El motor se calienta 1 Filtro de aire obstruido 2 La tensi n...

Page 92: ...las cuchillas es demasiado baja 2 Las cuchillas est n oxidadas 3 Las cuchillas est n desafiladas o mal afiladas 1 Aumente la tensi n de las cuchillas con la tuerca tensora 2 Lleve las cuchillas a una...

Page 93: ...timas son t xicas y peligrosas para el medio ambiente si no se eliminan adecuadamente Los metales pesados pueden tener efectos nocivos para la salud humana animal y de las plantas y se acumulan en el...

Page 94: ...MASZYNKI 99 7 2 REGULOWANIE OSTRZY 99 7 4 WYMIANA OSTRZY 100 7 3 OLIWIENIE OSTRZY 100 8 CZYSZCZENIE 101 8 1 CZYSZCZENIE G OWICY MASZYNKI 102 8 2 CZYSZCZENIE FILTRA POWIETRZA 102 9 KONSERWACJA 103 9 1...

Page 95: ...si nast puj ce symbole ZAGRO ENIE Ten symbol oznacza potencjalnie niebezpieczne sytuacje kt re je li nie uda si ich unikn mog prowadzi do powa nych obra e lub mierci OSTRZE ENIE PRZED NAPI CIAMI ELEK...

Page 96: ...ie przy wy czonym i od czonym od zasilania urz dzeniu Urz dzenie mo e by obs ugiwane wy cznie przez osoby kt re maj do wiadczenie w post powaniu ze zwierz tami kt re maj zosta ostrzy one Osoby z ogran...

Page 97: ...szyny r wnie do strzy enia byd a Stosowanie na ludziach jest niedozwolone Urz dzenie jest przeznaczone wy cznie do u ytku prywatnego a nie komercyjnego 4 ZAWARTO ZESTAWU Zawarto opakowania 1x VOSS far...

Page 98: ...owe 3 W cznik ON OFF 7 ruby mocuj ce 4 Przew d zasilaj cy 8 Ostrze dolne 6 1 OBJA NIENIA DO ETYKIETY PRODUKTU Symbol Znaczenie Utylizacja urz dze elektrycznych Dokumentuje zgodno produktu z dyrektywam...

Page 99: ...io w o onymi i ostrymi ostrzami Nie nale y u ywa maszynki d u ej ni podany maksymalny czas pracy ci g ej Nast pnie nale y pozostawi urz dzenie w stanie spoczynku na co najmniej 10 minut 4 Aby wy czy m...

Page 100: ...nale y u ywa tylko specjalnego oleju Rys 2 7 4 WYMIANA OSTRZY Zestaw ostrzy sk ada si z g rnego ostrza i wi kszego dolnego ostrza strony cierne zawsze spoczywaj na sobie UWAGA Trzymaj palce z dala od...

Page 101: ...PRZED NAPI CIAMI ELEKTRYCZNYMI Trzymaj urz dzenie z dala od wody lub innych p yn w w przeciwnym razie mo e doj do pora enia pr dem elektrycznym lub zwarcia UWAGA Trzymaj palce z dala od ostrych kraw d...

Page 102: ...yszczeniu nale y ponownie zamontowa i naoliwi ostrza zgodnie z opisem w rozdziale 7 4 8 2 CZYSZCZENIE FILTRA POWIETRZA Regularnie czy filtr powietrza Cykl czyszczenia zale y od cz stotliwo ci u ytkowa...

Page 103: ...W razie w tpliwo ci dotycz cych wymiany szczotek w glowych nale y skontaktowa si z przedstawicielem serwisu Podczas wymiany szczotek w glowych nale y upewni si e maszyna zosta a od czona od zasilania...

Page 104: ...cznik lub silnik 1 Sprawdzi gniazdo i zastosowany bezpiecznik i w razie potrzeby zleci ich sprawdzenie wymian przez wykwalifikowany personel 2 Prosimy o kontakt z przedstawicielem serwisu Silnik robi...

Page 105: ...pomoc ruby regulacyjnej 2 Ostrzanale ynaostrzy wspecjalistycznym sklepie Je li rdza jest zbyt du a nale y wymieni ostrza na nowe 3 Ostrzanale ynaostrzy wspecjalistycznym sklepie Ostrza nie tn 1 Wadli...

Page 106: ...recyklingu takie jak cynk elazo aluminium lit i srebro Baterie i akumulatory mog r wnie zawiera substancje takie jak rt kadm i o w S one toksyczne i niebezpieczne dla rodowiska je li nie zostan prawi...

Page 107: ......

Page 108: ......

Reviews: