4. OPERATION
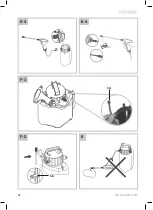
Charging the sprayer (Fig. C)
Plug the charger cable (11) (included) into an
adapter (not included).
• Plug the charger cable (11) into the sprayer
• Plug the charger plug into an electrical outlet
after a few seconds the charger indication light
(12) will lighten up and show the charging
status.
Fully charging the battery may take up to 2 hours.
Checking the battery status (Fig. D)
The battery indication light (15) shows the remai-
ning battery level when the on/off switch (13) is
pressed.
The battery indication light (15) has two lights
indicating the remaining level. The more lights that
burn, the more capacity the battery has left.
When the one light is burning, it means the battery
is almost empty and should be charged.
To spray the liquid (Fig. E)
Note:
Please observe the safety and proportioning
instructions provided by the manufacturer of the
product you are going to spray.
1. Pull the safety relief valve (9). See Fig. E1.
2. Unscrew the tank handle (7) and fill the tank
(6). See Fig. E2.
* If necessary, add additive liquid.
3. Screw the tank handle (7) back on the tank (6).
Check if the hose (5) is still well connected
to the sprayer (1) and to the tank ring (8), if
necessary tighten the nuts by hand.
4. Press and hold the on/off switch (13) on the
sprayer in order to spray
5. When done spraying, release the button on the
sprayer so it stops
Adjust spray from nozzle tip (Fig. E4)
Water may be sprayed out of the nozzle tip (3+4)
either linearly or in a fan shape. Turn on the sprayer
first, and then adjust the nozzle tip by turning it
clock and counter clockwise. As shown in Fig. E4.
Liquid level indicator (17)
The tank (6) has a transparent line that shows the
liquid level in the tank.
This can also be used as an measuring cup, indica-
ted per litre.
5. MAINTENANCE
Cleaning
Always clean your Pressure Sprayer after spraying.
Use the Pressure Sprayer only with clear water
(possibly with addition of dish detergent) and spray
empty. The valves, the sprayer (1), the nozzles
(3+4), hose (5) and hose filter (14) inside the tank
are cleaned.
Pull the safety relief valve (9) to see if has any
blockage for smooth running.
Storage (Fig F1, F2)
• Place the sprayer onto the holder positioned on
the tank ring. As shown in Fig. F1
• The nozzle not attached to the sprayer can be
stored on to the nozzles storage (16) as shown
in Fig. F2.
Store the pressure sprayer in a frost-free
place.
To clean the hose filter (Fig. F1)
Unscrew the tank handle and remove the hose
inside the tank. Clean the filter (14). After cleaning
place attached filter back on to the tank hose and
the hose inside the tank.
There is liquid in the tank but sprayer will not spray
• Check if the sprayer is fully charged
• Check if all hoses (inside the tank as well) are
properly connected, if necessary reconnect and
tighten necessary nuts.
• Relief the pressure by pulling the relief valve.
ENVIRONMENT
Faulty and/or discarded electrical or
electronic apparatus have to be collected at
the appropriate recycling locations.
Only for EC countries
Do not dispose of power tools into domestic waste.
According to the European Guideline 2012/19/EC
EN
9
WWW.VONROC.COM

