


95x Series Operating Manual - May 17, 2022
Page
115
of
155
the HI terminal of the milli-ammeter, the LO terminal of the milli-ammeter should be connected to the
RETURN terminal of the 95x. When the equipment is correctly connected press
START
to continue the
procedure. The user is now shown the reading as measured by the 95x (nominally 1mA). The user should
use the UP and DOWN arrow keys located below the display of the 95x to adjust the 95x reading to be
within the allowable tolerance of the milli-ammeter reading (the 95x specification is ±0.01mA). When
completed satisfactorily then press
START
to continue the procedure, otherwise abort the calibration by
pressing
STOP
.
•
If all steps above were completed successfully then the calibration is completed and the 95x display
shows “FINISHED CALIBRATION” for a short time. The user should remove all equipment and connections
from the 95x. DO NOT REMOVE POWER FROM THE 95x OR TURN OFF THE POWER SWITCH FOR AT LEAST
5 SECONDS AFTER COMPLETING THE CALIBRATION PROCEDURE.
VERIFYING CALIBRATION
Prior to performing a verification procedure, the user should first perform the self-test procedure as described in
The 95x has a built-in automatic verification sequence which may be followed by the user. In some circumstances
the user may wish to not use this built-in sequence but use their own sequence. The user can use any verification
sequence which they wish by building a special “test sequence” in the
95x and then using external equipment to
monitor the voltages and/or current during the execution of the sequence. This document does not cover the
details regarding how to do this but is limited to the steps in the internal automatically sequenced verification
procedure.
Please note the following -
•
In several steps the equipment needed to perform performance verification is highly specialized and may
not be available to many users. Making very high voltage measurements with high precision requires
special skills and equipment, particularly when performing high AC voltage testing. If there are any
doubts regarding the correct methods to use, consult the manufacturer of the test equipment being used.
•
The 95x should be fully powered and turned on for at least 10 minutes (1 hour is recommended) prior to
being calibrated. Initially there should be no connections to any of the 95x terminals and it is
recommended to not have any connections to the interface ports during the procedure.
•
In the various steps shown in this procedure, if a step is specific to certain models, then it is denoted as
such. In all cases, follow the prompts in the display of the 95x for the actual procedure.
•
The user can press
STOP
to abort the procedure.
•
The front panel High Voltage warning light is illuminated whenever there are high voltages or currents
present on the 95x terminals. When illuminated the user should not touch the connections to the 95x.
•
Several of the verification steps are performed at very high voltages, the user must ensure that the wiring
used has sufficient insulation for the voltages.
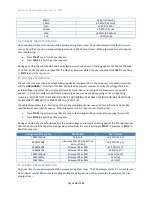
•
Although the sequence is similar between the 95x series products and options, there are differences
depending on the voltages, currents, and modes which each model and option is capable of. The 95x
automatically accounts for the actual model and option content when guiding the user through the
sequence. Individual steps and/or entire groups of steps may not be present in the actual product being
verified. Any optional customer requested factory voltage and current generation limitations are applied
during verification and so will also affect the procedure.
•
Since the 95x is internally grounded, the measurement equipment, current sources and test loads used
during verification must not be grounded.


