background image

20 / 35

 Version 1.9

Copyright ©

eco-CONTROL EC200-B

Operation and maintenance instructions

9.   

Select External 

and confirm, the input dialog to 

determine the quantity appears, display 39.

D

is

pl

ay

 1

8

10.  

Create an external signal

 (e.g., press the foot switch), the 

dispenser is started up. 

11.  Once the dosing quantity has been reached, switch off 

the 

external signal

. The dosing quantity is displayed, 

accept it with 

OK

.


 D

is

pl

ay

 3

9

12.  Press the 

STOP

 key, 

OK

 is offered to save the dosing 

quantity.

13.  Confirm with 

OK

, the dosing quantity is saved and 

display 3, 

Quantity program

, appears with the saved 

quantity.

D

is

pl

ay

 3

Note:

 Since the flow rate in the Teach in function can differ from the flow rate in the 

program that is used subsequently, we recommend that you next check this and 

make any necessary corrections if there are especially tight requirements concerning 

the dosing quantity.

5.10.2 Dosing time

1.   Press the 

Quantity program 

shortcut key, display 10 

appears.

2.   Set, confirm and save the dosing time.

The set value remains active until the next change or until 

the Dosing systems is switched off. Alternatively, a value of 

its own for the flow rate can be assigned to each dosing 

program (See 5.14, Changing a dosing program, page 29).

D

is

pl

ay

 1

0

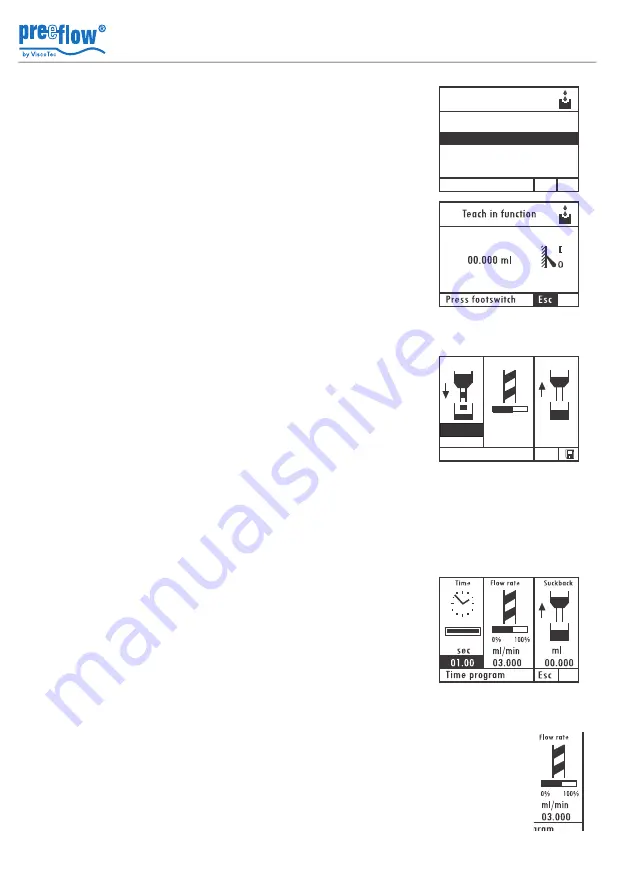
5.10.3 Flow rate

The flow rate can be set in each dosing program. The maximum flow rate 

that can be set is: 

eco-PEN300  1,48 ml/min; eco-PEN450 6 ml/min;  eco-PEN600 16 ml/min

•   Selecting, changing and saving the displayed value.

The bar chart shows in what range (%) the flow rate is. 

D

is

pl

ay

 3

4

Esc

NAVI-wheel

Teach in function

select signal

External

Quantity program

Esc

Suckback

Flow rate

Volume

0%

100%

ml/min

00.100

03.000

00.000

ml

ml

Summary of Contents for Preeflow eco-CONTROL EC200-B

Page 1: ...Dosing system Operation and maintenance instructions eco CONTROL EC200 B ...

Page 2: ......

Page 3: ...nger due to Dosing system 9 5 Operation 10 5 1 Displays and controls 10 5 2 Connections 11 5 3 Symbols on the screen 12 5 4 Functional and operational schematic 13 5 5 Starting up 14 5 6 Switching on and off 14 5 7 Shutting down 14 5 8 The dosing programs and their areas of application 14 5 8 1 Dosing programs 15 5 8 2 Operating modes 15 5 9 Calibrating 16 5 9 1 Calibration auto 16 5 9 2 Calibrati...

Page 4: ...s 28 5 13 Select the dosing program 28 5 14 Changing a dosing program 29 5 15 Dosing 30 5 16 Bleed the dispenser after filling cleaning 31 5 17 Service 31 5 17 1 Operating information 31 5 17 2 Formatting the chipcard 31 6 Accessories spare parts 32 7 Troubleshooting maintenance 33 8 Technical data 34 8 1 Dosing control 34 8 2 Dispenser 34 8 3 Interfaces 34 9 Disposal 34 10 EC Declaration of Confo...

Page 5: ...Copyright Version 1 9 5 35 eco CONTROL EC200 B Operation and maintenance instructions ...

Page 6: ...perate two dispensers at the same time It is possible to set it up for other dispensers at any time without noteworthy setting up times The dispensers have been developed and tested for high precision work with products ranging from low to high viscosity with extremely high repeat precision They are rotating displacement systems consisting of a rotor and stator and can be dismantled in no time A n...

Page 7: ...ions in brief with your transactions in the document Feature Section Page 3 dosing programs Quantity Start stop Time program 5 8 1 15 Teach in the simplest way to determine and save the required dosing quantity 5 10 1 18 24 different dosing programs operation with chipcard 5 12 28 Editing of the dosing programs with a PC in preparation Sucking back of the medium to prevent dripping 5 10 4 21 Flow ...

Page 8: ... chemical resistance of the parts which come into contact with the product see the commissioning and maintenance manual of the dispenser must be ensured prior to commissioning 4 4 Qualifications of the operating and maintenance personnel The owner bears the responsibility for ensuring that the operating and maintenance personnel have the required qualifications The Operation and maintenance instru...

Page 9: ...Connections on page 11 when the power has been switched off Otherwise the electronics of the drive motor could be damaged 4 8 Sources of danger due to Dosing system Very high dosing pressures can be produced depending on the viscosity and the speed of rotation and this could result in unintended spurting out of the medium Check the flow quantity in relation to the dosing needle used needle cross s...

Page 10: ...ftware update 4 NAVI wheel Select and set variable values and input dialog confirmations 5 Key START Starts the dosing function 6 Key STOP Stops the dosing function emergency stop 7 Key PRG Esc Selection of programming quitting an input dialog 8 Key INFO Brings further information onto the display used to quit page 2 in the dosing programs 9 Return Confirmation of a selection value input Shortcut ...

Page 11: ...r Input level monitoring medium 18 Foot switch Foot switch for hands free operation 19 System plugs See section 8 3 page 34 for the pin outs 20 RS 232 Data transfer with PC interface preparation 21 24 V DC 100 VA Mains plug connection for power supply 22 Chipcard SD memory card Chipcard reader SD memory card Self levelling liquid low viscosity medium Not a self levelling liquid medium high viscosi...

Page 12: ...king back Preventing dripping of the medium The amount of medium that is sucked back into the dispenser in connection with the dosing process Calibrating Matching the dispenser by determining the effective flow rate Teach in Empirical determination of the dosing quantity Saving Used to save the last values that had been amended Only applies if a chipcard has been inserted Start stop Shows the curr...

Page 13: ...ed for confirmation Changing a setting value 1 Select the value to be changed by rotating the NAVI wheel the value is shown in inverse 2 Press the NAVI wheel numbered items1 can be selected individually 3 Select a numbered item by rotating the NAVI wheel the numbered item flashes 4 Press the NAVI wheel the numbered item is shown in inverse 5 Change the value by rotating the NAVI wheel and press th...

Page 14: ...of application General In order to achieve eco CONTROL EC200 B the most accurate results all the main factors for a reproducible dosing operation can be set The dosing system must be recalibrated when the medium is changed See 5 9 Calibrating page 16 All the parameters of a dosing program can be saved When using a memory card there are 24 program slots available for permanent storage If you do not...

Page 15: ... period This is triggered by the operator or an external controller The amount that is dispensed can be defined The dosing operation can be broken off at any time until the set time has expired STOP key The maximum dosing time that can be set is 99 99 seconds 5 8 2 Operating modes Dosing manually In the three dosing programs the dosing is initiated by pressing the START key The quantity programs a...

Page 16: ... be damaged Keep at hand a suitable vessel calibration vessel to catch and measure the quantity required for calibration 5 9 1 Calibration auto Note During the calibration operation the Dosing system cannot be operated by either the foot switch or an external control signal Press the PRG key system selection menu display 2 appears Select and confirm Calibration auto the menu Calibration auto displ...

Page 17: ...s been determined Select the OK button and confirm the next dialog to save the calibration value appears display 17 1 Accept or discard the suggested program slot confirm this and the system has been calibrated Display 17 1 5 9 2 Calibration manual The Calibration manual function provides a simplified option to recalibrate the system without having to run through the entire process in the Calibrat...

Page 18: ...system saves the required amount Confirm the flow rate and set the desired value with the NAVI wheel Press the OK button system selection menu display 2 appears Display 40 Setting the dosing amount as a value 1 Press the Quantity program shortcut key display 3 appears 2 Ensure that the required quantity unit has been selected in the Quantity display area 3 Set and confirm the dosing amount Display...

Page 19: ...ing capacity is shown The NAVI wheel controls the dispenser in a linear fashion 1 4 tourn 1 4 conveying capacity Display 19 8 Rotate the NAVI wheel until the desired dosing quantity is reached The amount given out is shown directly Display 20 Continue with 12 9 to 11 only apply when controlling by means of an external signal Start stop Time program Calibration auto Calibration manuel Teach in func...

Page 20: ...commend that you next check this and make any necessary corrections if there are especially tight requirements concerning the dosing quantity 5 10 2 Dosing time 1 Press the Quantity program shortcut key display 10 appears 2 Set confirm and save the dosing time The set value remains active until the next change or until the Dosing systems is switched off Alternatively a value of its own for the flo...

Page 21: ...ange or until the Dosing systems is switched off Alternatively a value of its own for the sucking back can be assigned to each dosing program See 5 14 Changing a dosing program page 29 5 10 5 Material density Inputting the material density for the first time Press the Quantity program shortcut key menu Quantity program display 3 appears Confirm selection display 4 input dialog for material density...

Page 22: ...e material density value is to be changed in a particular program If there is no memory card in the control system the change is made in program 00 volatile memory 5 10 6 Tolerance value primary pressure monitoring If the air pressure at the pressure regulating valve is changed primary pressure for the medium an alarm is given and no further dosing is possible A tolerance value can be set The alar...

Page 23: ... the password 0000 to 9999 Time of the automatic blocking after the last input 30 seconds Turning on password protection Press the PRG key system selection menu display 2 appears Select and confirm Administration the Administration menu display 25 appears Display 2 Select Password protection display 41 appears Display 25 Start stop Time program Calibration auto Calibration manuel Teach in function...

Page 24: ...t screen appears Display 42 Note If no further buttons are pressed the password protection blocks the controller after 30 seconds Turning off password protection Release the controller as described above Press the PRG key system selection menu display 2 appears Select and confirm Administration the Administration menu display 25 appears Display 2 Select Password protection display 41 appears Displ...

Page 25: ...appears Display 2 Select Analogue Input display 43 appears The current setting is shown in the status bar Display 25 Select the desired setting and press Navi wheel the status bar displays Press OK to accept Select the OK button and confirm the setting is activated Display 43 Technical connection data on the system connector 15 Pin Analogue signal Input resistance resolution Pump ml min A1 0 10V R...

Page 26: ...the PRG key the start screen display 1 appears Display 1 Press and hold down the START key Press the Quantity program key Config Error messages are displayed display 33 Select the desired error message and switch it on or off with the Enter key Press the Esc key to quit the menu Display 33 Start stop Esc Suckback Flow rate A1 aktiv 0 000 ml O Start stop Start stop Time program Calibration auto Cal...

Page 27: ...ctive or has not been inserted when the Dosing systems is switched on a corresponding message display 37 is shown for 3 seconds Display 37 5 11 Clearing error messages If there is an error message it is shown flashing in the status line display 36 and an acoustic signal is given if it has not been switched off see 5 10 10 System and error messages page 26 Press the Info key the acoustic signal is ...

Page 28: ... this dosing program are now available for editing Do this as described below under 5 14 5 13 Select the dosing program Only possible if using a memory card If there is no memory card then only program 00 volatile memory is available Press the PRG key system selection menu display 2 appears Select Administration display 25 appears Display 2 Activate Select program display 26 appears Program 00 vol...

Page 29: ...25 Select and confirm the desired program number all program parameters pages 1 and 2 can be changed Display 26 Note The value in the Pause function defines the amount of time between stopping the dosing and starting the sucking back The pressure unit Bar can be changed over to psi Display 26 1 Start stop Time program Calibration auto Calibration manuel Teach in function Administration Quantity pr...

Page 30: ...splay Use the Info key to display all the dosing program parameters Display 26 26 1 Start stop Esc Suckback Flow rate 0 100 ml min 03 000 00 000 ml O Start stop Program no 00 Quantity program Esc Volume 00 100ml Speed 03 000ml m Pause Calibr 0 00 s Esc Esc Suckback Speed 0 000ml 03 000ml m Program no 00 Time program Time Speed 03 000ml m 01 00s Pause Calibr 0 00 s Suckback Speed 0 000ml 03 000ml m...

Page 31: ... key system selection menu display 2 appears Select and confirm the Service function display 38 appears Display 2 All the main system and operating times are displayed The language for the displays can be set Display 38 Using the chipcard Press the PRG key the start screen display 1 appears Press and hold down the START key Press the PRG key Release both keys again the chipcard is reformatted and ...

Page 32: ...83 Protective cap socket motor 1 2 4 20194 Protective cap for 9 pole Sub D RS 232 5 20168 Sensor empty reporting cpl for eco CONTROL EC 200 6 20165 Foot switch cpl for eco CONTROL EC 200 7 20055 Plug for foot switch 8 20056 Plug for sensor empty reporting 9 20313 cable extension 5m cpl 10 20314 cable extension 10m cpl 11 20333 connection motor 2 for eco PEN450 and eco PEN300 12 20335 connection mo...

Page 33: ... the chipcard Error messages Overcurrent monitoring Dispenser components do not run smoothly due to hardened medium or as a result of dry running Dismantle and clean the dispenser replace the stator if necessary See the operating instructions for the dispenser Level of medium critical Not enough medium in the supply tank Fill up with the medium If the error message remains check the sensor and sen...

Page 34: ...o 24 V On off switch no Interface RS 232 Compressed air monitoring 0 to 7 bar 0 to 100 psi External memory MM C SD Card min 64 MB max 24 dosing programs can be read with a Microsoft operating system Operating conditions 10 C to 40 C non condensing air pressure 1 bar Medium temperature 10 C to 40 C Storage conditions dry dust free 10 to 40 C The final disposal of the Dosing system is to be done in ...

Page 35: ...k GmbH Amperstraße 13 D 84513Töging Product description Function Dosing system with dispenser Model eco CONTROL EC200 B with dispenser eco PEN300 450 600 700 Harmonised standards applied DIN EN ISO 12100 2011 03 Safety of machinery DIN EN 809 2011 01 Pumps and Pump Units for Liquids Common safety requirements DIN EN ISO 13857 2008 06 Safety of machinery Safety distances DIN EN 61000 6 3 2011 09 El...

Page 36: ......

Reviews: