


17
KLYS
EN
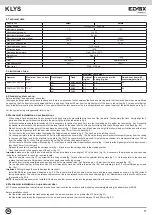
Maximum door height
Operator
Maximum door surface
area
Track length
Track
Sectional
(fig. 4a)
Up-and-over door with
spring (fig. 4b)
Up-and-over door with
counterweights (fig. 4c)
ENM1 (KLYS 9SD)
9 m
2
3 m
ENX1/ENX2 2.5
2.4
2.4
4 m
ENX3
3.5
3
ENM2 (KLYS 12SD) 12 m
2
3 m
ENX4
2.5
2.4
2.4
4 m
ENX5
3.5
3
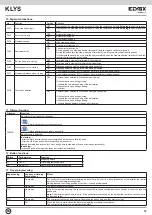
4. Standard system set-up:
Before installing the automation, check that:
the hinges, bearings and door guides are strong and there is no excessive friction between the fixed and moving parts, that the mechanical stops are well fixed
on opening, that the door is correctly balanced there is a space of at least 40 mm from the highest point of the door to the ceiling (fig. 3); make sure that the
door is ready for mounting the motorisation (the upper wheel of the last panel must be in a horizontal and not vertical stretch of the guide as shown in fig. 3)
For the system wiring arrangements, refer to fig. 1.
5. Mechanical installation on sectional door:
- When using a track divided into 2 parts, assemble the track using the pre-installed joint on one of the two parts. To assemble the track, simply align the 2
parts and slide the part without the joint into the part with the joint as indicated in fig. 5.
- All Elvox tracks are supplied pre-tensioned. If it is necessary to tension the track belt, turn the tensioning bolt to adjust the tension (fig. 6a). A correctly
tensioned track must have the lowest point of the loop formed by the upper stretch of the belt coinciding with the half way point on the track (fig. 6b).
- Make 2 holes in the half way point of the architrave as shown in fig. 7. Make sure to drill the holes at a height that allows the door to slide under the track.
In any case the highest point of the door must not be less than 10 mm from the track (fig. 8).
- Fix the track to the architrave without tightening the fixing screws as shown in fig. 9. The track must be left free to turn.
- Fix the support plate to the track at around 60 cm from the operator as shown in fig. 10a. Bend the two spacer brackets for assembly away from the ceiling
to the required height and fix the brackets to the plate (fig. 10b).The spacer brackets are used to install the mechanism at a maximum distance of 38 cm
from the ceiling (fig. 8). When fixing directly to the ceiling, do not use the spacer brackets.
- Lift the track are fix to the ceiling with plugs (fig. 11), making sure that the track is perfectly horizontal (fig. 11) and that the highest point of the door is never
less than 10 mm from the track.
- Release the operator by pulling the carriage cord (fig. 12) and move the carriage near to the closing position
- Hook the drive rod to the upper edge of the door (fig. 13).
Important:
make sure that with the door closed the curved drive plate is at an angle of 45° to the track (fig. 16). If necessary, the plate can be shorted using
the holes in the bracket to reach the required length.
- Open the operator cover (fig. 15), unscrew the two fixing screws (fig. 16) and slide out the operator locking plate (fig. 17). Fix the operator to the track and
replace the locking plate. Screw back the two previously removed fixing screws.
- Move the door into the completely open position and fix the mechanical stop (fig.19a) at approx. 10 mm from the drive carriage (fig. 18).
- Fix the stop definitively by drilling two holes Ø 3 mm through the track but not into the stop (fig. 19b) and screwing in two 3.5 mm self-threading screws
(fig. 19c).
Important:
Drilling through the could damage the track belt.
- Install the EBS4 lock release as indicated in fig. 20. The lock will fit in the block only with the key in and the lock positioned as shown in fig. 20d (notch A
facing downwards). The end of the release cable must be tied to the release cord on the track carriage (fig. 20e). Remember not to leave the cable in the
rest position (fig. 20f).
NOTE:
the external release must be installed if there are no other access routes into the garage apart from the sectional door.
6. Mechanical installation on up-and-over door:
KLYS series sectional door operators can also be used to drive up-and-over doors with protruding counterweights using the adapter boom ENX6.
Before installation check:
- that the distance between the track anchorage and the up-and-over door is no greater than 100 mm (fig. 21)
- that the distance between the highest point of the up-and-over door and the track is between 10 and 20 mm (fig. 21)
3. Limitations of use:
Description
ENM1
ENM2
Power supply
115÷230 Vac - 50/60 Hz
Maximum absorption
1 A
1.5 A
Absorption in stand-by
1÷3 W
Electric motor power supply
24 Vdc
Electric motor maximum power
200 W
300 W
Max. drive/thrust
700 N
1000 N
Max. door surface area
9 m
2
12 m
2
Opening/closing speed
7÷12 m/min
Protection rating
IP10
Operating temperature
From -20 to +50°C
Dimensions
See fig. 2
Weight
1.6 kg
1.9 kg
Use
Residential
Apartment block
Frequency of use
50%
100%
Max. travel
2700 - 3700 mm
2. Technical data
Summary of Contents for ELVOX KLYS ENM1
Page 3: ...3 KLYS 110mm 10mm max 38cm 60cm 7 5 6 8 9 10 a b a b Motor I EN...
Page 4: ...4 KLYS 45 11 12 14 13 15 16 I EN...
Page 6: ...6 KLYS 100 mm max 10 20 mm 8 m S 20 30 mm 8 mm 21 22 a b 23 a b I EN...
Page 7: ...7 KLYS 24 25 N L 1 11 2 3 4 13 5 12 8 9 6 10 7 14 51 62 61 0 1 10 5 26 27 115 230 V ac I EN...
Page 23: ...23 KLYS...