Vigilant
MX1-Au
Operator Manual
Document: LT0439
Page
23 October 2018
Issue 1.73
11-4
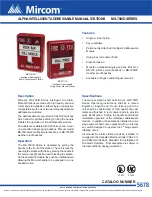
(a) 8U Cabinet
(b) 15U Cabinet
Figure 11-3 – Knockout positions at top and bottom of the cabinet
The cabinet has two 50mm knockouts in the top and bottom and five
20mm knockouts in the top and four in the bottom. Plus there are two
knockouts in the rear wall. Other entry holes can be drilled as required.
To prevent water entering the cabinet, seal unused knockouts and any
top cable entries. Where possible, use bottom cable entry with cables
going down 100 mm below the cabinet before rising.
The gearplate has precut slots behind the mains outlet and beside the
controller board to facilitate cable entry from the rear of the cabinet. The
cabinet has matching knockouts in these positions.
External Wiring
Cable Entry