


Disassembly Procedure
1. Disassembly of back cover shield and stand as Fig.1
1.1
1.2
Unlock the support to remove back cover shield.
Unscrew 4 screws to remove stand.
Fig. 1
1
2
2
1
2
1
3
4
5
2. Disassembly of back cover as Fig.2
2.1 Unscrew 13 screws to remove back cover.
Fig. 2
back cover shield
stand
back cover
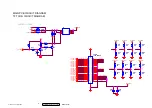
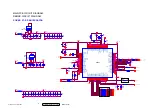
3. Disassembly of Main PCB Ass’y and Power PCB Ass’y
and AC Power Connect Wire and DVD Loading Ass’y
and DVD Control PCB Ass’y and TV Control PCB Ass’y
and Earphone PCB Ass’y as Fig.3
3.1
3.2
3.3
3.4
3.5
3.6
3.7
Unscrew 6 screws and disconnect wires to
remove Main PCB Ass’y.
Unscrew 4 screws and disconnect wires to
remove Power PCB Ass’y.
Unscrew 4 screws and disconnect wires to
remove AC Power Connect Wire.
Unscrew 4 screws and disconnect wires to
remove DVD Loading Ass’y.
Unscrew 2 screws and disconnect wires to
remove DVD Control PCB Ass’y.
Unscrew 2 screws and disconnect wires to
remove TV Control PCB Ass’y.
Unscrew 4 screws and disconnect wires to
remove Earphone PCB Ass’y.
Fig. 3
earphone pcb ass’y
2
1
3
4
5
6
7
6
7
TV control pcb ass’y
DVD control pcb ass’y
DVD loading ass’y
main pcb ass’y
power pcb ass’y
AC power connect wire
2
1
3
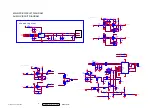
4. Disassembly of stand base bracket and LCD panel
bracket and LCD panel and speakers and front
cover as Fig.4
4.1
4.2
4.3
Unscrew 4 screws to remove stand base bracket.
Unscrew 16 screws to remove LCD panel bracket.
Unscrew 4 screws to remove speakers.
Fig. 4
front cover
2
1
3
LCD panel
bracket
speaker
LCD panel
stand base bracket
2
2
3
2
2
ViewSonic Corporation
Confidential - Do Not Copy
N
2201w-1M
3
5