92
Cylinder temperature sensor/outlet temperature
sensor
1.
Check lead and plug of cylinder temperature sen-
sor
%
or outlet temperature sensor
$
.
2.
Disconnect wires of sensor plug.
3.
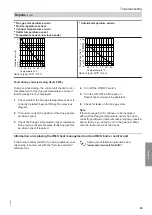
Check the sensor resistance. Compare the resist-
ance with the value for the current temperature
from the following diagram.
In the event of severe deviation (> 10 %), replace
the sensor.
Temperature sensor, low loss header
1.
Check lead and plug of temperature sensor
)
on
the ADIO electronics module (mixer extension kit).
2.
Disconnect wires of sensor plug.
3.
Check the sensor resistance. Compare the resist-
ance with the value for the current temperature
from the following diagram.
In the event of severe deviation (> 10 %), replace
the sensor.
Outside temperature sensor
1.
Check the lead and plug of the outside tempera-
ture sensor.
2.
Disconnect wires 1 and 2 from the external plug.
3.
Check the sensor resistance. Compare the resist-
ance with the value for the current temperature
from the following diagram.
If the results are very different from the curve
(> 10 %), disconnect the wires from the sensor.
Repeat the test directly on the sensor.
Check the on-site lead. 2-core lead, length up to
35 m with a cross-section of 1.5 mm
2
Depending on the test result, replace the lead or
the outside temperature sensor.
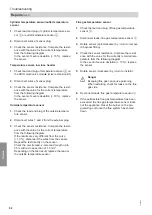
Flue gas temperature sensor
1.
Check the lead and plug of flue gas temperature
sensor
C
.
2.
Disconnect leads, flue gas temperature sensor
C
.
3.
Rotate sensor (anti-clockwise) by
¼
turn to remove
it (bayonet fitting).
4.
Check the sensor resistance. Compare the resist-
ance with the value for the currently recorded tem-
perature from the following diagram.
In the event of severe deviation (> 10 %), replace
the sensor.
5.
Rotate sensor (clockwise) by
¼
turn to install it.
Danger
Escaping flue gas can cause poisoning.
When restarting, check for leaks on the flue
gas side.
6.
Reconnect leads, flue gas temperature sensor
C
.
7.
If the permissible flue gas temperature has been
exceeded, the flue gas temperature sensor locks
out the appliance. Reset the burner on the pro-
gramming unit once the flue system has cooled
down.
Troubleshooting
Repairs
(cont.)
6130884
Service


