background image

3

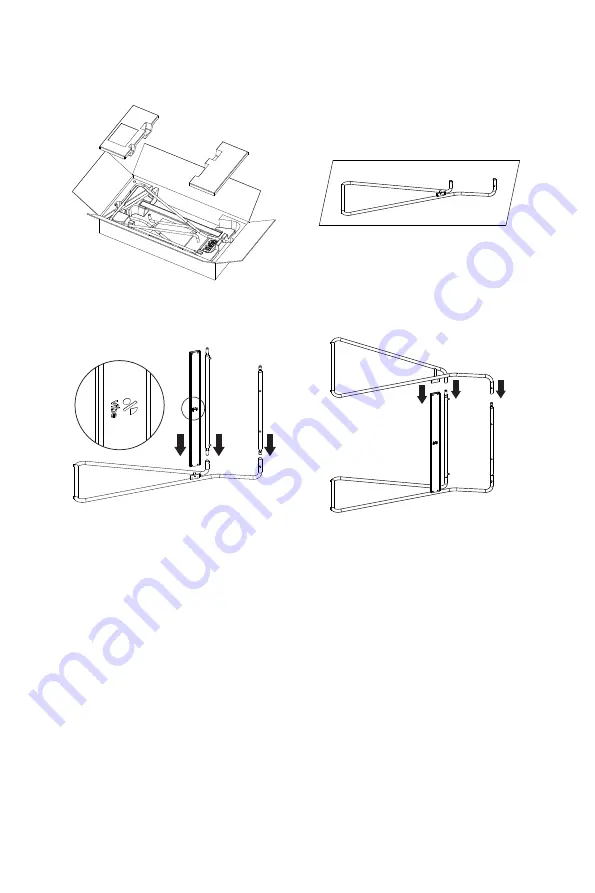
2.2.  Installing the Stand

Step 1

1. Open the stand package.

2. Spread the protective sheet in the package on the flat 

ground and put on the stand..

1

2

3

3. Install the three parts in the middle.

Note

: Pay attention to the direction of the logo.

4. Install the stand on the other side refer to graphic 

order.

Note

: Pay attention to the installation order.

Summary of Contents for Interactive Collaboration Board

Page 1: ...Vibe interactive collaboration board User Manual Please Read this manual before operation ...

Page 2: ......

Page 3: ...oth The screen may be wiped with a dry cloth when the power is off However never use organic solvent such as alcohol or ammonia based liquids to clean your display To avoid the risk of shock or permanent damage to the hardware do not expose the display to dust rain water or an excessively moist environment If your display becomes wet wipe it with dry cloth as soon as possible If a foreign substanc...

Page 4: ...ching the power cable or DC power cord wait for 6 seconds before re attaching the power cable or DC power cord for normal operation To avoid the risk of shock or permanent damage to the set do not expose the display to rain or excessive moisture When positioning the display make sure the power plug and outlet are easily accessible This product s power cord is equipped with a three wire grounded pl...

Page 5: ...ure This device complies with Part 15 of the FCC Rules Operation is subject to the following two conditions 1 This device may not cause harmful interference and 2 this device must accept any interference received including interference that may cause undesired operation End of Life Disposal Your new Public Information Display contains materials that can be recycled and reused Specialized companies...

Page 6: ... 3 1 Input Output 7 4 Touch Control 8 4 1 Draw Erase withVibe stylus 8 4 2 Canvas Operation by fingertips 8 4 3 Other Operations 8 5 Pixel Defect Policy 9 5 1 Pixels and Subpixels 9 5 2 Types of Pixel Defects Dot Definition 9 5 3 Dark Dot Defects 9 5 4 Proximity of Pixel Defects 9 5 5 Pixel DefectTolerances 10 5 6 MURA 10 6 Cleaning and Troubleshooting 11 6 1 Cleaning 11 6 2 Troubleshooting 11 7 T...

Page 7: ... varies depending on destination Power Cord Stylus 2pcs User manual Warranty card Accessory Box Wiping Cloth Pen Point 4pcs NOTES For all other regions apply a power cord that conforms to the AC voltage of the power outlet that complies with the safety regulations of the particular country 1 3 Installation Notes Due to the high power consumption always use the plug exclusively designed for this pr...

Page 8: ... strong electromagnetic interference during installation 5 Keep the product away from direct sunlight 6 To reduce the risk of fire or electrical shock do not expose this product to rain moisture or other liquids Do not touch the board with wet hands Do not install this product near flammable objects such as gasoline or candles or expose the board to direct air conditioning 7 Make sure all screws a...

Page 9: ... protective sheet in the package on the flat ground and put on the stand 1 2 3 3 Install the three parts in the middle Note Pay attention to the direction of the logo 4 Install the stand on the other side refer to graphic order Note Pay attention to the installation order ...

Page 10: ... sides to prevent apart 2 Ensure the direction and position of logo are consistent with figure above Rotate the tube to expose the screw holes then install the screws and plastic caps 3 Insert the four wheels 4 Thread the screws through the stand and plastic sleeve ...

Page 11: ...cover 2 Insert the side hole of the display into the stand positioning column Note User can refer to the triangle symbol on the back cover for the position of the hole 3 Insert the four wheels 4 Thread the screws through the stand and plastic sleeve ...

Page 12: ...6 Step 4 Connect the camera Note The camera needs to be inserted into the slot ...

Page 13: ...H Switch the main power on off 2 AC IN AC power input from the wall outlet 3 HDMI OUT HDMI video audio output 4 HDMI IN HDMI video audio intput 5 AUDIO Audio output 6 USB 3 0 Connect your USB storage device 7 USB 2 0 Connect your USB storage device 8 ETHERNET Connect the ethernet 9 Webcam Connect the webcam Buy optional ...

Page 14: ...direct contact to move the canvas Pinch to Zoom Move one s finger and thumb apat or bring them together on a touchscreen in order to zoom into or out of canvas 4 3 Other Operations The following operations can be done either with fingetip orVibe stylus Choose a tool or select an option Touch the target on the screen for one quick tap then release Select an object Touch and hold the target e g an i...

Page 15: ...lored sub pixels together appear as a single black pixel Other combinations of lit and dark sub pixels appear as single pixels of other colors 5 2 Types of Pixel Defects Dot Definition Pixel and sub pixel defects appear on the screen in different ways There are three categories of pixel defects and several types of sub pixel defects within each category Dot definition What is a defective Dot One o...

Page 16: ...mbient temperatures It is an industry wide phenomenon and Mura is not repairable It is also not covered by our warranty terms Mura has been around since the introduction of LCD technology and with screens getting bigger and in operation 24 7 many displays are running in low light conditions This all adds to the possibility of Mura affecting displays HOWTO SPOT MURA There are many symptoms of Mura ...

Page 17: ...inet becomes dirty wipe the cabinet with a soft dry cloth If the cabinet is extremely dirty soak a lint free cloth in a mild detergent solution Wring the cloth to remove as much moisture as possible Wipe the cabinet Use another dry cloth to wipe over until the surface is dry Do not allow any water or detergent to come into contact with the surface of the display If water or moisture gets inside th...

Page 18: ...tex A53 up to 1 4 GHz GPU Mali T860 GPU RAM 4GB DDR3 Storage 32GB EMMC Operating System Android 7 1 Nougat Mains power AC 100 240V 50 60 Hz Consumption Typical 170 W Connectivity Specifications HDMI out 1080p USB 2 0 HDMI In 1080p 720p USB 3 0 Ethernet RJ 45 WIFI Operating conditions Specifications Temperature Operational 0o C 40o C Storage 20o C 60o C Humidity Operational 20 80 Storage 10 90 Alti...

Page 19: ......

Page 20: ...Vibe interactive collaboration board Designed by Vibe Inc in Seattle US Made in China Vibe Inc info vibe us 1 864 335 2007 https vibe us 10400 NE 4th Street STE 500 Bellevue WA 98004 Q41G55M111101A ...

Reviews: