background image

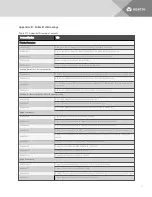
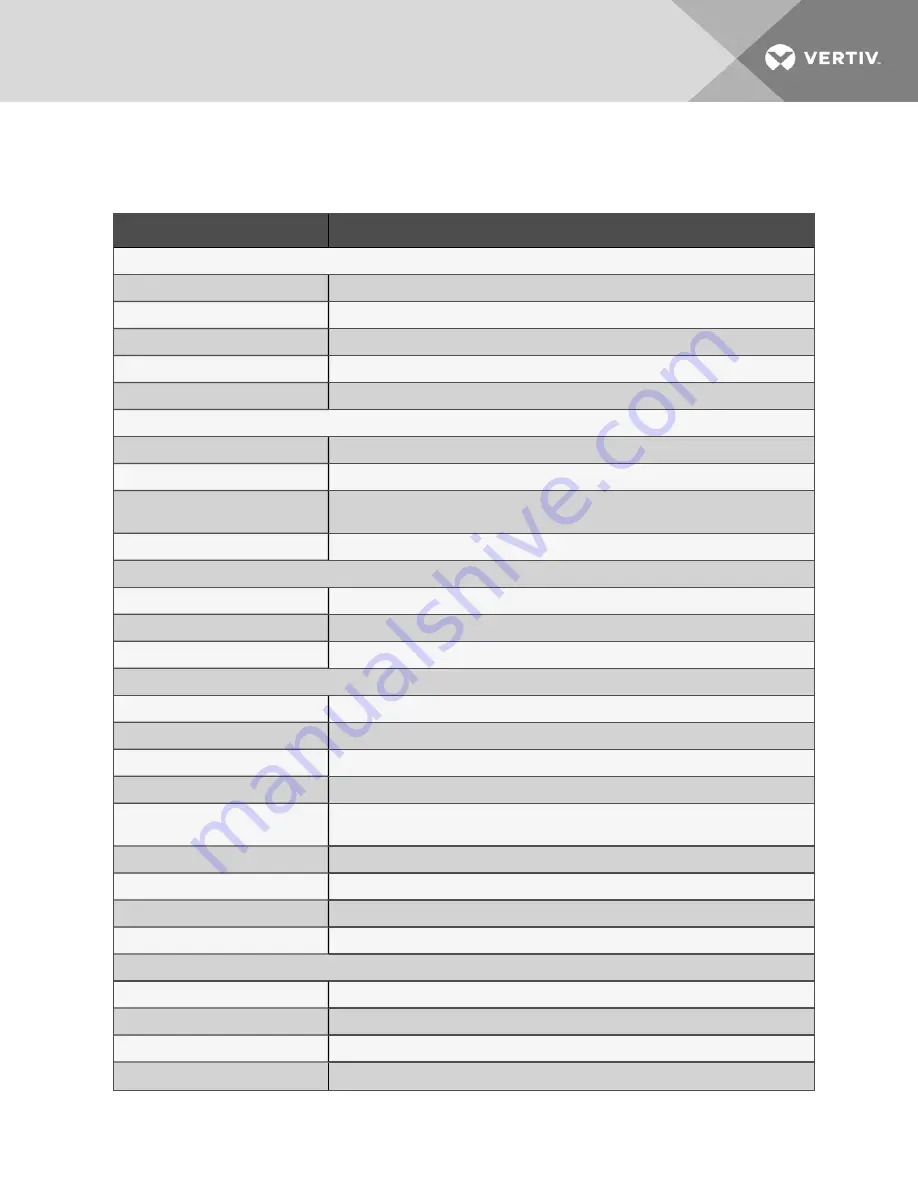
Appendix D: Submittal Drawings

Document Number

Title

Planning Dimensions

DPN003436

Cabinet and Anchor Dimensional Data 1 Fan (MCS028, MCM040, MCL055)

DPN003437

Cabinet and Anchor Dimension Data 2 Fan (MCS056, MCM080, MCL110) Dual Circuit

DPN003756

Condenser and Anchor Dimensional Data (MCM080, MCL110) Single Circuit

DPN003438

Condenser Dimensional Data 3 Fan (MCL165)

DPN003439

Condenser Dimensional Data 4 Fan (MCM160 and MCL220)

Planning Dimensions - Receiver Mounting

DPN003839

PDX-EEV Receiver Mounting MCS028, MCM040, and MCM080 Single Circuit Condenser Left Side Option

DPN003455

DSE Receiver Mounting MCM Single Circuit Left Side Condenser Outlet Receiver

DPN002554

Left Side DSE and PDX-EEV Receiving Mounting Kit MCL055, MCL110, MCL165, MCL220 Single Circuit
Compressor

DPN002383

DSE Receiver Mounting MCM160 Circuit Dual Condenser Outlet Receivers

Planning - Condenser Elevation Above/Below Indoor Unit

DPN003954

Air Cooled Piping Schematic Condenser above Indoor Unit

DPN003993

Air Cooled Piping Schematic Liebert® MC with Receiver above Unit

DPN003994

Air Cooled Piping Schematic Liebert® MC Mounted above Liebert® DA080-165

Piping Schematics

DPN002188

Typical Piping Schematic for Air Cooled DX Systems

DPN002858

General Arrangement Diagram 600mm (24in) Air Cooled with Liebert® MC Models

DPN002808

General Arrangement Diagram 300mm (12in) Air Cooled with Liebert® MC Models

DPN003730

Piping Schematic with Liebert® MC Condenser Air Cooled Scroll or Digital Scroll or Compressor Models

DPN004216

Piping Schematic with Liebert® MC Condenser Air Cooled DS077-105kW Semi-Hermetic Compressor
Models

DPN002615

Piping Schematic DA050, DA080, DA085 Models with Liebert® MC

DPN002340

Piping Schematic DA125, DA150, DA165 with Liebert® MC

DPN002929

Piping Schematic Air Cooled Models with TXV

DPN003843

Piping Schematic Air Cooled Models with EEV

Piping Connections

DPN002166

Piping Dimensional Data Single Circuit 1 Fan, 2 Fan, 3 Fan, and 4 Fan Units

DPN002167

Piping Locations Single Circuit with Lee-Temp

DPN003839

PDX-EEV Receiver Mounting MCS028, MCM040, and MCM080 Single Circuit Condenser Left Side Option

DPN002425

Piping Dimensional Data Dual Circuit 2 Fan and 4 Fan Units

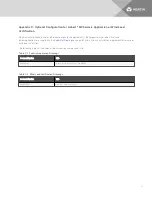
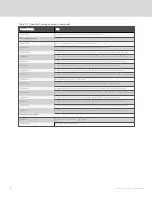
Table D.1 Submittal Drawings Contents

87

Summary of Contents for Liebert MC series

Page 1: ...Liebert MC Installer User Guide 60 Hz Air Cooled Microchannel Condenser Premium EC Fan ...

Page 2: ...ms all liability for damages resulting from use of this information or for any errors or omissions Refer to other local practices or building codes as applicable for the correct methods tools and materials to be used in performing procedures not specifically described in this document The products covered by this instruction manual are manufactured and or sold by Vertiv This document is the proper...

Page 3: ...r Moving and Installation 17 4 5 1 Attaching 18 in 457 mm Legs Removing the Skid and Attaching Slings 17 4 5 2 Attaching 36 in to 60 in 914 mm to 1524 mm Legs Removing the Skid and Attaching Slings 20 4 6 Mounting the Condenser 23 4 6 1 Standard Mounting Requirements 23 4 6 2 Seismic Certified and Wind Certified Mounting Requirements 23 5 Piping 25 5 1 Refrigerant Piping and Charging 25 5 1 1 Refr...

Page 4: ...Menu 47 10 1 3 Analog Signals Menu 48 10 1 4 Active Alarms Menu 50 10 1 5 History Alarms Menu 51 11 Maintenance 55 11 1 General Maintenance 56 11 2 Condenser Cleaning 56 11 2 1 When to Clean the Condenser Coil 56 11 2 2 What to Use to Clean the Condenser Coil 56 11 2 3 Cleaning the Condenser Coil 57 11 3 Replacing the Condenser Fan 58 11 3 1 Verifying the Fan Address 64 11 4 Replacing the Premium ...

Page 5: ...nside the unit is to install and open a remote disconnect switch Refer to unit electrical schematic Follow all local codes WARNING Risk of electric shock Can cause equipment damage injury or death Open all local and remote electric power supply disconnect switches and verify with a voltmeter that power is off before working within any electric connection enclosures Service and maintenance work mus...

Page 6: ...ts WARNING Risk of improper wire sizing rating and loose electrical connections Can cause overheated wire and electrical connection terminals resulting in smoke fire equipment and building damage injury or death Use correctly sized copper wire only and verify that all electrical connections are tight before turning power On Check all electrical connections periodically and tighten as necessary WAR...

Page 7: ...at these sources are correctly adjusted to the nameplate voltage and frequency of all equipment to be connected In general power source voltages should be stabilized and regulated to within 10 of the load nameplate nominal voltage Also ensure that no three phase sources are single phased at any time NOTICE Risk of oil contamination with water Can cause equipment damage Polyolester oil POE oil requ...

Page 8: ...Vertiv Liebert MC Installer User Guide 4 This page intentionally left blank ...

Page 9: ...rt MC 25 Digit Configuration Number Example Digit Description Digits 1 and 2 Unit Family MC Micro channel Condenser Digit 3 Platform Size S Small M Medium L Large Digits 4 6 Nominal Capacity kW 028 040 055 056 080 110 160 165 220 Example 040 40kW 95 F 35 C 27 R 15 K ITD Digit 7 Control Fan Type E Premium control and EC fan Digit 8 Refrigerant Circuits System Refrigerant Type 1 Single refrigerant c...

Page 10: ... in tall legs with bracing Digit 15 Agency Certification U CSA listed marked with CSA c us logo 1 IBC OSHPDSeismic Certification IBC FBC Wind Load Certification and IBC SnowLoad Certification Digit 16 Undefined Reserved for future use Digit 17 Receiver Leg Software Configuration 0 No Receiver Leg Software 1 Liebert Lee Temp Receiver Leg Software 2 Liebert DSEand PDX unheated Receiver Leg Software ...

Page 11: ...are matched to provide superior system energy efficiency The premium control board allows CANbus communication with the indoor unit s Liebert iCOM control This communication feature provides compressor run signals condenser operating mode changes condenser alarm monitoring simplified system charging procedures and outdoor temperature monitoring The Premium Efficiency Control board on a Liebert MC ...

Page 12: ...reases the maximum air flow of each fan and thus sound level produced by the condenser This feature requires special set up of the indoor unit A Liebert Lee Temp receiver is required for each refrigerant circuit The premium control has gain schedules that override the customer defined low noise schedule to prevent indoor unit high pressure alarm conditions from occurring should higher than design ...

Page 13: ...ivers to manage refrigerant volume fluctuations in the evaporator coil which occur during normal operation The receivers are field mounted on the Liebert MC condenser and are field piped in the liquid line between the condenser and the indoor unit The receiver discharge must be mounted higher than the EEV height of the indoor unit 2 Nomenclature and Components 9 ...

Page 14: ...Vertiv Liebert MC Installer User Guide 10 This page intentionally left blank ...

Page 15: ...xpansion valves EEV inside the indoor unit The vertical height of the receiver outlet must not exceed 60 ft 18 3 m above the EEV TXV units The bottom of the receiver on the outdoor MC condenser must be higher than the elevation of the thermal expansion valves TXV inside the indoor unit The vertical height of the bottom of the receiver must not exceed 60 ft 18 3 m above the TXV Consult factory befo...

Page 16: ...tic Condenser above Indoor Unit DPN003993 Air Cooled Piping Schematic Liebert MC with Receiver above Unit DPN003994 Air Cooled Piping Schematic Liebert MC Mounted above Liebert DA080 165 Table 3 1 Dimension Planning Drawings 3 2 Shipping Dimensions and Weights Model Number Number of Fans Domestic Packaging Export Packaging Weight lb kg Dimensions L x W x H in cm Volume ft3 m3 Weight lb kg Dimensio...

Page 17: ... weights to add to the packaged weights above Consult factory for additional information Receivers and 60 in legs are shipped separately from the condenser Table 3 2 Condenser Shipping Weights Dimensions and Volume Approximate continued 3 2 1 Condenser and Options Net Weights Total unit weight is the sum of the condenser weight with the selected legs plus the weight of any option Condenser Model M...

Page 18: ...denser Model MCL055 MCL110 MCL110 MCL165 MCL220 MCL220 Refrigeration Circuits 1 1 2 1 1 2 Condenser Dry Weight lb kg 18 in Leg 344 156 602 273 602 273 891 404 1186 538 1186 538 36 in Leg 486 220 766 347 766 347 1136 515 1453 659 1453 659 48 in Leg 518 235 798 362 798 362 1184 537 1501 681 1501 681 60 in Leg 549 249 829 376 829 376 1230 558 1547 702 1547 702 Additional Weight for Options lb kg PDX ...

Page 19: ...isk of damage from forklift Can cause unit damage Keep tines of the forklift level and at a height suitable to fit below the skid and or unit to prevent exterior and or underside damage Upon arrival of the unit and before unpacking Verify that the labeled equipment matches the bill of lading Carefully inspect all items for visible or concealed damage Report damage immediately to the carrier and fi...

Page 20: ...d 4 fan units 72 in 1829 mm When moving the packaged unit do not lift it any higher than 6 in 152 mm If the unit must be lifted higher than 6 in 152 mm you must exercise great care and no one may be closer than 20 ft 6 m to the lift point We recommend lifting one end off the ground no more than 6 in 152 mm and using the forklift to push or pull the unit Figure 4 1 Forklift Position with 1 to 4 Fan...

Page 21: ... brackets 4 5 Preparing a Condenser for Moving and Installation The following procedure is one method for removing a condenser from its shipping skid Other methods may be used provided that they are safe for personnel the condenser and other equipment 4 5 1 Attaching 18 in 457 mm Legs Removing the Skid and Attaching Slings NOTE For units supplied with 36 in to 60 in 914 mm to 1524 mm legs go to At...

Page 22: ...eye bolts 3 Use spreader bars a lift beam and a crane to lift the unit off the skid Make sure spreader bars are wider than the unit NOTICE Risk of improper lifting Can cause equipment damage Make sure that the spreader bars are wider than the unit If the spreader bars are too short the slings may crush the unit Figure 4 4 Securing Slings to Condensers for Lifting off Skid 4 Lift the unit 24 in 610...

Page 23: ...r to Figure 4 6 on the next page to attach rigging for lifting Spreader bars are still required Make sure that the spreader bars are wider than the unit to prevent crushing force 1 fan and 2 fan units Route the straps through the large holes in the side of the legs 3 fan and 4 fan units Secure straps or chains to the eye bolts on top of the unit NOTICE Risk of improper lifting Can cause equipment ...

Page 24: ...approximately 1 4 in 6 mm of the fastener threads exposed Do not insert bolt in the secondary bolt locations These are used to attach the legs after the unit is moved into the installation location 2 Assemble the leg structure according to the instructions supplied with the legs Cross bracing for 4 legs is shown in Figure 4 7 on the facing page NOTE When assembling the leg structure DO NOT tighten...

Page 25: ...wn in Figure 4 8 on the next page 3 fan and 4 fan units Route the slings against the outside of the attached eye bolts NOTICE Risk of improper lifting Can cause equipment damage Make sure that the spreader bars are wider than the unit If the spreader bars are too short the slings may crush the unit 4 Use spreader bars lift beam and crane to lift the unit 24 in 610 mm off the skid Remove the skid f...

Page 26: ...emove the straps from around the unit 11 Refer to Figure 4 9 on the facing page to attach rigging for lifting Spreader bars are still required Make sure that the spreader bars are wider than the unit to prevent crushing force 1 fan and 2 fan units Route the straps through the large holes in the side of the legs 3 fan and 4 fan units Secure straps or chains to the eye bolts on top of the unit NOTIC...

Page 27: ...ngth special inspection and attachment to non building structures must be outlined and approved by the engineer of record for the project or building Structural floors and housekeeping pads must also be designed and approved by the project or building structural engineer of record to withstand the seismic or wind anchor loads as defined on the installation drawings The installing contractor is res...

Page 28: ...Vertiv Liebert MC Installer User Guide 24 This page intentionally left blank ...

Page 29: ...002615 Piping Schematic DA050 DA080 DA085 Models with Liebert MC DPN002340 Piping Schematic DA125 DA150 DA165 with Liebert MC DPN002929 Piping Schematic Air Cooled Models with TXV DPN003843 Piping Schematic Air Cooled Models with EEV Table 5 1 Piping Schematics Drawings Document Number Title DPN002166 Piping Dimensional Data Single Circuit 1 Fan 2 Fan 3 Fan and 4 Fan Units DPN002167 Piping Locatio...

Page 30: ...n the presence of air copper oxide forms POE oils will dissolve these oxides from inside the copper pipes and deposit them throughout the system clogging filter driers and affecting other system components A pure dry nitrogen flow of 1 3 ft 3 min 0 5 1 5 l s inside the pipe during brazing is sufficient to displace the air Control the flow using a suitable measuring device Ensure that the tubing su...

Page 31: ...ill void compressor warranty Consult Vertiv Technical Support or the compressor manufacturer for further recommendations or if you have questions about compressor oils Refer to ASHRAE Refrigeration Handbook for general good practice refrigeration piping The indoor cooling unit has a factory installed high pressure safety switch in the high side refrigerant circuit A pressure relief valve is provid...

Page 32: ...82 Liquid Line 7 8 7 8 7 8 7 8 7 82 DA150 Hot Gas Line 1 3 8 1 3 8 1 3 8 1 3 8 1 3 82 Liquid Line 7 8 1 1 8 1 1 8 1 1 8 1 1 82 DA165 Hot Gas Line 1 3 8 1 3 8 1 3 8 1 3 8 1 3 82 Liquid Line 7 8 1 1 8 1 1 8 1 1 8 1 1 82 Consult factory for proper line sizing for piping runs longer than the listed maximum equivalent length 1 Downsize vertical riser one trade size 1 1 8 to 7 8 or 7 8 to 3 4 or 5 8 to ...

Page 33: ...runs longer than maximum equivalent length listed 1 Downsize vertical rizer one trade size 1 1 8 to 7 8 2 Digital scroll not available on 077 and 105 models Source DPN000788 Rev 13 Table 5 4 Recommended Refrigerant Line Sizes for R 407C by Compressor Type 5 1 3 Refrigerant Charge Requirements To calculate the charge requirements 1 Determine the charge for your units by model number from the follow...

Page 34: ...7 0 12 3 102 9 46 7 42 5 19 3 12 3 5 6 50 7 23 0 21 0 9 5 28 0 12 7 Small receiver 28 in long is used with DA050 DA080 and DA085 large receiver 60 in long is used with DA125 DA150 and DA165 Source DPN002411 Rev 8 Table 5 5 Approximate Refrigerant Required R 410A Condenser Model Single Circuit Condensers Dual Circuit Condensers Condensers without Liebert Lee Temp Condensers with Liebert Lee Temp Co...

Page 35: ...ressor type piping lengths receiver and total refrigerant charge 5 2 Equipment Application Guidelines Pump down must be disabled on the indoor unit when using the Liebert MC condenser due to the reduced volume in the condenser coil We recommend adding a discharge line check valve and crankcase heater when connecting the MC condenser to Liebert indoor units built before 2012 The check valve and cra...

Page 36: ...bert DSE Installer User Guide for the leak check and evacuation procedures for the entire thermal management system All Liebert DSE Thermal Management Systems require a DSE receiver on each condenser circuit whether or not the system includes a Liebert EconoPhase pump module 5 7 Charging for Condensers without Receivers Consult the indoor unit s installer user guide for charging systems without re...

Page 37: ...e line side of this switch contains live high voltage The only way to ensure that there is NO voltage inside the unit is to install and open a remote disconnect switch Refer to unit electrical schematic Follow all local codes WARNING Risk of improper wiring piping moving lifting and handling Can cause equipment damage serious injury or death Installation and service of this equipment should be don...

Page 38: ...DPN003284 CANbus and Interlock Connections Using 1 Liebert MC Condenser and Optional EconoPhase Unit DPN002361 CANbus and Interlock Connections Using 2 Liebert MC Condensers and Optional EconoPhase Unit DPN003267 CANbus and Interlock Connections between Liebert DS and Liebert MC Condenser Premium DPN002841 CANbus and Interlock Connections between 600mm 24in and Liebert MC Premium DPN003036 CANbus ...

Page 39: ...pply before installation Refer to the unit s electrical schematic and serial tag for specific electrical requirements Liebert MC condenser power connections are provided for three phase wires and 1 earth ground wire Line voltage electrical service is required for all condensers at the location of the condenser The voltage supply to the condenser may not be the same voltage supply as required by th...

Page 40: ... 575V 2 4 2 7 15 Medium Platform MCM040 208 230V 2 3 2 9 15 380V 1 4 1 8 15 460V 1 4 1 8 15 575V 1 2 1 5 15 MCM080 208 230V 4 6 5 2 15 380V 2 8 3 2 15 460V 2 8 3 2 15 575V 2 4 2 7 15 MCM160 208 230V 9 2 9 8 15 380V 5 6 6 0 15 460V 5 6 6 0 15 575V 4 8 5 1 15 Table 6 2 Electrical Data Three Phase 60Hz Condenser Premium EC Fan Control Vertiv Liebert MC Installer User Guide 36 ...

Page 41: ... 1 for acceptable power supply configurations Source DPN005027 Rev 0 Table 6 2 Electrical Data Three Phase 60Hz Condenser Premium EC Fan Control continued Rated Voltage Single Phase 120 208 230 Watts Receiver 150 300 150 300 Amps 1 4 2 8 0 7 1 4 Wire Size Amps 1 8 3 5 0 9 1 8 Maximum Overcurrent Protection Device Amps 15 15 15 15 1 The Liebert Lee Temp receiver requires a separate power feed for h...

Page 42: ...ndoor unit to the outdoor condenser No special considerations are required when the total external cable connection between the indoor unit and outdoor unit is less than 450 ft 137 m A CANbus isolator is required for total external cable connections longer than 450 ft 137 m but less than 800 ft 243 m The control wiring connections are described in the submittal documents included in the Submittal ...

Page 43: ...ne jumper position and the CANbus Device Address DIP Switch setting are correct according to the application at the job site 10 Verify that terminals 70 71 and 230 when applicable are used and properly wired for interlock wiring particularly on systems that use two condensers for one indoor unit 7 3 Piping Installation Checks 1 Piping completed to corresponding indoor cooling unit refrigeration ci...

Page 44: ...Vertiv Liebert MC Installer User Guide 40 This page intentionally left blank ...

Page 45: ... equipment and who are wearing appropriate OSHA approved PPE WARNING Risk of contact with high speed rotating fan blades Can cause serious injury or death Open all local and remote electric power supply disconnect switches verify with a voltmeter that power is off and verify that all fan blades have stopped rotating before working in the unit cabinet or on the fan assembly If control voltage is ap...

Page 46: ...Vertiv Liebert MC Installer User Guide 42 This page intentionally left blank ...

Page 47: ...to SPDare faulty Locate connection problem and repair Condenser disconnect is turned Off Recheck lights with disconnect switch in the On position SPDred LEDis illuminated A surge exceeding the rating of the SPDhas occurred Replace SPDand inspect other components for damage and replace them if necessary Control Board LEDs do not light Connection to P24 is loose or disconnected Check the connection ...

Page 48: ...Vertiv Liebert MC Installer User Guide 44 This page intentionally left blank ...

Page 49: ...ressure transducer fails the condenser uses temperature sensors to control the fan speed based on the liquid line temperature The condenser fans continue to operate for approximately 30 seconds after compressors turn Off The MC fans have various alarm conditions such as loss of voltage and loss of control signal that stop the condenser fans When an alarm condition is no longer present the fans tur...

Page 50: ...Fan Control Board Item Description 1 LEDindicates signal is present when lit 2 LEDindicates signal is present when lit 3 LEDindicates signal is present when lit Figure 10 2 Control Board HMI Vertiv Liebert MC Installer User Guide 46 ...

Page 51: ...u At the initial display press ESC to display the first item of the main menu which includes four options Analog Signals Menu Active Alarms Menu History Alarms Menu Configuration Menu Use the Up and Down keys to scroll through the menus and press ENT to enter the sub menus Figure 10 4 below shows the operation and structure of the main menu Figure 10 4 Main Menu Operation and Structure Item Descri...

Page 52: ...d only by properly trained and qualified personnel or as directed by the factory 10 1 3 Analog Signals Menu In the analog signals menu F press ENT to enter the analog signal items described in Table 10 1 on page 50 The item ID and signal value display alternately Figure 10 5 on the facing page shows the operation and item structure of the analog signals menu Vertiv Liebert MC Installer User Guide ...

Page 53: ...IDand the reading 2 Pressing up arrow cycles up through the menu items readings 3 Pressing down arrow cycles down through the menu items readings 4 Pressing ESC returns to the analog signals menu 5 Initial screen item F00 with example 16 1 reading 6 Down from configuration menu displays the analog signals menu 10 Control Operation 49 ...

Page 54: ...40 EC Fan 4 actual speed RPM RPM F41 EC Fan 4 requested speed F42 EC Fan 4 power kW kW F43 EC Fan 4 firmware version Hex format Hex format F50 Sub cooling 1 F C F51 Sub cooling 2 F C F90 Firmware Version Major 1 02 004 F91 Firmware Version Minor F92 Firmware Version Build Source 303847 Rev 5 Table 10 1 Analog Signal Definitions 10 1 4 Active Alarms Menu In the active alarms menu A press ENT to ent...

Page 55: ... 5 Dashes only display indicates no active alarms 10 1 5 History Alarms Menu In the history alarms menu H press ENT to enter the history alarm items which displays 100 history alarm records of the condenser see System Alarm Information and EC Fan alarm information for descriptions of the system and EC fan alarms The item ID is the sequence number of the history alarms The item ID and alarm informa...

Page 56: ...Method 000 CAN communication failure Communication circuit missing or damaged Check communication circuit Ignore alarm on condensers without CAN connections 001 Ethernet communication failure Ethernet hardware or connection failure Ignore alarm Ethernet connection is not present 002 USB communication failure USB device or file is damaged Replace USB device or file 003 Data corruption Memory chip i...

Page 57: ...sensor failure Ambient temperature sensor damaged Replace ambient temperature sensor 017 Ambient temperature high alarm Ambient temperature high No action is needed 018 Ambient temperature lowalarm Ambient temperature low No action is needed 019 Condenser temperature Sensor 2 failure Condenser temperature Sensor 2 damaged Replace condenser temperature Sensor 1 020 Condenser temperature Sensor 2 fa...

Page 58: ... failure Check power supply 1 4 10 EC fan specific uncategorized alarm detected Internal EC fan issue Re boot condenser if fans not running If alarm persists and fans not running replace fan 1 4 11 EC fan specific uncategorized warning detected 1 4 12 EC fan electronics high temperature condition 1 EC Fan is locked 2 EC Fan is damaged 3 Ambient temperature is too high For cause 1 check if EC fan i...

Page 59: ...ance with applicable regulations and manufacturers specifications Opening or removing the covers to any equipment may expose personnel to lethal voltages within the unit even when it is apparently not operating and the input wiring is disconnected from the electrical source WARNING Risk of electric shock Can cause serious injury or death The Liebert iCOM microprocessor does not isolate power from ...

Page 60: ...l On site or area conditions such as cottonwood trees construction etc can increase cleaning frequency On your standard monthly preventive maintenance schedule we recommend a visual inspection of the coil to monitor conditions 11 2 2 What to Use to Clean the Condenser Coil NOTICE Risk of improper cleaning agent selection including non base paint solvents Can cause building and equipment damage and...

Page 61: ...il to make sure that it is draining correctly 8 Rinse the coil thoroughly again 9 Vacuum the surface of the coil again and remove any excess dirt and water 10 Use compressed air blown from the inside out to dry out the coil 11 Do not impact the coil with the vacuum tube or air nozzle 12 Repeat the above steps until the coil is completely clean a Do not hit the coil face or header with the hose Thi...

Page 62: ...rform maintenance on the fans WARNING Risk of contact with high speed rotating fan blades Can cause serious injury or death Open all local and remote electric power supply disconnect switches verify with a voltmeter that power is off and verify that all fan blades have stopped rotating before working in the unit cabinet or on the fan assembly If control voltage is applied the fan motor can restart...

Page 63: ...resent at the unit Wait a minimum of 10 minutes to allow the EC fan capacitors to discharge before proceeding 3 Remove the fan cover disconnect electrical connections internal to the EC fan and remove the cable glands from the EC fan to be replaced see Figure 11 1 below and Figure 11 2 on the next page Figure 11 1 Internal Wiring of Ziehl Abegg Fan in Condenser Item Description 1 GND 2 Edge of cab...

Page 64: ...MCM Model Condenser Item Description 1 Wiring terminal detail 2 Communication cable from the previous fan or from the electric box 3 Communication cable connected to the next fan not used on the last fan 4 Not used on last fan Vertiv Liebert MC Installer User Guide 60 ...

Page 65: ...condenser 5 Use lifting equipment or an adequate number of personnel to remove the EC fan from the condenser NOTE A spreader bar may be required for the lifting equipment if only one technician is performing the fan replacement 6 Install a spreader bar over the new EC fan if only one technician is performing the fan replacement 7 Verify that the wire harness on the new EC fan is secured out of the...

Page 66: ... functions described in Table 11 1 below to establish a default control configuration for the board NOTE The complete list of P C and F parameters is located inside the lid of the electrical box panel Item ID Meaning Default Notes P01 Enter Preparation Mode 0 Setting this value to 1 enables preparation mode All other P menu items are disabled until this value is 1 Note that control operations may ...

Page 67: ...ions Configuration Code Fan Value C03 Fan 1 0 No Fan 1 EBM Papst 2 Ziehl Abegg C04 Fan 2 C05 Fan 3 C06 Fan 4 Table 11 2 Configuration Code Values 26 Press the ENT button 27 If the new value is entered into the control board the display flashes 888 28 Press the ESC button to display C03 29 Repeat steps 20 through 27 for the remaining fans configuration codes C04 C05 and C06 30 Unplug all the contac...

Page 68: ...o communicate with Fan 2 315 Unable to communicate with Fan 3 415 Unable to communicate with Fan 4 If any of these errors appear check the communication wiring at the problem fan and the fan before it If the wiring is correct and properly wired to the terminal repeat the fan addressing procedure in steps 30 through 36 46 If none of the errors listed in step 45 displays press the ESC button 11 3 1 ...

Page 69: ...he display 14 Repeat steps 3 through 8 for the rest of the fans if present C35 for Fan 2 C36 for Fan 3 C37 for Fan 4 NOTE All fans should be at 100 speed 15 Use the UP or DOWN arrow button until C24 displays 16 Press the ENT button 17 In the System Control configuration parameter use the UP or DOWN arrow button to select 1 18 Press the ENT button The display flashes 888 if the command is accepted ...

Page 70: ...live high voltage The only way to ensure that there is NO voltage inside the unit is to install and open a remote disconnect switch Refer to unit electrical schematic Follow all local codes 11 4 1 Preparing to Replace the Board 1 Verify that the following jumpers are installed on the new board see Figure 11 4 on the facing page Jumper at J4 and J6 on Pins 2 and 3 Jumper on J2 Jumper on J5 on Pins ...

Page 71: ...t provide earth ground to unit per NEC CEC and local codes as applicable Before proceeding with installation read all instructions verify that all the parts are included and check the nameplate to be sure the voltage matches available utility power The Liebert controller does not isolate power from the unit even in the Unit Off mode Some internal components require and receive power even during th...

Page 72: ...gs are installed properly 14 Change the CANbus DIP switch positions so they match the control board that was removed If the condenser is the second condenser on the CANbus communication line set Position 1 of the CANbus DIP switch from On to Off 15 Change the jumper positions for J2 J4 J5 and J6 to match the control board that was removed If the condenser is the last device on the CANbus communica...

Page 73: ... use of trained and authorized service personnel extended service contracts and factory certified replacement parts Contact your local sales representative for more details Check all that apply 1 Check coil clean and free of debris 2 Check fans free of debris 3 Fans securely mounted 4 Verify motor bearings in good condition 5 Check all refrigerant lines for vibration isolation Support as necessary...

Page 74: ...nt Economizer 1 Check for refrigerant leaks 2 Check re torque wire connections 3 Check contactors for pitting replace if pitted 4 Verify pump speed control operation 5 Check pump mounting Vertiv Liebert MC Installer User Guide 70 ...

Page 75: ...Liebert Thermal Management Products 1 800 543 2778 Liebert Channel Products 1 800 222 5877 Liebert AC and DC Power Products 1 800 543 2378 A 2 Locations United States Vertiv Headquarters 1050 Dearborn Drive Columbus OH 43085 USA Europe Via Leonardo Da Vinci 8 Zona Industriale Tognana 35028 Piove Di Sacco PD Italy Asia 7 F Dah Sing Financial Centre 3108 Gloucester Road Wanchai Hong Kong 71 ...

Page 76: ...Vertiv Liebert MC Installer User Guide 72 This page intentionally left blank ...

Page 77: ... to a free field calculation to a hemispherical radiation field at the listener or measurement distance d The sound pressure for this case is calculated using the following equation Lp Lw 10 LOG Q 4πd 10 3 Where Lw Sound power Lp Sound pressure d Distance from source feet Q Directional factor 2 for uniform hemispherical radiation Calculation methods used in this data are patterned after the ASHRAE...

Page 78: ...ls Actual field values may be equal to or less than that listed Table B 2 Sound Power Data for MCS028 dB SoundPower CalculatedTwo Fan Octave BandData A Weighted dBA Frequency Hz Percent Fan Speed Percent Fan Speed 20 50 80 100 20 50 80 100 63 491 58 69 71 231 32 43 44 125 50 64 72 89 34 48 56 73 250 50 61 72 78 41 53 63 69 500 52 60 72 77 49 57 69 73 1000 48 59 71 76 48 59 71 76 2000 37 53 66 73 3...

Page 79: ...e with AHRI Standard 220 and 270 Source ASHRAEFundamentals 2009 8 8 Table B 4 Sound Pressure Data for MCS028 at 10 ft 3 05 m dB SoundPressure at Distance 10 ft 3 05 m dB Octave BandData A Weighted dBA Frequency Hz Percent Fan Speed Percent Fan Speed 20 50 80 100 20 50 80 100 63 32 41 51 53 6 15 25 27 125 32 47 54 71 16 30 38 55 250 32 43 54 60 23 35 46 51 500 35 42 54 59 31 39 51 56 1000 30 42 54 ...

Page 80: ... Actual field values may be equal to or less than that listed Table B 6 Sound Power Data for MCM040 dB SoundPower CalculatedTwo Fan Octave BandData A Weighted dBA Frequency Hz Percent Fan Speed Percent Fan Speed 20 50 80 100 20 50 80 100 63 551 67 80 78 291 41 54 52 125 52 71 80 86 35 55 64 70 250 49 67 79 85 41 58 70 76 500 56 64 77 82 53 61 74 79 1000 43 62 75 81 43 62 75 81 2000 341 57 71 78 35...

Page 81: ...3 250 52 70 82 88 44 61 73 79 500 59 67 80 85 56 64 77 82 1000 46 65 78 84 46 65 78 84 2000 371 60 74 81 381 61 75 82 4000 361 52 67 74 371 53 68 75 8000 361 45 62 69 351 44 61 68 Total 63 77 89 93 57 70 82 89 1These values indicate the upper boundary limit due to background noise levels Actual field values may be equal to or less than that listed Table B 8 Sound Power Data for MCM160 dB 77 ...

Page 82: ... and 270 Source ASHRAEFundamentals 2009 8 8 Table B 9 Sound Pressure Data for MCM040 at 10 ft 3 05 m dB SoundPressure at Distance 10 ft 3 05 m dB Octave BandData A Weighted dBA Frequency Hz Percent Fan Speed Percent Fan Speed 20 50 80 100 20 50 80 100 63 381 49 62 61 111 23 36 34 125 34 54 62 68 18 37 46 52 250 32 49 61 67 23 41 52 58 500 39 47 59 65 36 43 56 62 1000 25 44 57 63 25 44 57 63 2000 1...

Page 83: ...60 66 2000 191 42 56 63 201 43 58 64 4000 191 34 50 57 201 35 51 58 8000 181 27 44 52 17 1 26 43 51 Total 45 60 71 76 39 52 65 71 1These values indicate the upper boundary limit due to background noise levels Actual field values ma be equal to or less than that listed Sound pressure level data used to develop this table was determined to be in accordance with AHRI Standard 220 and 270 Source ASHRA...

Page 84: ...Actual field values may be equal to or less than that listed Table B 12 Sound Power Data for MCL055 dB SoundPower CalculatedTwo Fan Octave BandData A Weighted dBA Frequency Hz Percent Fan Speed Percent Fan Speed 20 50 80 100 20 50 80 100 63 53 73 79 84 27 46 52 57 125 54 71 80 91 38 55 64 74 250 55 69 80 86 46 60 71 78 500 59 67 81 86 56 63 77 83 1000 42 64 78 84 42 64 78 84 2000 36 58 74 82 37 59...

Page 85: ...ctual field values may be equal to or less than that listed Table B 14 Sound Power Data for MCL165 dB SoundPower CalculatedFour Fan Octave BandData A Weighted dBA Frequency Hz Percent Fan Speed Percent Fan Speed 20 50 80 100 20 50 80 100 63 56 76 82 87 30 49 55 60 125 57 74 83 94 41 58 67 77 250 58 72 83 89 49 63 74 81 500 62 70 84 89 59 66 80 86 1000 45 67 81 87 45 67 81 87 2000 39 61 77 85 40 62...

Page 86: ...and 270 Source ASHRAEFundamentals 2009 8 8 Table B 16 Sound Pressure Data for MCL055 at 10 ft 3 05 m dB SoundPressure at Distance 10 ft 3 05 m dB Octave BandData A Weighted dBA Frequency Hz Percent Fan Speed Percent Fan Speed 20 50 80 100 20 50 80 100 63 36 55 61 66 9 29 35 40 125 37 53 62 73 21 37 46 57 250 37 51 62 69 29 42 54 60 500 42 49 63 68 38 46 60 65 1000 24 46 60 66 24 46 60 66 2000 18 4...

Page 87: ...d 270 Source ASHRAEFundamentals 2009 8 8 Table B 18 Sound Pressure Data for MCL165 at 10 ft 3 05 m dB SoundPressure at Distance 10 ft 3 05 m dB Octave BandData A Weighted dBA Frequency Hz Percent Fan Speed Percent Fan Speed 20 50 80 100 20 50 80 100 63 39 58 64 69 13 32 38 43 125 40 56 65 76 24 40 49 60 250 40 54 65 72 32 45 57 63 500 45 52 66 71 41 49 63 68 1000 27 49 63 69 27 49 63 69 2000 21 43...

Page 88: ...Vertiv Liebert MC Installer User Guide 84 This page intentionally left blank ...

Page 89: ...ions are supplied in the Submittal Drawings on page 87 and in the unit installation supplement for seismic or wind load installation The following table lists the relevant documents by number and title Document Number Title DPN002414 Seismic Anchorage Data One Fan Models Table C 1 Seismic Application Drawings Document Number Title DPN003582 Wind Load Data Certification Table C 2 Wind Load Certific...

Page 90: ...Vertiv Liebert MC Installer User Guide 86 This page intentionally left blank ...

Page 91: ...ic Liebert MC with Receiver above Unit DPN003994 Air Cooled Piping Schematic Liebert MC Mounted above Liebert DA080 165 PipingSchematics DPN002188 Typical Piping Schematic for Air Cooled DX Systems DPN002858 General Arrangement Diagram 600mm 24in Air Cooled with Liebert MC Models DPN002808 General Arrangement Diagram 300mm 12in Air Cooled with Liebert MC Models DPN003730 Piping Schematic with Lieb...

Page 92: ...between Liebert PDX Unit and Liebert MC Condenser Premium DPN003047 Electrical Field Connections 575 V option DPN002960 Installation Instructions for Installing 420 Surge Protective Device SPD to Liebert MC DPN003267 CANbus and Interlock Connections between Liebert DS and Liebert MC Condenser Premium DPN003266 CANbus and Interlocking Connections between Liebert PDX Unit and Liebert MC Condenser Pr...

Page 93: ...Vertiv Liebert MC Installer User Guide ...

Page 94: ...names and logos referred to are trade names trademarks or registered trademarks of their respective owners While every precaution has been taken to ensure accuracy and completeness herein Vertiv Group Corp assumes no responsibility and disclaims all liability for damages resulting from use of this information or for any errors or omissions Specifications are subject to change without notice SL 195...

Reviews: