

V
ERIZON
F
I
OS
TV
R
EMOTE
C
ONTROL
Model: RC144 5302 / 00B
For additional information
about your FiOS TV service
and your remote, go to
www.verizon.com/fiostv
For video instructions, press
the
Menu
key on your remote
then select
Help
on the Main
Menu
Verizon Customer Support
888-553-1555
S
TEP
1
-
I
NSTALL
B
ATTERIES
Install two new AA batteries.
Make sure they are oriented
correctly. To test if the
batteries have been installed
correctly, press a few keys on
the remote. One of the Device
Keys
[DVD, AUX, TV, STB]
on
the top of the remote will flash
briefly when you press a key.
S
TEP
2
-
G
ET TO
K
NOW
Y
OUR
R
EMOTE
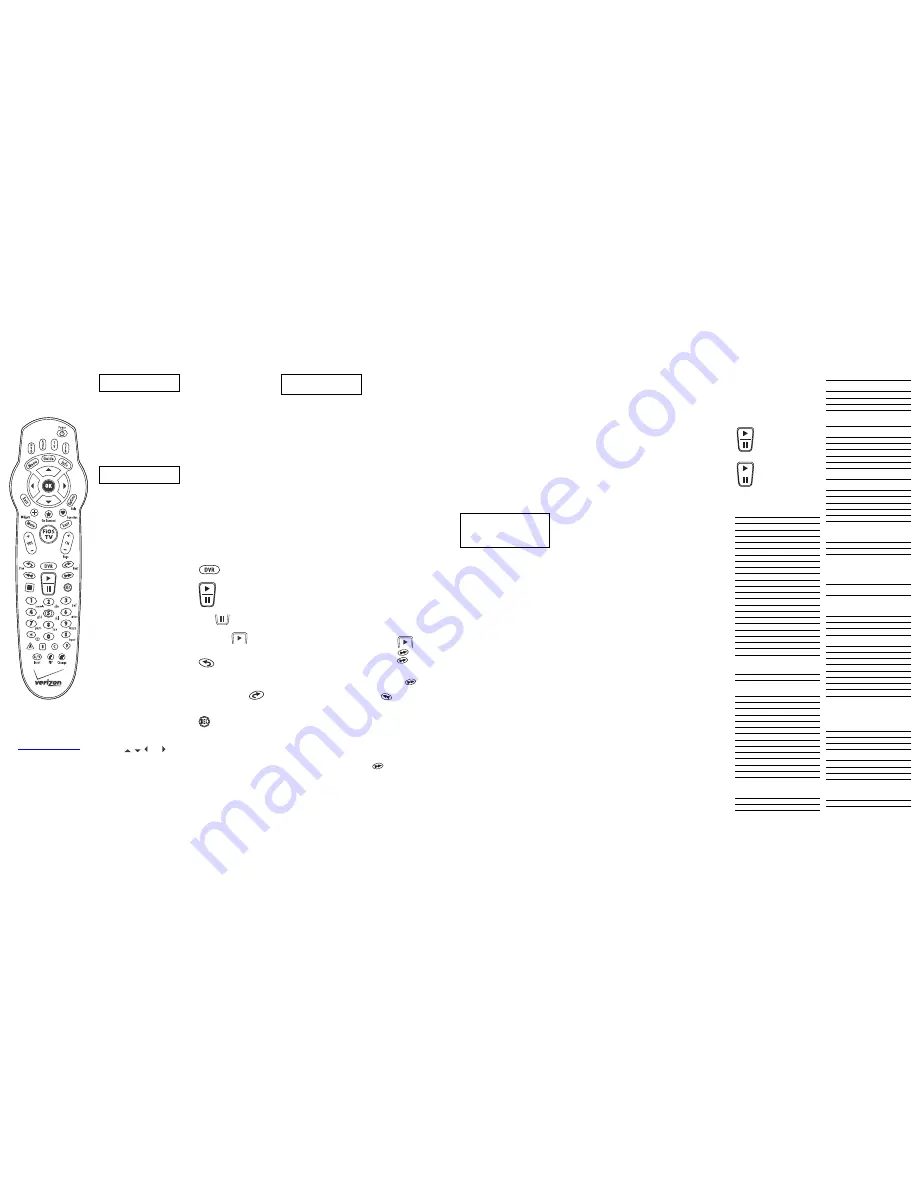
Your remote is now ready to
control your FiOS TV Set Top
Box (STB). To start, try the
following.
Make sure the remote has a
clear, direct and unobstructed
view of any device you want to
control.
•
Turn on your TV.
•
Press the
STB
key on the
top of the remote to make
sure you are in FiOS TV
“STB Mode.”
•
Press the
CH+
key to see
the next higher channel.
•
Press
5
-
0
then
OK
to tune
to channel 50.
•
Press
Last
to return to the
last channel.
•
Press
Info
to see
information about the
current program. Press
Exit
to return to TV watching.
•
Press
Guide
to see a list of
TV programs. Press
Exit
to
return to TV watching.
•
Press the
Menu
key to
launch the FiOS TV Main
Menu. From the Main Menu
you can access all the
features of your FiOS TV
service.
•
Press
,
, ,
and
keys
to navigate through this
menu. We suggest that you
become familiar with all the
options on the Main Menu.
To select any item, press
OK
. Press
Exit
at any time
to return to TV watching.
You are probably already
familiar with most of the keys
on the remote; however, there
may be a few which are new to
you.
•
Options
displays extra
options or provides help
based on what you are
doing.
•
Favorites
displays your list
of favorite channels. (The
first time you press the key,
you will be invited to set up
your favorite channels.)
•
On Demand
displays a list
of movies and other types
of programs you can watch
at any time.
•
Press
Widgets
to access
local weather, traffic and
other information.
If you have a STB with a built
in DVR…
•
displays your list of
recorded programs.
•
is a rocker button,
press the lower half of the
button
to pause the
program. Press upper half
of the button
to
continue to play from where
you left off.
•
jumps back a few
seconds in the program you
are watching.
•
If you are watching a
recorded program,
jumps forward in the
program.
•
records the current
program.
S
TEP
3
-
P
ROGRAM
Y
OUR
R
EMOTE
Your new remote control
comes from the factory ready
to control your FiOS TV
service. However,
VOL+
,
VOL-
and
MUTE
will not work until
you program the remote with
the brand of TV you have. In
addition to your STB and TV,
your remote can also control
two additional devices, for
example, a DVD player and an
audio receiver.
This is called “programming
the remote.” If you don’t want
to control devices other than
your FiOS TV STB, you do not
need to program the remote.
H
OW TO
P
ROGRAM
Y
OUR
R
EMOTE
We will use the example of
programming your remote to
control a
TV
. The procedure is
the same for DVD players and
audio receivers.
1. Look up your TV make in
the TV code listing on the
other side of this sheet.
2. Circle the first 4-digit
number displayed for your
make of TV.
3. Turn on your TV.
4. Press and hold the
TV
key.
5. While holding down the
TV
key, press the
OK
key.
6. Release both keys. The
Device Keys will blink twice.
7. Enter the 4-digit TV code
you circled. The TV key will
blink 3 times.
8. To test to see if this was the
correct code, point the
remote at your TV and
press
Power
. If the TV
turns off, you have
successfully programmed
your remote.
9. If the TV did not turn off,
repeat all the steps with the
next code in the list.
10. For future reference,
underline the code that
worked for you.
Note: If some of the keys on
the remote do not operate your
TV as you would expect, then
try the next code in the list for
your brand of TV.
To program the remote to
control a VCR or DVD player,
press and hold the
DVD
key,
instead of the
TV
key, in step 4
and 5. To program an audio
receiver, press and hold
AUX
instead.
Note: You can assign a DVD or
VCR to the DVD key. The AUX
key is reserved for audio
receivers, amplifiers and VCR.
Note: The remote will exit
programming mode after 20
seconds if no key is pressed.
W
HAT IF
N
ONE OF THE
C
ODES
W
ORKED
?
If none of the codes worked,
try the following procedure. (As
before, we will use the
example of a TV. For other
devices use the appropriate
Device Key instead of the
TV
key in step 2 and 3.)
1. Turn on your TV.
2. Press and hold the
TV
key.
3. While holding down the
TV
key, press
OK
.
4. Release both keys. The
Device Keys will blink twice.
5. Press
9
-
2
-
2
.
6. Point the remote at the TV.
7. Press
.
8. Press
. Every time you
press
the remote
sends out a new power-off
command to the TV. Keep
pressing
until the TV
turns off. (You can press
to go back
.
)
9. When the TV turns off, you
have found the right code.
Press
OK
to store this
code.
Note: There are over 300 TV
and DVD codes. The most
common codes are tried first,
but you may still need to press
over 300 times to find the
right code. If you reach the end
of the list of codes the entire
remote will flash twice and
return to normal operation. You
can exit programming at any
time by pressing Exit.
S
WITCHING
M
ODES
Press a Device Key on top of
the remote to switch modes.
For example, to control your
DVD player, press
DVD
. To
return to your FiOS TV STB
box, press
STB
. Pressing the
TV
,
DVD
or
AUX
key is like
picking up the remote for that
device.
Note: When you press Guide
,
Widgets
,
On Demand
,
Favorites
,
FiOS TV
,
or DVR
the remote assumes you want
to control the STB and will
automatically switch you to
STB mode.
O
PTIONAL
:
Reprogram
How the Channel,
Volume and Power
Keys Operate
T
HE
C
HANNEL
K
EYS
CH+
,
CH-
and
Last
control the
Set Top Box (STB) even after
you press the
TV
,
DVD
or
AUX
Device Key. This is the way
most people will want the
remote to work. However, you
can change the way the
Channel Keys work so that
when you press a Device Key,
the Channel Keys will operate
the selected device.
If you want the Channel Keys to
control different devices …
1. Press and hold the
STB
key.
2. While holding down the
STB
key, press the
OK
key.
3. Release both keys. The
Device Keys will blink twice.
4. Press
9
-
6
-
6
. The STB
key will blink twice.
5. Press
OK
. The STB key will
blink 3 times to indicate
success in programming.
Note: To return to controlling
the channel via the STB only,
press STB in step 5.
T
HE
V
OLUME
K
EYS
VOL+
,
VOL-
and
Mute
always
control the TV volume even
when you are in STB or DVD
modes. (However, the Volume
Keys will always control the
AUX device when in AUX
mode.) This is the way most
people will want the remote to
work. However, you can
change how the Volume Keys
work.
If you always want the Volume Keys
to control the AUX device …
Some people may want to
always adjust the volume using
their AUX device (typically a
home theater receiver)
regardless of the mode they
are in.
1. Press and hold the
STB
key.
2. While holding down the
STB
key, press
OK
.
3. Release both keys. The
Device Keys will blink twice.
4. Press
9 - 5
-
5
. The STB
key will blink twice.
5. Press
AUX.
The AUX key
will blink 3 times to indicate
success in programming.
Note: To return to controlling
the volume via the TV, press
TV in step 5. If you want to
control the volume through
any
device (by pressing a Device
Key, then a Volume Key),
press OK in step 5. This will
also control the volume of your
STB in STB mode.
R
E
-S
ETTING THE
R
EMOTE
Note: All previous programming
will be lost.
To reset the remote to the
original setting, do the
following steps.
1. Press and hold the
STB
key.
2. While holding down the
STB
key, press
OK
.
3. Release both keys. The
Device Keys will blink twice.
4. Press
9 - 0 - 0
. The STB
key will blink 3 times to
indicate success in
programming.
T
HE
P
OWER
K
EY
When you are in STB mode,
the
Power
key can be
programmed to turn on/off just
the STB
or
the STB together
with other devices.
If you want the Power Key to control
multiple devices with a single power
key press…
1. Press and hold the
STB
key.
2. While holding down the
STB
key, press
OK
.
3. Release both keys. The
Device Keys will blink twice.
4. Press
9
-
7
-
7
. The STB
key will blink twice.
5. One after the other, press
each Device Key you want
the Power Key to control in
the order you want them to
turn on or off.
6. Press
OK
when done. The
STB key will blink 3 times to
indicate success in
programming.
For example, to program the
Power Key to turn on or off
your TV, AUX and STB, in that
order, with one press of
Power
, press [
STB+OK
],
[
9-7-7
], [
TV
], [
AUX
], [
STB
],
[
OK
].
If you find that your devices do
not always turn on or off
together as expected, then you
should program your remote to
control only one device at a
time.
If you want the Power Key to control
only one device at a time…
To power any device, you will
need to press the appropriate
Device Key, then the
Power
Key.
1. Press and hold the
STB
key.
2. While holding down the
STB
key, press
OK
.
3. Release both keys. The
Device Keys will blink twice.
4. Press
9
-
7
-
7
. The STB
key will blink twice.
5. Press
OK
.
The STB key will
blink 3 times to indicate
success in programming.
The original setting for the
Power key depends on which
remote you have. (Please
check the Play / Pause key on
your remote to see which
remote you have.)
The
Power
key
controls only the
selected mode.
The
Power
key
controls both STB and
TV in STB mode.
Codes for Audio Amplifiers
BOSE
0701
Curtis Mathes
0327
Denon
3777
GE
0105
Harman/Kardon 0919
JBL
3781
JVC
0358
Left Coast
0919
Lexicon 3784
Marantz 0919,
3778
McIntosh 3785
Optimus 0327
Parasound
3782
Philips
0919
Pioneer
0040, 0327, 3775
Polk Audio
0919
RCA
0327
Sony
0716
Soundesign
0105
Soundmatters
3783
Victor
0358
Wards
0040,
0105
Yamaha
0160, 0381, 3776, 3779, 3780
Codes for Audio Receivers
ADC
0558
Adcom
3725
Aiwa
0148, 0216, 1415, 1432, 1668,
3614, 3615, 3616, 3617, 3627,
3636,
3670,
3680,
3718
Alco
1417
Amphion Media Works
1590, 1642
AMW
1590,
1642
Anam
1101
Anthem 3757
Apex Digital
1457
Audiotronic
1216
Audiovox 1417,
3754
BOSE
0666, 1256, 1280, 1960, 3741
Capetronic
0558
Carver
0216,
1216,
3636
Classic 3664
Coby
3751
Denon
1387, 3602, 3633, 3662, 3663,
3676, 3681, 3682, 3691, 3694,
3700, 3702, 3703, 3704, 3709,
3721
Emerson 3603
Fisher
1828
GE
3635
Harman/Kardon
0137, 0216, 0918, 1331, 1333,
3626,
3636,
3699
Hitachi
1828
Integra
0162,
1325,
1347
JBL
0137, 1333, 3626, 3752
JVC
1401, 1522, 3618, 3659, 3668,
3686, 3695, 3706, 3712, 3713,
3715,
3729,
3737,
3738
Kenwood
1340, 1596, 1597, 3619, 3646,
3649, 3656, 3658, 3675, 3688
KLH
1417,
1455
Koss
1393,
3749
Lexicon 3758
LG
1320
Linn
0216,
3636
Magnavox
0216, 0558, 1216, 1296, 1541,
3636
Marantz
0216, 1216, 1296, 1316, 3636,
3727
McIntosh 3759
Mitsubishi 1420,
3708
NAD
3637
Nakamichi
3638,
3639
Onkyo
0162, 0869, 1325, 1347, 1558,
3628, 3650, 3653, 3660, 3666,
3669, 3687, 3693, 3697, 3705,
3707, 3710, 3711, 3719, 3753
Optimus
0558, 0697, 1050, 1101, 3634
Oritron
1393
Panasonic
1315, 1335, 1343, 1545, 1575,
1660, 1790, 1791, 3629, 3630,
3667, 3683, 3701, 3723, 3728,
3731, 3732, 3733, 3734, 3736,
3742, 3743, 3745, 3746, 3747,
3750
Philips
0216, 1216, 1293, 1296, 3636,
3698,
3749
Pioneer
0041, 0177, 0558, 0657, 1050,
1411, 3607, 3608, 3625, 3644,
3645, 3652, 3654, 3677, 3678,
3679, 3689, 3690, 3722, 3740
Polaroid 3605
Polk Audio
0216, 1316, 3726
Proscan 1281,
3635
RCA
0558, 1050, 1101, 1281, 1417,
1538, 3609, 3620, 3635, 3748
Rotel
3760
RCA & Dimensia
3610, 3611, 3612, 3613, 3635
Rio
1896
Samsung
1322, 1527, 3720, 3755
Sansui
0216,
3636
Sanyo
1496,
1828
Sherwood
1104, 3632, 3724
Sonic Blue
1896
Sony
1085, 1285, 1468, 1585, 1685,
1785, 1786, 1885, 3606, 3621,
3622, 3631, 3640, 3641, 3642,
3643, 3648, 3651, 3657, 3671,
3672, 3673, 3674, 3684, 3685,
3714, 3716, 3717, 3730, 3735,
3739,
3744
Soundesign
0697
Sunfire 1340
Teac
1101,
1417
Technics
1335, 1545, 3629, 3630, 3661,
3665,
3667
Thorens 1216
Venturer 1417
Wards
0041, 0216, 3625, 3636
Yamaha
0162, 0203, 1203, 1303, 1358,
1402, 3600, 3601, 3604, 3623,
3624, 3625, 3647, 3655, 3692,
3696,
3756
Zenith
1320