background image

33

Operations & Maintenance Manual: Setting Up

0900‑5005 REV‑00

PROCEDURE 4.  CONFIGURE PRINTED AND PDF REPORT SETTINGS

If a printer is attached to the console, you can print scan results. Reports are printed vertically, like a receipt. 
Scan reports are made up of a number of sections. Some of the sections are optional. 

You can also export saved exams to an external USB drive. For information on exporting exams, see 

“Export 

Saved Exams”

 on page 49.

You can customize which sections and B‑mode images are included in reports, regardless of whether they 
are printed or exported in PDF format.

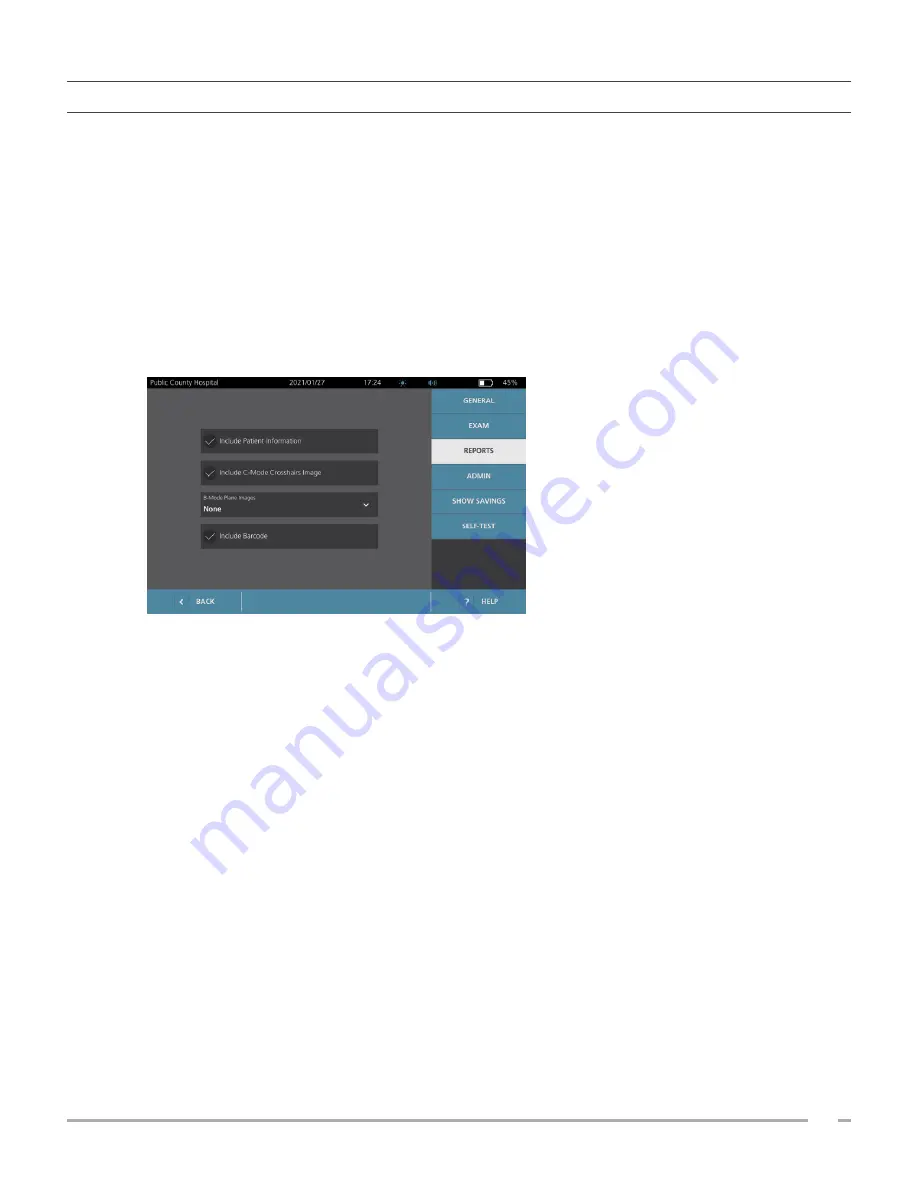
1.  On the Home screen, tap 

Settings

, and then tap 

Reports

2.  If a keypad appears, key in the PIN for Settings, and then tap 

Enter

The Settings screen opens to the Reports tab.

3.  Tap the information to include in reports. If a check mark is displayed to the left of the information 

description, the following information is printed:

• 

Include Patient Information

—Select to include patient data, such as patient ID or date of birth.

• 

Include C‑Mode Crosshairs Image

—Select to include the coronal view image computed by the 

system. The aiming circle and crosshairs are printed as black lines.

• 

B‑Mode Plane Images

—Select one of the following groups of images to include in printed and 

exported reports:


None

—Select to include no B‑mode image planes.


All

—Select to include all 12 B‑mode image planes.


Sagittal & Transverse

—Select to include the two primary B‑mode image planes.

• 

Include BladderTraq™ Outline

—Select to add outlines of the bladder’s internal contours to the 

B‑mode image.

• 

Include Barcode

—Select to include the exam’s final volume measurement as a barcode.

4.  When you are finished configuring the printed report settings, tap 

Back

. This saves your settings and 

returns the console to the Home screen.

Summary of Contents for BladderScan i10

Page 1: ...Operations Maintenance Manual ...

Page 2: ...0900 5005 REV 00 ...

Page 3: ...0900 5005 REV 00 Operations Maintenance Manual Effective March 12 2021 Caution Federal United States law restricts this system to sale by or on the order of a physician ...

Page 4: ...cal Australia Pty Limited Unit 9 39 Herbert Street St Leonards NSW 2065 Australia Within Australia 1800 613 603 Tel 1800 657 970 Fax International 61 2 9431 2000 Tel 61 2 9475 1201 Fax 0123 Copyright 2021 Verathon Inc All rights reserved BladderScan the BladderScan symbol BladderScan i10 BladderTraq CaliScan ImageSense VMODE Verathon and the Verathon Torch symbol are trademarks of Verathon Inc All...

Page 5: ...ce 1 Environments of Intended Use 1 HIPAA Privacy 2 SAFETY INFORMATION 2 Ultrasound Energy Safety 2 Contraindications 2 Warnings Cautions 2 INTRODUCTION 9 SYSTEM OVERVIEW 9 Components Accessories 10 SYSTEM FEATURES 12 Console Features 12 Probe Features 14 Battery Features 15 SYSTEM ICONS 15 Console Touchscreen Icons 15 Console Information Icons 18 Battery Indicator LED Colors 19 Console Battery Le...

Page 6: ...d PDF Report Settings 33 Procedure 5 Customize Cost Savings Calculations 34 Procedure 6 Configure a PIN for Saved Exams 35 Procedure 7 Configure a PIN for System Settings 36 USING THE SYSTEM 37 MEASURING BLADDER VOLUME 37 Procedure 1 Prepare for the Exam 37 Procedure 2 Input Patient Information or Operator ID Optional 38 Procedure 3 Measure Bladder Volume 39 Procedure 4 Review Exam Results 41 Proc...

Page 7: ... CALIBRATION 54 SYSTEM SOFTWARE 55 DEVICE DISPOSAL 55 WARRANTY 55 MAINTENANCE PROCEDURES 56 Procedure 1 Load Thermal Paper into the Printer Optional 56 Procedure 2 Run a Self Test 57 Procedure 3 Update the Software 58 Procedure 4 Complete a CaliScan Test 59 Procedure 5 Turn the System Off 60 Procedure 6 Perform an Unconditional Shutdown 61 Procedure 7 Copy the System s Configuration to Other Syste...

Page 8: ...sues 66 Procedure 4 Restore Factory Defaults 68 Procedure 5 Troubleshoot Irregular Printouts Optional 69 Procedure 6 Clear a Paper Jam Optional 71 Procedure 7 Replace the Printer Drive Roller Optional 72 Procedure 8 Evaluate Console Error Messages 73 PRODUCT SPECIFICATIONS 74 SYSTEM SPECIFICATIONS 74 COMPONENT SPECIFICATIONS 77 ELECTROMAGNETIC COMPATIBILITY 81 ACCESSORY CONFORMANCE TO STANDARDS 84...

Page 9: ...for a rechargeable lithium ion battery When the console is connected to external power it charges the battery STATEMENT OF INTENDED USE The BladderScan i10 system is an ultrasound device intended to be used for measuring the urine volume in the bladder noninvasively NOTICE TO ALL USERS The BladderScan i10 system should be used only by individuals who have been trained and authorized by a physician...

Page 10: ...ormation on ALARA refer to the American Institute of Ultrasound in Medicine publication Medical Ultrasound Safety The ultrasound output power of the BladderScan i10 system is not user adjustable and is limited to the minimum level necessary for effective performance For more information about acoustic output levels see the chapter Product Specifications on page 74 CONTRAINDICATIONS The BladderScan...

Page 11: ...do not obtain an optimal repeatable image WARNING Anatomical features surrounding the bladder can interfere with accurate scanning When aiming the probe ensure that the entire bladder is in view and centered WARNING Do not use water or surgical lubricants as a substitute for ultrasound gel Substituting these or other materials can cause incorrect scan results WARNING This product may only be clean...

Page 12: ...oise from its surroundings These malfunctions may cause improper operation procedure delays or both WARNING Portable radio frequency communications equipment including peripherals such as antenna cables and external antennas may not be used within 30 cm 12 inches of any part of the BladderScan system including cables that Verathon specifies or provides for use with the system If this distance is n...

Page 13: ...assemble the battery heat it above 60 C 140 F or incinerate it Keep the battery out of reach of children and in its original package until you are ready to use it Dispose of used batteries promptly according to local recycling or waste regulations If the battery is leaking or its case is cracked put on protective gloves to handle it and discard it immediately Put insulating tape such as cellophane...

Page 14: ...nue can start a fire or cause an electrical injury For help with battery malfunctions contact Verathon Customer Care WARNING No modification of this equipment is allowed WARNING To avoid the risk of injury when the printer door is open Do not touch the printer mechanism or print head which may be hot from recent printing Do not touch the edge of the paper cutter WARNING Never use the BladderScan i...

Page 15: ...oid damage to cables and accessories do not excessively twist or bend cables associated with the system CAUTION To dispose of the system or accessories at the end of their useful service life see the section Device Disposal The system and related devices may contain mineral oils batteries and other environmentally hazardous materials CAUTION Before you perform any system upgrade self test or maint...

Page 16: ...e of interference Reorient or relocate this device or other devices Increase the separation between devices Connect the device to an outlet on a circuit different than the other device s Eliminate or reduce EMI with technical solutions such as shielding Purchase medical devices that comply with the IEC 60601 1 2 standard Be aware that portable and mobile radio frequency communications equipment ce...

Page 17: ...kstation a printer an external battery charger and extra rechargeable batteries For more information see Components Accessories on page 10 Figure 1 BladderScan i10 System Showing Accessory Printer and Workstation The system includes an onboard tutorial as well as integrated help screens The console features a variety of customizable settings and a Saved Exams function that allows you to recall pri...

Page 18: ...V 00 COMPONENTS ACCESSORIES Table 1 Included System Components Accessories INCLUDED SYSTEM COMPONENTS ACCESSORIES Console Probe Battery In service USB flash drive Power adapter Power cord Note Plug may vary by region ...

Page 19: ...COMPONENTS ACCESSORIES Battery Charger Extra Battery Mobile Workstation Printer Calibration Kit Thermal Paper Additionally quick reference materials and ultrasound gel may be available for order in your region For more information contact Verathon Customer Care or your local representative or visit verathon com global support ...

Page 20: ...mize settings A rechargeable battery is inserted into one side of the console and the bottom surface includes a selection of ports for connecting system components and accessories such as external removable media storage devices You may also customize your console by adding an optional printer Figure 2 Console Features Battery door On Off button Main display Probe cable port USB ports USB C port P...

Page 21: ...attery an LED next to the On Off button is illuminated Probe cable port Connects the probe to the console USB ports Provides a connection for the optional printer and for external removable storage media USB C port Provides a connection for external removable storage media Power port Connects the power adapter to the console If you press the On Off button and hold it for more than two seconds the ...

Page 22: ...by a cable Figure 3 Probe Features Direction indicator Probe button Probe cable Probe dome Table 4 Probe Features PART NAME PURPOSE Probe button Starts aiming or scanning when pressed Direction indicator Displays the probe orientation selected for the current scan The lighted human figure indicator should be oriented in the same direction as the patient Probe cable Connects the probe to the consol...

Page 23: ... probe s scanning functions Each battery features a test button that allows you to check the charge level of the battery without inserting it into the console If you press the Test button on the back of the battery the display next to the test button illuminates to display the approximate charge level 25 50 75 or 100 Figure 4 BladderScan i10 Lithium Ion Battery Test button SYSTEM ICONS CONSOLE TOU...

Page 24: ...s Delete On the Results screen delete the displayed scan and its volume The system retains all other scans and all patient information On the Saved Exams screens delete a saved exam either the currently displayed exam or an exam selected in a list Help Start the onboard tutorial or display screen sensitive help text Print Print the scan self test or savings calculation results Note This function i...

Page 25: ...up the brightness or volume Decrease Turn down the brightness or volume Mute Turn the speaker on or off Play While viewing the onboard tutorial start or resume playback Pause While viewing the onboard tutorial pause playback Previous While viewing the onboard tutorial return to the previous frame Next While viewing the onboard tutorial advance to the next frame On the Results screen expand the his...

Page 26: ...tem but tapping them does not affect the system Table 6 Information Icons ICON FUNCTION The printer is charging but it does not have enough charge left in its built in internal battery to operate correctly The printer cannot operate because of a problem with its built in internal battery Note the accompanying alert ...

Page 27: ...ble 7 shows how the battery indicator LED reports the condition of the battery based on whether the system is connected to external power and whether it is turned on or off Table 7 Battery Indicator LED Colors COLOR CONNECTED TO EXTERNAL POWER NOT CONNECTED TO EXTERNAL POWER System On System Off System On Flashing red Overheating or drawing excessive current Steady red Less than 2 Greater than or ...

Page 28: ... fresh battery or connect external power The battery is approximately 10 charged Replace with a fresh battery or connect external power The battery is less than 5 charged Replace the battery or connect external power immediately At this point the system turns itself off if external power is not connected If external power is connected the system software may be temporarily unable to detect the bat...

Page 29: ...ngs 10 Customize Cost Savings Calculations 11 Configure a PIN for Saved Exams 12 Configure a PIN for System Settings ASSEMBLING THE SYSTEM Procedure 1 PERFORM THE INITIAL INSPECTION When you receive the system Verathon recommends that an operator familiar with the system perform a full visual inspection for any physical damage that may have occurred during shipment 1 Carefully open the top of the ...

Page 30: ... shipped with the workstation through the holes at the corners of the console mount and into the corresponding holes on the workstation Finger tighten all four screws securely Note The console mount on the workstation uses a combination of spring tension and friction to maintain the position of the console It can be adjusted without tools at any time 3 Connect the probe cable the power cable and t...

Page 31: ...ions Maintenance Manual Setting Up 0900 5005 REV 00 Procedure 3 INSERT A BATTERY 1 Slide the latch away from the battery well door on the console and then open the door 2 Move the door away from the battery well ...

Page 32: ...battery well and then push gently until the battery is completely seated Note The battery is designed to prevent incorrect installation If the battery does not slide into the battery well easily remove the battery reorient it and try again Do not attempt to force the battery into position 5 Close and latch the battery well door ...

Page 33: ... component is damaged do not use it Contact Verathon Customer Care or your local representative 2 Make sure the power cable is securely connected to the console 3 Plug the power adapter into a standard wall outlet Make sure the power cord can be easily disconnected if necessary 4 If the battery indicator LED on the console remains unlit press the On Off button The LED should light up to indicate t...

Page 34: ... best results Note To ensure that each battery is properly connected to the charger make sure that its Verathon logo and its contacts face right as seen from the front of the charger Battery contacts 6 Allow the battery to charge completely The indicator lights on the battery charger indicate the status of each battery Green solid Battery is fully charged Green flashing Battery is charging Yellow ...

Page 35: ...sed the printer as part of its initial BladderScan i10 system order follow the instructions in the BladderScan i10 Workstation Assembly Quick Start Sheet part number 0900 5007 to install the printer as you assemble the workstation If your organization purchases a printer for an existing BladderScan i10 system follow the instructions in the BladderScan i10 Printer Installation Quick Start Sheet par...

Page 36: ...your formatting preferences for the time date currency and numbers 1 If necessary press the On Off button After a few seconds the console displays the Home screen 2 On the Home screen tap Settings The Settings screen opens to the General tab 3 On the General tab tap Asset Tag Use the virtual keyboard to type an identifying name or number and then tap Enter The text you entered is displayed on the ...

Page 37: ...ew a value and then tap the value to select it Repeat as needed to set the desired month day and year 9 In the Date Format field tap the arrow and then select the month day and year display order The Date field immediately updates to display the selected format 10 In the Savings Currency field tap the arrow and then select the desired currency This unit is used when displaying savings as a result ...

Page 38: ...d then select the number of minutes the system should remain on but inactive before it turns itself off Note If an exam is in progress when automatic shutdown begins the system saves the exam results 4 If you want to define the type of barcode the system should use to display exam results tap Format Barcodes 5 From the Format Symbology list select one of the following barcode types SYMBOL TYPE EXA...

Page 39: ... at 2 33 PM 2020 04 22 Volume Edge Interference The measured volume in mL including the symbol if needed 200 mL Volume Number Only A number representing the measured volume in mL This selection allows numeric digits only so the symbol is not included 200 Note The Full Exam Notes option is not available if the Code 128 format is selected 7 From the Prefix and Suffix boxes select the control charact...

Page 40: ... assistance Inactivity Timeout Defines the amount of time that live B mode aiming is active Once the timeout period has been reached the system returns to the Home screen This setting is only visible if live B mode aiming is enabled Enable B Mode Plane Images Allows the display of B mode images in active and saved exams Enable On Screen Barcode Displays a patient s exam results as a barcode in add...

Page 41: ...e in reports If a check mark is displayed to the left of the information description the following information is printed Include Patient Information Select to include patient data such as patient ID or date of birth Include C Mode Crosshairs Image Select to include the coronal view image computed by the system The aiming circle and crosshairs are printed as black lines B Mode Plane Images Select ...

Page 42: ... Savings tab tap Configure Savings 3 On the Configure Savings screen tap a field to update and then enter new values Numeric fields accept decimal input but round to the nearest whole number UTI Rate Select the rate of urinary tract infections UTIs resulting from catheterizations UTI Cost Select the cost per UTI at your facility Catheterization Cost Select the cost per catheterization procedure Ca...

Page 43: ...e Home screen tap Settings 2 At the Settings screen tap the Admin tab 3 If a keypad appears key in the PIN for Settings and then tap Enter 4 On the Admin tab tap Manage Security 5 In the Manage Security dialog box tap Change PIN for Saved Exams 6 Tap the Enter New Saved Exams PIN box Using the keypad key in the new 4 digit PIN required for access to saved exams on the system and then tap Enter Alt...

Page 44: ...xisting PIN contact Verathon Customer Care for assistance in clearing it 1 At the Home screen tap Settings 2 At the Settings screen tap the Admin tab 3 If a keypad appears key in the PIN for Settings and then tap Enter 4 On the Admin tab tap Manage Security 5 In the Manage Security dialog box tap Change PIN for Settings 6 Tap the Enter New Settings PIN box Using the keypad key in the new 4 digit P...

Page 45: ...ed insert a charged battery Note Before you insert a battery into the console press the Test button and make sure the battery is fully charged If the charge level in the battery is 20 full or less replace it with a fully charged battery before proceeding The system cannot perform an exam while it is connected to external power 2 Allow the system to start When the system has started completely the ...

Page 46: ...he Home screen tap Patient ID The Patient and Operator ID screen appears 2 On the Patient Data screen tap Patient ID use the virtual keyboard to type a value and then tap Enter 3 Tap Patient First Name and then enter the patient s first name 4 Tap Patient Last Name and then enter the patient s last name 5 Tap Patient Sex and then tap the sex for the patient 6 Tap the Date of Birth field vertically...

Page 47: ...obe and locate the bladder before scanning Bladder Outline BladderTraq In B mode views the system highlights the detected edges of the bladder by outlining the bladder area in green 1 On the Home screen select whether you are standing on the patient s left or right side You do not need to specify the patient s age or sex to obtain an accurate result 2 With the patient lying in a supine position an...

Page 48: ...ted direction indicator points in the same direction as the head of the patient 7 If you are scanning an obese patient lift as much abdominal adipose tissue out of the way of the probe as possible Apply more pressure to the probe to reduce the amount of adipose tissue through which the ultrasound must pass but use no more pressure than necessary 8 Make sure that there are no air gaps between the p...

Page 49: ...ine to obtain the largest possible dark area 11 Once you are finished aiming the probe press the probe button or tap Scan on the screen The scanning process begins 12 Hold the probe steady while the scan is in process When you hear the end scan tone the scan is complete Continue to the procedure Review Exam Results Procedure 4 REVIEW EXAM RESULTS This section describes the procedures that can occu...

Page 50: ...included in the scan The system displays a greater than symbol before the measured result indicating the actual bladder volume may exceed the displayed result Move or angle the probe in the direction of the bladder on the display to optimize your results Bladder larger than view If more than one side of the bladder is not within the field of view then multiple portions of the bladder were not incl...

Page 51: ...mages are activated on your system and you want to view them tap the B mode icon Dual pane B mode images of the scan appear 5 In the top left corner of each of the B mode images the line through the human figure icon indicates the currently displayed plane To navigate through the scan planes tap the Previous and Next icons below the images VIEW MULTIPLE SCANS When you perform more than one scan th...

Page 52: ...surement number to see the scan display 8 To discard the displayed scan tap the Delete icon 9 If you want to transfer the scan result to an EHR or EMR system using a barcode reader continue to the procedure Generate a Barcode containing an Exam Result Otherwise skip to the procedure Print Save or Exit an Active Exam ...

Page 53: ...a barcode icon appears next to the largest scan result stored in the exam just above the Print icon The exact appearance of the icon matches the type of barcode the system displays which is selected during configuration 1 On the Results screen tap the Barcode icon The barcode and a string of text showing the exact result statement the barcode contains appear in a dialog box on the screen 2 On your...

Page 54: ...ou save the exam patient or operator information cannot be changed For information about viewing deleting and exporting saved exams see the section Managing Saved Exams on page 47 Procedure 7 VIEW COST SAVINGS The system calculates and displays information related to cost savings catheterizations avoided and UTIs avoided The default settings can be customized to reflect the rates and costs at your...

Page 55: ...an switch drives You can move exams from the internal memory to an external USB drive For more information see the procedure Export Saved Exams on page 49 Read the Warnings Cautions section before performing the following tasks Procedure 1 RECALL A SAVED EXAM Once you have saved an exam it can be recalled using the Saved Exams screen The Saved Exams screen displays exam results saved on the system...

Page 56: ...am s row When an exam is selected for review the results screen for the exam is displayed Procedure 2 DELETE A SAVED EXAM 1 On the Home screen tap Saved Exams 2 If a keypad appears key in the PIN for Saved Exams and then tap Enter The Saved Exams screen opens displaying a list of exams saved on the default media Each of the rows on this list corresponds to an exam 3 If it is not visible in the lis...

Page 57: ...write exams already stored on the USB drive Exported exam information is stored in PDF format so that it can be viewed on other devices Each exam document is stored in a separate folder on the USB drive and includes the following information Patient information C mode view of the scan if the C mode crosshairs image is enabled in reports B mode views of the scan if B mode images are enabled in repo...

Page 58: ...D REPROCESSING LEVELS Clean Low High Console Probe Cable Probe Printer Workstation The reprocessing levels shown in this table refer to the CDC Spaulding classifications CLEANERS DISINFECTANTS DISINFECTION EFFICACY Table 11 lists the low level disinfectant LLD classes that have demonstrated efficacy with the system For information about the long term effect of solutions on system materials see Com...

Page 59: ...presentative For contact information visit verathon com global support Table 12 Compatible Cleaning Solutions and Disinfectants PRODUCT ACTIVE CLASS USE Clean Disinfect GAMA Healthcare Clinell Universal Wipes Quaternary ammonium Clorox Healthcare Bleach Germicidal Wipes Chlorine chlorine compounds Clorox Healthcare Hydrogen Peroxide Wipes Hydrogen peroxide with alcohol Metrex CaviCide Alcohol with...

Page 60: ...ess the On Off button If prompted confirm that you want the system to shut down and then wait for it to do so 2 Wipe any ultrasound gel completely off of the probe 3 Using a solution or wipe listed as a cleaner in Table 12 wipe the console probe and probe cable according to the instructions provided by the cleaner s manufacturer If you are using a solution apply it with a clean towel Repeat as nee...

Page 61: ...ystem to shut down and then wait for it to do so 2 Using a wet cloth or a wipe indicated for cleaning medical devices wipe the printer according to the instructions provided by the wipe s manufacturer Repeat as needed to make sure that all visible contamination is removed 3 If the printer remains wet you may use a clean soft cloth or paper towel to remove any residual cleaning solution ...

Page 62: ...nter Printer cable Workstation Power adapter Power cable Power cord Battery or batteries Plugs Cracks that allow the ingress of fluid into the console or probe may affect the performance of the system Other than the maintenance included in this manual all service and repairs must be completed by an authorized BladderScan service representative or Verathon Service Center For more information contac...

Page 63: ...re Doing so may damage the system and void the warranty DEVICE DISPOSAL The system and accessories may contain mineral oils batteries and other environmentally hazardous materials When the system has reached the end of its useful service life return it and any related accessories to a Verathon Service Center for proper disposal Alternatively follow your local protocols for hazardous waste disposal...

Page 64: ... this is the first time you are loading the printer there may be a sheet of paper in the printer mechanism Remove the paper sheet 3 Place a roll of thermal paper inside the door as shown so that the loose end of the paper exits over the top of the roll 4 Hold the paper end so that it protrudes from the top of the printer and then close the printer door Make sure the door clicks into place 5 Tear o...

Page 65: ... the Home screen tap the Settings icon and then tap Self Test The Settings screen opens to the Self Test tab where the system completes the self test and displays the results 2 Scroll through the on screen test results by vertically swiping with your finger on the touchscreen 3 If the screen indicates any failed tests or abnormal results contact Verathon Customer Care or your local representative ...

Page 66: ...Make sure the probe is attached to the console 3 If there are any USB drives connected to the console remove them 4 Make sure that the system is displaying the Home screen and that its battery is at least 20 charged 5 If the system is connected to external power disconnect it 6 Insert a USB drive containing a valid software update package into one of the two larger USB ports on the console The sys...

Page 67: ...m is disconnected from external power 2 On the Home screen tap Settings and then tap Self Test 3 Swipe upward in the list of test results until the Probe section appears 4 Tap Start CaliScan Test 5 Review the test instructions and then tap Test The system begins to test probe components A message and process indicator appear while the test is in process Note Once the test has started do not press ...

Page 68: ...rn off the system during an exam the system prompts you to confirm that you want to continue without saving the exam results 2 Press the On Off button and hold it for about half a second 3 When a dialog box appears on the screen and asks if you want to turn off the system release the On Off button 4 Tap Yes to confirm that you want to turn off the system ...

Page 69: ...hutdown indicator appears at the lower left corner of the screen A progress bar within the indicator becomes progressively shorter while the system waits to begin its shutdown routine Note When you first press the On Off button the option to turn the system off normally is still available and the system displays the dialog box asking if you want to turn it off that way While the shutdown indicator...

Page 70: ...B flash drive from the console 8 Tap the Back button twice This returns you to the Home screen IMPORT A CONFIGURATION TO ANOTHER SYSTEM When the system detects that a USB flash drive has been connected it scans the drive for a configuration file If it finds one it automatically proceeds to import the configuration As a result you can apply an exported configuration to a different system by simply ...

Page 71: ...console are active and available for use However if necessary you can deactivate them by following this procedure 1 At the Home screen tap Settings 2 At the Settings screen tap the Admin tab 3 If a keypad appears key in the PIN for Settings and then tap Enter 4 On the Admin tab tap Manage Security 5 In the Manage Security dialog box tap the Enable USB Ports check box to clear it 6 Tap the Back but...

Page 72: ...The section on reviewing saved exams While the tutorial is playing you can take these actions View the previous frame of the tutorial tap Previous View the next frame of the tutorial tap Next Pause the tutorial tap Pause or continue the tutorial when paused tap Play When you are done viewing the tutorial tap Exit CUSTOMER SERVICES RESOURCES Verathon provides several customer service resources as d...

Page 73: ...section TROUBLESHOOTING PROCEDURES Procedure 1 TROUBLESHOOT CONSOLE BATTERY ISSUES 1 If the system does not turn on the battery may be dead or simply discharged To determine the battery s condition attempt to recharge it according to the instructions in the procedure Charge the Battery on page 25 2 If you cannot recharge the battery but a second battery is available remove the first battery and in...

Page 74: ...3 Press the On Off button again to activate the system 4 If the message appears again and you have an extra battery repeat Step 2 Replace the battery according to the instructions in the procedure Insert a Battery on page 23 and then repeat Step 3 5 If the message still appears contact Verathon Customer Care Procedure 3 TROUBLESHOOT PROBE AIMING ISSUES Use this procedure to troubleshoot the follow...

Page 75: ...ees to the sagittal plane Sagittal plane Probe cable 90 4 Look at the position indicator icons on the top of the probe Make sure the head of the lighted direction indicator points in the same direction as the head of the patient 5 After verifying the selected orientation probe placement and probe display rescan the patient Hold the probe steady while the scan is in process For detailed scanning in...

Page 76: ...tem settings cost savings calculations and saved exams from the system Do not restore factory defaults if you want to retain this information 1 On the Home screen tap Settings and then tap Admin 2 If a keypad appears key in the PIN for Settings and then tap Enter 3 Tap Restore Default Settings 4 If you want to restore the system defaults tap Yes The system restores factory settings and then restar...

Page 77: ...to turn off and then wait for it to do so 2 Slide the printer door upward to unlock it and then rotate the door down to open Placing your thumb on the outside of the printer and squeezing can make it easier to open the door 3 If a thermal paper roll is in the printer remove it 4 Using a cotton swab dipped in isopropyl alcohol IPA wipe along the length of the print head Do not use your fingers or a...

Page 78: ...outside the clip If the printer drive roller has fallen out of the gray clips replace it according to the instructions in the procedure Replace the Printer Drive Roller Optional on page 72 8 Load the thermal paper and close the printer door according to the instructions in the procedure Load Thermal Paper into the Printer Optional on page 56 9 If the printer continues to produce irregular printout...

Page 79: ...its of paper that have become separated from the roll 4 Verify the position of the printer drive roller in the printer door The printer drive roller s plastic bushings should rest inside the light gray plastic clips in the printer door as shown The gear should be outside the clip If the printer drive roller has fallen out of the gray clips replace it according to the instructions in the procedure ...

Page 80: ... printer drive roller inside the light gray plastic clips in the printer door 4 If the printer drive roller has fallen out put it back into place as shown The gear should be on the right when viewed from the front of the printer and the plastic bushings should be centered between the light gray clips in the printer door 5 Push down on the printer drive roller to seat it Make sure that it snaps int...

Page 81: ... not function while external power is connected Please unplug the system from the power outlet to resume scanning Disconnect external power from the system until you have saved and completed the exam The probe does not function while external power is connected No probe detected Please connect a probe to begin scanning Check the connection between the probe and the console to make sure it is secur...

Page 82: ... Type BF Expected product life 7 years Ingress protection IP against water Console IPX2 Probe IPX4 Printer IPX0 Power adapter IP22 Battery IPX0 Operating Conditions Use Indoor Temperature 10 to 40 C 50 to 104 F Relative humidity 20 to 75 Ambient air pressure 700 hPa to 1060 hPa Storage Conditions Use Indoor Temperature 10 to 60 C 14 to 140 F Relative humidity 15 to 85 Ambient air pressure 600 hPa ...

Page 83: ... 433 2 21 10 3 Index component value 2 21 10 3 2 21 10 3 Acoustic Parameters pr α at zMI MPa 0 652 P mW 0 854 P1 1 mW 0 205 zs cm 3 3 zb cm zMI cm 3 3 Zpii α cm 3 3 fawf MHz 2 27 2 27 Other Information prr Hz 408 srr Hz 5 1 npps 1 Ipa α at zpii α W cm2 11 3 Ispta α at zpii α or zsii α mW cm2 0 165 Ispta at zpii or zsii mW cm2 0 277 pr at Zpii MPa 0 844 Operating Control Conditions 2 6 MHz pulse MI...

Page 84: ...Bladder volume range 0 to 999 mL Volume accuracy greater than 100 mL 7 5 0 100 mL 7 5 mL The following examples show how the accuracy ranges shown in Table 18 may affect reported volume measurements If the measurement is greater than 100 mL the accuracy range is 7 5 and is calculated as follows 240 mL 7 5 18 mL 240 18 mL 222 258 mL If the measurement is 0 100 mL the accuracy range is 7 5 mL and is...

Page 85: ...pecifications Input Verathon Supplied Battery 10 8 V DC Output USB Ports 5 V DC at 100 mA maximum from each port Insulation Type BF Table 20 BladderScan i10 Power Adapter 0400 0156 SPECIFICATION DESCRIPTION Electrical Specifications Input voltage 100 240 V AC single phase Input frequency 50 60 Hz Input current 1 5 A max Input connection IEC C13 connection line cord plug NEMA 5 15 North America AS ...

Page 86: ...n Weight 470 g 1 04 lbs Cable 1 88 m 6 17 ft Table 22 BladderScan i10 Printer 0800 0640 SPECIFICATION DESCRIPTION General Specifications Height 106 mm 4 17 in Width 103 mm 4 06 in Depth 122 mm 4 80 in Weight without paper 460 g 1 01 lbs Resolution 8 dots mm 203 dots in Dot size 0 125 mm by 0 12 mm 0 005 in by 0 005 in Printing width 48 mm 1 89 in or 384 dots line ...

Page 87: ... damage the batteries Use only the battery model described in this section Consider replacement of the battery if the time between battery charges is significantly reduced and is affecting your use of the BladderScan i10 system Contact Verathon Customer Care or your local representative to order replacement batteries Table 23 Battery 0400 0155 CONDITION DESCRIPTION General Specifications Battery t...

Page 88: ... 1 in center positive Output 18 V DC max 4 A max Insulation Protection Class III Fuses No user replaceable fuses Table 25 Battery Charger Power Adapter SPECIFICATION DESCRIPTION Electrical Specifications Input voltage 100 240 V AC single phase Input frequency 50 60 Hz Input current 1 4 A max Input connection IEC C13 connection line cord plug NEMA 5 15 North America AS 3112 Australia CEE 7 4 Europe...

Page 89: ...formance of the system see Essential Performance on page 1 ELECTROMAGNETIC EMISSIONS Table 26 Guidance and Manufacturer s Declaration Electromagnetic Emissions The system is intended for use in the electromagnetic environment specified below The customer or the user of the system should ensure that it is used in such an environment EMISSIONS TEST COMPLIANCE ELECTROMAGNETIC ENVIRONMENT GUIDANCE RF ...

Page 90: ...al or hospital environment Voltage dips short interruptions and voltage variations on power supply input lines IEC 61000 4 11 0 UT 0 5 cycle At 0 45 90 135 180 225 270 and 315 0 UT 1 cycle and 70 UT 25 30 cycles Single Phase at 0 In compliance Mains power quality should be that of a typical commercial or hospital environment If the user of the system requires continued operation during power mains...

Page 91: ...in such an environment IMMUNITY TESTS IEC 60601 TEST LEVEL COMPLIANCE LEVEL ELECTROMAGNETIC ENVIRONMENT GUIDANCE Radiated RF IEC 61000 4 3 3 V m 80 MHz to 2 7 GHz 80 AM at 1 kHz In compliance Interference may occur in the vicinity of equipment marked with the following symbol Note Ut is the AC mains voltage prior to application of the test level These guidelines may not apply in all situations Ele...

Page 92: ...separation distance d in meters m can be estimated using the equation applicable to the frequency of the transmitter where P is the maximum output power rating of the transmitter in watts W according to the transmitter manufacturer Note At 80 MHz and 800 MHz the separation distance for the higher frequency range applies These guidelines may not apply in all situations Electromagnetic propagation i...

Page 93: ... scan as an ultrasound image C Celsius C mode Display mode showing the target of a current or saved scan as crosshairs over an area of color cm Centimeter DC Direct current EDS Entrance dimensions of the scan EHR Electronic Health Record EMR Electronic Medical Record EMC Electromagnetic compatibility EMI Electromagnetic interference Essential performance The system performance necessary to achieve...

Page 94: ...3 Derated peak rarefactional pressure PRF Pulse repetition frequency RF Radio frequency SCP Short circuit protection TI Thermal index definition 3 56 IEC 62359 2010 TIB Bone thermal index definition 3 17 IEC 62359 2010 TIC Cranial bone thermal index definition 3 21 IEC 62359 2010 TIS Soft tissue thermal index definition 3 52 IEC 62359 2010 UTI Urinary tract infection V Volt W Watt Wh Watt hour WEE...

Page 95: ......

Page 96: ......

Reviews: