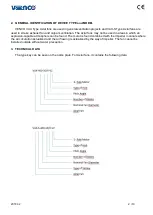
VENCO VAX Installation, Operation And Maintanance Manual Download Page 5


2018.02 


  4 / 10


5.  INSTALLATION 

The fan must be installed according to the air direction label on the fan. Before the start of assembly, 

examine manually whether the fan wheel runs freely. Before installation, check the minimum air gap between 
the blade tip and the housing according to the following table. During assembly, secure the assembly area. 
Take precautions for any access by unauthorized persons. The fan should be installed in a way that makes 
service and maintenance easy. A wiring diagram is applied on the inside of the junction box or separately 
enclosed. Electrical installations must be made by trained and authorized electrician. 
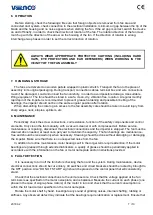
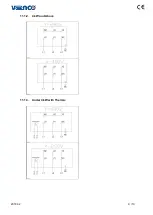
 

Drawing 5.1 

Drawing 5.1 illustrates the MFT, MSC, NRD/XS and MFL accessories that could be used with the fan. 

The connection of MFT Mounting Bracket, MSC Wire Guard and NRD/XS Vibration Absorber Mounting to 

the fan must be done as shown in the following drawing by screw, rondela and nut. 


Drawing 5.2 

Summary of Contents for VAX

Page 1: ...TION MAINTENANCE USER MANUAL AXIAL FANS VENCO Havaland rma ve Makina San ve Tic A 2004 Cad No 5 45400 OSB Turgutlu MAN SA T RK YE Tel 0090 236 332 5070 Fax 0090 236 332 5030 www venco com tr venco ven...

Page 2: ...t Do not use devices as a workbench or a storage area VENCO VAX and VAX S Axial Type Fans can only be operated in conditions of intended design and technical specifications BEFORE OPERATING READ THIS...

Page 3: ...The Axial fans may not be used in areas in which an explosion capable atmosphere can be found The motor is found combined with the impeller in canals where the air circulation actualized and the air f...

Page 4: ...motors with IP 55 and F class insulation 230 V 1 phaze 50 Hz and 380 V 3 phase 50 Hz Operating temperature between 15 C and 45 C VENCO VAX S Type Axial Fans F300 certificate harmonized with EN12101 3...

Page 5: ...access by unauthorized persons The fan should be installed in a way that makes service and maintenance easy A wiring diagram is applied on the inside of the junction box or separately enclosed Electr...

Page 6: ...nstallation of the NRDO accessory Drawing 5 3 demonstrates horizontal installation of the NRDO accessory to the axial fan When there is no air flow position of the wing must be as shown in the Drawing...

Page 7: ...13 10 12 5 1400 3 5 4 5 11 13 75 1600 4 5 12 15 ALL ELECTRICAL CONNECTIONS SHALL BE DONE ACCORDING TO EN 60204 1 BY TRAINNED AND AUTHORIZED PERSONNEL SWITCH THE ENERGY SUPPLY OFF BEFORE YOU BRING ABO...

Page 8: ...mpressed air Before service maintenance or repairing disconnect the electrical connections and the impeller is stopped The fan must be cleaned when needed at least once per year to maintain the capaci...

Page 9: ...fan is under warranty of our company The maximum repairing period is 30 business days This period starts from the date of notification to us Fan s warranty does not include electrical connection erro...

Page 10: ...2018 02 9 10 11 1 2 4 kW and Above 11 1 3 Under 4 kW with Thermic...

Page 11: ...2018 02 10 10 11 1 4 4 kW and Above with Thermic...

Reviews: