background image

3 Wiring and Connections 

36                SD780 Series Servo Technical Manual 


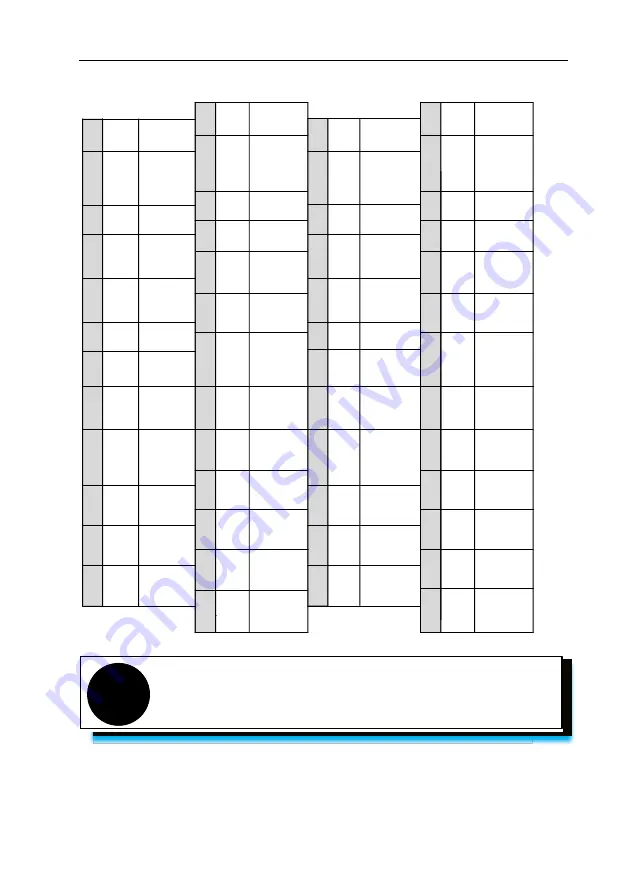
3.7 Definition of CN1 Terminal 


2

SG

Signal 

ground

4

SEN

Requirement 

input of 

encoder 

absolute data 

(SEN)

6

SG

Signal ground

Signal ground

3

PL1

OC power 

output of 

command 

pulse

5

V - REF

Speed 

command 

input

1

SG

8

/ PULS

Pulse 

command 

input

7

PULS

Pulse 

command 

input

10

SG

Signal 

ground

9

T - REF

Torque 

command 

input

27

/SO 2 +

(TGON+)

General sequence

control output 2

29

/SO 3 +

( S -

RDY +)

General sequence

control output 3

31

ALM+

Servo alarm 

output

33

PAO

A phase of 

encoder 

pulse division output

35

PBO

B phase of 

encoder pulse 
division output

26

/SO 1 -

(V-CMP-)

General sequence

control output 2

28

/SO 2 -

(TGON-)

30

/SO 3 -

(S - RDY-)

32

ALM -

Servo alarm 

output

34

/PAO

A phase of 

encoder pulse 

division output

11

SIGN

Sign 

command 

input

36

/PBO

B phase of 

encoder pulse 
division output

12

/SIGN

Sign 

command 

input

37

STO

Safe torque limit

13

PL2

OC power 

output of 

command 

pulse

14

/CLR

Clearance 

input of 

position 

deviation

39

/SI 9

General 

sequence 

control input 9

/SI 8

38

General 

sequence 

control input 8

16

OCP

OC power 

input of 

command 

pulse

CLR

Clearance 

input of 

position 

deviation

15

41

/SI 3

( P -

CON )

General 

sequence 

control input 3

40

/SI 0

(/ S - ON )

General 

sequence 

control input 0

18

PL3

OC power 

output of 

command 

pulse

17

OCS

OC input of 

pulse 

direction

43

/SI 2

( N - OT )

General 

sequence 

control input 2

42

/SI 1

( P - OT )

General 

sequence 

control input 1

20

/ PCO

C phase of 

encoder 

pulse division 

output

19

PCO

C phase of 

encoder 

pulse division 

output

44

/SI 4

(/ ALM -

RTS )

General 

sequence 

control input 4

22

BAT -

Battery( -)  of 
absolute 
encoder

21

BAT +

Battery (+)  of 

absolute 
encoder

45

/SI 5

(/P -CL )

General 

sequence 

control input 5

46

/SI 6

(/ N - CL )

General 

sequence 

control input 6

47 + 24 VIN

Power input of 

sequence 

control input signal

48

PSO

Position output 

of absolute 

encoder

24

OCS

OC input of 

pulse 

clearance

23

OCZ

OC output of 

Z phase 

pulse division

49

/PSO

Position 

output of 

absolute 
encoder

25

/SO 1 +

( V -

CMP +)

General 

sequence 

control output 1

50

TH

Overheat 

protection 

input of linear 

motor


Cautions


When tightening the screw of CN1 terminal, the torque shall not be greater than 0.2N. M, otherwise, the 
screw will slide.


Summary of Contents for SD780 Series

Page 1: ...1 1 Keys Names and Functions of the Panel Operator 22 2 1 2 Functions Switch 23 2 1 3 Status Display 23 2 2 Operations of Auxiliary Functions Fn group 24 2 3 Operations of Parameter Pn Group 24 2 4 O...

Page 2: ...4 1 3 Installation 54 4 2 JOG trail operation 54 5 Operation 55 5 1 Basic Functions 55 5 1 1 Quick Guide 55 5 1 2 Servo Enable and Over Travel Setting 55 5 1 3 Motor Rotation Direction 57 5 1 4 Stop M...

Page 3: ...vision pulse output signal of grating ruler encoder 98 5 8 7 Setting of Electronic Gear 99 5 8 8 Setting example of electronic gear ratio 100 5 8 9 Setting of alarm detection 101 6 Adjustment 103 6 1...

Page 4: ...t Manual Adjustment Fn101 131 7 9 1 Overview 131 7 9 2 Operating Procedure 131 7 10 Torque Command Offset Manual Adjustment Fn102 131 7 10 1 Overview 131 7 10 2 Operating Procedure 132 7 11 Current Of...

Page 5: ...al Position Interrupt Position Command 198 9 4 2 Equivalent Position Command Insertion Position Command 199 9 4 3 Absolute Position Interrupt Position Command 199 9 4 4 Multi segment Storage Function...

Page 6: ...Interface 255 14 3 Features 256 14 4 Real Time Monitoring 260 14 5 Auxiliary Functions 260 14 5 1 JOG 260 14 5 2 Inertia Identification 261 14 5 3 Program JOG 263 14 5 4 Mechanical Characteristics 26...

Page 7: ...S 485 and other field bus in the market but also has a full closed loop electronic CAM flying shear gantrysynchronization and other non standard application functions through USB can be connected to t...

Page 8: ...W2 Size Model SD780 Allover size mm Installation size mm Mounting aperture W H D W1 W2 H1 H2 A B A 1R1A 45 168 170 20 160 7 5 5 2 M4 1R8A 3R3A B 5R5A 71 168 180 58 58 160 6 5 5 3 M4 7R6A 9R5A 2R5D 3R8...

Page 9: ...ze mm Mounting aperture W H D W1 W2 H1 H2 E 500D 210 471 254 140 140 457 434 5 4 M6 600D F 700D 240 558 310 176 176 544 520 4 M6 800D 121D 171D 270 638 350 195 195 615 580 4 M10 221D 350 738 405 220 2...

Page 10: ...stallation Notice To ensure effective cooling through fans and natural convection leave enough space around the driver for heat dissipation during installation To ensure good heat dissipation effect i...

Page 11: ...N CONT 1PH 200V 240V 50Hz 60Hz 1PH 200V 240V 50Hz 60Hz 1PH 5 6A 3PH 0V 240V 0Hz 500Hz 3 3A DANGER CAUTION WARNING 400 600 0303 Suzhou Veichi Electr i c Co Ltd MADE IN CHINA Specification 1R1A 1R8A 3R3...

Page 12: ...less no freezing condensation Vibration resistance 4 9m s Shock resistance 19 6m s Protection level Level IP20 Cleanliness Non corrosive gas flammable gas water oil and chemical splashes Environments...

Page 13: ...l PI P Control P CON Torque limit switching TLC Motor rotation direction switching input SPD D signal Internal set speed switching SPD A SPD B Control mode selection C SEL Zero clamping ZCLAMP Referen...

Page 14: ...OT Protective function Over current over voltage under voltage overload regenerative fault encoder disconnection etc Accessibility Gain adjustment alarm recording JOG operation origin search etc Contr...

Page 15: ...Mpps Open collector Symbol pulse sequence CW CCW pulse sequence 200kpps Two phase pulse sequence with 90 phase differential 200kpps Reference Pulse Input Multiplication Switching 1times 100 times Clea...

Page 16: ...tage sampling Delay Drive Temperature sampling Gate drive Current sampling Control power Rheostat L1C L2C Control power ARM FPGA CN7 CN6 MicroUSB Dual RJ45 bus interface Full closed loop and 2500 line...

Page 17: ...ervo Technical Manual 1 5 System Configuration Examples AC200V 400V Circuit break Filter Braking resistor Battery unit matches with an absolute encoder Grating ruler VM7 series servo drive Contactor S...

Page 18: ...e type S standard type C CANopen bus type E EtherCAT bus type M MECHATROLINK II bus type L MECHATROLINK III bus type N PROFINET bus type F Multiple I O type F Supported encoder types A Absolute type G...

Page 19: ...d determine the most appropriate time for repair according to the conditions of use and use environment Inspect items Inspect time The essentials of inspection and maintenance Notes Vibration and soun...

Page 20: ...of replacement and contact our agency or sales office After the inspection we will judge whether we need to replace the parts The servo drive serviced by our company has its user parameters adjusted...

Page 21: ...6kW 2R9 2 9kW 4R4 4 4kW 5R5 5 5kW 7R5 7 5kW 011 11kW 015 15kW 020 20kW 022 22kW 030 30kW 037 37kW 045 45kW 055 55kW 075 75kW 090 90kW 110 110kW 150 150kW 200 200kW F Rated speed RPM 15 1500 20 2000 2...

Page 22: ...ors Unit mm Model L LL LR S QK U W T V7E L06A R2030 1 105 5 75 5 30 14 22 5 2 5 5 5 V7E L06A R2030 2 136 5 106 5 30 14 22 5 2 5 5 5 V7E L06A R4030 1 124 5 94 5 30 14 22 5 2 5 5 5 V7E L06A R4030 2 155...

Page 23: ...1L 142 107 35 19 25 3 6 6 V7E L08A R7530 2L 174 139 35 19 25 3 6 6 V7E M08A R7530 1L 152 117 35 19 25 3 6 6 V7E M08A R7530 2L 184 5 149 5 35 19 25 3 6 6 V7E L08A R7530 1 142 107 35 19 25 3 6 6 V7E L08...

Page 24: ...S QK U W T V7E M11A 1R230 1 190 135 55 19 40 3 6 6 V7E M11A 1R230 2 221 2 166 2 55 19 40 3 6 6 V7E M11A 1R530 1 200 145 55 19 40 3 6 6 V7E M11A 1R530 2 231 2 176 2 55 19 40 3 6 6 V7E M11A 1R830 1 210...

Page 25: ...V7E M13D R8515 2 221 2 166 2 55 22 36 3 2 8 7 V7E M13D 1R020 1 193 138 55 22 36 3 2 8 7 V7E M13D 1R020 2 221 2 166 2 55 22 36 3 2 8 7 V7E M13D 1R315 1 208 153 55 22 36 3 2 8 7 V7E M13D 1R315 2 236 2 1...

Page 26: ...0 8 V7E M18D 4R415 2 331 5 252 5 79 35 65 4 3 10 8 V7E M18D 4R415 1H 290 211 79 35 65 4 3 10 8 V7E M18D 4R415 2H 331 5 252 5 79 35 65 4 3 10 8 V7E M18D 5R515 1 325 5 246 5 79 35 65 4 3 10 8 V7E M18D 5...

Page 27: ...The foot plate of 200mm flange motor optional Model code S18 Material code 6010000008 263 Flange motors Unit mm Model L LL LR S QK U W T V7E M26D 03015 1FN 640 530 110 48 4 5 14 9 90 V7E M26D 03715 1...

Page 28: ...ter settings Operate the accessory functions UP key Select parameters up or increase the value switch between high medium and low segment values in multiple segment display parameters DOWN key Select...

Page 29: ...No motor testing function displays the running status alternately more details in this function Display Meaning Meaning Display It lights on when the control power is ON and lights off when OFF Speed...

Page 30: ...ATA SHIFT Long press DATA SHIFT 2 3 Operations of Parameter Pn Group 1 When the setting range is within 5 digit numbers Let me introduce the parameters Pn s setting method Take the setting method of t...

Page 31: ...ain the operating method of the monitoring display when the motor speed is 3000rpm Monitoring display Enter into monitoring Any interference MODE SET Long press DATA SHIFT If you want the monitor to a...

Page 32: ...r input 6 B1 Positive of Internal and external braking resistor Pins DC power supply fter rectification 7 B2 PB Energy consumption braking output 8 B3 Pin of internal braking resistor 9 Negative of DC...

Page 33: ...the drive correctly according to the motor cable phase sequence of the servo motor The wrong phase sequence will cause the drive to malfunction Be sure to ground the servo drive to avoid electrical da...

Page 34: ...wires between B2 and B3 unless using an external regenerative braking resistor When using an external regenerative braking resistor disconnect the short wiring between B2 and B3 and connect them by t...

Page 35: ...ve to malfunction When using external regenerative resistor connect according to the dotted line in the figure Pb Be sure to ground the servo drive to avoid electrical damage The 24V power supply for...

Page 36: ...IST Specification CONN 1 Color CONN 2 CONN 3 Signal 6 0 3 U Blue 1 U V Brown 2 V W Red 3 W PE Yellow Green 4 PE White 5 1 BAKE Black 6 2 BAKE V7E motor 60mm 80mm flange power cable definition WIRE RUN...

Page 37: ...cable definition Signal A terminal Pin number Color U A Blue V B Brown W C Red PE D Yellow Green 180 flange motor power cable definition D2M VM7 series D2 motor with brake Signal definition Pin numbe...

Page 38: ...umber Wire core color U F Blue V I Brown W B Red P E E Yellow green BAKE G Red BAKE H Black 3 3 CN2 Encoder Connection V7E motor 40mm 60mm 80mm flange encoder cable definition Drive terminal Motor ter...

Page 39: ...and B end pins as shown in the table above The encoder wire uses twisted pair shielded wire and the shielding layers at both ends of the wire should be grounded 2 When using the multi turn absolute en...

Page 40: ...dard type C CANopen bus type N PROFINET bus type CN6A CN6B port definition Pin No Signal name Function Pin No Signal name Function 1 CANH CAN Data 6 2 CANL CAN Data 7 GND 485 Signal ground 3 CANG CAN...

Page 41: ...that the length of the cascaded cable is less than 50cm and the CN6B of the last one should be connected with the terminal resistance Only CANopen bus Mechatrolink II bus RS 485 bus should be conside...

Page 42: ...neral sequence control input 9 SI 8 38 General sequence control input 8 16 OCP OC power input of command pulse CLR Clearance input of position deviation 15 41 SI 3 P CON General sequence control input...

Page 43: ...TLC 0x06 Torque limit switching used when torque limit need to change during operation SPD D 0x08 Used to change the motor control direction at internal speed SPD A 0x09 Use to select segment internal...

Page 44: ...l distribution mode is internally fixed Pn600 0 The function servo unit of each input signal is internally fixed and cannot be changed When selecting different control modes the functions of the pins...

Page 45: ...The drive provides reverse input signal switching function in order to facilitate wiring 1 Take the servo enable S ON as an example the default setting is Pn601 0x01 When the signal is ON the servo is...

Page 46: ...N1 40 S ON 2 CN1 41 P CON 3 CN1 42 P OT 4 CN1 43 N OT 5 CN1 44 ALM RST 6 CN1 45 TLC 7 CN1 46 Reserved 8 CN1 39 Invalid 9 CN1 38 Invalid The upper SEG LED lights up when the input signal is OFF The low...

Page 47: ...f the servo motor is the same as the command speed closed Position COIN 0x01 Positioning completed output ON closed when the difference between the command pulse number and the servomotor movement amo...

Page 48: ...arm occurs the output signal will be OFF If the change is set to Pn622 1 1 the servo alarm will output the signal ON 3 9 3 Confirming the Output Status The status of the output signal can be confirmed...

Page 49: ...and the speed is not consistent 3 10 Connection with the Upper Device 3 10 1 Analog Input Circuit 3 The following describes the 5 6 speed command input and 9 10 torque command input terminals of the...

Page 50: ...ion example of linear drive output 7 PULSE 8 PULSE PULSE SIGN 11 SIGN 12 SIGN FG Shield wire Servo drive Host computer control SIGN 15 CLR 14 CLR 150 150 150 The differential pulse input signal voltag...

Page 51: ...Control modules is PNP type common anode SIGN FG 24V Drive Control module Y0 Y1 PULSE Shield wire Twisted wire CLR 16 OCP 8 PULSE 12 SIGN 17 OCS 14 CLR 24 OCC Y2 2k 2k 2k Cautions If the linear drive...

Page 52: ...rol module Y2 Y1 Y0 PULSE 7 PULSE 8 PULSE 11 SIGN 12 SIGN 15 CLR 14 CLR SIGN 3 PL1 15V 15V 13 PL2 15V 18 PL3 FG Shield wire 1k 150 1k 150 1k 150 2 Control modules is PNP type common anode Control modu...

Page 53: ...Output Loop Servo unit signal output circuit is the following three kinds 1 Open collector output circuit The output signal SEN OCZ is an open collector transistor output circuit Please receive throug...

Page 54: ...al and 19 20 phase C signal terminals of the CN1 port The output signal PAO PAO PBO PBO and the origin pulse signal PCO PCO of the encoder s serial data are converted into two phase A phase B phase pu...

Page 55: ...21 22 BAT BAT 2 S ON P CON P OT N OT ALM RST TLC Servo ON input Servo ON while signal ON P operation command input Poperates while ON ForbidFWD drivinginput Forbid drivingwhile OFF Alarm reset input...

Page 56: ...ON while signal ON P operation command input P operates while ON Forbid FWD driving input Forbidden while OFF Alarm reset input Reset while on Torque limit selection According to torque limiting mode...

Page 57: ...P OT N OT ALM RST TLC Servo ON Input Servo ON while signal ON P operation command input P operates while ON Forbid FWD driving input Forbidden while OFF Alarm reset input Reset while on Torque limit...

Page 58: ...addition to 1R1A 1R7A 3R3A 500D 600D 700D 800D 121D the driver model has a built in regenerative resistor When the internal regenerative resistor does not meet the requirements a regenerative resisto...

Page 59: ...noise from its peripheral equipment To prevent mutual noise interference between the servo unit and its peripheral devices the following measures to prevent noise interference can be taken as require...

Page 60: ...on Are the settings wires and connections correct Is the supply voltage of the servo unit normal Is the driver status display interface free of warnings and alarms 4 1 3 Installation Install the servo...

Page 61: ...put signal wiring for over range is not required 1 Signal Setting Pin numbers can be configured by parameters Pn601 Pn609 and are always configured effectively by parameters Pn610 Pn612 See Input Sign...

Page 62: ...nction is a function that detects the over travel warning A 9A0 after the over travel is entered when the servo is turned on With this function the servo unit can transmit the information on detecting...

Page 63: ...ng forward rotation direction indicates that the counterclockwise rotation CCW is positive when looking at the servo motor cover Function mode Parameter Range Default Unit Communication address When e...

Page 64: ...not move due to gravity or external forces Holding brakes are built into servomotors with brakes Please use it as shown below Vertical Axis Shaft with External Force Applied Holding brake Prevents the...

Page 65: ...ng servo motor rotation the servo motor stops and the brake signal BK turns OFF At this time the brake signal BK output time can be adjusted by setting the brake command output speed value Pn010 and t...

Page 66: ...f the brake action 5 1 6 Regenerative Resistor Refer to Regeneration Resistor Connection for the wiring method When connecting an external regenerative resistor set parameters Pn012 and Pn013 accordin...

Page 67: ...warning detection time is half 50 of the overload alarm detection time 2 Change of the detection time of the overload warning Er 720 The overload continuous maximum alarm Er 720 can be detected in adv...

Page 68: ...parameters setting Function code Parameter Rang e Default s Unit Communication address When enabled Pn040 Method to use absolute encoder 0 1 0 0x0040 After restart 0 Use an absolute encoder as an abso...

Page 69: ...d it can only be cleared after re powered The alarm clearing will clear the encoder multi turn value at the same time and the single turn value will be retained Related monitoring data Monitoring code...

Page 70: ...ning is detected and the function for limiting the output torque can be selected Related parameters are as below Function code Parameter Range Default Unit Communication address When enabled Pn045 Und...

Page 71: ...ion operation Uner voltage warning apply torque limit inside the servo unit After receiving the under voltage warning release signal the torque limit value is controlled within the servo unit accordin...

Page 72: ...2 Pulse input form According to the pulse output form of the upper system the pulse input form of the servo unit is selected Enable operation Monitoring Un108 receiving pulses follow given changes Co...

Page 73: ...5 Pulse direction negative logic 6 CW CCW negative logic 3 Electronic gear ratio When the reduction ratio of the motor shaft and the load side is n m when the load shaft rotates by n revolutions when...

Page 74: ...on Clearance The deviation clear signal CLR is the input signal to clear the servo unit deviation counter 1 Clear signal wiring Deviation clear signal wiring can be divided into linear driver output a...

Page 75: ...viation clearing method selection Depending on the status of the servo unit you can choose when to clear the position deviation Set the deviation clearing method by Pn273 Function code Parameter Range...

Page 76: ...actions after the positioning is completed In this way the time required to complete the positioning can be shortened This signal is usually used in pair with the positioning completion signal Refer t...

Page 77: ...hat means the host device confirming positioning has been completed If the set value is too large the permanent positioning completion signal may be output when the deviation is small during low speed...

Page 78: ...r cause a position loss 1 Configuration of command pulse input magnification switching The signal is not configured in the factory default digital input configuration Therefore the pin number configur...

Page 79: ...enabled Pn211 Position command low pass filter time constant 0 655 0 ms 0x0211 After stop This parameter is used to set the time constant of the first order low pass filter corresponding to the positi...

Page 80: ...How to set the encoder frequency pulse output as follows Function code Parameter Range Default Unit Communication address When enabled Pn070 Encoder divider pulses 16 4194304 2048 0x0070 After restar...

Page 81: ...ed by the resolution of encoder The maximum output frequency of frequency division pulse of encoder shall not exceed 4MHz after 4 times frequency as shown in the table below Pulse Number of Encoder Fr...

Page 82: ...he frequency division pulse output 90 When forward B phase leads 90 90 When reversing phase A leads 90 A B C Time Time A B C PBO PBO PCO PCO GND Twisted pair 220 470 Using a linear receiver SN 75 ALS1...

Page 83: ...e speed command is given according to the voltage of V REF CN1 5 CN1 6 and the set value of analog speed command gain Pn300 Enable operation Monitoring Un103 receiving speed follows given changes Conn...

Page 84: ...02 Immediately The function could be set to smooth the speed command when one delay filter is applied to the analog speed command V REF input and it does not usually need to be changed If the set valu...

Page 85: ...g command offset Fn101 For details see Auxiliary Functions Input voltage range 0V 10V Setting range 1 5V 30V corresponding to rated speed Maximum input voltage 10V Rated Speed Motor speed r min 30 10...

Page 86: ...peed instruction SPD D SPD A SPD B OFF OFF OFF Positive 0 OFF ON Internal speed 1 Pn304 ON ON Internal speed 2 Pn305 ON OFF Internal speed 3 Pn306 ON OFF OFF Negative 0 OFF ON Internal speed 1 Pn304 O...

Page 87: ...herefore when used for speed control the host device does not build a position loop The servo motor is fixed within 1 pulse of the zero position fixing effective position Even if rotation occurs due t...

Page 88: ...p between zero fixed speed thresholds and zero fixed function is shown in the figure below 2 Zero fixed wiring The zero fixed signal is a universally configurable digital input See Sequence Input Circ...

Page 89: ...l V CMP is a signal that is output when the difference between the speed of the servo motor and the command speed is equal to or lowers than the set value of the speed coincidence range Pn320 Used whe...

Page 90: ...ol for details on the wiring related to the torque mode It is selected by control mode selection Pn000 2 The torque mode is divided into the internal torque command Pn400 0 and the analog torque comma...

Page 91: ...ding to the voltage connected to t ref cn1 9 cn1 10 and the set value of pn405 analog torque command gain Enable operation Monitoring Un102 receiving torque follows given changes Connect each part pro...

Page 92: ...0V exceeding this range may damage the drive Pn406 Analog torque command invertion 0 1 0 0x0406 Immediately Analog voltage corresponds to the polarity setting of the torque command 0 Positive polarity...

Page 93: ...ally adjusting using command offset Fn102 For details see Auxiliary Functions Input voltage range 0V 10V Setting range 1V 10V corresponding to rated torque Maximum output voltage 10V 100 Torque 10 3 1...

Page 94: ...Position mode Switch control mode via ON OFF of switch SPD A and SPD B 6 Internal speed Torque mode Switch control mode via ON OFF of switch SPD A and SPD B 7 Position Mode Analog speed Switch the co...

Page 95: ...ibution mode is parameter configuration Pn600 1 default parameter Through the ON OFF switching control mode of the control mode switching C SEL signal the signal is not configured in the factory defau...

Page 96: ...speed mode OFF Position mode Position mode Torque mode b Digital input signal distribution mode is parameter configuration Pn600 1 default parameter Digital input signal Pn000 Setting C SEL Parameter...

Page 97: ...als and command signals This signal is output under the following conditions The main circuit power is on For details on the output timing of S RDY during power on see Power up enable ON timing Non ha...

Page 98: ...ut signals The polarity of servo warning detection can be changed by setting the Digital output configuration as 0x07 0x107 3 Wiring of warning output signal The warning output signal is a general con...

Page 99: ...rake It is recommended to be more than 100ms to ensure that the electromagnetic brake is completely released when the command is input This time can be omitted when motor is not braked Position speed...

Page 100: ...osed loop system Because of the position detection device the position control accuracy of the closed loop feed system mainly depends on the resolution and accuracy of the detection device grating rul...

Page 101: ...Torque control Chapter Pn002 Motor rotation direction selection 3 2 Pn250 Application of external encoder in full closed loop control 3 2 Pn253 Resolution of external grating ruler 3 3 Pn204 Pn206 El...

Page 102: ...50 Application of external encoder in full closed loop control 1 3 Pn002 Motor rotation direction 0 Command direction FWD command Reverse command FWD command Reverse command Motor rotation direction C...

Page 103: ...anually rotate the motor shaft along the CCW direction 3 When the full closed loop feedback pulse counter counts positively Un012 or the servo monitoring parameter Un007 feedback pulse counter and Un0...

Page 104: ...68 Pulse r 0x0253 After Restart Set the pitch value feedback pulse number of external grating ruler when the motor shaft rotates for 1 turn 5 8 6 Setting of frequency division pulse output signal of g...

Page 105: ...ation method of electronic gear ratio setting value Semi closed loop control When the machine deceleration ratio of motor shaft and load side is n M when the motor rotates m turns the load shaft rotat...

Page 106: ...the segment number of serial conversion unit or linear encoder The servo unit controls the servo motor in the unit of feedback pulse 5 8 8 Setting example of electronic gear ratio The grating ruler p...

Page 107: ...the set value is exceeded output Er d10 alarm of excessive deviation between motor and load position Pn257 Detection value of excessive deviation between motor and load position Postion mode Setting r...

Page 108: ...factory setting value is 20 the second turn starts from the deviation after 1 revolution of the motor multiplied by 0 8 Related parameter Pn252 Deviation coefficient between motor and external encode...

Page 109: ...lter friction compensation rotation inertia and so on These paramenters would influence with each other so you must take the balance among all paramenters into the consideration while setting The fact...

Page 110: ...overtravel and you could refer to the servo enable and overtravel setting if you want more details Smart settings adjustment via no instructions Is the adjustment result satisfactory Adjust with robus...

Page 111: ...ceeds the tracking ability of the motor the follow up hysteresis will become large resulting in the positional deviation not satisfying the above relation Please reduce the acceleration and decelerati...

Page 112: ...nditions and notes Vibration detection value initialization Fn105 Yes Robust control is invalid in operation and it turns to be valid when the operation is over Bandwidth setting Fn303 No EasyFFT Fn40...

Page 113: ...set to Auto adjust without auxiliary function Function code Parameter Range Default Unit Communication address When enabled Pn151 Notch filter 2 automatic adjustment selection 0x00 0x01 1 0x0151 Imme...

Page 114: ...n 1 changeable Acceleration 20000min 1 s changeable Travel distance Maximum 2 5 turns changeable 6 3 2 Steps The inertia recognition function can only be identified by the PC debugging software VCSDso...

Page 115: ...adjusting the running command from the host control system The command intelligent setting can also be used for additional adjustments after the no command intelligent setting When the correct inerti...

Page 116: ...ent settings will not be performed properly Please use the bandwidth setting see Bandwidth setting for details The motor is power ON servo ON in position control with command intelligent setting When...

Page 117: ...an effectively suppress the continuous vibration of about 100Hz 1000 Hz that occurs when the control gain is increased 0x1 Automatically set IF vibration suppression frequency through intelligent sett...

Page 118: ...ecome invalid According to the system configuration if you want to use Speed feedback V REF input Torque feedforward T REF input and model tracking control from the upper device at the same time set P...

Page 119: ...inputting a speed command or a position command from the host device and manually adjusting the running speed By adjusting one or two values with the bandwidth setting the relevant servo gain setting...

Page 120: ...omatically setting Please set the corresponding function switch to No adjust automatically before you don t want to change its value through the bandwidth setting Function code Parameter Range Default...

Page 121: ...nd torque feedforward T REF input will be invalid According to the system configuration if you want to use V REF input Torque feed forward T REF input and model tracking control from the host device a...

Page 122: ...setting 6 6 1 Servo Gain Please adjust each servo gain one by one after fully understanding the composition and characteristics of the servo units if the servo gain needs to be adjusted manually In m...

Page 123: ...all inputs the speed loop contains integral elements Since the integral element is a delay element for the servo system when the time parameter is set too large overshoot may occur or the positioning...

Page 124: ...y switches By using the gain switching function it could increase the gain and shorten the positioning time during positioning and it could reduce the gain and suppress the vibration when the motor st...

Page 125: ...d in the factory default digital configuration Therefore the pin number configuration 0x0E needs to be configurated by parameters Pn601 Pn609 Switching gain Speed loop gain Speed loop integration time...

Page 126: ...switch to the 1st gain Auto switching gain is only valid in position control The switching conditions are performed by the following settings Switching logic parameter Switching conditions Switching g...

Page 127: ...orten the positioning time This function is effective when the servo unit performs position control Note When the feedforward command is too large position overshooting will occur Please check the res...

Page 128: ...T REF assignment 0 1 0 0x0124 After restart Torque feedforward is a function to shorten the positioning time Torque feedforward can be selected to given by external analog T REF 0 None 1 T REF as a t...

Page 129: ...switch 0x00 0x04 0 0x0131 Immediately The mode switch is a function that automatically performs P control and PI control switching Setting the switching condition by this parameter and satisfying the...

Page 130: ...ontrol When the switching condition of the mode switch is set as torque command factory default if the torque command exceeds the torque set in Pn132 the speed loop will be switched to P control The f...

Page 131: ...P PI P PI 0 When the switching condition of the mode switch is set as the position deviation if the position deviation exceeds the value set in Pn135 the speed loop will be switched to P control This...

Page 132: ...Current offset manual adjustment Fn 105 Initialize the detected value of the vibration detection Fn 303 Bandwidth setting Fn 401 Easy FFT Fn 402 Online vibration monitoring 7 2 Alarm Records Display...

Page 133: ...alarm Alarm record display Old alarm Any interface MODE SET Long press DATA SHIFT Low alarm recording time UP previous code DOWN next code Long press DATA SHIFT Short press DATA SHIFT Alarm recording...

Page 134: ...ical vibration Parameter Pn500 Pn310 Pn311 set the Jog speed acceleration and deceleration time default Jog speed is 500rpm Software reset Auxiliary function Enter reset Any interface MODE SET Reset c...

Page 135: ...ss than the max speed the actual deceleration time is calculated in proportion 7 6 2 Operating Procedure 7 7 Program JOG Operation Fn006 7 7 1 Overview Program JOG operation is a function that continu...

Page 136: ...Auxiliary function Program JOG preparation Any interface MODE SET UP Long press DATA SHIFT Enabled ON MODE SET UP DOWN in the setting direction working process Program JOG preparation JOG MODE SET Lon...

Page 137: ...is a method of directly input the torque command offset Manual adjustments are used for the following occasions When you need to set an offset When confirming the offset set by automatic adjustment Au...

Page 138: ...adjustment Fn103 is executed Auxiliary function Auxiliary function Enter offset manual adjustment Any interface MODE SET Adjust the interface Long press DATA SHIFT Long press DATA SHIFT Auxiliary func...

Page 139: ...mal operating conditions Set the servo action after vibration is detected 0 No vibration detection 1 Warning after vibration is detected 2 Alarming after vibration is detected Pn186 Vibration detectio...

Page 140: ...ary according to different mechanical conditions 7 13 2 Operating Procedure 7 14 Bandwidth Settings Fn303 7 14 1 Overview For detailed description of this function see 6 5 Bandwidth Settings Vibration...

Page 141: ...this function after the servo is turned off Bandwidth setting Auxiliary function Tuning mode Any interface MODE SET Gain adjustment Long press DATA SHIFT UP Long press DATA SHIFT UP DOWN Gain setting...

Page 142: ...set When using the PC debugging software to adjust it is recommended to perform the smart setting or bandwidth setting Generally no manual operation is required Only when the PC debugging software is...

Page 143: ...on signal when selecting the home position signal source you need to select the forward or reverse rising edge of the home position signal source as the home position signal as shown in the figure 1 b...

Page 144: ...ecimal coded value Coding table of 35 home position return methods Home position return methods bit 0 bit 1 bit2 bit 3 bit 4 bit 5 bit 6 bit 7 bit 8 Hexadecimal coded value Home position return method...

Page 145: ...rising edge of HomTrig could trigger the home return The input function definition of SI terminal related to home return is shown in Table 2 1 below Table 2 1 SI terminal input function definition SI...

Page 146: ...s of SI terminals related to point functions are shown in Table 2 3 below SI Terminal Name SI Terminal Function Code Function Description PosTrig 0x16 Point trigger function valid on rising edge PosBi...

Page 147: ...the servo drive is enabled If the servo is not enabled the home position return is invalid 8 2 Home position return function code Pn899 Home position return method selection Address 0x899 Factory defa...

Page 148: ...3 below Pn802 Zero point offset pulse value Address 0x802 Factory default 0 Setting range 2147483648 2147483648 unit command unit Control mode P Parameter description The pulse offset value that needs...

Page 149: ...for the falling edge of reverse limit at low speed forward direction search for Z pulse in forward direction 1 a H H L Motor Reverse limit Forward direction Limit signal Z pulse Running route Home po...

Page 150: ...e falling edge of forward limit at low speed reverse direction search for Z pulse in reverse direction 2 a H L H Motor Limit switch Limit signal Z pulse Running route Home position return method 2 a b...

Page 151: ...ition signal at low speed reverse direction search for Z pulse in reverse direction Home position return method 3 a b Start the home position return Home position signal ON Search for the falling edge...

Page 152: ...n at low speed forward direction search for Z pulse in forward direction 4 a H L H L Motor Home position signal Forward direction Home position signal Z pulse Running route Home position return method...

Page 153: ...tion at low speed forward direction search for Z pulse in forward direction 5 a H L H Motor Home position signal Forward direction Home position signal Z pulse Running route Home position return metho...

Page 154: ...t low speed reverse direction Search for the Z pulse in reverse direction Home position signal Forward direction 6 a Home position signal Z pulse Running route Motor H L H L Home position return metho...

Page 155: ...ction Search for the Z pulse in reverse direction Motor Home position signal Forward direction 7 a Home position signal Z pulse Running route Limit signal Limit signal H H L Home position return metho...

Page 156: ...verse direction Motor Home position signal Forward direction 7 c Home position signal Z pulse Running route Limit signal Limit signal H L H L H Home position return method 7 c Home position return met...

Page 157: ...Z pulse Running route Limit signal Limit signal L L H Home position return method 8 b c Start the home position return Home position OFF Search for the rising edge of home position at high speed forw...

Page 158: ...on Motor Home position signal Forward direction 9 a Home position signal Z pulse Running route Limit signal Limit signal H L H Home position return method 9 a b Start the home position return Home pos...

Page 159: ...rse direction Motor Home position signal Forward direction 9 c Home position signal Z pulse Running route Limit signal Limit signal H H L H L Home position return method 9 c Home position return metho...

Page 160: ...Forward direction 10 b Home position signal Z pulse Running route Limit signal Limit signal H L H L Home position return method 10 b c Start the home position return Home position OFF Search for the...

Page 161: ...ion Search for the Z pulse in forward direction Home position signal Forward direction 11 a Home position signal Z pulse Running route Limit signal Limit signal Motor H H L Home position return method...

Page 162: ...Forward direction 11 c Home position signal Z pulse Running route Limit signal Limit signal Motor H H H L L Home position return method 11 c Home position return method 12 a Start the home position re...

Page 163: ...nning route Limit signal Limit signal Motor L H L Home position return method 12 b c Start the home position return Home position signal OFF Search for the rising edge of home position at high speed r...

Page 164: ...Home position signal Forward direction 13 a Home position signal Z pulse Running route Limit signal Limit signal Motor H L H Home position return method 13 a b Start the home position return Home pos...

Page 165: ...orward direction 13 c H H L L H Home position signal Z pulse Limit signal Home position signal Forward direction Running route Limit signal Motor Home position return method 13 c Home position return...

Page 166: ...ignal Forward direction Running route Limit signal Motor Home position return method 14 b c Start the home position return Home position signal OFF Search for the falling edge of home position at high...

Page 167: ...n CIA402 Home position return method 16 Reserved Home position return method 17 a Start the home position return Search for the reverse limit at high speed reverse direction Touch the rising edge of r...

Page 168: ...eed reverse direction Home position return method 18 a b Start the home position return Forward limit valid Stop after searching for the falling edge of forward limit at low speed reverse direction Ho...

Page 169: ...irection Home position return method 19 b Home position return method 20 a Start the home position return Home position signal OFF Search for the rising edge of home position at high speed forward dir...

Page 170: ...p after searching for the rising edge of home position at low speed forward direction Home position return method 20 b Home position return method 21 a Start the home position return Home position sig...

Page 171: ...osition return method 21 b Home position return method 22 a Start the home position return Home position signal OFF Search for the rising edge of home position at high speed reverse direction Decelera...

Page 172: ...ling edge of home position at low speed reverse direction 23 a H L Home position signal Limit signal Home position signal Forward direction Running route Limit signal Motor Home position return method...

Page 173: ...speed reverse direction 23 c H L H L Home position signal Limit signal Home position signal Forward direction Running route Limit signal Motor Home position return method 23 c Home position return met...

Page 174: ...Limit signal Motor Home position signal Limit signal Home position return method 24 b c Start the home position return Home position OFF Search for the rising edge of home position at high speed forw...

Page 175: ...direction 25 a H L Home position signal Forward direction Running route Limit signal Motor Home position signal Limit signal Home position return method 25 a b Start the home position return Home pos...

Page 176: ...peed reverse direction 25 c H H L L Home position signal Forward direction Running route Limit signal Motor Home position signal Limit signal Home position return method 25 c Home position return meth...

Page 177: ...osition signal Forward direction Running route Limit signal Motor Home position signal Limit signal Home position return method 26 b c Start the home position return Home position OFF Search for the f...

Page 178: ...ling edge of home position at low speed forward direction 27 a H L Home position signal Forward direction Running route Limit signal Motor Home position signal Limit signal Home position return method...

Page 179: ...L Home position signal Forward direction Running route Limit signal Motor Home position signal Limit signal Home position return method 27 c Home position return method 28 a Start the home position re...

Page 180: ...it signal Motor Home position signal Limit signal Home position return method 28 b c Start the home position return Home position signal OFF Search for the rising edge of home position at high speed r...

Page 181: ...orward direction 29 a H L Home position signal Forward direction Running route Limit signal Motor Home position signal Limit signal Home position return method 29 a b Start the home position return Ho...

Page 182: ...ed forward direction 29 c H H L L Home position signal Forward direction Running route Limit signal Motor Home position signal Limit signal Home position return method 29 c Home position return method...

Page 183: ...ection Stop after searching for the falling edge of home position at low speed reverse direction Home position return method 30 b c Start the home position return Home position signal OFF Search for t...

Page 184: ...ion return method 32 6098 00h 32 Reserved Home position return method 33 6098 00h 33 Start the home position return Find the first Z pulse in the reverse direction Home position return method 33 Home...

Page 185: ...ddress 0x208 Default 0 Setting range 0x0000 0x0001 Unit N A Control mode P Parameter description internal and external position command selection The point control function is the internal position mo...

Page 186: ...I terminal 9 2 1 Position command trigger select stop Position command trigger select and stop can be realized in two ways The first method is to use the external input terminal DI terminal to realize...

Page 187: ...POS0 POS3 position command selection PosStop position command stopp PosTrig position command trigger can be realized by DI terminal defined as follows Position DI function DI function code number Pos...

Page 188: ...keypad mode If the internal position command mode of Pr is selected while the servo is enabled when the value of Pn898 is set to between 1 and 31 the corresponding Pr position command segment will be...

Page 189: ...r 16 bits define the speed acceleration deceleration and delay time of the Pr position command The function code from Pn880 to Pn897 defines the acceleration deceleration time positioning speed and de...

Page 190: ...l mode 3 Jump mode Single segment multi segment description The single segment position command indicates that the next position command is no longer executed after the current position command is exe...

Page 191: ...ingle segment multi segment position instruction is executed as shown below Speed mode description If the current position command segment is given the speed mode when the position command is planned...

Page 192: ...e TargetPos PosAbs 2 Relative position command The motor running target position value is the current actual position value plus the given relative position value TargetPos PosFdb PosRel 3 Incremental...

Page 193: ...e current position command is completed The plug in function is shown below Interrupt operation Uninterrupted operation Note The interrupt function is valid after the Pr command is set and the interru...

Page 194: ...k and the multi segment position delay time becomes 0 after the overlap function is turned on The multi segment position overlap function is shown below T time POS_T Trigger pulse Rising edge Rising e...

Page 195: ...leration time selects the time defined by Pn886 Invalid 7 Acceleration time selects the time defined by Pn887 Acceleration time selects the time defined by Pn887 Invalid Function code F part function...

Page 196: ...1 Delay time selects the value defined by Pn891 Invalid 2 Delay time selects the value defined by Pn892 Delay time selects the value defined by Pn892 Invalid 3 Delay time selects the value defined by...

Page 197: ...ti segment position acceleration deceleration time are defined Control the actual internal multi segment position according to the part E of the position of the control command multi segment word high...

Page 198: ...7 Default 800 Setting range 0 60000 Unit ms Control mode P Same as Pn881 Pn888 Internal multi segment position speed value selection 0 Communication address 0x888 Default 100 Setting range 0 6000 Unit...

Page 199: ...e 0 6000 Unit rpm Control mode P Same as Pn888 Pn88F Internal multi segment position speed value selection 7 Communication address 0x88F Factory value 3000 Setting range 0 6000 Unit rpm Control mode P...

Page 200: ...ti segment position delay time selection 3 Communication address 0x893 Default 10 Setting range 0 60000 Unit 0 1s Control mode P Same as Pn890 Pn894 Internal multi segment position delay time selectio...

Page 201: ...n is clear and the target position value is independent of the actual position The reference point for the incremental position is the position command value The incremental position operation mode is...

Page 202: ...relative to absolute zero As shown below As shown in the figure above the first position command setting value is PosCmd0 After the pulse of Pos0 is run the operation ends and the remaining PosRem0 p...

Page 203: ...tor reaches the position of Pos0 accurately it is necessary to re plan the deceleration time to ensure that the motor finally runs to the Pos0 position 9 3 3 Point Control Speed and Delay Time The poi...

Page 204: ...he previous position command operation and immediately execute the newly inserted position command Run according to the newly inserted position command target position Incremental position into a posi...

Page 205: ...value of the previous segment is ignored and a position is directly run based on the current actual position As shown in the figure above the position equivalent to the Rem area is ignored 9 4 3 Abso...

Page 206: ...nd During the operation the new position command is triggered through the PosTirg function and the newly triggered position command is temporarily stored After the previous Pr command is completed the...

Page 207: ...n value is executed The fourth and fifth position command values of the multi segment position command series will no longer be executed 9 4 5 Overlapping Storage Function When the previous position c...

Page 208: ...storage diagram As shown in the figure above during the execution of the first position command there is a stored position waiting to be executed When the first position is executed a new position co...

Page 209: ...l be compensated to run on the next position command and there will be no pulse loss problem 9 6 Stop Function During the operation of internal multi segment position control PosStop can be used to tr...

Page 210: ...f the command is completed and the remaining pulse can be run by sending an incremental position command with an incremental position of 0 if the next position command is an absolute position command...

Page 211: ...ram is shown below Interrupt jump function As shown in the figure above there are two command segments 1 and 2 that are executed sequentially When multiple segments of command1 are currently being exe...

Page 212: ...al jog function code is shown in the following table Pn500 Jog speed Communication address 0x500 Default 500 Setting range 0 1000 Unit rpm Control mode P S Parameter description Jog speed setting Unit...

Page 213: ...N Reverse jog ON ON Not executed jog As shown in the above table the relationship between Forward Jog and Reverse Jog is exclusive OR That is if only one terminal of Reverse Jog is valid the Jog can b...

Page 214: ...Mode Switch control mode via ON OFF of switch SPD A and SPD B 7 7 Position Mode Analog Speed ON OFF switching control mode by C SEL signal switching 8 8 Position mode Torque mode ON OFF switching con...

Page 215: ...are off at the same time setting this parameter can change the time from the brake BK signal OFF to the actual non power input status of the motor Note The brake delay time is slightly different When...

Page 216: ...atus within 4 9 seconds after the driver is powered on reset and the undervoltage alarm Er 830 will be reported when the undervoltage Over time will not be detected 1 Set the low battery voltage as a...

Page 217: ...under voltage warning signal releases the torque limit value is controlled within the servo unit according to the setting time For details see Torque limit when the main circuit under voltage Pn050 T...

Page 218: ...Bit0 of Pn085 is forced to be 1 1 During power on and start the value Bit0 of Pn085 is not forced to be 1 Panel keypad operation setting 00 Modify the data power off and store it in EEPROM After servo...

Page 219: ...102 Immediately In order to respond to small input the speed loop contains integral elements Since this integral element is a delay factor for the servo system when the time parameter is set too large...

Page 220: ...loop to the gain of the 2nd position loop in a straight line within the switching transition time Pn113 Gain switching transition time 2 0 65535 0 ms 0x0113 Immediately Starting from the time when th...

Page 221: ...ternal torque command 1 Conditioned by speed instruction 2 Conditioned by acceleration 3 Conditioned by position deviation pulse 4 No mode switch function Pn132 Speed loop P PI switching condition tor...

Page 222: ...auxiliary functions Pn151 Notch filter 2 automatic adjustment selection 0x00 0x01 1 0x0151 Immediately 0 Automatic adjustment without auxiliary functions 1 Automatic adjustment through auxiliary func...

Page 223: ...tting it too small will increase the vibration Pn160 Disturbance compensation function selection 0x00 0x01 0 0x0160 Immediately 0 Not use 1 Use Pn161 Disturbance observer cutoff frequency 1 1000 150 0...

Page 224: ...imum load value of robust control 0 500 0 0x0178 Immediately Set the robust control load factor The larger the value is set the faster the system responds but it will be noisier When the inertia is la...

Page 225: ...6 CW CCW negative Logic Pn202 Pulse input direction negation 0 1 0 0x0202 After restart Select the negation of pulse input direction 0 Positive 1 Negative Pn203 Command pulse input magnification 1 10...

Page 226: ...nd low pass filter time constant 0 655 0 ms 0x0211 Cease to take effect This parameter is used to set the time constant of the first order low pass filter corresponding to the position command and it...

Page 227: ...7 Immediately This parameter is used to set the frequency of low frequency vibration suppression 2 Pn238 Low frequency Vibration Suppression 2 Correction 10 1000 100 0x0238 Immediately This parameter...

Page 228: ...ntrol attenuation coefficient 50 200 100 0 0x0247 Immediately Use 2nd gain when model tracking is valid Pn249 Speed feedforward torque feedforward selection 0x00 0x01 0 0x0249 Immediately 0 Do not use...

Page 229: ...n the time required for the positioning to complete the operation The signal will be output when the difference between the command pulse number of the host device and the servo motor movement positio...

Page 230: ...lear mode of the switch position deviation clear signal CLR 0 Clear when level is ON 1 Clear when the rising edge OFF ON 2 Clear when level is OFF 3 Clear when the falling edge ON OFF 4 Position devia...

Page 231: ...mmediately In the analog speed control even if the input command is 0V the servo motor may rotate at a slight speed This is because there is a slight deviation in the commands inside the servo unit Th...

Page 232: ...ameter Range Default Unit Communication address When enabled Pn400 Torque command selection 0 1 1 0x0400 Immediately Select the torque control command source 0 Internal setting 1 Analog input Pn401 To...

Page 233: ...in the command inside the servo unit This error can be eliminated by setting an appropriate analog torque command deadband range Pn410 Internal torque command in torque control 500 500 0 0x0410 Immed...

Page 234: ...ing distance 1 1073741824 32768 command unit 0x0503 Immediately Set the JOG movement distance of the running program as the command unit Pn505 Program JOG acceleration deceleration time 2 10000 100 ms...

Page 235: ...4 Alarm clear 0x104 Alarm clear negation 0x05 Manual P PI control 0x105 Manual P PI control negation 0x06 Torque limit switch 0x106 Torque limit switch negation 0x07 Reserved 0x107 Reserved 0x08 Inter...

Page 236: ...0x07 Reserved 0x107 Reserved 0x08 Internal speed command direction selection 0x108 Internal speed command direction selection negation 0x09 Internal speed command selection A 0x109 Internal speed comm...

Page 237: ...x05 In speed limit 0x105 The signal in speed limit negation 0x06 Brake chain 0x106 Brake chain signal negation 0x07 Warning 0x107 Warning signal negation 0x08 Positioning proximity signal 0x108 Positi...

Page 238: ...x01 0 0x0732 After restart Set no motor test function encoder type 0 Incremental encoder 1 Absolute encoder Pn792 Absolute encoder operation 0 2 0 0x0792 After restart 0 No action 1 Write motor parame...

Page 239: ...tion address When enabled Pn800 Home position return control word 0 0xFFFFFFFF 0x0 0x0800 Immediately Home position return control word mode setting see Chapter 8 for details Pn802 Zero position offse...

Page 240: ...0x0 0x0818 Immediately Same as Pn804 Pn81A Pr6 pulse number 2147483648 2147483647 0 command unit 0x081A Immediately Set the position of the 6th segment Pn81C Pr7 control word 0 0x80000000 0x0 0x081C...

Page 241: ...0x0 0x0830 Immediately Same as Pn804 Pn832 Pr12 pulse number 2147483648 2147483647 0 command unit 0x0832 Immediately Set the position of the 12th segment Pn834 Pr13 control word 0 0x80000000 0x0 0x083...

Page 242: ...0848 Immediately Same as Pn804 Pn84A Pr18 pulse number 2147483648 2147483647 0 command unit 0x084A Immediately Set the position of the 18th segment Pn84C Pr19 control word 0 0x80000000 0x0 0x084C Imme...

Page 243: ...Like Pn804 Pn866 Pr25 pulse number 2147483648 2147483647 0 Unit 0x0866 Immediately 25th position setting Pn868 Pr26 control word 0 0x80000000 0x0 0x0868 Immediately Like Pn804 Pn86A Pr26 pulse number...

Page 244: ...ime setting 2 Pn883 Pr Acc and dec time 3 0 60000 400 ms 0x0883 Immediately Acc and dec time setting 3 Pn884 Pr Acc and dec time4 0 60000 500 ms 0x0884 Immediately Acc and dec time setting 4 Pn885 Pr...

Page 245: ...0x088F Immediately target speed 7 setting Pn890 Pr delay time0 0 6000 0 0 1s 0x0890 Immediately Delay time0 setting Pn891 Pr delay time 1 0 6000 1 0 1s 0x0891 Immediately Delay time 1 setting Pn892 Pr...

Page 246: ...Unit 0xE006 Displays the number of command pulses received by the servo motor Un007 Counter of feedback pulse 0x80000000 0x7fffffff Command Unit 0xE007 Displays cumulative pulses fed back from the ser...

Page 247: ...FFFF 0xE00F Un035 DSP software version 0 0xFFFF 0xE035 Un036 FPGA software version 0 0xFFFF 0xE036 Un087 Encoder communication abnormal times 0 0xFFFF 0xE087 Un089 Heat sink temperature 0 0xFFFF 0xE09...

Page 248: ...ge 0 0xFFFF V 0xE140 Un141 Effective current feedback 0 0xFFFF 0 01A 0xE141 Three phase synthetic feedback current effective value Un14B D axis current command monitoring 0 0xFFFF 0xE14B Un220 Torque...

Page 249: ...communication abnormalities when an alarm occurs 0 0xFFFF 0xE30F Un320 Fault code history 1 0 0xFFFF 0xE320 Un321 Fault code history 2 0 0xFFFF 0xE321 Un322 Fault code history 3 0 0xFFFF 0xE322 Un323...

Page 250: ...ion in main circuit 1 Servo driver fails replace the servo driver Er 040 Abnormal parameter setting 1 Check whether the changed parameters are out of range 2 Check if the setting of electronic gear ra...

Page 251: ...cord correctly Er 400 Over voltage 1 When the power supply voltage is not enabled measure the power supply voltage at the same time monitor whether the bus voltage Un140 is 1 414 times of the input po...

Page 252: ...or not Er 720 Overload continuous maximum load 1 Check whether there is any problem in the motor wiring phase sequence and connection and encoder wiring 2 consider the operating conditions and load an...

Page 253: ...re normal 3 Re connect the servo drive power if an alarm still occurs it may be a servo drive failure Er C90 Encoder communication failure line broken 1 Use multimeter to test every signal line of the...

Page 254: ...vo ON Set correct excessive position deviation value during servo ON AL 91 0 Overload warning 1 Check if there is any problem of the motor wiring and encoder wiring 2 Incorrect motor or driver selecti...

Page 255: ...ame content includes slave address or broadcast address execution commands data and error check The response of the slave is also the same structure including action confirmation return data and error...

Page 256: ...ith the previous message in less than 3 5 character times the receiving device will consider it a continuation of the previous message If the above two situations occur during the transmission the CRC...

Page 257: ...nd information START T1 T2 T3 T4 3 5 bytes of transmission time ADDR 01H CMD 10H Write data address high 01H Write data address low 00H The number of data is high in word 00H Number of data status cal...

Page 258: ...cludes a frame error detection field calculated based on the CRC method The CRC field detects the contents of the entire frame The CRC field is two bytes and contains a 16 bit binary value It is calcu...

Page 259: ...n After the master application responds with an objection the typical process is to resend the message or make a command change for the corresponding failure Modbus exception code Code name Meaning 01...

Page 260: ...vo product debugging 4 Verify that the Use FIPS compliant algorithms for encryption option is set to disabled Control Panel Administrative Tools Local Security Policy Security Options Use FIPS complia...

Page 261: ...ts Tools parameter settings real time monitoring digital oscilloscope fault information screenshots and other functions Advanced applications inertia identification JOG program JOG homing mechanical c...

Page 262: ...open exit etc 2 Turn on Open function open the existing file Step Click the menu bar File Open Select the current system directory folder Test32 Select VCDGSmsyc vcb file 3 Exit Exit function Close t...

Page 263: ...nt parameter pages are added to facilitate viewing of function codes iii function code The function code is a specific function and provides relevant information such as the current state name current...

Page 264: ...te import Function code writing can be individually written Step a write individually select a function code click on the column corresponding to the current value click twice in succession it may ent...

Page 265: ...out the modified parameters to facilitate user analysis Step Click on the toolbar icon to find out the modified parameters At the same time the pop up dialog box will display the progress in the form...

Page 266: ...export of monitoring parameters is a way to output and save the monitoring parameters which can facilitate the customer to save the monitored parameters Step a Check the monitored parameters If you wa...

Page 267: ...rward rotation click Reverse and the motor will perform reverse rotation 14 5 2 Inertia Identification The inertia Identification function allows the servo unit to perform automatic operation forward...

Page 268: ...arameters according to the actual situation usually keep the default and click Next Write Next Enable Forward Reverse After the forward rotation is repeated three times the final inertia identificatio...

Page 269: ...cess and then click on Next to enter the parameter adjustment interface and set related parameters as required The detailed interface is as shown in the figure below b After setting the corresponding...

Page 270: ...ment interface and adjust the corresponding parameters according to the actual situation as shown in the following figure b Click Next Write Next Enable Forward Enable Reverse Next Complete to enter t...

Page 271: ...ter effectively removes high frequency vibrations and noise Step a Click on to enter the FFT measurement interface Set the command amplitude and rotation direction in the measurement conditions Click...

Page 272: ...enter the single parameter adjustment prompt interface click on Next to enter the parameter adjustment interface select the organization selection according to the actual situation and select the des...

Page 273: ...equency After the tuning is completed click on Next to enter the auto tuning completion interface and click on Finish to complete the single parameter adjustment operation 14 5 7 Offset Adjustment Off...

Page 274: ...5 9 Soft Reset Same as Power on again The function could reset the servo unit from the inside by software Used to re power on or reset the alarm after changing the parameter setting It is also possibl...

Page 275: ...d clearing of fault information Click to display the following interface According to the above information the servo fault is repaired 14 6 Digital Oscilloscope Digital oscilloscopes collect data at...

Page 276: ...zoom in zoom out adaptive zero position dot line measurement and other functions ii Curve display area Different curves provide visual display and measurement results for display iii channel setting...

Page 277: ...nual Data channel I O channel iv Waveform display selection area It provides selection and display of desired waveforms v Digital display of measured value It provides display of current value effecti...

Page 278: ...record button to stop recording and the status of the icon changes to 14 6 2 Trigger Acquisition The trigger acquisition is based on the trigger condition and the acquisition cycle and makes the servo...

Page 279: ...e toolbar icon the graph will automatically display the two axes of the X axis and the upper right corner will automatically display the two axis values corresponding to the X axis cursor the differen...

Page 280: ...chnical Manual XY digital display There are multiple axes on the Y axis which can be selected according to the needs Through the measurement function the mouse will display the XY value of the current...

Page 281: ...Y axis scale display hide can be modified through the toolbar settings Steps a Click the top right corner of the oscilloscope interface and and in the Y axis option check the label visibility and scal...

Page 282: ...r to the lower right corner this area can be enlarged b Zoom out the area Press the left mouse button and pull a zone from the lower right corner to the upper left corner this area can be reduced c Zo...

Page 283: ...e bak format export is supported In addition the exported data can be imported for viewing Steps a Data import Click the digital oscilloscope toolbar icon to pop up the open dialog box and find the ex...

Page 284: ...enu window window vertical display 4 Close Click on the main window of the host computer menu bar Window Close all 14 7 2 Help It provides servo debugging software version and other information Steps...

Reviews: