background image

VECTRIX VX-2 SERVICE MANUAL 

Version 1.0/July 2011  

VECTRIX, LLC 


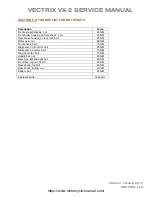
SECTION F-4: TORQUE LIST FOR BOLTS/NUTS


Description 

Force 

Front axle self locking, nut 

65 NM 

Front brake housing on front shock , bolt 

30 NM 

Rear brake housing on rear fork, bolt 

25 NM 

Motor axle, nut 

80 NM 

Front shock, bolt 

70 NM 

Brake disc on front rim, bolt 

25 NM 

Brake disc on motor, bolt 

15 NM 

Ring on motor, bolt 

15 NM 

Handle bar, nut 

50 NM 

Rear fork, left and right nut 

80 NM 

Front fork, top nut, 32mm 

60 NM 

Rear shock, top bolt 

45 NM 

Rear shock, bottom nut 

40 NM 

Battery, bolt 

25 NM 


All plastic parts 

16 kgf.cm 


https://www.motorcycle-manual.com/

Summary of Contents for VX-2

Page 1: ...VECTRIX VX 2 SERVICE MANUAL Version 1 0 July 2011 VECTRIX LLC www vectrix com service vectrix com https www motorcycle manual com...

Page 2: ...ide Emblem 13 Rear Fender Top 14 Side Cover Swing Arm Cover 15 Front Wheel 16 Front Brake Master Cylinder Line Caliper 17 Rear Brake Master Cylinder Line Caliper 18 Rear Shock 19 Rear Swing Arm Motor...

Page 3: ...eter Display Controller LED 2 Malfunctions 3 Check of Charger Function SECTION F Technical Information 1 Cable Assembly Front Brake Turn Indicators BOM 2 Cable Assembly Front Headlamp Horn BOM 3 Cable...

Page 4: ...mm Open wrench 17mm Open wrench 18mm Open wrench 19mm Open wrench 32mm Open wrench 45mm Special tool Motor Nut contact service vectrix com 42mm spanner socket with 22mm relief slot Torque wrench 0 20N...

Page 5: ...VECTRIX VX 2 SERVICE MANUAL Version 1 0 July 2011 VECTRIX LLC SECTION A 2 VX 2 MAJOR COMPONENTS IDENTIFICATION https www motorcycle manual com...

Page 6: ...re for the VX 2 MECHANICAL disassembly assembly Unless otherwise noted in each procedure assemble all parts in the reverse order in which they were taken apart If you have any questions regarding VX 2...

Page 7: ...therwise it drops down and could break To unplug the headlight assembly hold the front fairing and loosen all the connectors of the headlight To reassemble after unplugging the headlight assembly plea...

Page 8: ...screwdriver counter clockwise ccw left side and clockwise cw right side until the front cover snaps out From the rear of the assembly unscrew the four Phillips screws left and right position with a P...

Page 9: ...ON B 3 SPEEDOMETER COVER Preparations Disassemble Front Console Cover Wind Deflector see Section B 2 Unplug the connector from the base of the Speedometer Unscrew the left and right Phillips PH2 screw...

Page 10: ...fully pull back the cover slowly to the left Use your fingers to hold the cover and pull backward Slowly pull back the cover and remove Remark To assemble the Front Vertical Panel Cover Lower please m...

Page 11: ...ANEL COVER UPPER Preparations Disassemble Front Fairing see Section B 1 Disassemble Front Vertical Panel Cover Lower see Section B 4 Carefully remove Key Switch bezel using a Flathead screwdriver Key...

Page 12: ...VECTRIX VX 2 SERVICE MANUAL Version 1 0 July 2011 VECTRIX LLC Unscrew the six remaining PH2 Phillips screws to remove the upper Front Panel cover https www motorcycle manual com...

Page 13: ...e of the cover so that they can clear the frame Carefully move the cover forward until the cover can easily be removed Side view of the inner backside cover Remark For assembling the Center Step Throu...

Page 14: ...NUAL Version 1 0 July 2011 VECTRIX LLC SECTION B 7 FRONT FENDER Unscrew the four PH2 Phillips screws left and right side To unscrew the Phillips screws hold the inner nut with 8mm open wrench https ww...

Page 15: ...e Key Latch to raise the Seat Unscrew the two 8mm hex head screws Hold the seat during unscrewing the second screw Remove the seat Make sure the Seat Latch is in the Open position before checking that...

Page 16: ...PH2 Phillips screws in order as seen in the picture While loosening Screws 5 and 6 hold the Under Board otherwise it drops down and could break Remark When assembling the Under Board Belly Pan please...

Page 17: ...ations Disassemble Center Step Through Cover see Section B 6 Disassemble Under Board see Section B 9 Open the two screws 1 2 and the two screws for the side shields with PH2 screwdriver Same procedure...

Page 18: ...CROSSOVER REAR TAIL LIGHT ASSEMBLY Remove four PH2 screws 2 upper and 2 lower Carefully slide Crossover Tail Light Assembly back and upward to avoid breaking the side tab connector in the left and rig...

Page 19: ...ews and remove panel Repeat procedure for the other panel Carefully pull out left and right side until the cover can easily lift up Note Each Side Emblem is secured with two PH2 Phillips screws Remark...

Page 20: ...ly see Section B 10 Disassemble Side Body Panels Side Emblems see Section B 11 On the right side of the bike unplug connectors to the Left and Right Turn Indicators and License Plate Light assembly Un...

Page 21: ...2011 VECTRIX LLC SECTION B 14 SIDE COVER SWING ARM COVER Unscrew the four PH2 screws using a Phillips screwdriver Unscrew the three PH2 screws using a Phillips screwdriver 2 1 screw is covered by the...

Page 22: ...the two Hex fasteners 1 2 with open wrench 12mm and remove the brake Put the scooter on a motorcycle lift and elevate the scooter until the front wheel moves freely Unscrew the nut on the left side by...

Page 23: ...er see Section B 2 Disassemble Speedometer Cover see Section B 3 Disassemble Front Fender see Section B 7 Remove hex fastener of the hose clamp with 8mm open wrench Disassemble the front brake Now it...

Page 24: ...For assembling the Front Brake Master Cylinder Line Caliper please make sure the attachment points are in the correct position and no edge is protruding Insert the screws slightly and if all screws an...

Page 25: ...ent Procedure C 16 Unscrew the two inner hex bolts by using an Allen key 6mm Disassemble the rear brake Now it is possible to exchange the brake pads Remark It is not necessary to disassemble the side...

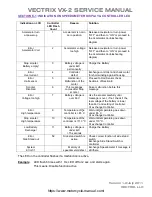
Page 26: ...the brake hose including the complete brake lever assembly through the frame Attention Do not open the brake system inside the scooter The brake fluid could damage the paint or other parts Move the br...

Page 27: ...n wrench 14mm Unscrew the bolt 2 by using a open wrench 13mm Unscrew the bolt 3 by using a open wrench 12mm and remove rear shock Remark For disassembling of the rear shock it is not necessary to remo...

Page 28: ...en wrench 10mm Remove the rear Mud Guard Unscrew the nut 1 by using a open wrench 10mm Unscrew the bolt 2 by using a open wrench 10mm and remove the bolt Remark It is not necessary to remove any cover...

Page 29: ...Speedometer Remove the two cross screws by using a Phillips screwdriver 2 and remove the complete Speedometer cover Remove all parts of the handlebar Left and right switch assembly Left and right brak...

Page 30: ...you have any questions regarding VX 2 Electrical disassembly assembly procedures please contact service vectrix com ICM LOCATION The Interface Control Module ICM is located in one of two locations on...

Page 31: ...B 3 Unscrew both nuts with 8mm open wrench Remove the plastic bracket Remark On the underside of the plastic bracket there are two plastic attachment points which fit into two holes of the plastic cov...

Page 32: ...mm Turned Full contact Hexagonal Socket S02445 Removal Procedure 1 Turn ignition key to the off position 2 Remove three screws 3 3 4 from the lower throttle box assembly 3 Lift the kill switch housing...

Page 33: ...er U Bolt nut and tighten both nuts 7 Twist the throttle to ensure free movement and that it returns to a neutral position 8 Using 8mm Hexagonal Socket S02445 install the kill switch cover onto the bo...

Page 34: ...eadings are the same 6 Remove the large rubber band or similar to release the left side brake lever 7 Slightly tighten the set screw this will secure the screw from moving 8 Install the right handleba...

Page 35: ...MANUAL Version 1 0 July 2011 VECTRIX LLC 6 Loosen the Throttle set screw 1 and remove the sensor magnet 2 Set Screw LOOKING INTO THE THROTTLE WITH THE HANDLEBAR ENDCAP REMOVED Magnet Holder https www...

Page 36: ...011 VECTRIX LLC 7 Remove the screws 1 and slide the insert and sensor out of the handlebar 8 Remove the sensor 1 from the insert 9 Mark and remove the sensor wires from the handlebar connector and rem...

Page 37: ...ocedure 1 Install the sensor wires through the handlebar and out the harness hole 2 Install the sensor wires into the connector in the same location as removed 3 Install the sensor 1 onto the insert 4...

Page 38: ...l the sensor magnet and screw in until lightly seated then back out 1 full turn 11 Check the adjustment of the Regen Throttle Refer to Throttle Position Checking Procedure 12 Install the right handleb...

Page 39: ...Connections 2 Open the Vectrix diagnostic program by clicking on the ScooterDiag icon This will open up the Scooter Diagnostics Summary page 3 Within the General Information box click on the Show Inst...

Page 40: ...see Section B 2 Remove Vertical Panel Cover Lower for ICM access for VIN all LYSE and LYSV40002B1000001 to LYSV40002B1000034 see Section B 4 Remove all cable ties 1 Remove connector from the Interface...

Page 41: ...2 Remove Vertical Panel Cover Lower for ICM access for VIN all LYSE and LYSV40002B1000001 to LYSV40002B1000034 see Section B 4 Remove all cable strips Open connector CN1 from the Interface Control Mo...

Page 42: ...2 Remove Vertical Panel Cover Lower for ICM access for VIN all LYSE and LYSV40002B1000001 to LYSV40002B1000034 see Section B 4 Remove all cable strips Open connector CN3 from the Interface Control Mo...

Page 43: ...l Cover Lower see Section B 4 Disassemble Vertical Panel Cover Upper see Section B 5 Remove all cable ties Open connector Unscrew the two fasten bolts of Key switch by 10mm socket wrench Test function...

Page 44: ...Fairing see Section B 1 Disassemble Front Console Cover see Section B 2 Disassemble Vertical Panel Cover Lower see Section B 4 Disassemble Vertical Panel Cover Upper see Section B 5 Open the connecto...

Page 45: ...P ASSEMBLY Preparations Disassemble Front Fairing see Section B 1 Headlamp Assembly Replacement Headlamp Assembly Part S XC S00092 Removal Procedure 1 Remove the right front fairing Refer to Front Fai...

Page 46: ...marker lamp bulb connector 5 Disconnect Headlamp Assembly connectors and replace with new Headlamp Assembly 6 Connect the headlamp and lower marker lamp connectors 7 Install the headlamp assembly ont...

Page 47: ...VECTRIX VX 2 SERVICE MANUAL Version 1 0 July 2011 VECTRIX LLC 9 If the headlamp assembly was replaced aim the headlamp Refer to Headlamp Adjustment Procedure https www motorcycle manual com...

Page 48: ...pins of the Turn Indicator Light Remark Procedure is the same for both Turn Indicator Lights Right and Left Unscrew the Nut from the inside with a wrench Remove entire Front Turn Signal Assembly and p...

Page 49: ...ION C 10 SIDE STAND SWITCH Preparations Disassemble Center Step Through Cover see Section B 6 Remove the connector inside of the electronic box under the seat Unscrew the bolt by 8mm open end wrench T...

Page 50: ...Tail Light Assembly see Section B 11 Remove all cable strips Open 3 pin connector Unscrew the two side screws and one middle screw with Phillips screwdriver Replace entire Tail Light Assembly Note The...

Page 51: ...N C 12 LICENSE PLATE LIGHT ASSEMBLY Unscrew the two PH2 Phillips screws Remove plastic cover Pull out the defect bulb Remark Don t touch the glass body of the new bulb with your fingers use a tissue T...

Page 52: ...onnector doesn t fit through the hole of the plastic Remove the nut with an open wrench 14mm Pull out the Rear Turn Indicator assembly Replace entire Rear Turn Indicator Assembly Note The Rear Turn In...

Page 53: ...Key Switch to ON Position Unplug blue Battery Main Connector Turn Key Switch to OFF Position Disconnect Positive Terminals first and remove Main Fuse 1 Then disconnect remaining Negative cables and wi...

Page 54: ...CTRIX LLC Install new Motor Controller and re secure with four Phillips bolts Reconnect Negative Cables and Wiring Harness first Then replace Main Fuse and Positive Cables next Reconnect the blue Batt...

Page 55: ...te This is the same procedure to replace the Rear Brake Rotor Open the seat and remove Cover of electronic box Turn Key Switch to ON Position Unplug blue Battery Main Connector Turn Key Switch to OFF...

Page 56: ...remove the cable clamp Pull out the motor cables from the electronic box Unscrew the motor nut with the Vectrix EM 90400 Special spanner socket Remove the motor rear wheel assembly in the direction o...

Page 57: ...Step Through Cover see Section B 6 Note Photos in this section show the electronic box removed which makes the procedure easier to complete but is not necessary if only the Step Through panel is remo...

Page 58: ...t up the Middle Battery 2 as shown and remove it Each battery typically weighs XXXX pounds XXXX kg Remark Batteries are fixed to the battery case with strong Velcro Move the batteries sideways to loos...

Page 59: ...RIX LLC Slide forward then lift up Rear Battery 4 and remove it Empty battery case for 60AH After replacing the Batteries Measure the voltage of each battery It should be higher than 12 0 VDC Charge t...

Page 60: ...11 VECTRIX LLC SECTION C 17 BATTERY CHARGER Put Key into key hole on the side of the VX 2 to open Under Seat Storage Area Turn Key to open Under Seat Storage Area Remove Battery Charger from Under Sea...

Page 61: ...ard blue Battery Charger female connection Plug Battery Charger AC connector into a AC main Turn on Battery Charger Unit power switch Recharge until Battery Charger Output LED reaches 100 Green Note R...

Page 62: ...rson is sitting on the driver s seat The scooter is in the vertical position Clean the headlamp before aiming Follow your state s requirements for headlamp aiming Headlamp Aiming Location The aiming a...

Page 63: ...f the headlamp center line 3 Adjusting the headlamp 1 To adjust the light beam up and down turn the right lower side adjustment screw Clockwise to raise the beam and counterclockwise to lower the beam...

Page 64: ...after Stop scooter Solve malfunction before this message Error Voltage too high 7 Battery voltage is over 63V Use the scooter carefully until message is over if not check if the real voltage of the b...

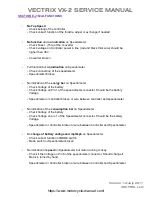
Page 65: ...on Pin 1 of the speedometer connector Should be the battery Voltage Speedometer or controller broken or wire between controller and speedometer No indication of the consumption bar on Speedometer Chec...

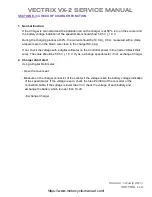
Page 66: ...ug If not check the voltage with a digital voltmeter on the Controller power in line red and black thick wire The value should be 59 5 V 1 0 V If yes exchange speedometer if not exchange Charger 2 Cha...

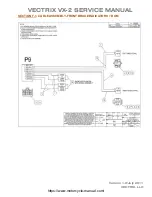
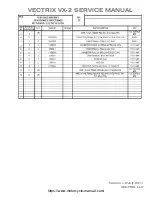
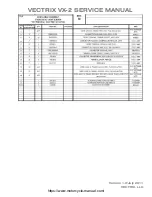
Page 67: ...VECTRIX VX 2 SERVICE MANUAL Version 1 0 July 2011 VECTRIX LLC SECTION F 1 CABLE ASSEMBLY FRONT BRAKE INDICATORS BOM https www motorcycle manual com...

Page 68: ...VECTRIX VX 2 SERVICE MANUAL Version 1 0 July 2011 VECTRIX LLC https www motorcycle manual com...

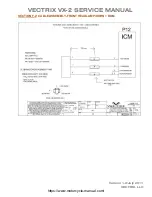
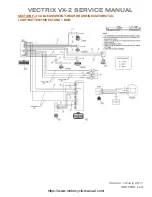
Page 69: ...VECTRIX VX 2 SERVICE MANUAL Version 1 0 July 2011 VECTRIX LLC SECTION F 2 CABLE ASSEMBLY FRONT HEADLAMP HORN BOM https www motorcycle manual com...

Page 70: ...VECTRIX VX 2 SERVICE MANUAL Version 1 0 July 2011 VECTRIX LLC https www motorcycle manual com...
Page 71: ...VECTRIX VX 2 SERVICE MANUAL Version 1 0 July 2011 VECTRIX LLC https www motorcycle manual com...
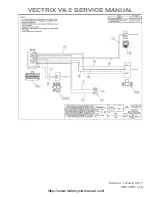
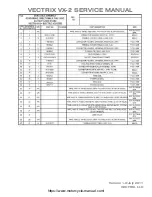
Page 72: ...VECTRIX VX 2 SERVICE MANUAL Version 1 0 July 2011 VECTRIX LLC SECTION F 3 CABLE ASSEMBLY REAR BRAKE INDICATORS TAIL LIGHT BATTERY SIDE STAND BOM https www motorcycle manual com...

Page 73: ...VECTRIX VX 2 SERVICE MANUAL Version 1 0 July 2011 VECTRIX LLC https www motorcycle manual com...
Page 74: ...Rear brake housing on rear fork bolt 25 NM Motor axle nut 80 NM Front shock bolt 70 NM Brake disc on front rim bolt 25 NM Brake disc on motor bolt 15 NM Ring on motor bolt 15 NM Handle bar nut 50 NM...

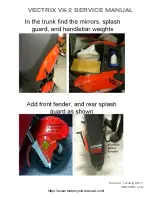
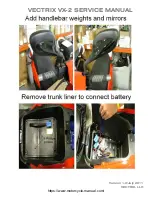
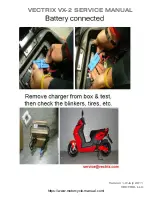
Page 75: ...VECTRIX VX 2 SERVICE MANUAL Version 1 0 July 2011 VECTRIX LLC SECTION G 1 UNPACKING INSTRUCTIONS https www motorcycle manual com...

Page 76: ...VECTRIX VX 2 SERVICE MANUAL Version 1 0 July 2011 VECTRIX LLC https www motorcycle manual com...
Page 77: ...VECTRIX VX 2 SERVICE MANUAL Version 1 0 July 2011 VECTRIX LLC https www motorcycle manual com...
Page 78: ...VECTRIX VX 2 SERVICE MANUAL Version 1 0 July 2011 VECTRIX LLC https www motorcycle manual com...
Reviews: