background image

Smart 1-Line

TM 

                      Instruction Manual Rev 1.01                           

www.utilityrelay.com


Page 12 


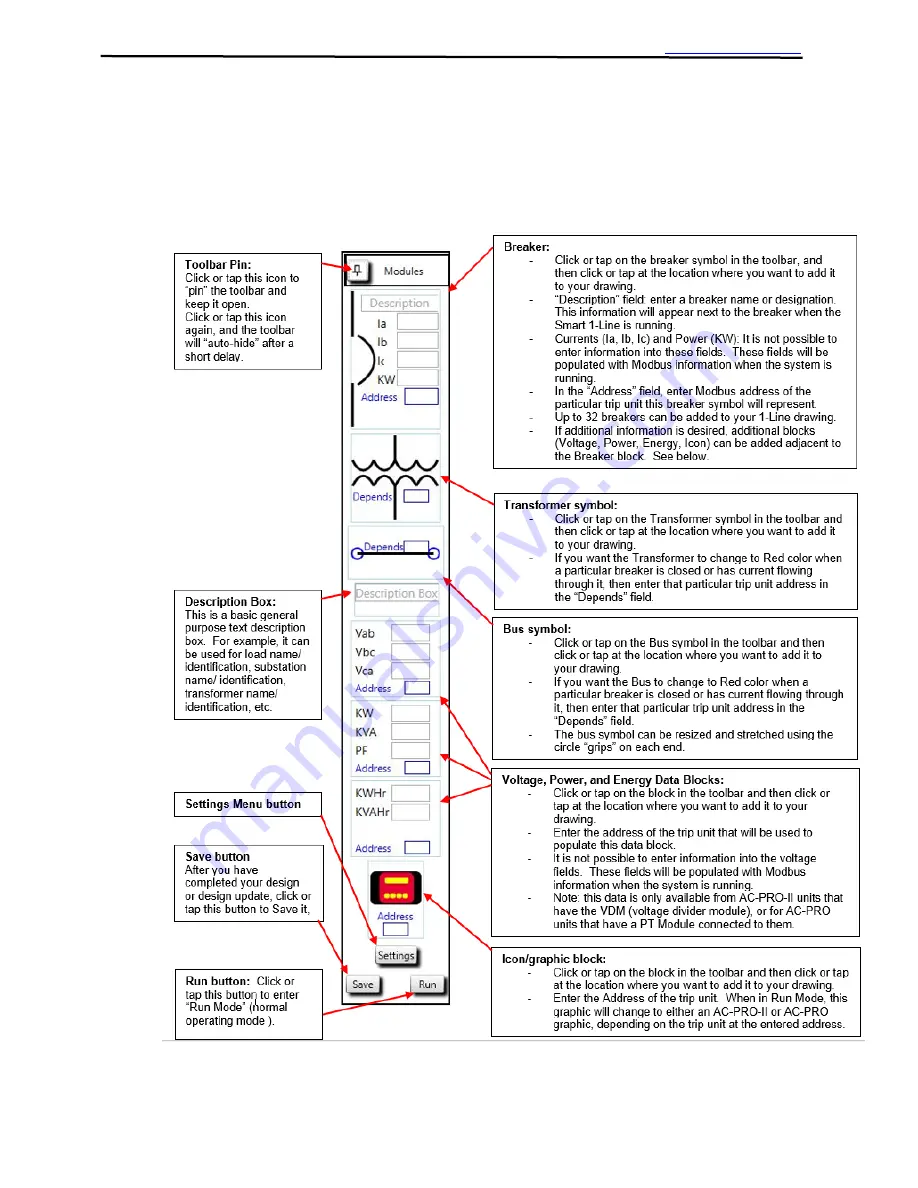
3.1.2.7  Designer Mode Toolbar 

 
Using the Designer Mode toolbar, simply click or tap on the symbol/item you want to add, and then 
click or tap at the location where you want to add it. 
 
After items are added to your drawing, they can easily be moved around by clicking or tapping on the 
item, and then dragging to the desired location.   


Figure 11: Designer Mode Toolbar 


Summary of Contents for Smart 1-Line

Page 1: ......

Page 2: ......

Page 3: ...gner Mode 11 3 1 2 1 Designer Mode Password 11 3 1 2 2 Drawing your 1 Line 11 3 1 2 3 Adding items 11 3 1 2 4 Rotating items 11 3 1 2 5 Removing items 11 3 1 2 6 Power Distribution System Changes 11 3 1 2 7 Designer Mode Toolbar 12 3 1 2 8 Smart 1 Line Settings 14 3 1 2 9 Modbus Settings 14 3 1 2 10 Timing Settings 16 3 1 2 11 Modbus Server Settings 17 3 1 2 12 Preferences Settings 18 3 1 2 13 Use...

Page 4: ...ed 38 6 1 Smart 1 Line Settings 38 6 2 Baud Rate 38 6 3 Power state of AC PRO II and or AC PRO trip units 38 7 0 General and PC Items 38 7 1 Operating System 39 7 2 Internet and or Server Connections 39 7 3 PC Windows Settings 39 7 3 1 Windows Accounts and Passwords 39 7 3 1 1 Smart 1 Line user account 39 7 3 1 2 Administrator account 39 7 3 2 Screen Timeout and Brightness settings 40 7 4 Other ap...

Page 5: ...nu 14 Figure 14 Modbus Settings Example for RS 485 Direct Connection 15 Figure 15 Modbus Settings Example for External Gateway connection 15 Figure 16 Timing Settings 16 Figure 17 Modbus Server Settings 17 Figure 18 Preferences Settings 18 Figure 19 Browse to Customer Logo Window 18 Figure 20 Diagnostics settings 19 Figure 21 Run Mode 1 Line Diagram example 21 Figure 22 Breaker Block example state...

Page 6: ...eforms Alarms and more Industrial PC with High Definition 21 5 Color Touch Screen Solid State Drive no moving parts no cooling fans etc Software Pre Installed Field Configurable Electronic 1 Line Diagram Remote Breaker Tripping View Time Current Curves and Test Data Wall Mount Design for Switchgear or Control Room mount can be supplied by URC or Customer RS 485 Communications to AC PRO AC PRO II E...

Page 7: ... connection from a customer supplied External RS 485 to Ethernet Modbus Gateway 1 1 1 RS 485 Direct Connection The standard method for connecting trip units to the Smart 1 Line is a Direct RS 485 connection to the serial port on the Smart 1 Line See the figure below for an example See Section 3 for Settings Figure 2 Typical Diagram 1 RS 485 Direct Modbus RTU 1 1 Typical System Diagrams ...

Page 8: ...lityrelay com Page 6 1 1 2 External RS 485 to Ethernet Modbus Gateway optional Figure 3 Typical Diagram 2 External Modbus Gateway Modbus TCP 1 1 3 Local Smart 1 Line Remote Smart 1 Line Figure 4 Typical Diagram 3 Local Smart 1 Line Remote Smart 1 Line ...

Page 9: ... keyboard IP 65 washable Perixx PERIBOARD 517 available on Amazon com o USB mouse Adesso iMouse W3 Waterproof with Magnetic Scroll Wheel available on Amazon com o Heavy duty Industrial Keyboard Mouse folding shelf RackSolutions Full Keyboard Wallmount available on Amazon com o USB hubs extenders Sabrent USB hubs and extenders available on Amazon com WARNING 1 The Smart 1 Line information should no...

Page 10: ...ng its standard 100mm x 100mm VESA hole pattern Figure 5 VESA Mounting holes Any heavy duty VESA 100mm x 100mm capable of supporting 30 lbs can be used The Panel PC weighs approximately 15 lbs If specified URC can supply the Panel PC OEM wall mount kit along with the Smart 1 Line Contact URC for additional information Figure 6 Rear Connections 2 0 Installation 2 1 Mounting 2 2 Connections ...

Page 11: ... 8 RS 485 Maximum Recommended Cable Lengths Note the above maximum lengths are based on URC testing of direct RS 485 connection to The Smart 1 Line 2 3 2 Termination circuits URC does NOT recommend typical RS 485 external R or RC termination circuits for use with AC PRO II and AC PRO RS 485 wiring The AC PRO II features an internal termination network which can be switched ON or OFF via a front ac...

Page 12: ...of Modbus communications Other systems must have drivers for AC PRO II and or AC PRO A driver is simply application programming that enables the system to correctly interpret the AC PRO II or AC PRO Register Map Smart 1 Line Modbus Server Settings must be configured properly See Section 3 of this manual Ensure the included Power supply is connected to a reliable 120VAC source and that the power su...

Page 13: ...be rotated 90 degrees by double tapping or double clicking The Bus items can be stretched and rotated using the grips on each end of the line 3 1 2 5 Removing items In Designer Mode Items can be removed by dragging them off the screen to the right 3 1 2 6 Power Distribution System Changes The Smart 1 Line MUST be updated if power distribution system changes occur Examples are replacing breakers ex...

Page 14: ...signer Mode toolbar simply click or tap on the symbol item you want to add and then click or tap at the location where you want to add it After items are added to your drawing they can easily be moved around by clicking or tapping on the item and then dragging to the desired location Figure 11 Designer Mode Toolbar ...

Page 15: ...Smart 1 LineTM Instruction Manual Rev 1 01 www utilityrelay com Page 13 Figure 12 Designer Mode 1 Line Drawing example ...

Page 16: ...uration settings There are two possible methods for connecting trip units to the Smart 1 Line Refer to Figures 14 and 15 Select Modbus RTU and COM2 if your trip unit RS 485 network connects directly to the Smart 1 Line Serial port See Figure 2 See example setting window below Select the Baud rate IMPORTANT The Baud rate setting on the Smart 1 Line and ALL of the trip units MUST be set to the same ...

Page 17: ...Modbus TCP if your trip unit R 485 network connects to an external Ethernet gateway See Figure 3 See example setting window below Enter either the Server name or the IP address of the external Ethernet gateway device Enter the Modbus port of the external Ethernet gateway device Figure 15 Modbus Settings Example for External Gateway connection ...

Page 18: ...ch trip unit For example if this setting is set to 10 seconds the information for each breaker will be requested and should be updated every 10 seconds Trip Unit Response Timeout Adjusts how long the Smart 1 Line will wait for a reply from each trip unit Number of Retries per Request Adjusts how many times the Smart 1 Line will retry a data request before determining that the trip unit is not resp...

Page 19: ...mart 1 Line will be connected to the same system this setting should be 4 Max Number of Queued Messages This is an advanced setting The Modbus Server receives messages from Modbus Clients and sends them to Trip Units over RS485 If a new message from a client is received before a Trip Unit responds it s queued and after the Trip Unit response or timeout sent to a Trip Unit Modbus Server can queue u...

Page 20: ... Logo image file can be imported and can appear in the upper right corner of the Smart 1 Line when it is in Run Mode The image file format can be png jpg gif or bmp One example logo size resolution is 280 x 80 This size allows for a legible logo but does not take up too much room on the Smart 1 Line screen However any size logo can be used For reference consideration the entire Smart 1 Line screen...

Page 21: ...ditional information about the Communications status box Log Level This setting should remain at the default setting unless directed by URC for troubleshooting purposes This setting determines how much information the Smart 1 Line logs software events internally A setting of 1 represents the least amount of data logging A setting of 5 represents the largest amount of data logging The default setti...

Page 22: ...ENABLE or DISABLE Set to ENABLE if you want to be able to trip the breaker using the Smart 1 Line Settings Change Over Comm can either be set to ENABLE or DISABLE However presently regardless of this setting the Smart 1 Line is not capable of changing trip unit settings Alarm Relay settings are user programmable If you want the Smart 1 Line to indicate an alarm has occurred this alarm must be set ...

Page 23: ...the Smart 1 Line will periodically request information from each trip unit breaker It will use this information to update the values and graphics on the 1 Line diagram Specifically it will request info from each unique trip unit address that is included in the Designer Mode 1 Line diagram Figure 21 Run Mode 1 Line Diagram example 4 0 Operation 4 1 Run Mode ...

Page 24: ...s Open or Unknown as many breakers are not presently supplied with URC limit switches Therefore in many applications current flow is used to indicate position and even if current is Low the breaker could still be closed o Gray Trip unit not communicating Breaker Tripped indication Red X appears Alarm indication Red bell symbol flashes o Trip occurred Current greater than LT Pickup setting and Actu...

Page 25: ...click on the breaker symbol to obtain additional information See the Figure below for guidance on where to tap or click the symbol Tap or click the curved portion of the symbol see below Figure 23 Breaker symbol area to tap After tapping or clicking on the breaker an additional window will open Depending on which trip unit is present different software tabs will appear on the right side of the win...

Page 26: ...larm with reset capability Quick Trip Switch position Breaker position if equipped with URC limit switch Actuator Open circuit Trip unit Alarm relay conditions depend on trip unit version and customer settings UnderVoltage can be reset by user OverVoltage can be reset by user Phase Loss LT Long Time Pickup phase current exceeded LT Pickup setting Ground Fault can be reset by user Sluggish Breaker ...

Page 27: ...Smart 1 LineTM Instruction Manual Rev 1 01 www utilityrelay com Page 25 Figure 25 Readings Tab AC PRO II only ...

Page 28: ...urity Code The Security code is the last four digits of the AC PRO II serial number 4 After the Security Code is entered you will be prompted to confirm that you want to trip the breaker Clicking or tapping on Yes will result in tripping the breaker The trip will be logged by the AC PRO II as a Forced Trip The AC PRO II will capture detailed trip data including currents voltages waveforms breaker ...

Page 29: ...ture a waveform On demand waveform capture includes o Current Phase A B C and Neutral RMS values Waveforms 5 cycles o Voltage Vab Vbc Vca applies to AC PRO II with Voltage Divider Module RMS values Waveforms 5 cycles o Date Timestamp Waveforms can be saved to an electronic file by using the File menu then selecting Save As The electronic file can be saved to the Smart 1 Line or to a customer suppl...

Page 30: ...a firmware v2 0 and later Van Vbn Vcn firmware 1 2 v1 9 o Breaker mechanism time s Sluggish Breaker Detection o Trip waveform capture firmware v2 0 27 and later 1 cycle pre trip and 4 cycles post trip Current Phase A B C and Neutral Voltage Vab Vbc Vca or Van Vbn Vcn depending on firmware version o Total Trip Counts Trip data can be saved to an electronic file by using the File menu then selecting...

Page 31: ... tab AC PRO II only The Settings tab will appear on the right side of the window for AC PRO II trip units It provides the following information features and capabilities View all AC PRO II settings Read only To view settings tap or click the blue arrow Figure 29 Settings Tab AC PRO II only ...

Page 32: ...e or to a customer supplied USB stick Import previously saved TCC Test files by using the File menu then selecting Open o Test trips are plotted on Time Current Curves Enter TCC Tests notes or import previously saved TCC Test file notes Enter or import previously saved Breaker Mechanism times for benchmark purposes To Plot a Time current curve TCC 1 Goto the Settings tab and use the blue arrow to ...

Page 33: ...ollowing information features and capabilities RMS Currents Phase A B C GF Unbalance RMS Voltages Vab Vbc Vca if equipped with PT Module Power values if equipped with PT Module o Real Power KW o Apparent Power KVA Energy value KWHr if equipped with PT Module View Settings read only Last Trip data Trip type RMS currents Quick Trip switch position Breaker position status if equipped with PT module a...

Page 34: ... for convenience for documenting and maintaining records of breaker data and breaker test data This tab allows for text entry of breaker information and data In addition previously saved Breaker Tests files can be imported to the Smart 1 Line using a USB flash drive Contact URC for additional information Figure 32 Breaker Tests Tab ...

Page 35: ...tact URC for additional information Figure 33 Trip Unit Tests Tab 4 1 3 Transformer When in Run Mode the transformer symbols will appear either Black Red or Gray The color will depend on the communications and closed energized status of the trip unit with the address that was entered into the transformer Depends field in Designer Mode Black associated trip unit is communicating but energized statu...

Page 36: ...hat can be used to display text in any area of the Smart 1 Line Common uses are Load names Substation names Transformer names Address indication if viewing addresses is desired in Run Mode notes etc 4 1 6 Voltage data block When in Run Mode the Voltage data blocks will display voltage values from the trip unit with the address entered into the voltage blocks in Designer Mode For AC PRO II firmware...

Page 37: ...urs or MVAHr Megavolt ampere Hours Note If the KWHr or KVAHr value exceeds 5 digits these fields will change from kilo KWHr and KVAHr to Mega MWHr and MVAHr 4 1 9 Trip unit icons When in Run Mode the trip unit icons will change depending on the device at the address associated with the Icon block entered in Designer Mode Appears if AC PRO II is detected at the address in the Icon block in Designer...

Page 38: ...cates the total of trip units that are successfully communicating The second number indicates the total of trip units that Smart 1 Line is trying to communicate with Figure 34 Communications Status Box 4 1 11 Designer Mode button When in Run Mode the Designer Mode button is in the bottom right corner Tap or click the button to make changes to the Smart 1 Line or its settings See Section 3 for addi...

Page 39: ...ndication Quick Trip Switch status Settings Read only Remote Breaker Tripping Alarm indication Current Waveforms Voltage Waveforms Sluggish Breaker indication Alarm Relay reset capability Detailed Trip data Timestamps for Trip Data Waveforms Trip Waveforms Time Current Curves Future features can be added by field firmware update highest possible communications speed baud rate 19200 19200 19200 115...

Page 40: ...ed continuously Standard AC PRO II and AC PRO trip units derive their power from the CTs sensors if current is flowing The AC PRO II with VDM Voltage Divider Module option can also derive trip unit power from the energized line side stabs of a racked in breaker even if the breaker is open and or zero current is flowing Therefore AC PRO II with VDM Voltage Divider Module trip units are recommended ...

Page 41: ... Line To change the Smart 1 Line user account Password you must log in to Windows as Administrator Logging into the Administrator account is only recommended if you are familiar with Microsoft Windows See the next Section for additional information 7 3 1 2 Administrator account In situations where a customer MUST change PC settings URC provided a Windows Administrator account login information in ...

Page 42: ...ich is only recommended if you are familiar with Microsoft Windows See the previous for additional information To change the Screen Timeout of the Smart 1 Line Windows account follow these steps 1 Log in to the Administrator account See previous section for instructions 2 Tap or Click the Windows icon in the bottom left 3 Type brightness 4 Select Adjust brightness level of the display IMPORTANT PA...

Page 43: ...ith cord is included Power consumption 75W Power button location Rear adjacent to power connections Operating Temperature 0 50 C 32 104 F Safety and EMC Safety CE UL CCC BSMI EMC CE FCC Class B BSMI Dimensions 21 9 x 13 7 x 2 4 558 4 x 349 8 x 62 2mm Weight 15 lbs 6 8kg Enclosure Industrial Solid Aluminum Alloy Cooling Fanless Mounting Surface mount VESA 100x100mm hole pattern URC offers optional ...

Page 44: ...te AC PRO units that are equipped with optional Modbus communications have a fixed Baud Rate of 9600 o Timing Settings Modbus Settings and Modbus Server Settings The Smart 1 Line has several settings that affect communications See Section 3 for additional information RS 485 Network wiring o Network wiring integrity If you are troubleshooting a network that is being tested used for the first time o...

Page 45: ...yrelay com Page 43 Utility Relay Company 10100 Queens Way Chagrin Falls OH 44023 USA www utilityrelay com Phone 1 888 289 2864 Fax 440 708 1177 For the latest version of Instruction Manuals visit http www utilityrelay com Side_Bar Instruction_Manuals html ...

Page 46: ......

Page 47: ......

Page 48: ......

Reviews: