UPS Valencia Assembly Manual Download Page 1

12 x 16 Flat Top Pergola

A S S E M B LY   G U I D E

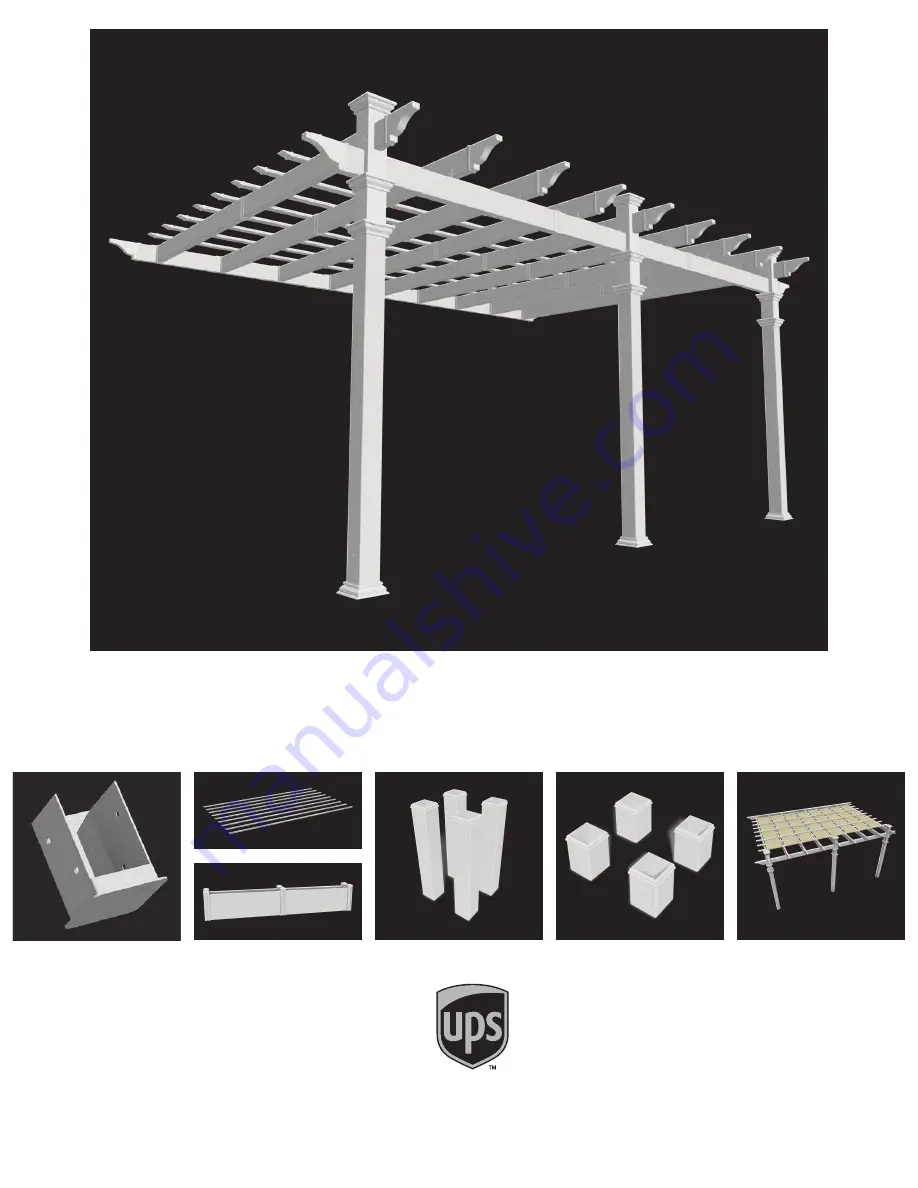
O P T I O N A L   A C C E S S O R I E S :

A) Bolt Down Bracket Kit

 (3 for Pergola)

D) Tall Base Molding

B)12 x 16 Additional Shade Slat Kit

E) Short Base Molding

C) Pergola Planter

F) 12 x 16 Canvas Weave Kit

C

A

B

D

E

F

Summary of Contents for Valencia

Page 1: ...S E M B LY G U I D E O P T I O N A L A C C E S S O R I E S A Bolt Down Bracket Kit 3 for Pergola D Tall Base Molding B 12 x 16 Additional Shade Slat Kit E Short Base Molding C Pergola Planter F 12 x 16 Canvas Weave Kit C A B D E F ...

Page 2: ...d Application Wood Post Layout Installation using Bolt Down Post Brackets for Concrete or Wood Surface Vinyl Column Assembly and Installation Over Wood Posts Main Support Beam Assembly Wall Side Rafter Assembly Main Support Beam Assembly Posts Side Ledger Boards Installation Main Suport Beams Rafters Placement Fastening Decorative End Caps Post Caps Shade Slats Assembly and Installation PAGE 4 5 6...

Page 3: ...s intructions closely and plan ahead to avoid confusions and issues during installation What looks like the toughest part of this project is actually the easiest the graceful solid looking columns We ve designed these columns to simply be slipped over treated 4x4 wood posts that are either embedded in concrete or directly mounted to a concrete or wood surface using our bolt down brackets See pages...

Page 4: ...rview 1 Post Caps 3 5 Sq 2 Main Column Tops 3 3 Post Trims 6 4 Rafter Beam Decorative End Caps 13 5 Main Support Beams with pre drilled holes on top Inner 2 6 Main Support Beams with pre drilled holes on top Outer 4 7 Beam Rafter Joiners 13 8 Main Column Bottoms 3 9 Rafter Brackets 6 10 Rafters Outer 9 11 Rafters Inner 9 12 Shade Slats Outer 18 13 Shade Slats Inner 9 14 One Way 4 x4 Internal Wood ...

Page 5: ...5 1 4 2 2x7 6x165 7cm 7 8 x 3 x 70 2 2x7 6x177 8cm 5 x 5 12 7x12 7cm Pergola Materials Breakdown In the event of missing or defective parts please call our customer service dept 1 Post Caps 3 2 Main Column Tops 3 3 Post Trims 6 4 Rafter Beam Decorative End Caps 13 5 Main Support Beams with pre drilled holes on top Inner 2 6 Main Support Beams with pre drilled holes on top Outer 4 7 Beam Rafter Joi...

Page 6: ...rews for brick or concrete wall 11 purchase at local building center also purchase drill bit Please consult your local building center for mounting anchors These second set of screws will be used to mount your wood beam ledger onto your structure Refer to page 12 for more information 12 x 16 Flat Top Pergola L CONCRETE Ready Mix Purchase Separately O P Purchase Separately Purchase Separately J H E...

Page 7: ...ave determined where the posts will be located excavate 10 25 4cm diameter x 36 91 4cm deep post holes After holes are dug and cleaned place the 4x4 9x9cm wood post into a hole ensuring it s level and square to string lines The final post height should be 84 213 cm out of the ground If a post is higher because of obstructed excavation of footings please cut down in height accordingly Fill the vaca...

Page 8: ...urface for Attached Pergola Note for additional information on the bolt down bracket installation refer to the bolt down bracket instructions 2 3 3 With the three bolt down brackets installed plumb proceed to set the 4x4 x7 wood posts in place Secure the wood posts using the screws provided with the bolt down bracket kit Repeat for all wood posts Posts should be 84 in height In order to create a s...

Page 9: ...r Please Note Vinyl Weld Glue has about a sixty second cure time and about a 20 minute dry time Slide the bottom post trim into position to cover the joint on the column Slide the top post trim into approximate position just below the bottom routed hole on the bottom of the top vinyl column assembly If necessary adjust post heights accordingly to ensure future level installation of beams and rafte...

Page 10: ...s stage the columns should be properly installed as per the following illustration with the columns 88 1 2 in 223 5 cm apart Critical Note the opening direction of the holes on the top of the posts 88 5 in 224 8 cm 139 in 353 cm 88 5 in 224 8 cm ...

Page 11: ... by two joiners as illustrated Insert two outer main support beams until they both butt up tight inside the joiner 1 2 1 Critical Note Note the location of the pre drilled holes on the top edge of the outer main support beams As pictured below the further distanced holes need to mate together inside the beam joiner This is critical to ensure equal spacing of your rafters Pre drilled holes on top 2...

Page 12: ...ine rafter hangers as shown Align the top holes on the rafter hangers to those on top of the main support beams and fasten with two 1 1 2 38mm screws each Secure each rafter hanger in place using two 1 1 2 38mm screws through the pre drilled holes as shown 4 4 STEP FIVE Insert an outer rafter section section 69 1 8 175 6cm long as shown Screw the joiner to vinyl rafters and wood insert using 1 1 2...

Page 13: ...es on the inner main support beam is facing up Add a joiner as shown and thread the pressure treated wood through an outer beam Note the pre drilled holes on the outer beam Make sure they are facing up and observe the distances of the pre drilled holes as per Critical Note found on page 11 illustration 2 Push the pressure treated wood through and past the post as shown and insert another joiner an...

Page 14: ...uld overhang the post by 4 1 4 in 10 8 cm on both sides Secure the main support beam to the posts using eight 4 in 102 mm screws for each post through the pre drilled holes as shown Align the holes on the rafter brackets to the pre drilled holes on the main support beam and fasten with two 1 1 2 38mm for each of the bracket 4 4 1 4 in 10 8 cm 5 5 4 6 7 7 6 ...

Page 15: ...ting to a brick wall Screws heads should be recessed flush with the wood beam 1 STEP SEVEN 15 To locate the position of your wood beams A Measure half way between the middle vinyl post B Mark and draw a string line square to the wall C Measure up 94 3 8 239 7cm and mark with pencil This would be the bottom centre of the middle wood board as shown 2x6 x 16 4x15x488cm Pressure Treated Board cut in t...

Page 16: ...vious step To fasten use a minimum of eight 3 9 cm lag screws through the main support beam and wood beam Space the lag screws between the rafter hangers Place the nine rafters into the rafter hangers rafter brackets Ensure that they are pushed all the way in the rafter hangers Fasten into the rafter hanger using four 5 8 16mm screws as shown Fasten the rafters onto the rafter brackets using 5 8 1...

Page 17: ...ition post trim in place 1 Slide the post trim down 2 Apply a generous amount of vinyl glue around the post 3 Slide the post trim back up to the desired location and allow a few minutes for glue to cure To glue decorative end caps place 1 Apply a generous amount of vinyl glue to the decorative end caps as shown 2 Slide the decorative end caps into the beam rafter and allow a few minutes for glue t...

Page 18: ...hade slats Push firmly until extrusion bottoms out inside joiner No screws are necessary Complete the assembly by gluing a decorative end cap at each end as shown Shade Slat Assembly 1 1 Note If you purchased the Additional Shade kit or Canvas Weave kit please consult their respective instructions at this point Additional Shade Kit Canvas Weave Kit ...

Page 19: ... goal is to ensure that all the shade slats overhang equally to the eye Install first shade slat 11 27 9cm away from the top of the vinyl columns Install the rest of the shade slats at 11 27 9cm spacing Install one 2 1 2 64mm screw at each intersection of rafter and shade slat 1 2 3 Suggestions for Additional Shade as Necessary White resin lattice in variety of shapes and sizes are available at yo...

Reviews: