


UK
CZ
DE
DK
EE
ES
FI
FR
HR
HU
IT
LT
LV
NL
NO
PL
PT
RO
RU
SE
SK
1 0
U P O N O R S M AT R I X M O V E · Q U I C K G U I D E
Q U I C K G U I D E
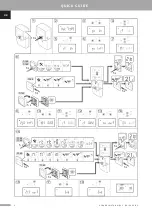
14. Use buttons
-
or
+
to change parameter settings to
INI
.
15. Select a thermostat.
THERMOSTATS T-166, T-168 AND T-169
15.1 Press and hold the
OK
button on the
thermostat for about 5 seconds to enter the
settings menu. The settings icon and menu
numbers are displayed in the top right corner
of the display.
15.2 Use buttons
-
or
+
(T-169 = or ) to
change the numbers to
04
and press
OK
.
Current control mode is displayed (RT, RFT,
RS or RO).
15.3. Use buttons
-
or
+
(T-169 = or ) to
change control mode to
RO
and press
OK
.
15.4 Use buttons
-
or
+
(T-169 = or ) to
change the numbers to
09
and press
OK
. The
text
Int YES
is displayed, if the thermostat
already is registered as a reference room
thermostat.
15.5. Use buttons
-
or
+
(T-169 = or ) to
change
Int YES
to
Int CNF
.
15.6. The connection indicator starts flashing in
the thermostat display to show that the
registration process begins.
15.7 The current outdoor temperature is shown in
the controller display, and the text
Int YES
is shown in the thermostat display when the
registration is complete.
15.8 Press and hold the
OK
button on the
thermostat for about 5 seconds to exit the
settings menu, or wait about 70 seconds for
the software to exit itself.
THERMOSTAT T-163
15.1 Gently press and hold the registration button
on the thermostat, release when the LED
starts flashing green (located in the hole
above the registration button).
15.2 The current outdoor temperature is shown in
the controller display when the registration
is complete. It might take some time for the
thermostat to send the current temperature
data to the controller. 00.0 is displayed in the
meantime.
16. Press the
OK
button on the controller to confirm
the change and return to the system parameter
settings.
End registration
N OT E !
If system parameter settings are to be
changed, go to section
Setup the system
>
Step 3
.
17. Use buttons
<
or
>
to locate parameter
24 (End)
– Exit system parameter settings.
18. Press the
OK
button to exit the system parameters
menu.
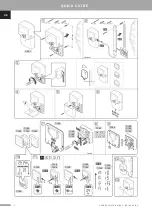
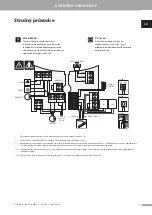
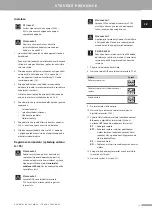
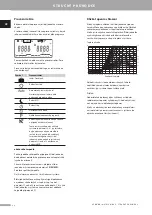
Setup the system
Change the system parameter settings to setup the
system.
13
14
C
12
15
11
16
C
10
17
1 2 3 4 5 6 7
9
18
8
19
C
7
20
6
21
5
22
4
23
3
24
2
0h
0h
1
1
0h
0h
2
10
12
14
16
18
20
C
P
C
AUTO
22
24
4
6
8
1
2
3
4
5
6
24
24
10 s
Summary of Contents for Smatrix Move
Page 3: ...03 2020 Uponor Smatrix Move UK QU I CK GU I DE...
Page 15: ...03 2020 Uponor Smatrix Move CZ ST RU N PR VODCE...
Page 27: ...03 2020 Uponor Smatrix Move DE K U RZ AN LEI TU N G...
Page 39: ...03 2020 Uponor Smatrix Move DK QU I CKGU I D E...
Page 51: ...03 2020 Uponor Smatrix Move EE KI I RJU HEN D...
Page 63: ...03 2020 Uponor Smatrix Move ES GU A R PI DA...
Page 75: ...03 2020 Uponor Smatrix Move FI PI K AOPA S...
Page 87: ...03 2020 Uponor Smatrix Move FR G U I D E DE R F REN CE RAPI D E...
Page 99: ...03 2020 Uponor Smatrix Move HR B R Z I VODI...
Page 111: ...03 2020 Uponor Smatrix Move HU R V I D TMUTAT...
Page 123: ...03 2020 Uponor Smatrix Move IT GU I DA RAPI DA...
Page 135: ...03 2020 Uponor Smatrix Move LT TRUMPA I N S T RUKCI J A...
Page 147: ...03 2020 Uponor Smatrix Move LV S I N S T RUKCI J A...
Page 159: ...03 2020 Uponor Smatrix Move NL SN ELGI DS...
Page 171: ...03 2020 Uponor Smatrix Move NO HU RTI GV EI LED N I N G...
Page 183: ...03 2020 Uponor Smatrix Move PL KR T KI PR Z E WODN I K...
Page 195: ...03 2020 Uponor Smatrix Move PT GU I A R PI DO...
Page 207: ...03 2020 Uponor Smatrix Move RO G HI D R A PI D...
Page 219: ...03 2020 Uponor Smatrix Move RU...
Page 231: ...03 2020 Uponor Smatrix Move SE SN ABBGU I D E...
Page 243: ...03 2020 Uponor Smatrix Move SI HI T R I VODI...
Page 255: ...03 2020 Uponor Smatrix Move SK S T RU N N VOD...